All along, as I've been discussing building an instrument with my friends, I would say that so far, nothing has been difficult, it's just that there are a million steps and something catastrophic could happen in any one of them... Definitely had one of those moments while finishing up, but in the end, things could have been far worse.
The last two steps on the body were to rout the neck pocket a little deeper and to drill the bridge ground. My templates use a pair of locating pins with one being under the bridge. Where I suspected I may need to rout the neck pocket deeper, I left off drilling the bridge ground until the end so I wouldn't risk damaging my locating pin.
I lined up the drill bit to hit the middle of the control cavity and it came out the back of the instrument... Annoying, but I learned a valuable lesson and I'm certainly not going to make that mistake again!

I use the router to give myself a nice flatter starting point for the drill bit. I don't want it to follow the old hole so I aim closer to the top of the control cavity.

Out the back again! At this point, I'm frustrated and try again right away and it comes out the back a third time! My aim should be spot on so I think what may be happening is that the drill bit deflects a bit every time it hits some harder grain in the ash.

Time for the "nuclear" option. I map out the footprint of my bridge and rout myself a channel to give me the flattest and shortest path to the control cavity and finally succeed. Of all the things to go wrong, this is pretty minor in the grand scheme of things, but I'm going to leave the 'beauty marks' on full display as a reminder.

With that behind me, I turn my attention to leveling, crowning, and polishing the frets. I was pretty diligent in checking my work with a fret rocker as I went along so frets don't need much leveling and this step goes pretty smoothly.
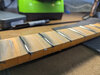
A few hours of finish sanding and I'm ready to finish. Finishing a project is where I always tend to falter... I get impatient and hurry through the steps that should require the most methodical attention. This time, I try Rubio Monocoat; it's easy to apply, requires one coat, and is fully cured in just a few days. The oil darkened the neck more than I would have expected, but it looks good overall.


Off to the final assembly: I shield the body with self-adhesive shielding tape from StewMac. I'm leaving a few tabs on top of the body to connect with the pieces on the back of the pickguard and control cavity cover.

Does anyone know what's going on here? Did Nordstrand just 'forget' to pot one side of the pickup? It doesn't seem any more microphonic or anything on that side...

A few hours of soldering and setup later, it's alive!
My expectation for my first build was that I would learn a lot, but wouldn't wind up with a 'great' instrument, but this thing plays really well and sounds really good! The finish isn't anything to write home about, but with respect to the playability and sound, I'd put it up against my US Fenders. The sound is obviously in the P-Bass family, but a little more 'percussive' and 'punchy'.
Part of me wishes I had followed my original plan and dyed it black, but overall, I'm very pleased with the result. That said, no sooner had I finished it and my partner says "I think it would look better with black hardware"... She's absolutely correct black hardware and has been ordered.