
People who were not planning to be around or accountable after it got wet. i.e. poor quality cheap builders.Whoever thought putting MDF laminate in an entrance way was a good idea??

Enjoy the benefits of a premium membership!
Upgrade Account
-
TalkBass has been independent since 1998. Add your voice.
Create a free account to reply to discussions, view embedded media, and browse with fewer display ads.
Join free Log in
Want zero display ads or expanded classifieds tools? Compare plans.
You are using an out of date browser. It may not display this or other websites correctly.
You should upgrade or use an alternative browser.
You should upgrade or use an alternative browser.
First project: Folk Bass DIY upright
- Thread starter NKBassman
- Start date
More options
Who Replied?

It was the previous owners. Probably done in the 80s or 90s. They took great care of the bones of the house, so I’ll forgive them this.People who were not planning to be around or accountable after it got wet. i.e. poor quality cheap builders.
If anyone who built my house is still around, we should be contacting the Guinness book of world records
 .
.I’m painting baseboards today, so hopefully I can find time to cut the truss rod channel today in between coats. I did end up buying a proper metric (6mm) router bit for the TR channel, so should be nice and snug.
Last edited:
Since I didn’t leave a lot of space between the CF channels and the Center TR channel, would it be best to glue in the CF bars first?


In the interest of saving myself a bit of time and trying to have this ready by July 5, I just ordered myself a pre-slotted nut. I'll intend to replace it with a homemade ebony one eventually, but I'm hoping this will save me a bit of effort in the near term.
Naturally, it'll need to be touched up to suit the fingerboard once it's plopped into place. Are there any methods for doing this that don't involve expensive nut files? My "best" plan so far is to freehand it with a dremel, and thus I ordered two of deez nuts just in case. Can't seem to find any info on the radius or string slot widths unfortunately. I might be able to borrow some nut files from my setup guy... maybe that's a text message worth sending.
A while back I picked up a used set of GHS black nylon tapes that I want to try here, which are 50-70-90-105, so not too far out from the norm. However, my fingerboard radius is 7.5", which is certainly tighter than standard spec for an off-the-shelf replacement nut.
Finally, any recommendations for how to secure it in place but also keep it removeable for the future? Hot stick glue maybe? When/if I ever get the new nut made, I guess I won't care if this one comes out in pieces.
Naturally, it'll need to be touched up to suit the fingerboard once it's plopped into place. Are there any methods for doing this that don't involve expensive nut files? My "best" plan so far is to freehand it with a dremel, and thus I ordered two of deez nuts just in case
. Can't seem to find any info on the radius or string slot widths unfortunately. I might be able to borrow some nut files from my setup guy... maybe that's a text message worth sending.A while back I picked up a used set of GHS black nylon tapes that I want to try here, which are 50-70-90-105, so not too far out from the norm. However, my fingerboard radius is 7.5", which is certainly tighter than standard spec for an off-the-shelf replacement nut.
Finally, any recommendations for how to secure it in place but also keep it removeable for the future? Hot stick glue maybe? When/if I ever get the new nut made, I guess I won't care if this one comes out in pieces.
Last edited:

How about making the nut a snug fit and not gluing it. The strings should keep it in place. (Unless you do a lot of bending....)
No bending on this contraption.
the way I designed the neck there is nothing to snug the nut up against, it just sits on the neck beam up against the end of the fingerboard.
We can worry about crossing this bridge when I get there. I’ve got a few other steps I need to make happen first.
Thanks! It was a small town summer festival. Started out pretty slow but that pic was taken at the end of our second set. Really fun crowd, and I lucked out on a nice Ampeg 3PRO/610 for backlineAlso, I like your gig pic!
 . Best of all, I was home and in bed by midnight! lol
My best gigs these days end this way...Best of all, I was home and in bed by midnight! lol
A little bit more creative fencing and the TR channel is mostly finished without any major issues from being so close to the carbon fibre channels. I just took it slow and did it in a bunch of small passes. I still have to do the nut end, which is slightly wider than the TR itself, but unfortunately I ran out of time tonight.


Oh and did I mention there was free beer for the bands?My best gigs these days end this way...
Last edited:
Perfection.Oh and did I mention there was free beer for the bands?
Got some more stuff done last night.
Achieved "Substantial Completion" on the sunroom floor and baseboards. Nothing fancy really, just big dumb boards, but I have achieved the look I was going for and we're both pleased with how it came out.


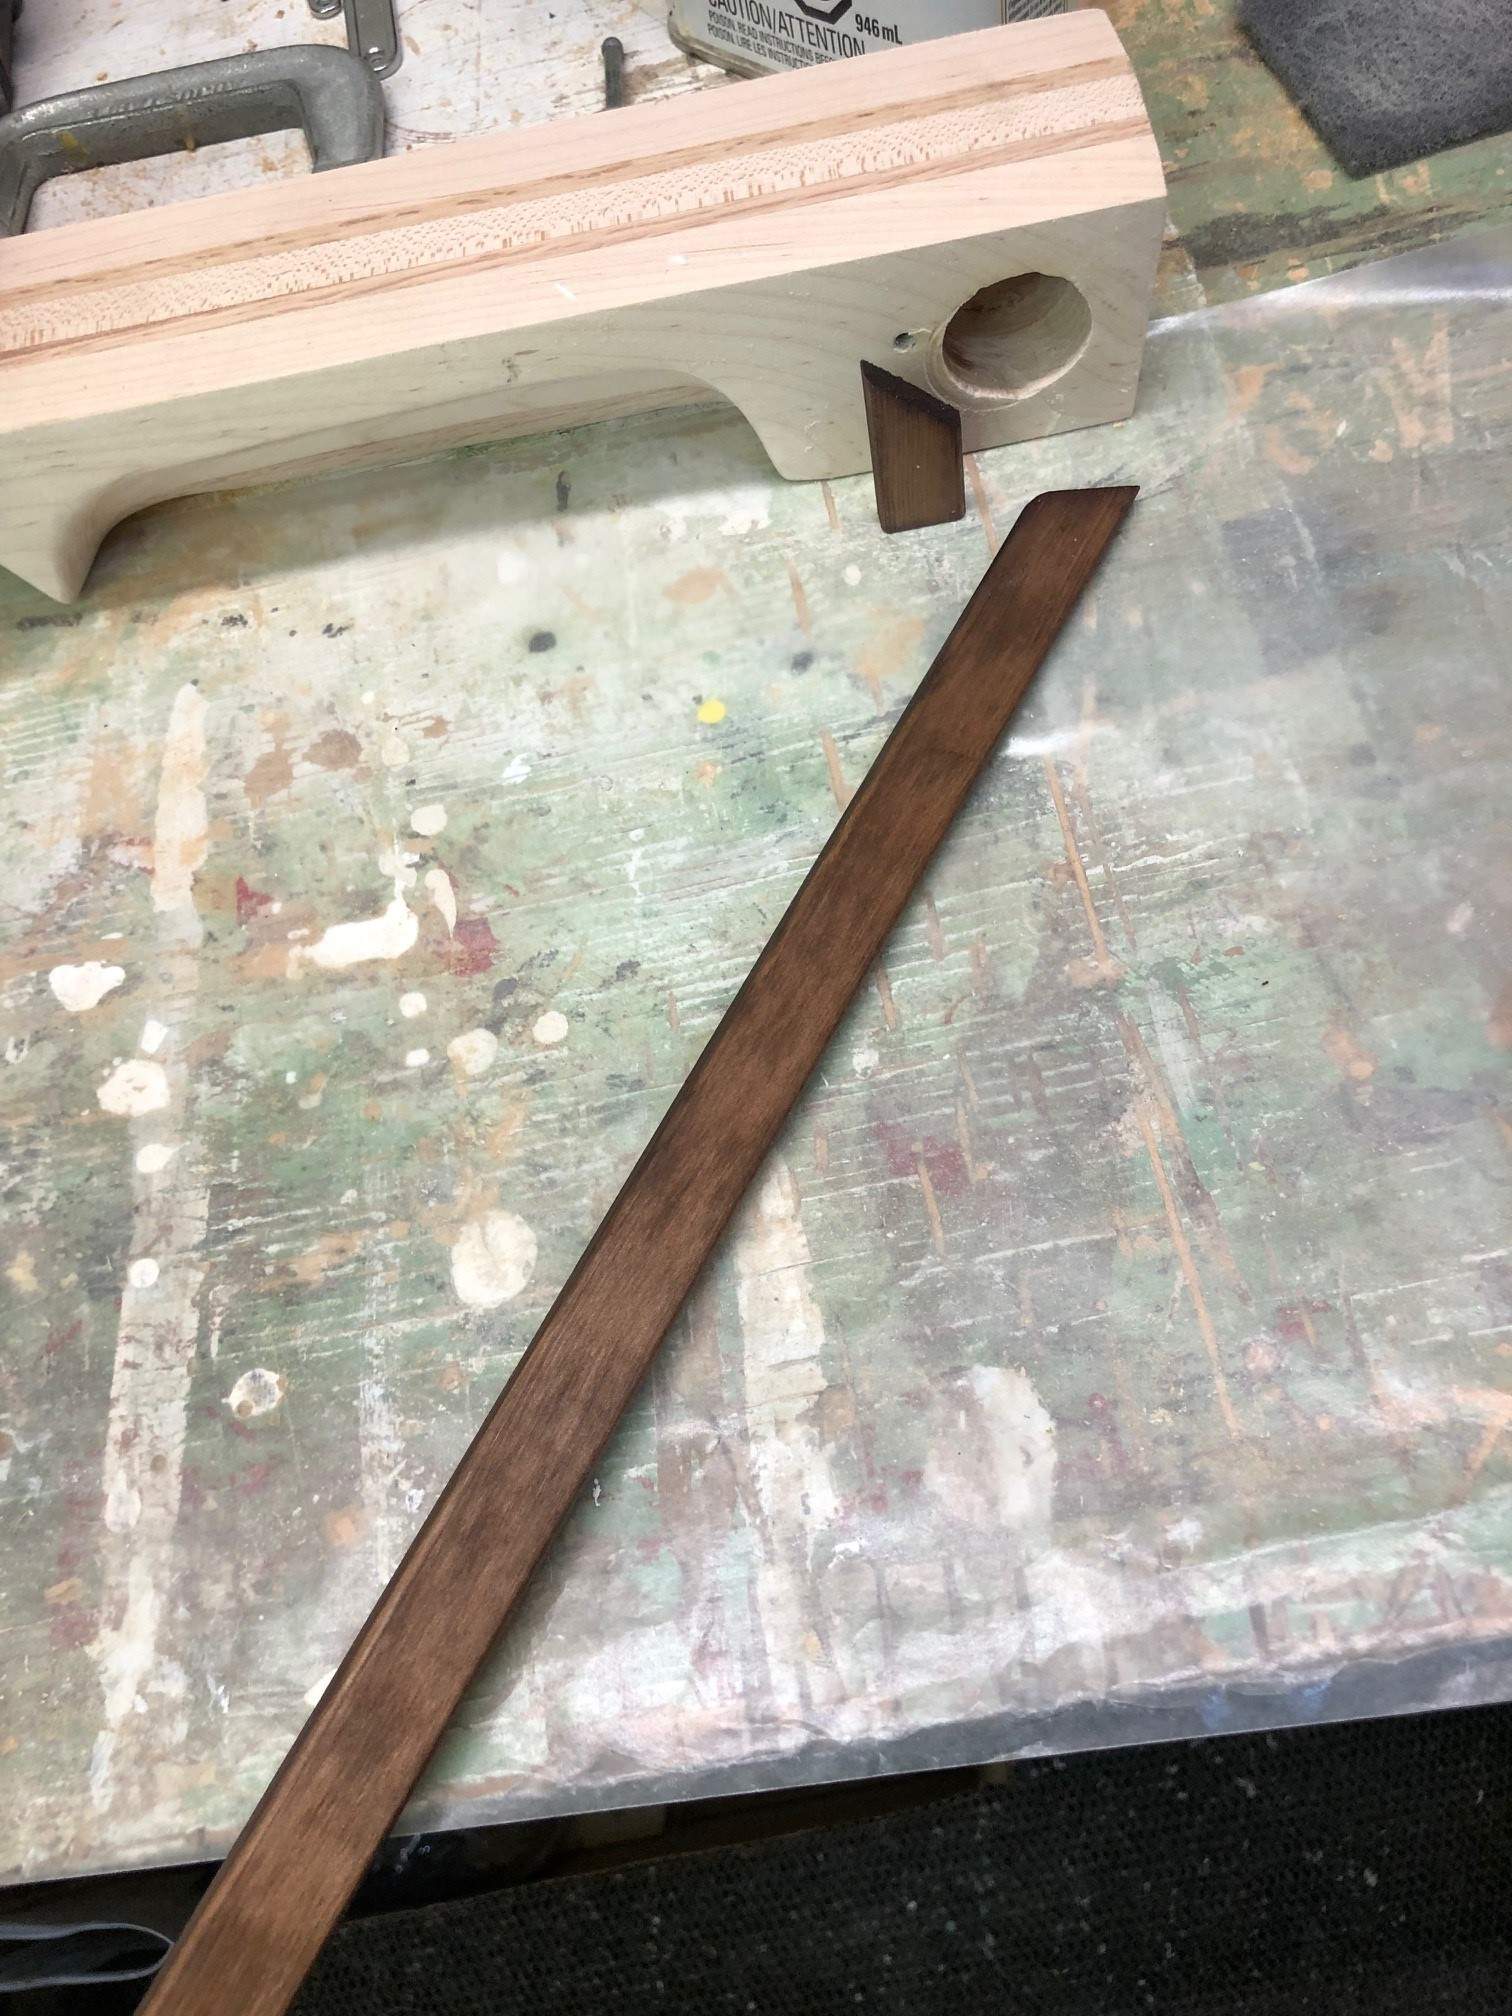
So there's a small piece of trim to hide the floor edge up against the flooring transition to the living room, which will look better stained than painted white. I prepared a sample stick of scrap material (longer than the actual piece I need to install) with different combinations of whatever stains I had on hand out in the garage. Hilariously, my "Project Manager" chose the vinegar iron acetate ebonizing w/ tung oil combination that I had prepared for this project. So that's what's going in on the foor  ! Nice little tie-in between my active projects.


Finished routing the truss rod channel and test fit everything. Nice and snug with no slop. The nut end slot is not perfect, but it'll do. Not bad for a first try.


Glued in the CF bars using Lepage 2-part marine epoxy from the little squeeze tube. I chose the marine epoxy primarily because it offered a leisurely 2 hr working time. In fact, it was the only epoxy they had at Canadian Tire that didn't advertise <=5 minute working time! I squeezed out and mixed up the epoxy on a scrap of paper and then slopped it into the channels with a scrap bit of plywood offcut from my flooring project. I smeared it around and tried to get even coverage/depth along the bottom of the channel, and then pressed in the CF bars. They were wanting to float up a little bit, so first I pressed them down running from one end to the other to squeeze out any air bubbles, then clamped it all down using a small piece of aluminum flat stock on top to prevent them from floating up above the plane of the neck, with wax paper in between to prevent epoxying the aluminum to the work piece. Worked like a charm! Shockingly, the epoxy didn't bond to the wax paper at all! It was easier to get the paper off the epoxy than the wood glue from the neck blank glue up.
Just needs a bit of sanding or scraping cleanup now to remove the excess, and then on to the next thing.

In retrospect, I should have epoxied in the stiffeners before routing the TR channel as a sure way to prevent getting glue in the TR slot. Doesn't look like there'll be any problems, and it'll be easy to clean up if there are, but something to think about for next time.
Achieved "Substantial Completion" on the sunroom floor and baseboards. Nothing fancy really, just big dumb boards, but I have achieved the look I was going for and we're both pleased with how it came out.
So there's a small piece of trim to hide the floor edge up against the flooring transition to the living room, which will look better stained than painted white. I prepared a sample stick of scrap material (longer than the actual piece I need to install
) with different combinations of whatever stains I had on hand out in the garage. Hilariously, my "Project Manager" chose the vinegar iron acetate ebonizing w/ tung oil combination that I had prepared for this project. So that's what's going in on the foor ! Nice little tie-in between my active projects. Finished routing the truss rod channel and test fit everything. Nice and snug with no slop. The nut end slot is not perfect, but it'll do. Not bad for a first try.
Glued in the CF bars using Lepage 2-part marine epoxy from the little squeeze tube. I chose the marine epoxy primarily because it offered a leisurely 2 hr working time. In fact, it was the only epoxy they had at Canadian Tire that didn't advertise <=5 minute working time! I squeezed out and mixed up the epoxy on a scrap of paper and then slopped it into the channels with a scrap bit of plywood offcut from my flooring project. I smeared it around and tried to get even coverage/depth along the bottom of the channel, and then pressed in the CF bars. They were wanting to float up a little bit, so first I pressed them down running from one end to the other to squeeze out any air bubbles, then clamped it all down using a small piece of aluminum flat stock on top to prevent them from floating up above the plane of the neck, with wax paper in between to prevent epoxying the aluminum to the work piece. Worked like a charm! Shockingly, the epoxy didn't bond to the wax paper at all! It was easier to get the paper off the epoxy than the wood glue from the neck blank glue up.
Just needs a bit of sanding or scraping cleanup now to remove the excess, and then on to the next thing.
In retrospect, I should have epoxied in the stiffeners before routing the TR channel as a sure way to prevent getting glue in the TR slot. Doesn't look like there'll be any problems, and it'll be easy to clean up if there are, but something to think about for next time.
Last edited:
I've got a last-minute pickup gig tonight, and then somehow nothing at all scheduled for the whole entire weekend. Which is basically the calm before the storm that is my schedule for next week.
So before the poopie hits the fan next week, I'm hoping to get a few more of these tasks done on the bass neck over the weekend... in no particular order:
So before the poopie hits the fan next week, I'm hoping to get a few more of these tasks done on the bass neck over the weekend... in no particular order:
- Glue scroll block to neck blank.
- Start shaping scroll block.
- Cut neck blank taper.
- Install truss rod.
- Install fingerboard.
- Find ideal mounting position and drill mounting holes and install threaded machine screw inserts.
- Reshape neck mounting block.
Last edited:
I didn't even notice this in the small thumbnail above, but this pic also shows off some more "strategic lightening" that I did on the neck mounting beam using a forstner bit on a drill press. Once the beam is reinstalled into the drum the large hole will be hidden between the internal mounting plates. The smaller hole is the mounting hole for the lag screw.
Some might be tempted to call this a "stash hole", depending on your own particular proclivities.
Some might be tempted to call this a "stash hole", depending on your own particular proclivities.
@Bruce Johnson @Freekmagnet (and anyone else who want's to chime in)
What would you use for a typical offset between the outer strings and the edge of the fingerboard?
I designed this with a 1.75" nut measured out-to-out on the width of the fingerboard (not string-to-string). How far in from the edge of the neck would you place the centerline of the string slot? Or, how much edge would you expect beyond the outside diameter of each string?
Looks like I drew my neck with ~0.125 edge from where I assumed the centerline of the string would be, but I didn't actually account for the thickness of the string. so for the 110 E string, that only leaves .070" (2.25/32) to the edge of the fingerboard. On a 50 G string, 0.100" from edge of string to edge of fingerboard.
As I'm typing this I'm realizing it might not be a big deal. Keeping in mind that I just purchased a pre-made replacement nut to start off with, and I'll be making my own bridge which can be any spacing that I want, this may or may not be an issue. Ideally I'll be shooting for 18-19 mm spacing at the bridge since that's what I'm used to from playing Fenders my whole life. However, I would just like the string-to-edge distance to be consistent along the length of the neck, and now is the time to re-draw the taper if I'm going to.
I guess I could just wait for the nut to show up and then adjust everything on the actual work piece based on how that fits. But I'd appreciate any input.
What would you use for a typical offset between the outer strings and the edge of the fingerboard?
I designed this with a 1.75" nut measured out-to-out on the width of the fingerboard (not string-to-string). How far in from the edge of the neck would you place the centerline of the string slot? Or, how much edge would you expect beyond the outside diameter of each string?
Looks like I drew my neck with ~0.125 edge from where I assumed the centerline of the string would be, but I didn't actually account for the thickness of the string. so for the 110 E string, that only leaves .070" (2.25/32) to the edge of the fingerboard. On a 50 G string, 0.100" from edge of string to edge of fingerboard.
As I'm typing this I'm realizing it might not be a big deal. Keeping in mind that I just purchased a pre-made replacement nut to start off with, and I'll be making my own bridge which can be any spacing that I want, this may or may not be an issue. Ideally I'll be shooting for 18-19 mm spacing at the bridge since that's what I'm used to from playing Fenders my whole life. However, I would just like the string-to-edge distance to be consistent along the length of the neck, and now is the time to re-draw the taper if I'm going to.
I guess I could just wait for the nut to show up and then adjust everything on the actual work piece based on how that fits. But I'd appreciate any input.
Last edited:

Freekmagnet
Commercial User
What would you use for a typical offset between the outer strings and the edge of the fingerboard?
I usually go with .100”.
.125” seems like a little too much for me.
I usually go with .100”.
.125” seems like a little too much for me.
About 0.025" too much?

.100" from center of string, or edge of string?
Last edited:

Shockingly, the epoxy didn't bond to the wax paper at all!
Polyethylene film (grocery bag) can also work for clamping 'shields' like wax paper. Better yet, we usually have it around for free.
Single use plastic garbage bags are all but phased out where I live. All the stores now sell the more robust woven reusable bags now, which probably wouldn't work as well as a bond breaker.Polyethylene film (grocery bag) can also work for clamping 'shields' like wax paper. Better yet, we usually have it around for free.
I'm all for reducing plastic pollution, however the benefit of reusable grocery bags is only realized if one actually remembers to reuse it.
Last edited:
Freekmagnet
Commercial User
About 0.025" too much?
.100" from center of string, or edge of string?
From the edge. .025” doesn’t seem like a lot, but it’s enough to make a difference.


