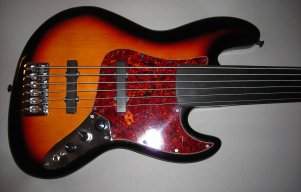
I am very, very happy with my Jaco Artist fretless. The only thing I would change is to put the side dots on the fretlines rather than between them. Obviously I could stick a piece of white paper or similar in the appropriate place, but I am sure others have had similar issues and I am wondering what is the best/neatest/most professional way to achieve this. I am content to leave the existing markers in place as they do not stand out particularly anyway.

Enjoy the benefits of a premium membership!
Upgrade Account
-
TalkBass has been independent since 1998. Add your voice.
Create a free account to reply to discussions, view embedded media, and browse with fewer display ads.
Join free Log in
Want zero display ads or expanded classifieds tools? Compare plans.
You are using an out of date browser. It may not display this or other websites correctly.
You should upgrade or use an alternative browser.
You should upgrade or use an alternative browser.
Fitting side dot markers to a fretless
- Thread starter Tim1
- Start date
More options
Who Replied?
Turnaround
Commercial User
First, acquire some side dots in your choice of material. I prefer to get it in rod form, but you can buy individual dots. Carefully drill out the existing dots and fill with wood of a similar colour. This may not be easy because the dots are usually part on the rosewood and part on the maple. But the most professional way is to fill the old dots to match the surrounding wood. In this case I might even make up a rod that was half its thickness in maple and the other in rosewood. This would definitely be easier using the filler pieces in rod form. I can't imaging the dots holding together very well if they consisted of two pieces.
Glue short pieces of the rod into the holes of the original dots. When dry, cut to length, trim to flush, sand and seal.
Then drill the holes for the new position markers at the desired locations. Glue in the rod as above, cut, sand, seal. If you have scarred the edge of the fingerboard in the process, it not a big deal to float a bit of new finish over the area, smooth and buff. A fussy job, but not all that difficult.
Glue short pieces of the rod into the holes of the original dots. When dry, cut to length, trim to flush, sand and seal.
Then drill the holes for the new position markers at the desired locations. Glue in the rod as above, cut, sand, seal. If you have scarred the edge of the fingerboard in the process, it not a big deal to float a bit of new finish over the area, smooth and buff. A fussy job, but not all that difficult.

When I was learning upright bass I just used a little dot of "White Out", using the pen applicator. Nice bright dots (you determine the size), can't be felt while playing, and easily removed when you don't need the training wheels anymore.

Turnaround
Commercial User

If that's all he wants to know ... here's the answer ... take it to a professional. Permanently adding more dots to a fretboard that already has them (AND has fret markings) will just confuse the fretboard. The alternate solution we proposed is reversible, and doesn't make the player dependent on the dots for very long. To each his own. I suppose if I was a bass technician I'd recommend a solution that requires a professional ... just sayin' ...Interesting responses given that the OP asked for the "best/neatest/most professional" solution.
Interesting responses given that the OP asked for the "best/neatest/most professional" solution.
You said it. Especially given it was a solution to markers on an upright where eventually you don't need them. On a fretless you DO need them.
The "rod" method is the most professional but also the most difficult. What I've done on my unlined fretless conversions is to make markers by drilling holes in the side of the finger board and filling them with white epoxy (on ebony...black epoxy on maple). I like them because they are easy to do, you can make them a large diameter and easy to see on a dark stage, and you can make them different diameters (for example I make the ones above the 12th fret smaller.
Only thing to watch for is that you've GOT to be careful drilling the holes because you get "drill wander" and the holes end up not centered on the edge of the fingerboard.
Turnaround
Commercial User
Only thing to watch for is that you've GOT to be careful drilling the holes because you get "drill wander" and the holes end up not centered on the edge of the fingerboard.
It can help to use a centre punch before drilling to avoid having the bit wander. Brad-point drills are also useful in this regard.
Interesting responses given that the OP asked for the "best/neatest/most professional" solution.
The the best, neatest and most professional solution is to use temporary markers as every student of instruments in the violin family does and remove them as listening and playing improve and they don't have to rely on visual cues. That's simply how it's done.
Last edited:


I've taken a piece of white vinyl with adhesive backing and punched out dots with a hole punch which I then stuck on. They are a bit large but they are in an EUB. You could use a smaller hole punch but it may be difficult to handle the dots to stick them.
The nice part is they stay in place but are easy to remove when you want.
The nice part is they stay in place but are easy to remove when you want.
The only problem with that approach is at volume, I wasn't hearing my own bass clear enough. If dots help use dots, I like lines.
Then my guess is either the rest of the band is too loud, the bass isn't loud enough and/or the bass eq needs to be different for the situation.
Last edited:

Absolutely. If you want permanent side dots on your fretless in the position that 99% of all fretless basses have them, you are simply doing it wrong. 
Thanks for all the advice, guys. The current update on my situation is that I have left things as they are and simply practiced regularly, so that the side dot position really has become a non-issue as I have become increasingly more familiar with a fretless fingerboard. Mind you, the lines sure are a bonus . I haven't gigged the bass yet, that happens this weekend for a few select numbers, but if positioning becomes a problem under stage lighting I will simply put some white out dots on the side as a temporary measure.
. I haven't gigged the bass yet, that happens this weekend for a few select numbers, but if positioning becomes a problem under stage lighting I will simply put some white out dots on the side as a temporary measure.
Where they are is where they were on Jaco's bass. If there are lines, leave the markers where they are. If there are no lines, I like the markers to be where the lines would be if they were there.
A pin vise is useful for precision holes like that. They are intended for holding pins for things like grinding, etc,
but work well as a hand operated drill. They use collets similar to those on a dremel to hold a drill bit (or pin).
They're not very expensive, but look for the ones with a swivel end, which allows you to apply pressure while
turning them. That type will have more uses. The plain straight pin vises without the swivel end will work well
enough for shallow holes in wood though.
-
but work well as a hand operated drill. They use collets similar to those on a dremel to hold a drill bit (or pin).
They're not very expensive, but look for the ones with a swivel end, which allows you to apply pressure while
turning them. That type will have more uses. The plain straight pin vises without the swivel end will work well
enough for shallow holes in wood though.
-


