• TalkBass has been independent since 1998. Add your voice.
    Create a free account to reply to discussions, view embedded media, and browse with fewer display ads.
    Join freeLog in
    Want zero display ads or expanded classifieds tools? Compare plans.

Fret Leveling: taper high frets ("fall away")

I'm getting ready to tackle my first fret leveling, and suspect this is an advanced technique, but I will ask anyway...
...how frequently are the frets tapered, starting where the neck meets the body?

Obviously as a "bandage" for a ski jump this would be needed (as opposed to pulling frets and planing the neck), but I am asking this in the context of flat necks in good condition (with a little normal relief).

I have seen more than one video that places masking tape on top of the fret (1-2 layers) at around the 15th fret on a Fender-style bass, and then leveling frets above the 15th fret, using the 15th fret as a ramp (high spot) to taper the high frets. Seems like the sandpaper/file would chew through the tape quickly, but anyway...

Again, I assume this is an advanced technique used by only the most experienced luthiers for special situations (or crazy DIY folks), but I wanted to confirm my thinking. I don't plan on leveling for another 1-2 weeks, but I want to keep picturing the process in my head, reading here and watching YouTube videos.
 
Last edited:

I did this same thing on a bass, I think most techs would call it a "fall away". But I started at the 12th fret since that's the middle of the string but you can start it anywhere you want of course. Yeah I put 2 or 3 layers of tape over the 12th fret to act as the high side of the ramp. I was using a small flat beam, I think 12"x1" or so and about 400 grit sandpaper and it did not eat through the tape. You really don't want to put very much downward pressure on it and let the grit and the weight of the beam do the work. Mark the frets with marker and you will see how its leveling, also from the dust that accumulates. Be careful when you crown them to make sure the top is in the center or the intonation will be ever so slightly off but its not a huge deal and 99.99% of people would never hear the difference.
 
Rather pointless. It is advisable on acoustic guitars because they often form a hump at the fingerboard extension over the body. It's a combination of a thin top of the guitar and a thin fretboard in that area, neither of which correspond to the structure of an electric bass. On a bass with low action, the fallaway is more likely to cause backbuzz when fretting in the upper area.
 
Rather pointless. It is advisable on acoustic guitars because they often form a hump at the fingerboard extension over the body. It's a combination of a thin top of the guitar and a thin fretboard in that area, neither of which correspond to the structure of an electric bass. On a bass with low action, the fallaway is more likely to cause backbuzz when fretting in the upper area.

Thank-you for entertaining SO many questions from me recently! I think I see a path forward now, with heartfelt thanks to you and other patient experts here.

I went through something similar in my quest for the "perfect strings" some time back: both rounds and flats. The great responses on TB resulted in great string selections.

Thanks again! :bassist:
 
There are three main reasons why people grind "fall away" into frets. This is advanced level stuff; most basic fret leveling jobs don't include deliberate fall away.

First, like Richard said, it's an old trick done on acoustic guitars as a preventative measure, on the assumption that the neck would eventually develop a kink around where it crosses the body.

Second, on electric guitars, if you are into extreme bending up at the top, adding fall away allows you to bend farther off to the side before it buzzes out. The tradeoff in that the action is higher up there. Used together with compound radius, for the same reason: extreme bending.

Third, and the one that applies to basses: Correcting the shape of the relief curve, on a neck that's not bending to the right shape under load. When you pull the strings up to tension, the neck is supposed to curl up into a non-symmetrical shape. Almost all of the curvature should be between the nut and the 5th fret. From the 5th fret up, the curvature should gradualy decrease, and it should end up flat from the 16th up. That's the ideal geometry.

But if the neck structure isn't built carefully, the curvature will be more symmetrical and further up the neck. There will be too much curvature between the 5th and the 14th (where the neck thickens up). This makes the heel section (14th on) effectively become a small ramp, tilting slightly upward. Buzz at the last fret when you go really low on the action.

Note: It's a similar effect to a "ski jump" problem, but less drastic. And it's caused by the natural deflection of the neck under load. A ski jump is a permanent bend or kink in the neck, where the wood has stretched and moved.

If you are trying to do a really good leveling job, you can correct for this "mini-ramp" by grinding in some fall away. With the neck unloaded, you make a bit of downhill ramp from the 14th up. So, when it's pulled up under load, that area ends up flat, as it's supposed to be in the ideal shape.

This correction is not necessary on a neck whose structure curves correctly inherently. It's an advanced technique for making a less-than-perfect neck more perfect. Luthiers with a lot of experience in fretwork will check the natural relief curve of the neck and add this correction if necessary. Another one of those extra details you get with a $400 fret leveling job vs a $100 fret leveling job.

Let me emphasize again that this fall away correction isn't something that you should automatically do on all necks to make them "better". It should only be done on necks that need the correction to the relief curve. If you grind fall away into a neck that already curves correctly, then you will do a bad leveling job. The neck will have a buzzy lump at around the 14th.

Side note: This correction of a mini-ramp by grinding fall away is part of the magic of what a PLEK machine does. It measures the shape of the neck loaded and unloaded, and calculates how to grind the shape unloaded, so that it will pull to the correct shape under load. It does the correction by computer, that the experienced Luthier does by measurement and testing.

Side note: The Buzzy Lumps is obviously a good band name.
 
Third, and the one that applies to basses: Correcting the shape of the relief curve, on a neck that's not bending to the right shape under load. When you pull the strings up to tension, the neck is supposed to curl up into a non-symmetrical shape. Almost all of the curvature should be between the nut and the 5th fret. From the 5th fret up, the curvature should gradualy decrease, and it should end up flat from the 16th up. That's the ideal geometry.

But if the neck structure isn't built carefully, the curvature will be more symmetrical and further up the neck. There will be too much curvature between the 5th and the 14th (where the neck thickens up). This makes the heel section (14th on) effectively become a small ramp, tilting slightly upward. Buzz at the last fret when you go really low on the action.
I have to disagree with you here Bruce. The neck does not tilt up beyond the 14th fret - it's fastened to the body so it doesn't tilt. All bending is happening between the 1st fret and the 14th (roughly). Regardless of how symmetrical the curve is, the area between 15 and the butt end of the board stays flat. And if it is flat there's no point having it drop off unless you are string bending with a smaller radius. And if someone is setting their relief by using a straightedge end to end on the board, they are going to get a really bad setup if there is fretboard fallaway.
 
for my money if you do want fallaway on a good flat neck with an otherwise straight fret top profile, the idea of adding it via shimming up with layers of tape before filing is way too drastic

at most you'd want to just apply a little extra "english" to the very last few frets with the fret leveler, not even enough to really measure a gap afterwards. i'd never start it as far back as the 12th fret, that puts a hump in the playing area. the idea of fallaway is to get what are essentially "dead" unused frets up top at the body joint out of the way.
 
And if someone is setting their relief by using a straightedge end to end on the board ...
Sorry for the digression, but now that you bring this up, I've been thinking that I should get a straightedge (or multiples) that I can use for this. Not end-to-end, but extending from the first fret to the fret where the neck meets the body. On all of my FSOs, 19-20" should work, and on another bass, it looks like 21-22". These are, of course, not standard-sized straightedges (even at luthier shops, as far as I can tell), so what do pros who like to measure relief this way use? Do they make their own if they have the tools, or just get a 24" and cut it short?
 
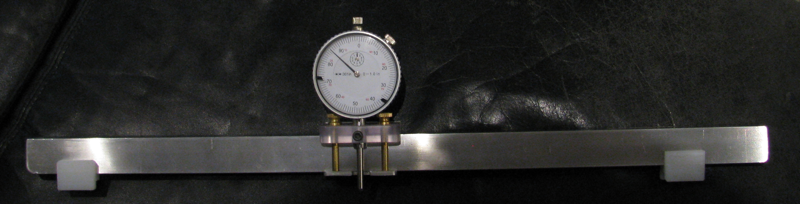
I made a gauge that is adjustable to any length:

The white end pieces can be slid along the beam to rest wherever I like on the frets. Another narrower set I use when I want to measure the fretboard. The dial gauge is on a carrier that can also move along the beam. I can profile the entire fretboard or the frets end to end with it.
 
  • Like
Reactions: DCCat
Hey Richard;

Here's a quick crude illustration of the geometry I'm talking about.

Relief Curves 1.jpg


You are right that the heel of the neck doesn't actually curve up in relation to the body. But, if the relief curve is too much in the middle of the neck, it forms a mini-ramp at the heel...in relation to the line of the string. That's what the fall away corrects for; flattening out the end of that relief curve to make it closer to the ideal. Not perfect; a correction.
 
Hey Richard;

Here's a quick crude illustration of the geometry I'm talking about.

View attachment 4650914

You are right that the heel of the neck doesn't actually curve up in relation to the body. But, if the relief curve is too much in the middle of the neck, it forms a mini-ramp at the heel...in relation to the line of the string. That's what the fall away corrects for; flattening out the end of that relief curve to make it closer to the ideal. Not perfect; a correction.

In checking my Fender-clone Sire P7, I find it has ideal relief. I used a notched straight-edge and a flashlight shining from the far side. Easy to get 4/64" action with flatwounds, but there is at least one high/low fret I'll tackle after I experiment on the TRBX304.

In checking my Yamaha TRBX304, I find the relief is poor: further up the neck. Doesn't really START to bend/bow until about the 5th fret. I guess that is why I got it most buzz-free at a relief of 0.023, but still never better than 6/64" with D'addario EXL-165 rounds. I have the neck flatter (with more buzz) at the moment, in preparation for some gentle leveling. Definitely some "rocking" here/there with the fret-rocker, so I can probably improve matters, but not the ideal "bass specimen". I bought this $500 bass with 24 frets and a pencil-thin neck expecting some issues, but all I really got it for was slap. Having lower action would make chords (and tap) easier, but I have definitely had worse bases over the years.

Knocking on wood (maple/ash) regarding its longevity, the Sire is my main bass anyway. The neck seems to be 1/2 a baseball bat (ha-ha), and does have graphite reinforcement (only the 5-strings have the graphite).
 
Last edited:
Hey Richard;

Here's a quick crude illustration of the geometry I'm talking about.

View attachment 4650914

You are right that the heel of the neck doesn't actually curve up in relation to the body. But, if the relief curve is too much in the middle of the neck, it forms a mini-ramp at the heel...in relation to the line of the string. That's what the fall away corrects for; flattening out the end of that relief curve to make it closer to the ideal. Not perfect; a correction.
But your illustration is faulty. Look at it from the bridge to the 14th fret. Whatever is happening outside of that area is of no consequence when we are fretting from 14 on up. And since that area is flat and there is no need for fallaway.

If you were to create some fallaway and lower the breidge so the string line followed the taper, it would fret out around the 12th fret.

upload_2022-4-8_22-50-44.png


The upper pic has a flat neck and the string fretted at the 14th fret. Assume that the bridge is set so that the fretted note rings clearly. Now when the neck bows as in the lower pic, the geometry does not change from the 14th fret up. It only appears that there is a "ramp" at the end when the string is not fretted, but in fact there is no ramp:

upload_2022-4-8_23-3-8.png

upload_2022-4-8_23-4-36.png
 
  • Like
Reactions: fig
Hey Richard;

I have to disagree with your disagreement about my disagreement!

(Note to everyone: Richard and I are both old veteran Luthiers with enough experience and knowledge to know how much we still don't know about the engineering of stringed instruments. This is a friendly technical argument to try to figure something out. No need to break up the fight. This is what we do for fun.)

I contend that my drawings are right, and you are misunderstanding the setup condition where this problem occurs. The "mini-ramp" problem happens when the action is set really low (clearance at the heel end), as compared to the vertical height of the nut because of the relief curve. Too much relief, as compared to the height of the action. So, the string is not parallel to the heel portion of the neck, as you are showing. The string is sloping slightly downhill over the heel. My drawings are exaggerated, but that's what's going on. Looking at it from the string, the heel of the neck becomes a shallow ramp.

And the buzzing problem is greatest with open strings and the first few positions. As you lower the action way down, it buzzes at the last fret, the end of the ramp. As I explained above, having a good decreasing-radius relief curve reduces the problem by making that ramp angle shallower. And, if the neck has too much relief curvature in the middle, adding the little bit of fall away flattens out that ramp.

The point is that this is a correction for an imbalance between the relief and the action that happens when you take the action super low. To keep the string parallel to the heel, as you lower the action, you should also be proportionally lowering the relief. Then you wouldn't have this ramp thing. But, relief is needed to keep the string from buzzing around the 5th fret, while playing an open note. There's a minimum to the relief you need to stop that 5th fret buzzing. If you set the relief there, and continue to lower the action, then the string is sloping downhill, and you have the mini-ramp at the heel.

That's the root cause of all this: The action is too low for the required relief. The customer wants super-low action at the high end of the neck, and you are trying to balance out preventing buzzing at the 5th (by adding some minimum amount of relief) with preventing buzzing at the last fret (by adding a small amount of fall away).

By the way, I don't grind in this fall away in necks I build. I make the structure bend to a really good relief curve. And I don't set my basses up for "stupid-low" action. My basses aren't intended to be played that way.

I learned about this fall away technique from my late buddy Mike Lipe, who built guitars and basses for almost 50 years. He did many thousands of fret jobs, by hand. I built the main structures of his necks for him for about 15 years. I saw him doing this fall away filing on one of our bass necks, and I asked him why. He didn't really understand the geometry of it, but he said he'd been doing it for years because it works. He could make the frets perfectly level, and do the perfect setup, and when you lower the action way down, it would buzz at the last fret. Add a little tiny bit of fall away, and you could get the action lower. He didn't understand why, but it worked. I was curious, so we spent some time with straightedges, figuring out what was going on.

Mike continued to file the fall away on all his bass necks. He felt it wasn't always necessary, but it was a bit of added insurance that the action could be set as low as anyone would want.

He also filed fall away on most of his guitar necks, but that was specifically to allow radical bending. A steeper angle.
 
Hey Richard;

I contend that my drawings are right, and you are misunderstanding the setup condition where this problem occurs. The "mini-ramp" problem happens when the action is set really low (clearance at the heel end), as compared to the vertical height of the nut because of the relief curve. Too much relief, as compared to the height of the action. So, the string is not parallel to the heel portion of the neck, as you are showing. The string is sloping slightly downhill over the heel. My drawings are exaggerated, but that's what's going on. Looking at it from the string, the heel of the neck becomes a shallow ramp.

That's the root cause of all this: The action is too low for the required relief. The customer wants super-low action at the high end of the neck, and you are trying to balance out preventing buzzing at the 5th (by adding some minimum amount of relief) with preventing buzzing at the last fret (by adding a small amount of fall away).
So we agree after all. I knew we would. It comes down to the setup - if you have too much relief and attempt to compensate with the string height at the bridge, you end up with a geometry that is as you describe. I feel that it's a poor compromise and maintain that a proper setup will give optimum fret clearance all over the neck without the need for a fallaway. And a fallaway can actually cause buzzing around the 12th fret because in the line of the string path which is "sloping slightly downhill over the heel", there is an apparent hump where the fallaway starts. Anything that deviates from the ideal relief curve introduces its own set of compromises.
 
  • Like
Reactions: taketwo and fig
So we agree after all. I knew we would. It comes down to the setup - if you have too much relief and attempt to compensate with the string height at the bridge, you end up with a geometry that is as you describe. I feel that it's a poor compromise and maintain that a proper setup will give optimum fret clearance all over the neck without the need for a fallaway. And a fallaway can actually cause buzzing around the 12th fret because in the line of the string path which is "sloping slightly downhill over the heel", there is an apparent hump where the fallaway starts. Anything that deviates from the ideal relief curve introduces its own set of compromises.

Lovin' the dialog! When I was told in the forum that my relief of 0.023 was too much, and the high relief suggested other problems, I didn't know why. In reading here, and the ski-jump thread, I understand: a little bit more.

FYI, non-luthier long-time on-again/off-again non-gigging hobby player.
 
Yeah, a couple of these related threads have been very educational regarding advanced techniques and subtleties. Very cool of you professionals and very experienced folk for sharing your insights and deeper level understanding.

FWIW, on the opposite end of the spectrum, I do the simple method with inexpensive tools only on my stuff. I-beam level (cut to a little longer length than fret board), long straight edge (dremel notched along one edge), various sandpapers, all bought at a local hardware store. Most expensive item was the triangular crowning file that I ordered.

I used inexpensive tools to test whether I was even capable of doing a leveling. If that was beyond me, then minimal money loss on tool investment. Used my beater bass as the first patient. If I borked the beater, no worries. (Borked the Beater...band name? LOL)

After alot of reading and youtubing, did my first leveling/crowning. Came out much better than I ever expected and gave me exactly what I'd hoped. Could set much lower action, no unwanted fret noise, overall nicer to play. Very happy camper. Did two more basses using those tools and they came out fine.

@OldSchoolFlats , with all the questions you're asking and the great responses from the experienced folk, you're gonna be a very happy camper, too.

Despite the great knowledge imparted from the pros, I'm just a hobby player these days (infirmities of age, and such). Will just stick with my simple methods as they work for me.

Regards to the 'Pros from Dover' for taking time to teach others.

Signed,
'Hen from Tucson'
 
Last edited:
  • Like
Reactions: Lo-E
Yeah, a couple of these related threads have been very educational regarding advanced techniques and subtleties. Very cool of you professionals and very experienced folk for sharing your insights and deeper level understanding.

FWIW, on the opposite end of the spectrum, I do the simple method with inexpensive tools only on my stuff. I-beam level (cut to a little longer length than fret board), long straight edge (dremel notched along one edge), various sandpapers, all bought at a local hardware store. Most expensive item was the triangular crowning file that I ordered.

I used inexpensive tools to test whether I was even capable of doing a leveling. If that was beyond me, then minimal money loss on tool investment. Used my beater bass as the first patient. If I borked the beater, no worries. (Borked the Beater...band name? LOL)

After alot of reading and youtubing, did my first leveling/crowning. Came out much better than I ever expected and gave me exactly what I'd hoped. Could set much lower action, no unwanted fret noise, overall nicer to play. Very happy camper. Did two more basses using those tools and they came out fine.

@OldSchoolFlats , with all the questions you're asking and the great responses from the experienced folk, you're gonna be a very happy camper, too.

Despite the great knowledge imparted from the pros, I'm just a hobby player these days (infirmities of age, and such). Will just stick with my simple methods as they work for me.

Regards to the 'Pros from Dover' for taking time to teach others.

Signed,
'Hen from Tucson'

Amen.