• TalkBass has been independent since 1998. Add your voice.
    Create a free account to reply to discussions, view embedded media, and browse with fewer display ads.
    Join freeLog in
    Want zero display ads or expanded classifieds tools? Compare plans.

Fretless five competition: Mad scientist edition

No, this one is about 3 coats of shellac sealer sprayed and wet sanded. Then 4 days of 3 coats per day of Mcfadden/Seagrave gloss lacquer. I am not a big fan of epoxy. It's good for certain things but it is a pain to work with so I generally avoid it if possible.
Tomorrow will be 14 days so I will will probably start wet sanding in the evening. :bassist:

Funny epoxy story: A few years ago I worked for a company that was building a nice custom bar for a local establishment. Full 40 ft. bar, all solid oak, the works... I was responsible for installing the bar and once I was done another crew came in behind me and finished it once it was in place. Something I always avoid but since the bar was getting a THICK epoxy topcoat it had to be assembled before the epoxy could be poured. These guys had done some tabletop size pours before, about the size of the full Glazecoat kit from HD, but this pour required a five gallon bucket of both part A and part B. Not thinking, they mixed the 2 together in a very large plastic drum and made the mistake of walking away for a minute to finish their prep. IME it is better to mix in several smaller containers to help spread the mix more evenly and to avoid what happened next.:D In no time at all the bucket of epoxy was smoking and got so hot from the chemical reaction that it melted a hole in the container allowing the epoxy to ooze out onto the floor. By the time half the epoxy had come out of the bucket the whole thing was fused into a smoking, noxious lump that was stuck to the hardwood floor. I never would have believed the heat that came off of the stuff, and the smoke was caustic enough to knock a man flat. Fortunately the floor had not been sanded or finished so the damaged was repaired easily enough. The guy in charge of the finishing crew on the other hand didnt come out of it so well. 10 gallons of epoxy is not cheap.:atoz:

Needless to say, lesson learned.

#1: Use a shallower, wider container to disperse the heat of the reaction.

#2: Mix and pour, dont wait around or you will get burned one way or the other. :scowl:

After all that I will stick with nitro and superglue and avoid the heat;)
 
yep, some people learn the hard way>>>LMAO I mix what I need, and call it good, it's always more than used, but never run short. I do a lot of filling with epoxy, and will be doing the FB on this one with it. Can't wait to see this one done. going into finish this weekend myself...LOL
 
Lab Journal #39: Time to reopen the lab and knock the cobwebs off of this thread. The nitro has had 2 weeks to cure and nobody I ask can smell it gassing off anymore so it's time to get dirty and wet... with sandpaper ;)) I look forward to this part of the build very much. When you spend a few rubbing down the bass you really get an intimate feel for the instrument. When I slowly polish up to a fine finish, be it furniture or guitars, I almost feel like I am slowly breathing life in to the piece. Very satisfying.

I often start wet sanding at 600 grit but the finish really went down clean on this bass so I started at 800 grit instead. So, a little warm water with a drop or two of dish soap to keep the paper from loading and away we go.

IMG_3519.jpg


The water from the wet sanding makes everything look perfect so it is important to stop often and wipe the bass dry with a clean rag to gauge your progress. It is also very important to keep the paper nice and wet or you will build up globs of finish that will add deeper scratches than you are removing. My goal is to completely level the finish with this grit so minimal sanding is required through successive grits. In this pic you can see the last few little shiny spots.

IMG_3524.jpg


It is important to turn the bass in the light to catch every one of these little spots and get rid of them now with a coarser grit. Once all the spots are gone this is what we have.

IMG_3527.jpg


IMG_3520.jpg


IMG_3528.jpg


IMG_3532.jpg


Once 800 grit is complete it is time to step up to 1000 grit. Since the finish is already flat the goal is to sand no more than needed to remove the previous scratch pattern. Again, plenty of light is your friend as the scratch patterns stand apart when light reflects off of them. All I have on hand tonight is 800 and 1000 grit so tomorrow will entail a trip to the local auto parts store to pick up some 1500 grit paper. Here are pics sanded to 1000 grit.

IMG_3530.jpg


IMG_3534.jpg


IMG_3537.jpg


IMG_3539.jpg


You can see that even at 1000 grit we are starting to get some shine. I havent decided yet if I want to go full out gloss on this one or if a satin finish might look better. I will probably buff it up to a full gloss. At that point I can rub it back out to a satin finish if I prefer. In fact, I may even give you guys a say. :D Be back soon with pics of 1500 grit and beyond. Thanks for stopping by. :bassist::bassist:

 
You can see that even at 1000 grit we are starting to get some shine. I havent decided yet if I want to go full out gloss on this one or if a satin finish might look better. I will probably buff it up to a full gloss. At that point I can rub it back out to a satin finish if I prefer. In fact, I may even give you guys a say. :D Be back soon with pics of 1500 grit and beyond. Thanks for stopping by. :bassist::bassist:

I saw hints of a satin finish on this and I couldn't help but emit a dark, satisfied growl from my loins.
Go with satin.
 
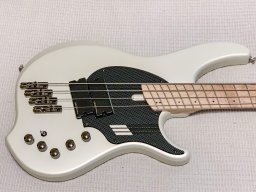
Lab Journal #40: Back in the lab and the subject is near completion. Since I last checked in the bass has been polished and buffed out and is awaiting assembly. Last time I left off after 1000 grit wet sanding. I picked back up at 1500 and then used an auto polishing compound and a foam polishing pad in my cordless drill. Once the polishing compound was wiped off I used an automotive swirl remover and a soft polishing cloth to bring the bass up to a nice gloss. At first I considered a satin finish but after seeing the gloss I like it just the way it is. :cool: I hope to get the bass wired up tomorrow and get pics up but if not I will be out of town till sunday and post them then. Before I go here are some pics of the body after polishing.


234.jpg


235.jpg


239.jpg


236.jpg


240.jpg
 
Dude! You're from outer space!
I still maintain the same opinion I held previously...
The back is a beautiful piece of craftsmanship, and displays the beauty of the woods selected in a showcase that tends to defy natural physics.

But for me, the beauty of the top woods is it. You have managed to present the Natural Beauty that Nature provided within the woods and portions of the woods that you have selected, with an elegance that is amazing.

With all that is going on visually, there is going to be a lot to live up to sonically, and musically...

:hyper:
 
Lab Journal #41: Thanks for the kind words guys. I got the test subject wired up on wed. but had to head out of town before I could post up any pics. Currently it is wired V,V,stacked mid and stacked bass/treble. I did not have a blend pot available at the time but the second volume knob will ultimately be switched for a blend pot. The V,V setup is fine for rock gigs and such but for orchestra/theatre shows the single master volume is invaluable. Fortunately I had my small rig with me while I was out of town so I got to spend a good bit of time playing the bass and I am happy to report that it sounds and plays as good as it looks. The SGD pickups sound as good as any I have heard and all the little nuances and details that make that "fretless sound" are there in spades. Here are a couple of pics with the wiring in place. I still need to secure the batteries and polish the control plate before the experiment is completely done.

IMG_3551.jpg


IMG_3553.jpg


I am having second thoughts about the satin chrome hardware against the gloss finish. I probably wont get it done before the competition is complete but I intend to swap the bridge and tuners out for black instead. I can always build another bass that will look good with this hardware and I think the black will look way better against the ziricote. (Unless someone has a set of 3/2 black ultralite tuners (3/8 " shaft) or a black A type bridge with .728 spacing that you want to trade.) :hiding:

Some time this week I will get together some final presentation pics and put together some sound/video clips so you guys can join in the fun too. :D