• TalkBass has been independent since 1998. Add your voice.
    Create a free account to reply to discussions, view embedded media, and browse with fewer display ads.
    Join freeLog in
    Want zero display ads or expanded classifieds tools? Compare plans.

Harrison inspired 4001 ric build

The Addiction Deepens! Now you are truly screwed, gotta finish that guitar too. And Work.... and take care of kids.... and ... etc. I finally realized that if I didn't have some kind of creative outlet, I was miserable enough to take it out on people I love. They might not get the obsession, but making stuff is necessary to my mental health. Hard to find anything more satisfying than building a work of Art you can PLAY.
 
Used my new lmii fretting jig and I was quite pleased. Not any faster than a saw and square but really cut the ability to make a mistake. Glad I invested in this tool.
IMG_3212.jpg


Now with the fretboard completed (20 frets, fret 21 being the cutoff point), I can use the actual board to make sure my nut marking is accurate, and it is.
IMG_3213.jpg


So now I can move on to my truss rod jig. This was also so much easier than trying to improvise, if you don't have a jig like this I cannot express how easy the process was. Drew a centerline in the piece, used the screws to line up the new router plate line, and routed. Took just a few passes to get it to 3/8" for the rod. I went a bit past the nut line, I have a tool that I bought with my stewmac rods that will hopefully ream a nice clean hole for the bigger end of the rod.
IMG_3215.jpg
IMG_3216.jpg

As always, pardon the mess, still have to put up my pegboard, but this is more fun.
 
Ok, so my hope for a reamer didn't pan out. It is really meant for heel end truss rods, and maybe it would have worked with a 45 degree peg head angle. So I just had to rout the adjustment end a bit bigger. I will take one of my fancy gouges and gouge it a bit so I can get a clean passage for the hex driver.
IMG_3218.jpg


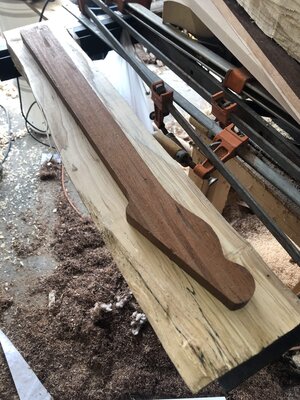
I tried something new and cut the 5 degree angle for the headstock on my tablesaw, but while it was quicker the cut was a bit off. Unfortunately it wandered into the nut area. I should have built more room in for error, as when the blade is out that much it tends to be wander. I approached it in steps with a thin kerf blade. That is ok, I have to make a veneer out of my walnut and cover the headstock anyway to cover the transition of my 1/8" step. I will use the extra thickness to rebuild a 90 degree edge for the nut. Now the big question is, do I veneer the whole headstock including the wings, or just the center section? I like the look of the ric wings as separate pieces, tbh. Have to ponder...
IMG_3217.jpg
IMG_3219.jpg


While I do that I work on the fingerboard. I knock some indents in for my dots, drill them out, and fill the with water putty. I really like this stuff and used it on my rosewood tele build. The guy on the can is wearing my favorite outfit, the same one I wear outside when I am working but want to make sure the neighbors will not bother me.
IMG_3220.jpg
IMG_3221.jpg
IMG_3222.jpg


Each of those fingers are never far away from trouble.... but they enjoyed helping with the water putty.
 
I bought a glue line rip blade to try out, will use scraps first. Anyone have any luck with one of those? Looking to cut the taper in the center section with it. Seems too good to be true but have my fingers crossed. Have to get a jointer one of these days, or I could just hand plane of course.
 
  • Like
Reactions: Gilmourisgod
I like the contrasting headstock wings myself, that's a Ric classic. I think it advertises the neck through construction. I haven't tried a glue line blade, but before I got a jointer, I did it with a good straight edge and a shear cut flush trim router bit, and then got it absolutely true with some sandpaper stuck to my table saw top. I did it on a granite countertop once, but She Whom I Adore was not amused.
 
  • Like
Reactions: Verner
Time to clean up, but got one more thing done. Cut up a thin piece, and then split that to book match. Glued it up and ran it through the thickness sander. Man I love this machine! 1/8" veneer in no time. Of course, this bass is going to be a giant series of patches, but I am learning a lot and am already forming plans for the next one. I imagine it will go much smoother the second time.
IMG_3223.jpg
IMG_3224.jpg
Have to justify the cost of time and tools of course. These ric builds won't pay for themselves until the 11th bass or so...
 
Tested out my new glue line rip blade on my duel 51 p bass build (I am building with a student at my high school, and she has named her future bass Loretta). Used it to join some alder blank halves, and it did ok. Blade is only promising results on wood up to 1" thick, and the fender style blank wood is 1 3/4", so I just did shallow shave passes. Pretty smooth overall. I cleaned it up with some sandpaper and a scraper, but it probably would be fine as is for most applications. It is not as good as a well tuned planer though. The ric, being only 1 1/4", should do just fine. My student and I only get to work on the basses sporadically once a week after school for less than an hour at a time, but like I said in my other post, building a ric and a fender at the same time highlights the efficiency of Leo's designs. I am also much more familiar with that type of build, so it feels less dangerous whenever I cut something. Every cut on the ric spurs the thought "here goes nothing".
IMG_3232.jpg
IMG_3233.jpg
IMG_3230.jpg

I had the Alder in my garage for about 7 years, and apparently the local boring beetles like it. They enjoy the joists in my house as well. I also thought it was odd how the tightbond looks like it bleached the wood. Old alder looks like construction lumber next to a classy sandwich of walnut and maple.

Oh, and the school bandsaw has a 3 year old blade, burns things, and screams. Classic.
 
Which glue line rip blade did you end up with? I bought the Freud 24 tooth thin kerf rip blade LU87R010 last year and now use it for the majority of my tablesaw work, including ripping glue lines and resawing. It will chatter some and show teeth marks if the stock isn't perfect, but now that I'm used to using it I can get "perfect" clean gluable cuts most of the time. Even on really thick stock, I've resawn 6" boards in two passes and gotten a better than gluable result if the board is square and true. If I think a piece is going to chatter at all during the cut, I just cut a blade width outside the line and do a second cut to shave off the rest. Having a featherboard set really tight and pushing the piece through consistently without pausing seems to be the trick to getting clean gluable cuts. I pretty much stopped jointing square stock by other methods once I got this blade and figured out how to use it. Actually, I don't even own a jointer any more. I was jointing everything on a router jig before I got this blade (I still use the router for stuff that's weird shaped or otherwise won't work on the saw). The router is probably more accurate and less likely to chatter or have other issues, but it takes a minute to get the jig out and set it up versus just pushing something across the saw.
 
The Woodworker I and II blades are supposedly glue line rip, and I’ve long pined for one, but never bit the bullet. I spent a lot of time setting up my jointer so it cuts very nicely, using a magnetic jig to align the blades. A PITA, but you only have to do it once in the life of the blades. I’ve tried thin kerf blades, most seem to flex too much without a stiffener plate, which limits depth of cut. My saw blades are getting dull, trying to decide if it’s worth having them sharpened vs just replacing.
 
I also have the freud, but I went with the full kerf blade as I figured it would be more stable. I have a thin kerf ripping blade that @Gilmourisgod turned me on to, used it for the resaw of the walnut but I am using it for pretty much everything now. That helps with my old craftsman table saw. The saw is actually plenty strong in general, but the line to my garage is improvised (previous owners) and heavy cuts on the tablesaw can trip the breaker. Has not been an issue with the thin kerf rip. Then I used the glue line for a shave pass. The blade changes are a pain, but it isn't a daily thing I do so it isn't an issue at the moment.
 
Not huge news, but I corrected the skewed headstock cut with a few swipes of the hand plane. Then I glued on the veneer I made last week. I will have to re-trim the upper part of the truss rout, and sand the nut shelf flat, but then I can cut the taper and glue on the fretboard. This thing will start looking like a bass very soon.
IMG_3260.jpg
IMG_3261.jpg


More importantly, I finally got my indoor shop space a bit more organized. I can move more hand tools in so they don't rust out like in the garage, and power tool work will just stay out there. Even made some handy out of the way clamp racks.
IMG_3262.jpg
IMG_3263.jpg


Also, got a neat birthday present from my wife, some nice sapele slabs. I think I can sneak a whole les paul jr out of it with a scarf joint.
IMG_3264.jpg
 
86D27D30-ACA9-4C0B-83FC-B82DB62BD1EA.jpeg 9FC150D9-F80C-4733-938D-F72A01265D7D.jpeg D19EEB38-D774-42D7-A2A3-087B6E759D29.jpeg 67386F7D-709C-4862-9A2B-6D261E347437.jpeg C13B52FD-F3A0-40D6-B28A-D2831DCF1A3F.jpeg 418048A1-8A28-4697-80D2-E635FEA75D83.jpeg
Hey everybody, I don't have much of anything new to post but hope to soon. Not too long after my last post, as many of us did in the education community, we felt like something was coming. My wife is also working on a masters as a nurse practitioner, and her statistics professor was plotting the spread earlier than most, so I used most of my free time to start getting ready for things just in case. At this point, most of my time is spent teaching my 7 and 5 year old and trying to remotely teach 180 of my public school students. It is stressful and frustrating, but at the same time I am enjoying the extra time with my family and the community around us is really coming together. My wife is now working with covid patients so there is always a lingering uneasiness as parents, especially as protective equipment stockpiles dwindle. We have had to have surreal conversations about what arrangements need to be made for our three kids if both of us end up with this and need to be hospitalized, which due to her work is a real possibility. At the end of the day I know I am still pretty lucky comparatively, we have stable jobs and even my little private business teaching lessons is doing fine remotely. I hope everyone out there is doing as well as they can, and finding some diversion in this hobby.

So the only thing remotely related I have done is try my hand at riving some wood for a future build. Last year the power company took down one of our maple trees, and I cut up a 3 foot long chunk while I was working the firewood. I don't have a chainsaw mill or even a bandsaw, so I stood the trunk up and scored some lines with my kindling hatchets. Then I drove wedges in and split it down the middle. There is some twist in the grain, so I will try and follow that as I process it. I am hoping to get a few necks and maybe even a body blank out of the log, but it is my first time so who knows. Just took some time to chop this since I was chopping firewood anyway. Not long enough for a bass unfortunately, but maybe I will get a super heavy all-maple tele out of it next season. Finished it up with hand planes and the thickness planer, some very interesting grain. Here are some pics, maybe some of you will find it interesting.

Unfortunately, I gave myself AC arthritis in my right shoulder, probably due to bad form at the gym. So that makes the day after pretty sore. But it is satisfying seeing and hearing a long log split in half.
 
Well, I got a part today and that is bass build related, so here it is:
3D810AB4-7B01-4B21-A8C6-18E1A9A1D576.jpeg
C8AE17AB-D82F-4086-8105-061EEB84D421.jpeg

So this is the new style 4003 bridge. I like the functionality of the hipshot but the look of the ric bridge is pretty iconic. This seems well built, and combines the best of both designs. It has a heft to it, and the bottom is all flat except for the mute. This means I don’t have to route a pool under the bridge, just the small mute area.

So I have been able to do some woodworking at least. The stores in our area are pretty bare most of the time, so we are starting a garden and raising chickens for the eggs and meat. So they need a coop. We had them before, but the free range birds slowly disappeared due to predation. This coop has wheels and will also have a portable enclosure so they can still eat free range but will be protected.
9FE4E8D1-4CEA-400B-8B2B-11384F4897E6.jpeg
B7BED5D4-F244-41A3-B953-317645621708.jpeg

Most important to me, they won’t be able to break into my garage like the last time. They really enjoyed roosting on my tools and so I would have to clean off chicken poop and feathers regularly.

So I have a few covid projects to finish and then it is back to bass building. Hope everyone is doing well.
 
A V2 bridge! First one I've seen used on a build, I'm curious to hear your review of it. That looks like a much sturdier solid casting than the old "hollow" ones with stiffener ribs (like mine). Hopefully you didn't already do the bridge routes shown on my drawings! You'll still need the mute route though, which is on the template. Better check it anyway, It may have some different measurements, and needs to be deep enough for the vertical travel of the mute bar, and a little extra for the ground wire. I think I ended up having to make mine about another 1/16" deeper than it showed on the drawings.

I always thought the whole "hen-pecked" thing was some kind of apocryphal story... until I went to a friends house who was raising hens. Sure enough, the Beta Male had all his feathers pecked off, was scrawny and generally harassed looking. Chickens are vicious little b*stards towards each other! When I can't build basses, I try to get my hands on wood somehow, I've been scratching the itch with a 93' MIM P bass rehab and refin, but I'm running out of work on it! That coop looks like fun to build, and manageable for one person.
 
Oh man it’s been a year, I truly hope everyone that was watching this thread is doing well. I know a lot of you have checked out my current threads, finishing up a dual 51 P-bass with my student and an impulse EB-3L build. Those are winding down to the finishing stage, so I will be picking this pre-pandemic build up soon. It’s actually made with all the same wood stock as the EB so I will have walnut maple twins. Not identical obviously, just fraternal.

Through the pandemic, things got so crazy both as an educator and a parent. I had to shelve my hobbies for the most part. However, things are loosening up, kids are doing great in school, my schools haven’t had to shut down in a while, and we are finally seeing friends and family again. What a crazy time to live through.

I read through this last night, and this thread and build taught me so much. My EB build went so smoothly in comparison due to the experience and contributions of this community. I have a few more tools and techniques, so for those who were watching this and would like to see a conclusion, it’s coming soon. I expect it will take up much of the summer, but I wanted to make sure all those who helped me with advice and enthusiasm knew I didn’t forget. Time to get back to work!
 
I don’t know if anyone still has this on their radar, as it has been years, but I have a week off and I decided to dust this old project off. Usually things are so busy with three active sports kids that shop time is a rare event during the school year. However, we get a few days off of softball, and we arranged lots of play dates, so I am hoping to put some hours in and get this build looking like a bass.

I see this was my first ever build post way back in 2019, boy have things changed since then. It was also heartwarming to see all the help that was given from those more experienced members, what a great community! I am always stalking the threads in my quieter moments, there are some awesome things going on here.

This is still my first neck-through bass, so the order of operations is a little less forgiving. I cut the excess off the back of the giant neck blank, and the back of the headstock. Gave it some extra room because there is an angle in the blank.
IMG_9631.jpeg
IMG_9632.jpeg


with the back flat, I radius the fingerboard and resaw my fret slots to depth. Then sand it down with finer grits until it is shiny.
IMG_9636.jpeg
IMG_9637.jpeg
IMG_9638.jpeg
IMG_9639.jpeg


Going to press some frets next, and then start shaping the back of the neck. If I can get the wings on by the end of the week I may have a shot at baby-stepping this thing to the finish line before summer!

If you spot me making a major blunder please feel free to chime in, I don’t have any sense of continuity with this build as it has been a long time. I’ve also learned so much in that time, I know I will probably be contending with some old imperfections along the way.