
• TalkBass has been independent since 1998. Add your voice.
    Create a free account to reply to discussions, view embedded media, and browse with fewer display ads.
    Join freeLog in
    Want zero display ads or expanded classifieds tools? Compare plans.

Harrison inspired 4001 ric build

The pickup issue is inherent to Rics, unfortunately. You can get another 1/16" or so higher by removing the little rubber spacers around the pickup height screws, if you haven't done that already. On the older V1 bridges, you could file down the zinc saddles to get them lower, I guess that's not an option on the V2. I've seen people countersink the bridges before, you obviously have the skills to pull it off, and with the bridge in hand, ,making a template shouldn't be too difficult. If you know where the bottom of trussrod is relative to the back of the neck, you can safely shave it down to within 1/8" under the rod, and you can take off a lot of wood below the :shoulders, making it more of a flat "D" than a "C", or even a soft "Vee". Don't give up on it! Take a rest from it, come back and keep tweaking. This is why my builds take 2-4 years, when I get stumped or sick of it, I walk away for a while. The problems will solve themselves in you head while you are not "thinking" about it. Bass looks badass with the black pickguard. If you are like most people, that treble pup cover will get removed, it's right over my favorite "sweet spot" of tone and string tension. The Tubeampology Treble Bezel works really well, and can be had with or without a thumb rest. I go the "cove" model, which has a thumb recess rather than a raised ridge.
 
  • Like
Reactions: Verner
The pickup issue is inherent to Rics, unfortunately. You can get another 1/16" or so higher by removing the little rubber spacers around the pickup height screws, if you haven't done that already. On the older V1 bridges, you could file down the zinc saddles to get them lower, I guess that's not an option on the V2. I've seen people countersink the bridges before, you obviously have the skills to pull it off, and with the bridge in hand, ,making a template shouldn't be too difficult. If you know where the bottom of trussrod is relative to the back of the neck, you can safely shave it down to within 1/8" under the rod, and you can take off a lot of wood below the :shoulders, making it more of a flat "D" than a "C", or even a soft "Vee". Don't give up on it! Take a rest from it, come back and keep tweaking. This is why my builds take 2-4 years, when I get stumped or sick of it, I walk away for a while. The problems will solve themselves in you head while you are not "thinking" about it. Bass looks badass with the black pickguard. If you are like most people, that treble pup cover will get removed, it's right over my favorite "sweet spot" of tone and string tension. The Tubeampology Treble Bezel works really well, and can be had with or without a thumb rest. I go the "cove" model, which has a thumb recess rather than a raised ridge.
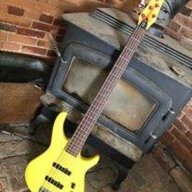
Lots of great advice all around there, thank you!
 
Not sure why your bridge saddles are bottomed out. I went and looked at some of your earlier photos, and it looks like you have plenty of overstand (fret plane height above the body plane). Does the V2 bridge have a thicker base plate perhaps?

And yes, the neck pickup height constraints are a common and well-known problem. But I'm not going to say anything about the pickguard..... :speechless:
 
Not sure why your bridge saddles are bottomed out. I went and looked at some of your earlier photos, and it looks like you have plenty of overstand (fret plane height above the body plane). Does the V2 bridge have a thicker base plate perhaps?

And yes, the neck pickup height constraints are a common and well-known problem. But I'm not going to say anything about the pickguard..... :speechless:
Yeah, it’s a full 1/2” above the body, and everything seems to be flat and in the proper plane. It’s acceptably low, but only just so.
 
Ideally you want the strings to be able to lay right on the fretboard when the saddles are lowered, otherwise the temptation to get better action from TR adjustment is there and the risk of eventually breaking the TR is also there. You may not do it, but a future owner might. :D In other words, this is another vote for either countersinking the bridge or a new thicker fretboard. I'm guessing the fretboard would be an unattractive option considering the neck is already feeling unwieldy.

In the end though, it looks great and came together really well. Pickguard notwithstanding. :smug:
 
I followed your other build threads but, somehow, I completely missed this one until last week and just read through the whole thing over the past couple of days - and I’m really glad I found it! I like following your problem-solving and your builds look great.

Here’s another potential solution to the string height problem, although it’s a lot more work than just countersinking the bridge:

I was recently reading @Bruce Johnson’s thread about his fretboard radius jig and he mentions that his fingerboards are tapered; They’re thicker at the heel end.
Now, pulling the frets you just put in and then sanding the board so that it’s thinner at the nut would be a lot of work and a real drag but the taper would give you roughly the same effect as tilting the neck back by the same amount. If you refretted with tall frets you could carry the same idea even further by adding just a tiny bit more taper in the fret height. While removing such a small amount of material from the nut end of the neck might seem insubstantial, it would actually make a pretty noticeable difference at the bridge. Probably just about the equivalent of a matchbook cover shim in a Fender neck. At the bridge saddles, that buys you a lot.

Obviously, it would be a real nuisance but it also might be a graceful solution that also might make the neck more comfortable.
 
I followed your other build threads but, somehow, I completely missed this one until last week and just read through the whole thing over the past couple of days - and I’m really glad I found it! I like following your problem-solving and your builds look great.

Here’s another potential solution to the string height problem, although it’s a lot more work than just countersinking the bridge:

I was recently reading @Bruce Johnson’s thread about his fretboard radius jig and he mentions that his fingerboards are tapered; They’re thicker at the heel end.
Now, pulling the frets you just put in and then sanding the board so that it’s thinner at the nut would be a lot of work and a real drag but the taper would give you roughly the same effect as tilting the neck back by the same amount. If you refretted with tall frets you could carry the same idea even further by adding just a tiny bit more taper in the fret height. While removing such a small amount of material from the nut end of the neck might seem insubstantial, it would actually make a pretty noticeable difference at the bridge. Probably just about the equivalent of a matchbook cover shim in a Fender neck. At the bridge saddles, that buys you a lot.

Obviously, it would be a real nuisance but it also might be a graceful solution that also might make the neck more comfortable.
That is a really clever idea, what a great thought! You are absolutely right, that would maintain the 1/2” rise and thin the neck towards the headstock. It probably wouldn’t take all that much, assuming it works like lowering an acoustic bridge saddle. In that case, losing 1/8” at the nut should save me 1/16” at the 12th fret, putting me at 1/32” over the fret. That’s lower than I would go, but would ensure the option of adjustment as the bass settles in. Awesome idea!

I will have to give that some real thought. If everything were still square I think this would be an easy decision. With everything already radiused it seems like it would be a bit more complicated to do evenly. Thank you for passing the idea along!

I took the bass to softball the last few days and have been carving away, the neck is definitely better than it was. The tuning has been great, neck isn’t budging even though I removed quite a bit of material.
 
…losing 1/8” at the nut should save me 1/16” at the 12th fret, putting me at 1/32” over the fret.
Yeah, I was thinking about it some more after I posted; I was imagining taking off 3/32 at the nut - a number I just pulled out of a hat as it seemed like you wouldn’t likely blow past your dot marker with that amount. You could estimate the effect it would have on your saddles by laying a straightedge on top of one of the middle strings and then raising it 3/32” above the string at the last fret. However much higher the straightedge is at the saddle is how much height you would gain. I’m guessing it would be in the neighborhood of just over 1/8”. That’s about the same gain you’d get from a matchbook shim in a Fender neck pocket, I think. Maybe a touch more. That should be plenty.

Getting the taper straight and even now that the body wings are glued on, well, that’s going to be tricky, isn’t it?!? Your best bet is probably just a good old sanding beam but it will be hard to make sure you don’t remove any material from the heel end. Maybe a router planing jig would make better sense…. Run the taper down the center with the router, blend into the radius with a hand plane and then smooth with a radius block. Jeez…. when I type it out it starts to sound like work! :nailbiting:

