• TalkBass has been independent since 1998. Add your voice.
    Create a free account to reply to discussions, view embedded media, and browse with fewer display ads.
    Join freeLog in
    Want zero display ads or expanded classifieds tools? Compare plans.

How do you carve your contours?

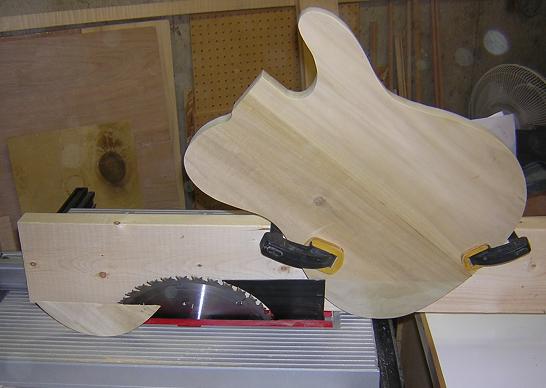
Once I did a forearm contour with my table saw blade set for a bevel cut.
11-DropTopCutCompleted.jpg


Pros: Very fast. No sweat. Hardly any sanding. With my saw's dust collection there was hardly any cleanup.
Cons: The bevel was completely flat, which I discovered is a bit unnatural looking. When I carve them by hand they have a bit of a convex shape which I learned is more appealing to the eye.

So despite the pros outweighing the cons numerically, I've gone back to slower more labor intensive method because I much prefer the way it looks.
 
Once I did a forearm contour with my table saw blade set for a bevel cut.

View attachment 2998350

Pros: Very fast. No sweat. Hardly any sanding. With my saw's dust collection there was hardly any cleanup.
Cons: The bevel was completely flat, which I discovered is a bit unnatural looking. When I carve them by hand they have a bit of a convex shape which I learned is more appealing to the eye.

So despite the pros outweighing the cons numerically, I've gone back to slower more labor intensive method because I much prefer the way it looks.

This is really good to know. Although I never had any intention of using a table saw to make my contours, they were going to be relatively flat. I can picture what you're talking about. Keeping a convex curve to them sounds like a better option
 
The contours that I am planning can be seen in this render of my design. the forearm contour following the shape of the outline with a fairly well defined line of where it starts on the body, but rounded off on the outer edge. There is also another contour on the bottom. I think I'll work it by hand for this one. Rasps and sanding blocks (and an orbital sander) might be a bit easier to control for a first try than power tools where I could accidentally take off too much material


Render silver redgum pickguard BODY.jpg
 
For body contours like that, my buddy Mike Lipe freehands the cuts on the bandsaw, holding the body up on edge tilted and following rough pencil lines. Then he shapes it out with a rasp and sanding blocks. The technique is a little risky, but it works. He's been doing it that way for about 40 years (!). I still prefer the angle grinder.
 
The only machines I use for 'contouring' is a spindle sander for the sides once I cut out the form and a router for round-overing the edges. To get my deep contoured bevels I cut base lines with a saw as shown to give me a flat stop guide and a rasp, files and sanding blocks from there.

fullsizeoutput_583.jpeg

I did use a big (stationary) industrial disc sander for the flat elbow bevel.
fullsizeoutput_f56.jpeg
 
The only machines I use for 'contouring' is a spindle sander for the sides once I cut out the form and a router for round-overing the edges. To get my deep contoured bevels I cut base lines with a saw as shown to give me a flat stop guide and a rasp, files and sanding blocks from there.

View attachment 2998551
Hmmm.

When I have lines like that (or I might add a few more to increase the ease/certainty) I just break out the wood between them to begin with. If they are close enough a screwdriver will do. Otherwise (and for cleanup) a chisel is useful, but you have to watch the grain direction when chiseling off chunks, which is one reason to cut a few more lines if doing it this way.
 
Hmmm.

When I have lines like that (or I might add a few more to increase the ease/certainty) I just break out the wood between them to begin with. If they are close enough a screwdriver will do. Otherwise (and for cleanup) a chisel is useful, but you have to watch the grain direction when chiseling off chunks, which is one reason to cut a few more lines if doing it this way.

It's not like I "break the wood" between the lines - the lines set a "stop here" point for rasping. (I enjoy the physical experience of sculpting by hand) The more lines the merrier, but these were sufficient for defining the level to stop. Once the lines disappear - you're at the point you want to file/sand.
 
It's not like I "break the wood" between the lines - the lines set a "stop here" point for rasping. (I enjoy the physical experience of sculpting by hand) The more lines the merrier, but these were sufficient for defining the level to stop. Once the lines disappear - you're at the point you want to file/sand.
It simply reminded me of what I do when defining a waste area with a saw - you don't need to do it my way, I simply share that in my way, I do break out the bulk (generally making closer cuts to make it easier/less risky), and then "here we are, lets shape" if there's further shaping to be done. It's also how I do the cutouts in lap joints, for instance.
 
  • Like
Reactions: JIO
It simply reminded me of what I do when defining a waste area with a saw - you don't need to do it my way, I simply share that in my way, I do break out the bulk (generally making closer cuts to make it easier/less risky), and then "here we are, lets shape" if there's further shaping to be done. It's also how I do the cutouts in lap joints, for instance.

I hear you - sorry if I came off as defensive which was not my intention. Just relating my chosen method, as you described yours. :thumbsup:
 
I always do shaping by hand, because it's my favorite part, and I'm not good with angle grinders.

I start with the big fat rasp:
fddcba14.jpg


It removes material faster than anything else I have (including the Shinto, which I rather hate). An angle grinder could do it faster, but I'm not good with those, so I don't use them. I use the rough side of the big rasp (shown), to get within a couple millimeters, then use the finer side, and those two smaller rasps, to get to my line.

6fcaf105.jpg


Once I'm approximately there, I get out my scrapers. I use these three the most:
49cc1167.jpg

The more acute concave one I use for scraping the neck. Scrapers leave a really nice surface. It's much nicer and much quicker than sanding, mostly because you don't have to go through all the grits. They use a shearing action rather than an abrasive action.


They also have the advantage of being able to extract Padauk dust from Ash pores, like so:
5f023056.jpg

(Compare with the first and second pictures.)
 
I'm a big fan of the Shinto saw rasps. I like the fact that it can cut aggressively, or so fine that it leaves a surface you almost don't have to sand - once you get used to it at least, there's a bit of a learning curve in getting the smoothest cuts. Sometimes if I'm working on a piece of highly figured wood and need to plane an edge true or otherwise flatten or true a small surface, I'll use the rasp instead of a plane to reduce the chance of tearout. I feel like I have better control over that with the saw rasp.

As much as I like them, I wish they'd make them as inserts to go in a more conventional rasp handle, I don't really like the configuration of the handles they sell. And I wish they'd come up with a way to make one in a narrow round shape, so they could take the place of aggressive half round files.
 
I just got the farrier rasp in the mail yesterday, I just tried it on a scrap, but it seems to work very well. The rough side takes off massive quantities of wood fast, the less rough side does a nice job of smoothing things out. It's got a rubber covering on both end, which is an improvement over the Shinto. On the negative side, it's heavy!
 
  • Like
Reactions: HaMMerHeD