• TalkBass has been independent since 1998. Add your voice.
    Create a free account to reply to discussions, view embedded media, and browse with fewer display ads.
    Join freeLog in
    Want zero display ads or expanded classifieds tools? Compare plans.

How to ground to shielding?? Need advice.

I am building a bass. The body is a fender select active jazz. I believe it has conductive paint already shielding the cavity. It will get Nordstrand single coils and a Nordstrand 3B-4a preamp. My question is this - How do I connect the ground from each pickup, the bridge, and the jack to the shielding? Attached is a picture of the body I will be using. On my custom shop jazz it has a "ground lug" also pictured. I've searched for ground lug parts and found nothing, is there a different name for the grounding lug in my custom shop (picture attached). Is it as simple as running a screw and a terminal or ground lug through the side of the cavity and then soldering the wires to the terminal? If anyone actually has an active select jazz bass and can show me what the inside of the cavity looks like that would be awesome as well.

Thanks for the input guys, I have built 3 basses and I understand how to wire them, I'm just not sure how to ground this one....
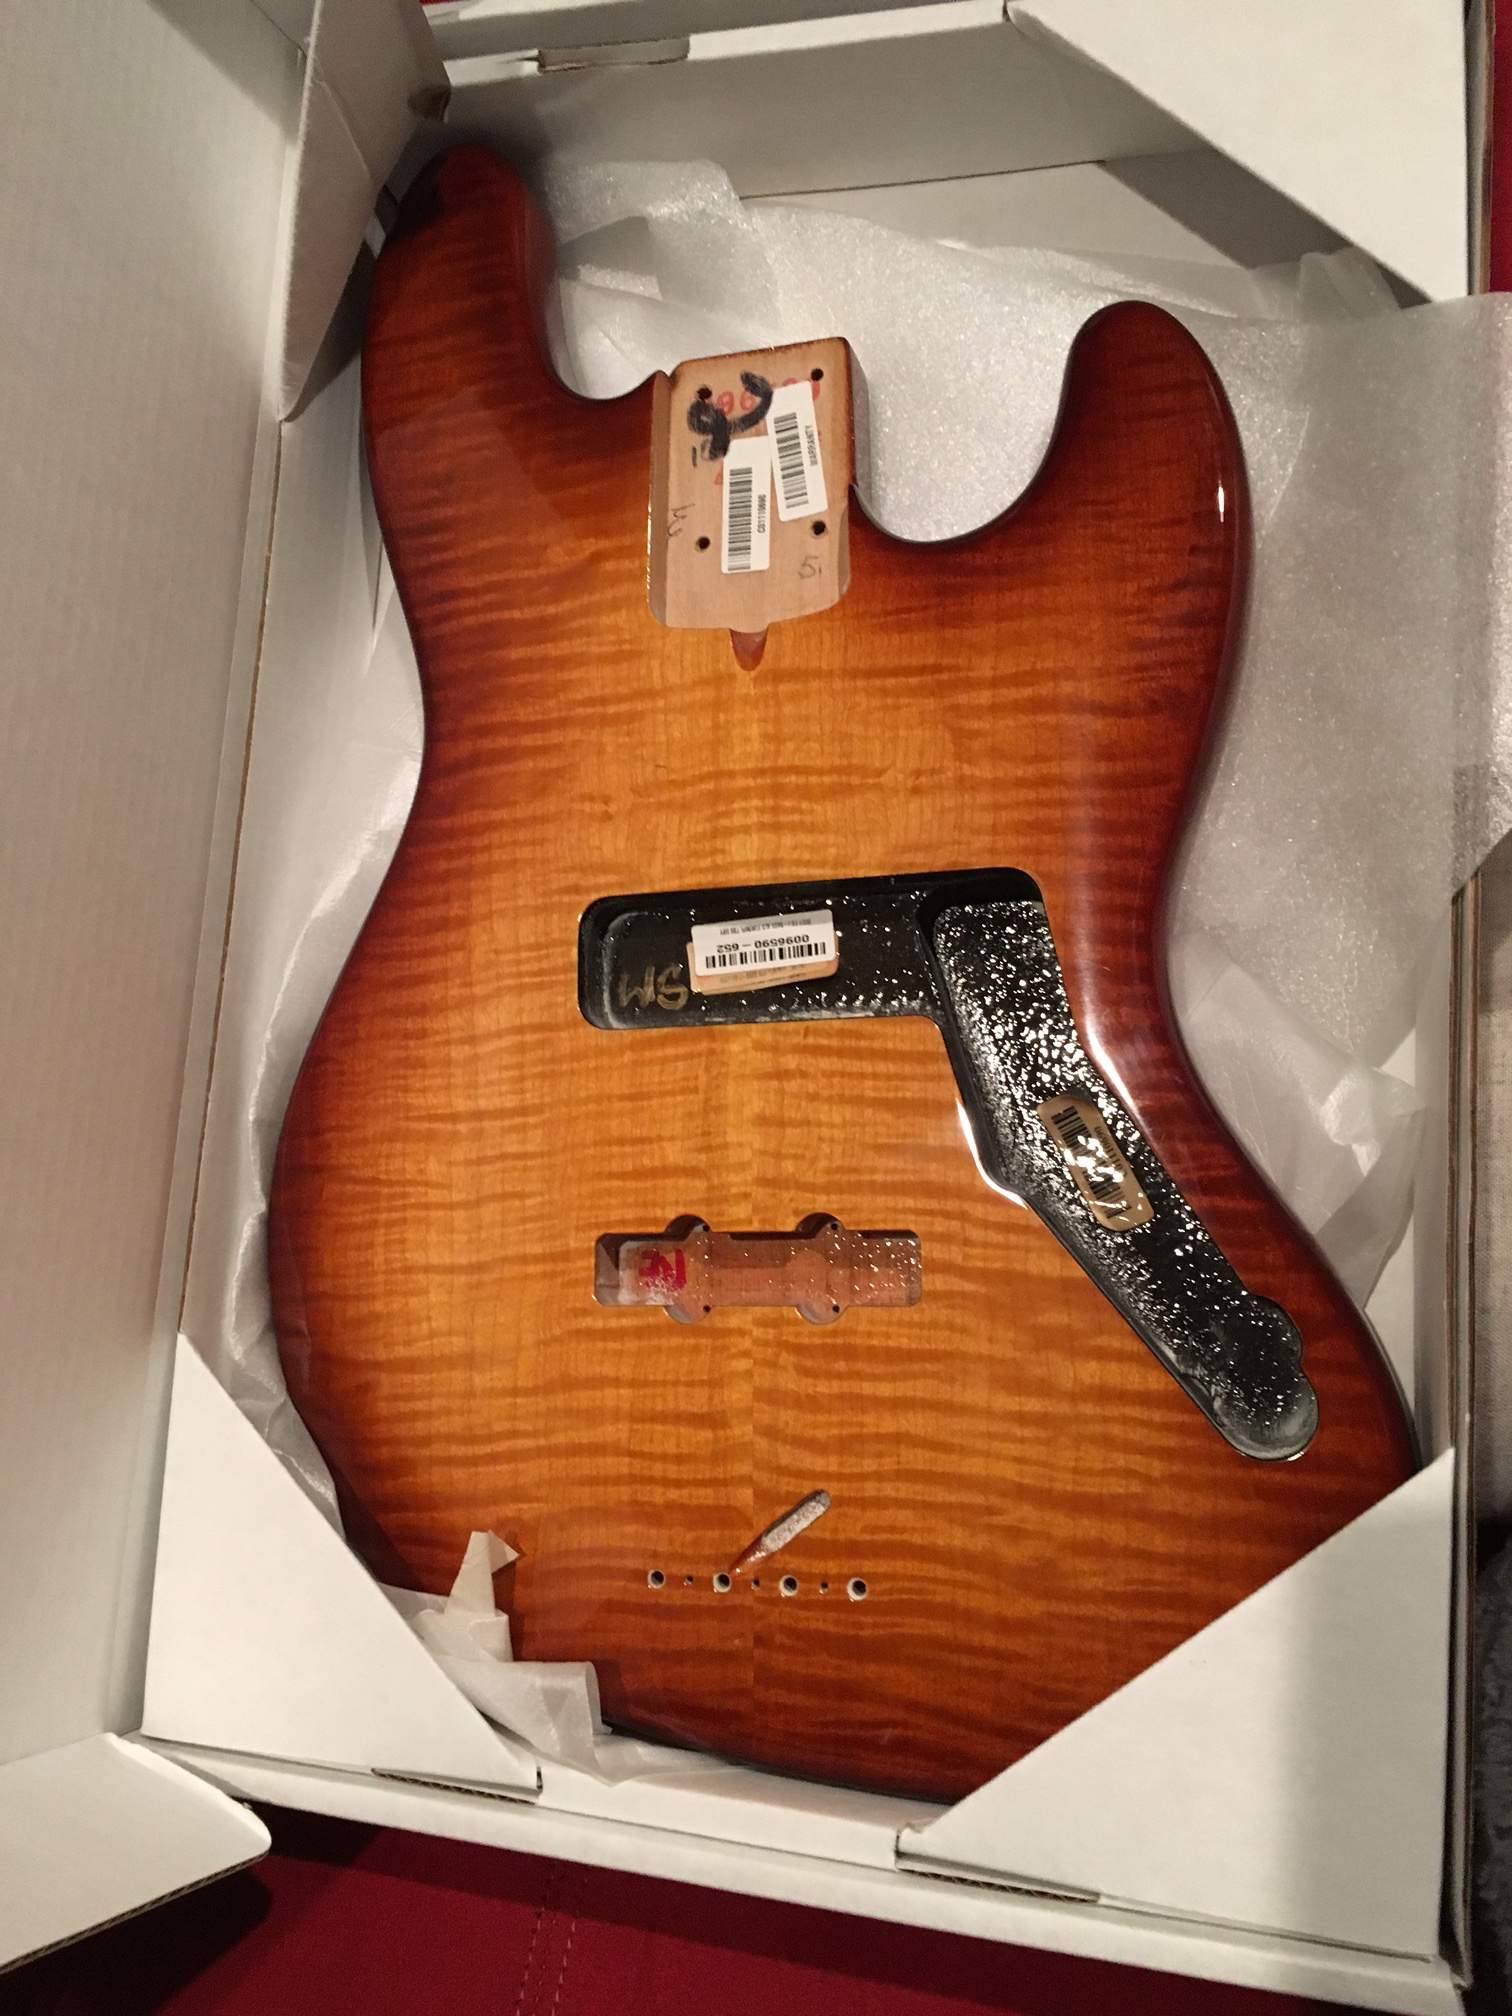
Fender Select body.jpg
Custom shop ground lug.jpg
 
Search for "crimp ring terminals", they come in various sizes. I wouldn't trust the factory shielding, adhesive copper tape is better if you want to do your own shielding.

EDIT: Yes, it is that simple because all the cavity is painted with the conductive paint so it is grounded. Of course the output jack ground lug cable must be in contact with the paint.

double-crimp-reich-560px.jpg
 
Last edited:
keep in mind most instrument wiring is 20-22 ga wire, i would try to use one connector for several wires and use a crimp connector sized for 18ga.

edit: "I" would also use non insulated connectors, and just solder the wires to the connector anyway.
 
While you are at it, shield the bridge pickup route and the channel for the wires that goes to the control cavity. Test for conductivity between the bridge pickup cavity and the control cavity. Add a strip of copper tape from the control cavity that overlaps the top of the body a bit so that the shielding on the control cover makes contact with the copper strip.
 
  • Like
Reactions: DavC
Do you have a mutlimeter? I would double check that cavity for contunuity. While it is hooked up like it is conductive paint I have never seen conductive paint under a gloss coat.

I would also suggest finishing the shielding job before re-assembly. Everything I know on the subject can be read in my signature but there is already great advice in this thread.
 
Do you have a mutlimeter? I would double check that cavity for contunuity. While it is hooked up like it is conductive paint I have never seen conductive paint under a gloss coat.

I would also suggest finishing the shielding job before re-assembly. Everything I know on the subject can be read in my signature but there is already great advice in this thread.

I doubly advise to check the paint with an Ohmmeter. Fender is notorious for shield paint that doesn't work or only half works. Stick two probes into the paint or from your grounding screw (with terminals and star washer) to elsewhere on the paint. Ohms should be relatively low like under hundreds of ohms. An "open" reading or high Ohms (in the thousands of Ohms) indicates that it may just be plain old black paint and not shielding at all.

And yes it is as simple as running a screw through a ground lug through the paint and into the wood. However as others have noted it is best if the lug has "teeth" rather than smooth.
ground_lug.gif
 
I doubly advise to check the paint with an Ohmmeter. Fender is notorious for shield paint that doesn't work or only half works. Stick two probes into the paint or from your grounding screw (with terminals and star washer) to elsewhere on the paint. Ohms should be relatively low like under hundreds of ohms. An "open" reading or high Ohms (in the thousands of Ohms) indicates that it may just be plain old black paint and not shielding at all.

And yes it is as simple as running a screw through a ground lug through the paint and into the wood. However as others have noted it is best if the lug has "teeth" rather than smooth.
ground_lug.gif
I'd shoot for ohms less than 5.
In short distances, 90 ohms could mean a poor connection somewhere.
 
  • Like
Reactions: bassbenj
That doesn't look like shielding paint. Shielding paint has a matte finish. I would assume that it is not shielded and do a complete shielding on it if it were me.

In addition I normally ground all the cavities to eachother. I use shielding paint then put a small strip of copper tape in each cavity. Then solder a wire from each cavity onto the tape strips. Might be overkill as I run strips of copper foil tape up so it makes contact with the pickguard or control cavity as well.
 
  • Like
Reactions: BlueTalon
For my (factory unshielded) Jazz, I made a ground bus from 10 gauge solid copper household wire. I soldered it to the pots, soldered every wire to it, and then soldered a wire to copper foil in the cavities.

Then I ran a bit of brass tube between the bridge pup rout and the control cavity, and soldered or at either end.

I went kinda nuts, but as long as I had it in pieces...
 
Maybe it's overkill, but I use the old foil tape. I make sure the positive leads are intact, then cover everything else in a shroud of foil. This not only helps shield interference, but as it is a common ground, the exact point of contact for the bridge (or other ground wires) isn't specific. It does cut down on hum quite a bit. Not too much of a headache if you need to replace a pot or a switch, either. Hope this helps.
 
Not as elegant as a lug, but sometimes I have used copper tape (only if the shielding is done with copper also). In that case I would strip a few inches and tape it down with an overlapping piece of shielding tape. It's not going anywhere if you strip off and attach a long enough piece.

I have done this as well. You do not have to use copper shielding to achieve that trick but you do need to use conductive adhesive copper tape. I would probably just solder a wire right onto the copper tape if the shielding was done with tape but either method performs just as well.

@jamro217 do you mean aluminum foil? That is actually the worst material for the job, by far. It is only marginally cheaper than getting copper tape from China too. I have worked extensively with aluminum and copper tape as well as conductive paint. I prefer paint but I use copper tape in all my jobs as well.
 
That doesn't look like shielding paint. Shielding paint has a matte finish.
I think the clear coat is sprayed on after the shielding paint has been applied, so the shielding paint gets clear-coated too. I can't see any good reason to do it this way, but I guess it makes sense on the Fender assembly line.
 
It is clear coat over shielding paint and in this case you would have to scratch the area in the ground lug and on the top of the control cavity.
It is amazing how a company like Fender fails to the deal with the issue of shielding with a sound solution.
 

Latest posts