
Enjoy the benefits of a premium membership!
Upgrade Account
-
TalkBass has been independent since 1998. Add your voice.
Create a free account to reply to discussions, view embedded media, and browse with fewer display ads.
Join free Log in
Want zero display ads or expanded classifieds tools? Compare plans.
You are using an out of date browser. It may not display this or other websites correctly.
You should upgrade or use an alternative browser.
You should upgrade or use an alternative browser.
InLace liquid inlay
- Thread starter wentworthk
- Start date
More options
Who Replied?also, I'm just going to save money on the end nippers and shipping, and get a pair for 10 bucks from a hardware store and then use my buddys bench grinder to bring the face flush.
but seriously, home run on the gauges. im doing that right now.
but seriously, home run on the gauges. im doing that right now.

Yeah, lots of tools can easily be made. 
I haven't done a fret job yet. (I will be doing soon, though). But from my research so far it seems like there are lots of ways of doing it. The tools needed doesn't have to be all that expensive for hobby use. Many of the operations can be done cheaper with standard tools and lots of patience. For professional use i guess proper tools are essential, though.
I haven't done a fret job yet. (I will be doing soon, though). But from my research so far it seems like there are lots of ways of doing it. The tools needed doesn't have to be all that expensive for hobby use. Many of the operations can be done cheaper with standard tools and lots of patience. For professional use i guess proper tools are essential, though.
Radius gauges are made for precision for a reason. If you think you can cut those out by hand at a perfect radius then you are better than most including me.
If you are just using them to get a rough idea for putting in fret wire then that's good enough (The EB3 is a 12" radius btw) but its more for fb leveling to check to see if your radius is consistent all the way down the next before fretting. They make metal ones and plastic ones with perfect edges that are smooth. the oldest trick in the book is using light and shadows to tell where inaccuracies are, hand cut piece(s) of card stock is not a good direction to go.
You will need a fret wire bender to accurately radius your wire just bending it like in the video is quite ballsy and not recommended for beginners. Fretting is not as easy as it looks. Stew mac is a great company and has an even better marketing department its easy to get carried away with the catalog in your hands, try looking at a Grizzly tool catalog... the kit from stewmac looks great, the fret sander stick I would not recommend, it presents more problems for someone getting started than it solves. You can make really accurate flat blocks out of Corian, synthetic stone material used in kitchens and bathrooms. At your local store or remodel construction job ask for some scraps the smooth surface on the top are usually leveled on huge beds and is more accurate than anything by hand. stick some 320- 220(320 for starters, 220 for aggressive removal) on it and presto a fret leveler. take a little piece 3" long for knocking down individual frets.
Fret work is very black and white its either level or its not. If the fb was prepped properly and is level then the fretwire can seat properly. Fretwire seated properly should have little to no needed removal of metal. You may need a fret slot saw btw, but measure the depth of the slot with a caliper or use a guitar string as a depth gauge. Epiphones usually have really deep slots no it will likely not be an issue.
Other things I recommend are the fb guard for polishing up frets, tape is cheaper and just as good. The little metal shields that look like double sided razors with a strip cut out of the middle are soo handy and last forever. a set of nut files since you will be lowering the overall thickness of the fretboard and this may be an assumption but using the same size fretwire, or smaller, means your nut slots needs to be addressed, same with the saddles for action, and pickup height.
When doing guitar work the goal is to be as accurate as possible, keeping things within .0005 is what you should aim for. that's five ten thousandths of an inch. being within .001 is good for a beginner. Take your time, its hard at your age i know. think about the physical part of what your doing from every angle. Can you clamp something down and make it easier to control? can you change your seating position? can you get better lighting/ controlled lighting?
When fretboard leveling with the radiused sanding block be sure to have a vacuum around for cleanup not only of the block and your work area but for removing all the dust from the slots and surface of the board BEFORE you use the gauges to check the radius. Dust left on the surface can trick the eye/ gauge when using a light source behind it. rant over
If you are just using them to get a rough idea for putting in fret wire then that's good enough (The EB3 is a 12" radius btw) but its more for fb leveling to check to see if your radius is consistent all the way down the next before fretting. They make metal ones and plastic ones with perfect edges that are smooth. the oldest trick in the book is using light and shadows to tell where inaccuracies are, hand cut piece(s) of card stock is not a good direction to go.
You will need a fret wire bender to accurately radius your wire just bending it like in the video is quite ballsy and not recommended for beginners. Fretting is not as easy as it looks. Stew mac is a great company and has an even better marketing department
its easy to get carried away with the catalog in your hands, try looking at a Grizzly tool catalog... the kit from stewmac looks great, the fret sander stick I would not recommend, it presents more problems for someone getting started than it solves. You can make really accurate flat blocks out of Corian, synthetic stone material used in kitchens and bathrooms. At your local store or remodel construction job ask for some scraps the smooth surface on the top are usually leveled on huge beds and is more accurate than anything by hand. stick some 320- 220(320 for starters, 220 for aggressive removal) on it and presto a fret leveler. take a little piece 3" long for knocking down individual frets. Fret work is very black and white its either level or its not. If the fb was prepped properly and is level then the fretwire can seat properly. Fretwire seated properly should have little to no needed removal of metal. You may need a fret slot saw btw, but measure the depth of the slot with a caliper or use a guitar string as a depth gauge. Epiphones usually have really deep slots no it will likely not be an issue.
Other things I recommend are the fb guard for polishing up frets, tape is cheaper and just as good. The little metal shields that look like double sided razors with a strip cut out of the middle are soo handy and last forever. a set of nut files since you will be lowering the overall thickness of the fretboard and this may be an assumption but using the same size fretwire, or smaller, means your nut slots needs to be addressed, same with the saddles for action, and pickup height.
When doing guitar work the goal is to be as accurate as possible, keeping things within .0005 is what you should aim for. that's five ten thousandths of an inch. being within .001 is good for a beginner. Take your time, its hard at your age i know. think about the physical part of what your doing from every angle. Can you clamp something down and make it easier to control? can you change your seating position? can you get better lighting/ controlled lighting?
When fretboard leveling with the radiused sanding block be sure to have a vacuum around for cleanup not only of the block and your work area but for removing all the dust from the slots and surface of the board BEFORE you use the gauges to check the radius. Dust left on the surface can trick the eye/ gauge when using a light source behind it. rant over
Hapa, thanks for the advice, I'm definitley going to need it for this one.
luckily, I'm a graphic designer by trade, so it was incredibly easy for me to go into the original file for the gauges, and thin the stroke line down in the file so as to get a more accurate cutting guide.- honestly, I actually went through and double checked the calibration on it (see attached picture) sure enough, it checked out as being correct. I'v got a buddy with a laser cutting machine, I'm thinking about having him cut me some of these out of veneer...

anyways,then i just sat down and took a solid twenty minutes and cut them out painstakingly slowly.
its reading in at a 16". i used the light trick too. i found other things on line saying that it was likely a 12" as it is gibsons standard, but the 12 was definitely not sitting flush maybe becuase its an epiphone? either way, my next plan of attack is to pick up a soldering iron and some end nips and VERY carefully, and VERY slowly remove the frets.
hapa, do you have any other words of wisdom?

luckily, I'm a graphic designer by trade, so it was incredibly easy for me to go into the original file for the gauges, and thin the stroke line down in the file so as to get a more accurate cutting guide.- honestly, I actually went through and double checked the calibration on it (see attached picture) sure enough, it checked out as being correct. I'v got a buddy with a laser cutting machine, I'm thinking about having him cut me some of these out of veneer...
anyways,then i just sat down and took a solid twenty minutes and cut them out painstakingly slowly.
its reading in at a 16". i used the light trick too. i found other things on line saying that it was likely a 12" as it is gibsons standard, but the 12 was definitely not sitting flush maybe becuase its an epiphone? either way, my next plan of attack is to pick up a soldering iron and some end nips and VERY carefully, and VERY slowly remove the frets.
hapa, do you have any other words of wisdom?
LOL, you never said you have access to a laser table...that's kinda awesome. If you can have them laser cut them give him the file, buy some 1/4 acrylic and that's pretty much what you are buying from stew mac. Specs are what it's supposed to be... What actually comes off the line is a whole other story. less radius means less time sanding that in fewer passes of the cnc route etc = cheaper price. Go with 16" then, its more a matter for your preference at this point. Check that radius all the way up the neck. The light trick is really much more effective without frets, you want your eye to be at a low enough angle to catch all light making its way through.
When pulling frets go very slowly, give a little wiggle, Never pull up, and go Slow. Granted the glue may have been disintegrated, using solder with the iron is a trick Carey Nordstrand taught me. bead a small (4-5 dots of solder) amount on the fretwire and the heat transfer is tremendously more effective than a round tip on a round fret. Bead it on the fret then one hand on the iron careful not to burn the board the other hand firmly squeezing the frets out. If they used super glue or similar you will actually see the glue fumes sometimes it causes a little hazing, that's ok since your leveling the FB afterwards. remove the last fret 21st? and take a picture of how you did and the depth of the slot and I can guide you from there. If you have an old xacto blade you can destroy - grind a hook into the back of the blade to use as a fret slot scraper to get the gunk out and likely pop out the slot filler to get a more accurate analysis of slot depth. The xacto blades are nearly perfect for fret slots, do not use the edged side. The risk of cutting deeper or removing wood from the sides of the slot is too high in your situation.
Oh and one more thing go slow, you will not have any chip out. And if you have some its going to be knocked down a bit later in FB leveling.
Go slow
When pulling frets go very slowly, give a little wiggle, Never pull up, and go Slow. Granted the glue may have been disintegrated, using solder with the iron is a trick Carey Nordstrand taught me. bead a small (4-5 dots of solder) amount on the fretwire and the heat transfer is tremendously more effective than a round tip on a round fret. Bead it on the fret then one hand on the iron careful not to burn the board the other hand firmly squeezing the frets out. If they used super glue or similar you will actually see the glue fumes sometimes it causes a little hazing, that's ok since your leveling the FB afterwards. remove the last fret 21st? and take a picture of how you did and the depth of the slot and I can guide you from there. If you have an old xacto blade you can destroy - grind a hook into the back of the blade to use as a fret slot scraper to get the gunk out and likely pop out the slot filler to get a more accurate analysis of slot depth. The xacto blades are nearly perfect for fret slots, do not use the edged side. The risk of cutting deeper or removing wood from the sides of the slot is too high in your situation.
Oh and one more thing go slow, you will not have any chip out. And if you have some its going to be knocked down a bit later in FB leveling.
Go slow
ok Hapa, 21st got the fret wire out, I'm considering just going down and pulling the rest. looks like I've really got the work cut out for me as I've got binding running down both sides.
is binding easy to replace? I think I'd like to go white if I can. how do you get it off? thats one I'm definitley not going near until further research...
that soldering iron trick worked like a charm!
went to the hardware store and got a pair of end nippers and talked them into letting me use their bench grinder to grind the face down flush. they worked really well.
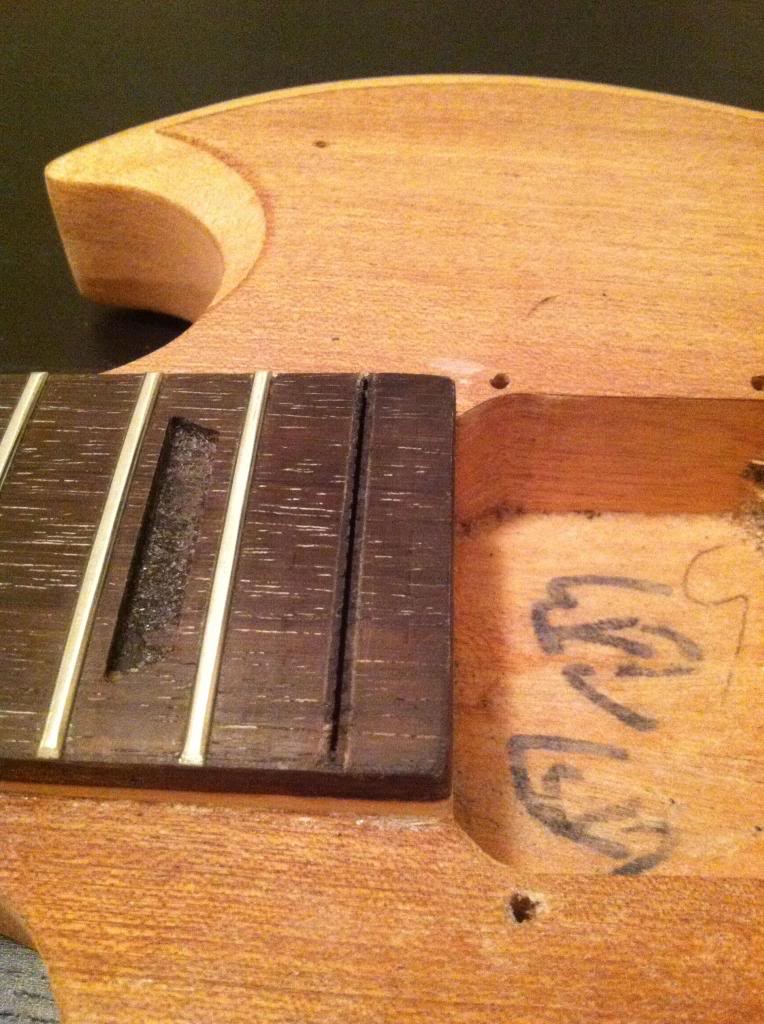
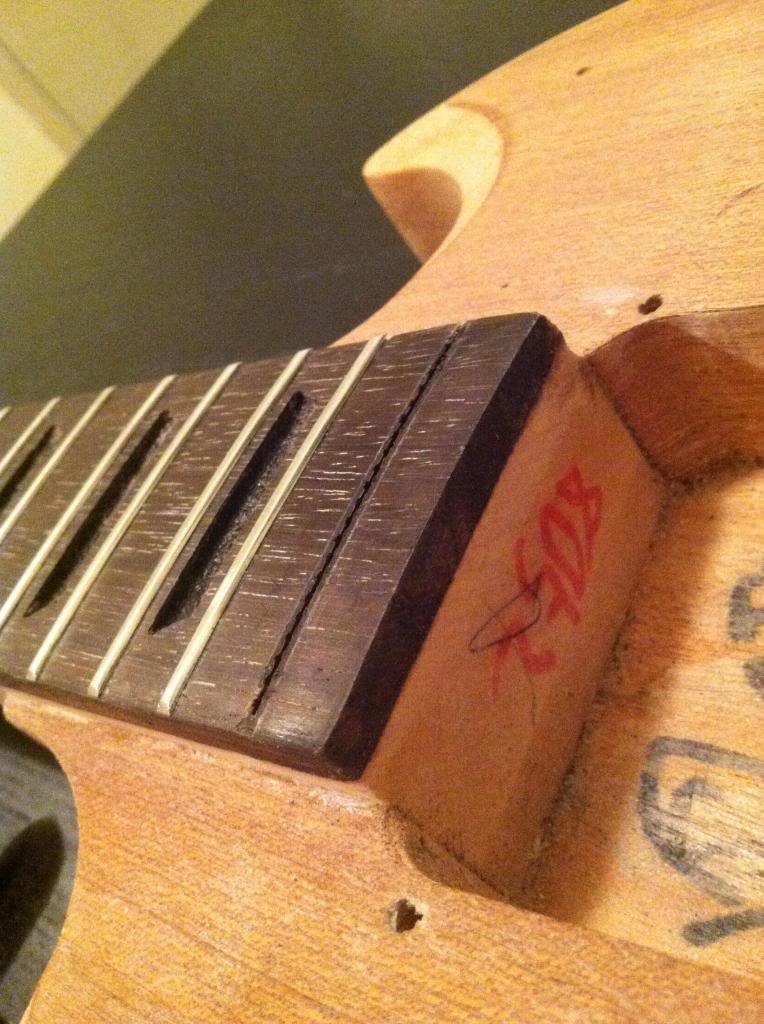

is binding easy to replace? I think I'd like to go white if I can. how do you get it off? thats one I'm definitley not going near until further research...
that soldering iron trick worked like a charm!
went to the hardware store and got a pair of end nippers and talked them into letting me use their bench grinder to grind the face down flush. they worked really well.
That is really not a bad job pulling your first fret...I fell like i should buy you a beer or something.
Go ahead with the rest exactly like you did that one. Confidence is good but don't get cocky since you got the first one out nicely and take your time.
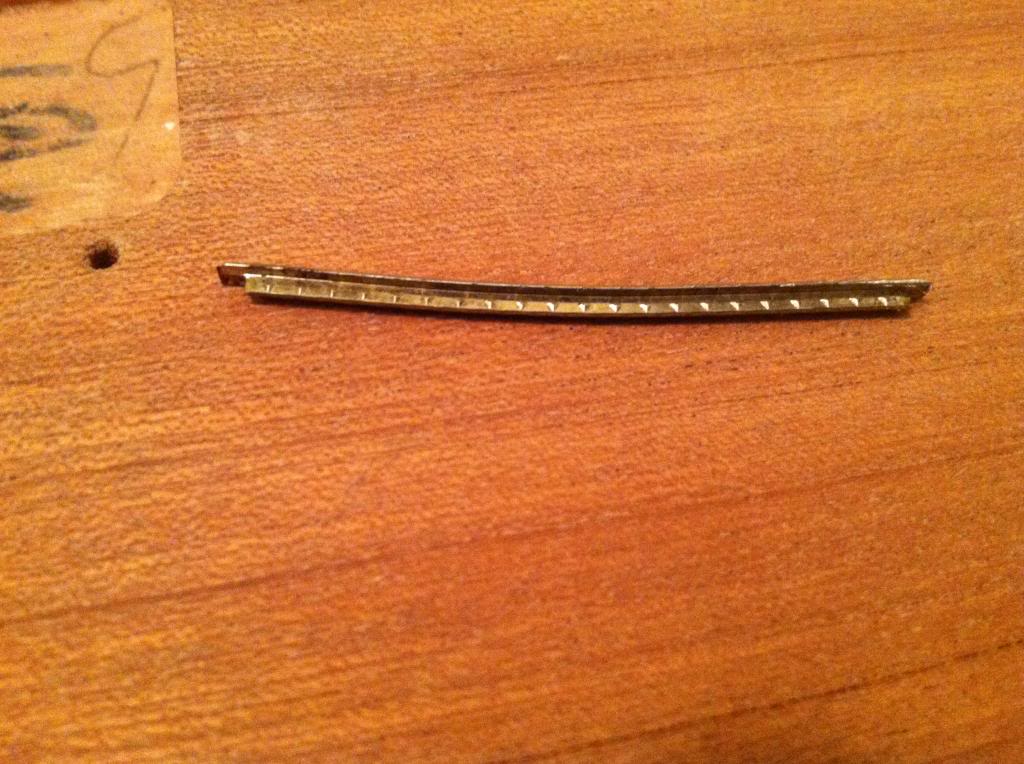
Binding...SOB. No it is not easy to replace and look good, frankly Im surprised that the binding didn't melt with the solvent. Forgive me for my arrogance but are you sure its binding? it could be a bunch of filler, but i kinda see a line in the picture. You will need to clip the tang (new quote) before refretting that Stew mac video showed a good demo. Its just an extra step that can give you problems fretting for your first time, with raised fret ends. Its easier to hammer the fret out of shape/radius.
Go ahead with the rest exactly like you did that one. Confidence is good but don't get cocky since you got the first one out nicely and take your time.
Binding...SOB. No it is not easy to replace and look good, frankly Im surprised that the binding didn't melt with the solvent. Forgive me for my arrogance but are you sure its binding? it could be a bunch of filler, but i kinda see a line in the picture. You will need to clip the tang (new quote) before refretting that Stew mac video showed a good demo. Its just an extra step that can give you problems fretting for your first time, with raised fret ends. Its easier to hammer the fret out of shape/radius.
So I pulled them all out last night, I just sat for two hours and walked them all out super slowly - had a little whiskey, listened to a little sabbath - and didn't get any chip out!
To the bass' defense, I don't think there was any glue in there...at all
I'm pretty sure it is binding, it runs the length on both sides, It looks to be wood, I'll try and get a better picture.
How do you get it off?
To the bass' defense, I don't think there was any glue in there...at all
I'm pretty sure it is binding, it runs the length on both sides, It looks to be wood, I'll try and get a better picture.
How do you get it off?
Ahhh!!! do not, take it off. Wood binding is not likely, I can almost guarantee that its plastic. Based on the 3rd pic in post #27 there is a lot of filler crammed into those slot ends. Manufacturers will clip the frets short like that with a machine so the tang doesn't come out the side of the slot if/when the wood dries out from when it was made. Having just the crown of the fret hanging over is then also easier to file flush with the neck with less material...and why the cheap guitars that have fret sprout can cut your hands up out of the box. like 2mm beveled edged razors at every fret.
If your telling me there is binding Oi...Can of worms. humor me and see if any/all of the slot filler can be pushed out with the back of a razor blade/ scraper. They must have epoxied that binding on and its not normal binding material. "Normal" binding material melts down with acetone and glues, specifically Duco cement is what I know. It acts as a solvent as mushes up the binding material so when using a non stretch tape (binding tape) and taping the glue up down the plastic fills any gap/ imperfections in the wood. also one can cut the binding up into little pieces in a small cup of acetone and duco cement to make a binding goo/ filler for any mishaps during the install or joining two pieces of binding invisibly. Again this is intended to done when the bass is being made so the excess sanding after the bass is done is tricky. There is a little video of me on youtube when I was at Carey's old shop prepping binding under Carey's channel.
All said and done. I still do not recommend you redo the binding. just nip the tangs on the frets and you will OK. you can even buy a tool that does just that called a fret tang nipper :\ lol.
Pics please. Im into this now.
If your telling me there is binding Oi...Can of worms. humor me and see if any/all of the slot filler can be pushed out with the back of a razor blade/ scraper. They must have epoxied that binding on and its not normal binding material. "Normal" binding material melts down with acetone and glues, specifically Duco cement is what I know. It acts as a solvent as mushes up the binding material so when using a non stretch tape (binding tape) and taping the glue up down the plastic fills any gap/ imperfections in the wood. also one can cut the binding up into little pieces in a small cup of acetone and duco cement to make a binding goo/ filler for any mishaps during the install or joining two pieces of binding invisibly. Again this is intended to done when the bass is being made so the excess sanding after the bass is done is tricky. There is a little video of me on youtube when I was at Carey's old shop prepping binding under Carey's channel.
All said and done. I still do not recommend you redo the binding. just nip the tangs on the frets and you will OK. you can even buy a tool that does just that called a fret tang nipper :\ lol.
Pics please. Im into this now.
ok, sorry for going awol, I've gotten a better picture of the supposed "binding"...
at this poing, I'm realizing i've got so much more work ahead of me, what the hell, why not try and replace some binding too?!
whats the best way to get it off? re-route the whole thing? or try and pop it off? I would imagine popping it off would potentially chip the wood to which its glued...
I'm thinking this thing would look really sweet with a nice stripe of white binding around the fretboard... which means I would have to route out the end down by the pups...what the hell, i'm in it to win it now right?
the other reason I think it might be good, would be to cover up a little ding i took out of the corner of the fretboard/binding when hand sanding paint off the the tight spot on the side of the neck joint...
anyways, let me know what you think, I've got the whole thing de-fretted now, I'm going to get the rest of the holse liquid inlayed and wait for my 16" radius sanding block to get here... then sand it all flush, take it up to 1200- think i need to go finer?
then when i've got all that done, I'll give a shout regarding the actual fretting process...
I've heard stainless steel frets are nice... thoughts?
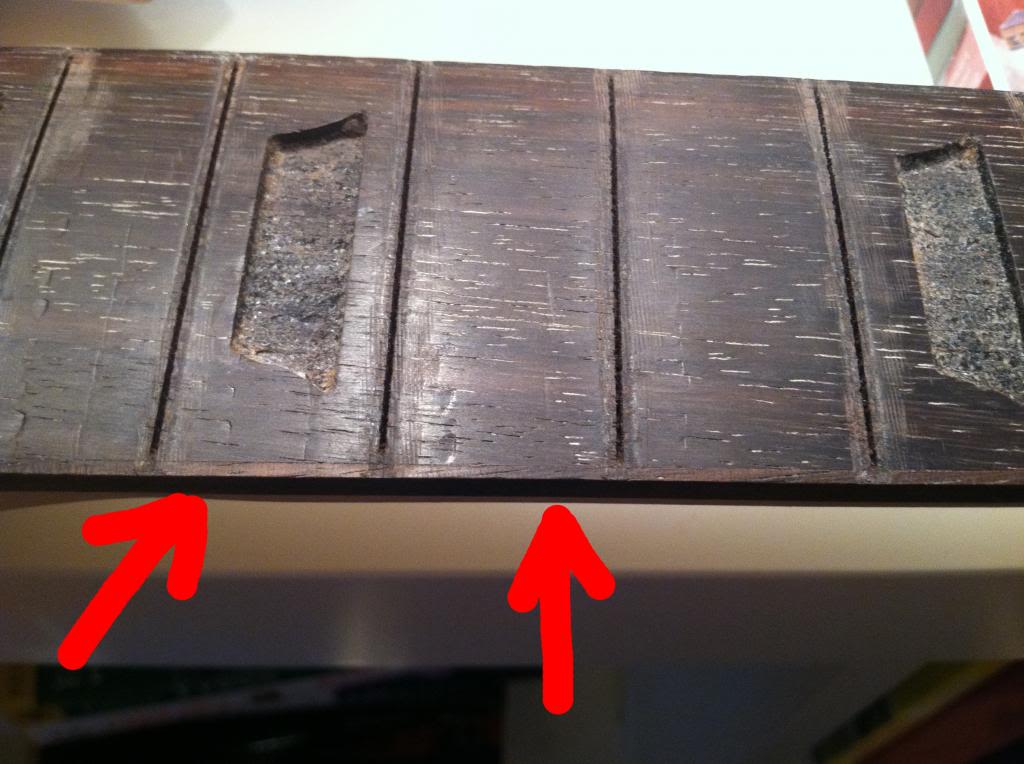
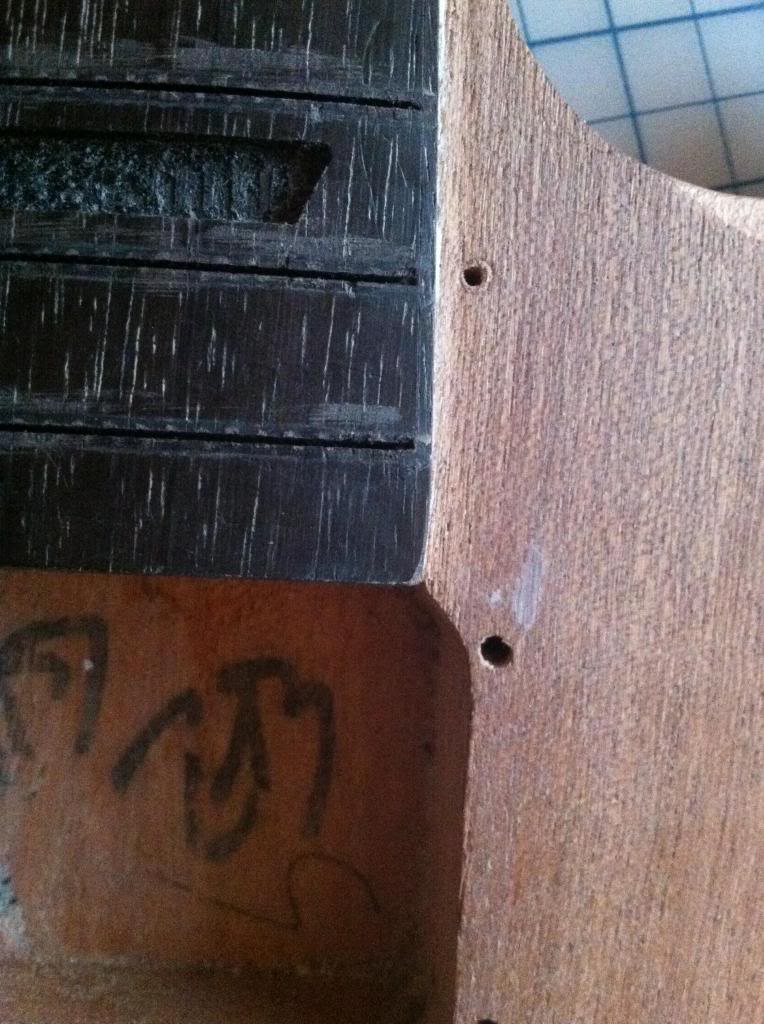
at this poing, I'm realizing i've got so much more work ahead of me, what the hell, why not try and replace some binding too?!
whats the best way to get it off? re-route the whole thing? or try and pop it off? I would imagine popping it off would potentially chip the wood to which its glued...
I'm thinking this thing would look really sweet with a nice stripe of white binding around the fretboard... which means I would have to route out the end down by the pups...what the hell, i'm in it to win it now right?
the other reason I think it might be good, would be to cover up a little ding i took out of the corner of the fretboard/binding when hand sanding paint off the the tight spot on the side of the neck joint...
anyways, let me know what you think, I've got the whole thing de-fretted now, I'm going to get the rest of the holse liquid inlayed and wait for my 16" radius sanding block to get here... then sand it all flush, take it up to 1200- think i need to go finer?
then when i've got all that done, I'll give a shout regarding the actual fretting process...
I've heard stainless steel frets are nice... thoughts?
Well, I stand corrected they did use wood binding. I wonder if they only had guitar width fingerboards and used cutoffs to make it wide enough for bass...Cool. I still do not recommend removing the binding, and re binding it with plastic. But it is a $30 bass and you seem to have the passion for it...
I actually wrote out instructions for how to do this and came to my senses. I am not going to tell you how to replace the binding. I am not calling myself a master repairman by any means but even I would be hesitant on doing that. The best way I can think of is removing the fret board with a heating block remove the binding at the same time. That is a tricky thing to do and the likely hood of you warping the fingerboard is very high if you haven't done it before. Besides that you would need a bunch of clamps, cauls, files, hand planes (or a lot of block sanding)... This is a long winded way of saying I do not recommend you doing it. If you fully realize the risk and want to do it anyway (like many of us luthiers do) I will give you the steps to get r done.
Looking at the pics you did a decent job of controlling chip out however you got a little gorilla handed with the down force of the fret puller. all those dents of from the flush cutter, good thing is that it doesn't appear that you cut any wood fibers so not only could you steam those out if you wanted to and you are going to be radiusing the fb anyway. Start with 120 grit on the block and only go to 220 then 320. For raw wood you don't want to go higher than that finish has a hard time sticking. for finish you go as high in grits you got.
You can also fix the fb edge when radius sanding the fb. Depending on how much you take off, the din will have less wood to look off. additionally you can mix the dust from the fb with high viscosity superglue shape it on the edge of the fb and re shape it kind of like wood putty but an exact match. I appreciate the attitude of intended precision. if you wanted to be super pro - use a chisel to make a flat even edge and glue/clamp a small piece of rosewood to it and shape the glued on chip to be flush with the side and top (radiused) parts of the fb. If you don't build it may be a trick to find a small piece of rosewood...especially in a matching grain and color.
When radius sanding clamp down the work piece so all you energy is going into sanding not being a human vice.
Use a straight edge to see how flat you can get you fb, by removing the truss rod tension a little bit of back bow is a good thing. Ideally you want something to support the headstock and neck so it doesn't move when sanding. When you apply force down the neck will want to give a little.
Get a with colored pencil to mark up the fingerboard to check for consistency in sanding. Literally squiggle white lines all across the board between each vacuuming.
Be sure to visually line up the block on the center line and do not go crooked with each pass. I would recommend to sand just to the 95% mark of removing the chip outs and making the fb "perfectly level".
Install the blocks knock them down as much as you can first with a flat block being careful not to sand into the fb making flat spots (undoing the work you just did). the return with the radius block until flush and getting that last 5 % with 120, do as many passes with 220 as needed to remove the 120 scratch lines then with 320.
As stated before be sure to have a vacuum handy to remove dust from the block and board. The oily nature of the rosewood will start to clump up in spots on the sand paper cause its own micro scratches and imperfections. Also for checking your self with the radius gauges constantly.
Did you use a metal file on the fret slots? perhaps to knock down the little bit of chip out you had? I see chatter lines
I actually wrote out instructions for how to do this and came to my senses. I am not going to tell you how to replace the binding. I am not calling myself a master repairman by any means but even I would be hesitant on doing that. The best way I can think of is removing the fret board with a heating block remove the binding at the same time. That is a tricky thing to do and the likely hood of you warping the fingerboard is very high if you haven't done it before. Besides that you would need a bunch of clamps, cauls, files, hand planes (or a lot of block sanding)... This is a long winded way of saying I do not recommend you doing it. If you fully realize the risk and want to do it anyway (like many of us luthiers do) I will give you the steps to get r done.
Looking at the pics you did a decent job of controlling chip out
however you got a little gorilla handed with the down force of the fret puller. all those dents of from the flush cutter, good thing is that it doesn't appear that you cut any wood fibers so not only could you steam those out if you wanted to and you are going to be radiusing the fb anyway. Start with 120 grit on the block and only go to 220 then 320. For raw wood you don't want to go higher than that finish has a hard time sticking. for finish you go as high in grits you got.You can also fix the fb edge when radius sanding the fb. Depending on how much you take off, the din will have less wood to look off. additionally you can mix the dust from the fb with high viscosity superglue shape it on the edge of the fb and re shape it kind of like wood putty but an exact match. I appreciate the attitude of intended precision. if you wanted to be super pro - use a chisel to make a flat even edge and glue/clamp a small piece of rosewood to it and shape the glued on chip to be flush with the side and top (radiused) parts of the fb. If you don't build it may be a trick to find a small piece of rosewood...especially in a matching grain and color.
When radius sanding clamp down the work piece so all you energy is going into sanding not being a human vice.
Use a straight edge to see how flat you can get you fb, by removing the truss rod tension a little bit of back bow is a good thing. Ideally you want something to support the headstock and neck so it doesn't move when sanding. When you apply force down the neck will want to give a little.
Get a with colored pencil to mark up the fingerboard to check for consistency in sanding. Literally squiggle white lines all across the board between each vacuuming.
Be sure to visually line up the block on the center line and do not go crooked with each pass. I would recommend to sand just to the 95% mark of removing the chip outs and making the fb "perfectly level".
Install the blocks knock them down as much as you can first with a flat block being careful not to sand into the fb making flat spots (undoing the work you just did). the return with the radius block until flush and getting that last 5 % with 120, do as many passes with 220 as needed to remove the 120 scratch lines then with 320.
As stated before be sure to have a vacuum handy to remove dust from the block and board. The oily nature of the rosewood will start to clump up in spots on the sand paper cause its own micro scratches and imperfections. Also for checking your self with the radius gauges constantly.
Did you use a metal file on the fret slots? perhaps to knock down the little bit of chip out you had? I see chatter lines
trying sooo hard not to have to refret... seems really difficult...
Oops.


ok Hapa, you win. you've sufficiently terrified me with the idea of steaming the fretboard off... I have no desire to take another layer of stuff off of this thing.
lets just chalk that corner sanding mishap up to the bass' character...
as for the dents from the downward force of the end nippers- I'll take full responsibility yes, but it wasnt from the downward force, it was from the rocking back and forth...
when bench ground the faces of the end nippers down, I left an angle on the outer edges (see drawing) I should have ground them all to a smooth circumference rather than just focusing on where the edges come together, any ways, those newly created outer edges dented it when rocking... hind sight's 20/20...
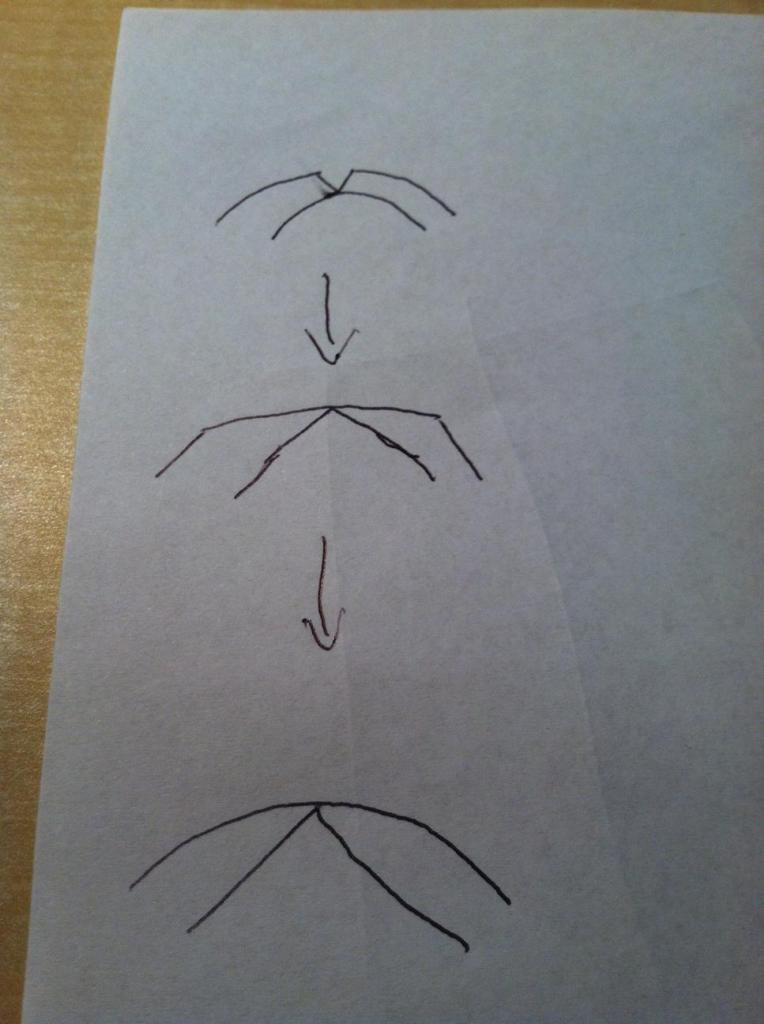
first picture is how the end nippers started, second is where i ground them to, third is where I should have/will grind them to...
and, yes, I went after the stuff that was proud around the fret notches with a file, I didn't want to be ripping out and potentially chipping out when i get after it with the radius sander....
so i'll get after it with 120 grit to start when the block gets here.
I'm planning on clear coating this whole thing when i get done, should I be clear coating the fb too? and thats why I finish with 320?
thanks again for all the help man!
lets just chalk that corner sanding mishap up to the bass' character...
as for the dents from the downward force of the end nippers- I'll take full responsibility yes, but it wasnt from the downward force, it was from the rocking back and forth...
when bench ground the faces of the end nippers down, I left an angle on the outer edges (see drawing) I should have ground them all to a smooth circumference rather than just focusing on where the edges come together, any ways, those newly created outer edges dented it when rocking... hind sight's 20/20...
first picture is how the end nippers started, second is where i ground them to, third is where I should have/will grind them to...
and, yes, I went after the stuff that was proud around the fret notches with a file, I didn't want to be ripping out and potentially chipping out when i get after it with the radius sander....
so i'll get after it with 120 grit to start when the block gets here.
I'm planning on clear coating this whole thing when i get done, should I be clear coating the fb too? and thats why I finish with 320?
thanks again for all the help man!
oh yeah, I had another question. that chemical stipper ate away at the side dots too, I've heard they're easy as hell to install, just get a size bigger than whats in there, drill it out with a drill press, dab a little super glue in there, shove it in, cut it down with a razor, and then sand it flush?
Ahh, kudos to you having the gusto to mod a tool for guitar use. perfectly logical to the dents and its strictly constructive criticism. Really its not that big of a deal knowing that you are going to be re leveling the fb. I would not put clear on the rosewood, tape it off with just a 1/16th of the edge of the fb showing.
Later you will want to do the fret end round over after rolling the edges. For the body and neck sanding to 220 is more than adequate. With 320 a better option for Nitro cellulose finish as it is less forgiving and sticks better than poly or urethane.
For the side dots measure them and I will make a hasty assumption that the stew mac plastic dots are the same size if not bigger. But avoid going bigger if you don't have too. getting all your dots to align after hand drilling them to be bigger is tough. But instal is correct. Super glue drop in stick cut about 1/8th higher tap down to ensure proper seating, let it dry sand down excess. Don't sand off the plastic when the glue is still setting you'll get sticky white crap imbedded into the fb, bits of the grit from sand... a big ol mess.
Another option if an odd size is to buy metal piping. To fit the whole. It can usually be ordered online in very gradual size increments. I bought some sterling silver tubing from a jewelry supply shop for my side dots.
Later you will want to do the fret end round over after rolling the edges. For the body and neck sanding to 220 is more than adequate. With 320 a better option for Nitro cellulose finish as it is less forgiving and sticks better than poly or urethane.
For the side dots measure them and I will make a hasty assumption that the stew mac plastic dots are the same size if not bigger. But avoid going bigger if you don't have too. getting all your dots to align after hand drilling them to be bigger is tough. But instal is correct. Super glue drop in stick cut about 1/8th higher tap down to ensure proper seating, let it dry sand down excess. Don't sand off the plastic when the glue is still setting you'll get sticky white crap imbedded into the fb, bits of the grit from sand... a big ol mess.
Another option if an odd size is to buy metal piping. To fit the whole. It can usually be ordered online in very gradual size increments. I bought some sterling silver tubing from a jewelry supply shop for my side dots.
"Later you will want to do the fret end round over after rolling the edges"
^I'm not following here, sorry.
the stew mac dots come in two different sizes, I'll measure and let you know...
I'll give a shout when sanded...
^I'm not following here, sorry.
the stew mac dots come in two different sizes, I'll measure and let you know...
I'll give a shout when sanded...
Fb level, then fretting, then flush filing, then beveling, then tape up fb with a 1/16th showing at the edge.
After finish: Fret job/ leveling, then crowning, then round over the fret ends/ dressing, then knife edging/ edge rolling. Condition with oil on the rosewood I highly recommend FeednWax. It is a blend of Lemon and mineral oil with wax particles in it so it gets into the wood and can be hand buffed with out leaving a residue.
After finish: Fret job/ leveling, then crowning, then round over the fret ends/ dressing, then knife edging/ edge rolling. Condition with oil on the rosewood I highly recommend FeednWax. It is a blend of Lemon and mineral oil with wax particles in it so it gets into the wood and can be hand buffed with out leaving a residue.

Knife edging?Fb level, then fretting, then flush filing, then beveling, then tape up fb with a 1/16th showing at the edge.
After finish: Fret job/ leveling, then crowning, then round over the fret ends/ dressing, then knife edging/ edge rolling. Condition with oil on the rosewood I highly recommend FeednWax. It is a blend of Lemon and mineral oil with wax particles in it so it gets into the wood and can be hand buffed with out leaving a residue.


