• TalkBass has been independent since 1998. Add your voice.
    Create a free account to reply to discussions, view embedded media, and browse with fewer display ads.
    Join freeLog in
    Want zero display ads or expanded classifieds tools? Compare plans.

Inside The Secret Underground Laboratory

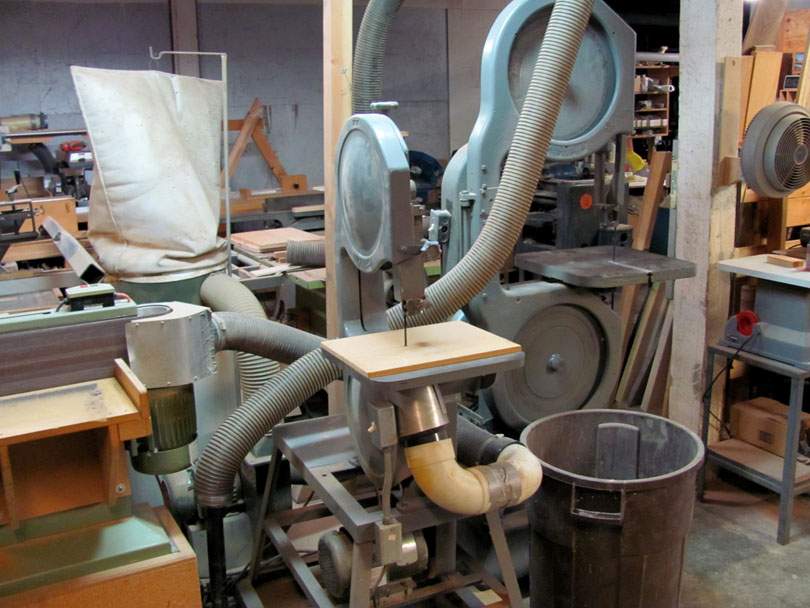
Continuing on the tour around my woodworking shop, in the center is the cluster of my big woodworking machines. These are the machines I use many times, every day. They are arranged sort of in a circle around a large Grizzly dust collector, with a large homemade selector valve and hoses connected to some of them.

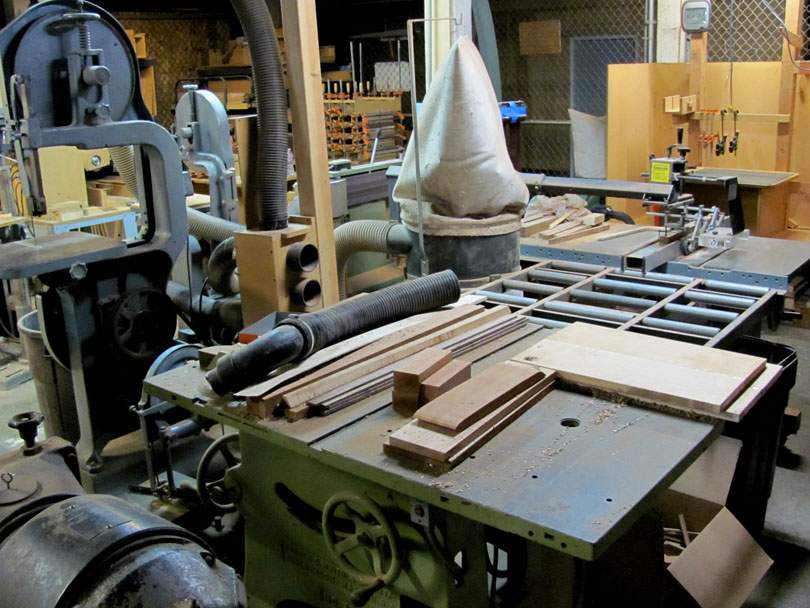
Here are my two main woodworking bandsaws. The smaller one is an early 1950's Davis & Wells 14" saw. I use this saw many times every day. I keep it set up with a 1/4" x 10tpi blade. The big one is a 1942 Davis & Wells 20" saw, which I just acquired this summer. It replaces my Grizzly 16" saw, which is now over in Keith's shop. I use the big D & W for heavy sawing of neck blanks and resawing of boards. It will resaw up to 12". I keep a 1/2" x 3tpi blade on it. These are two wonderful old machines, built to run forever. They both began cutting wood years before I was born, and I'm an old geezer! More details about them over on the bandsaw thread.
IMG_5435B.jpg


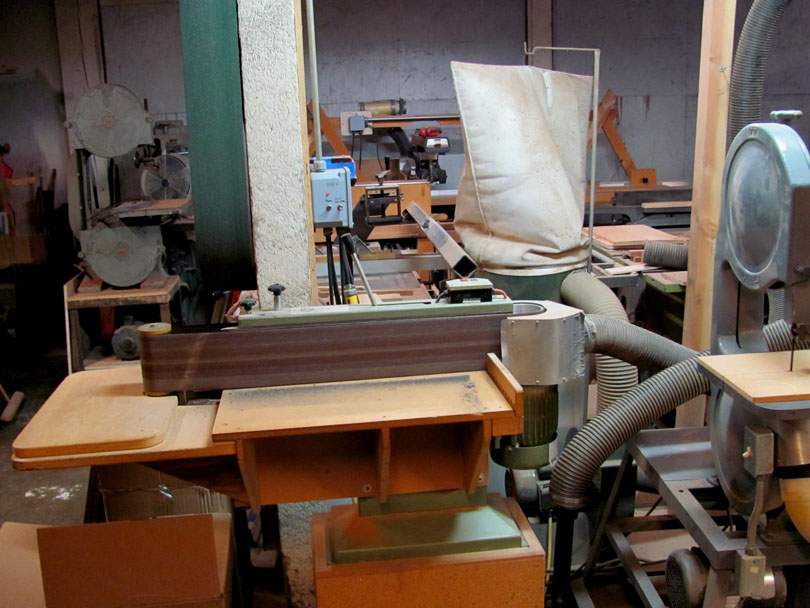
To the left is my trusty Grizzly edge sander, probably the most used machine in my shop. I bought it new in 1994, and have modified it quite a bit over the years. I made up a fixed MDF table and added parts to extend the belt length to 89". I even added a bearing under the end roller so that it can be used for pattern sanding. Behind it is the large Grizzly dust collector.
IMG_5436B.jpg


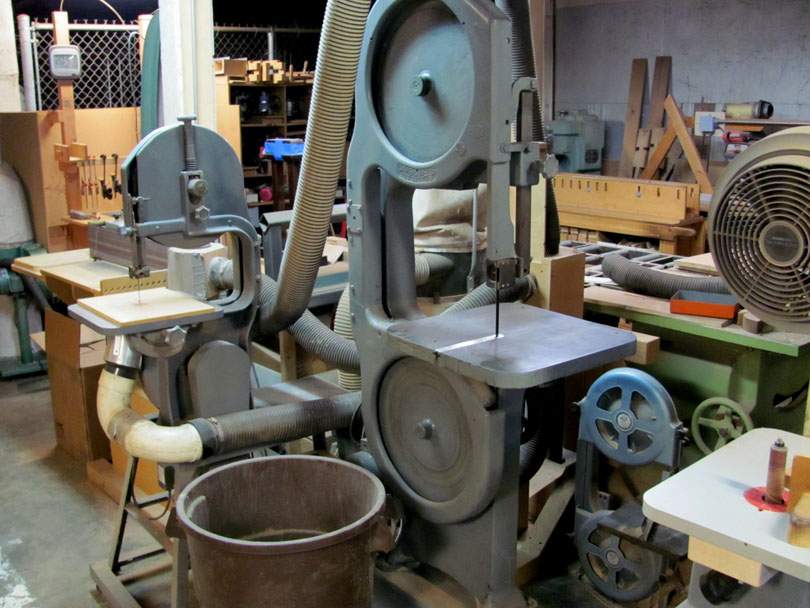
Hiding back behind the big Davis & Wells is my third woodworking bandsaw, a cute little 1938 Walker Turner Driver Line 12" saw. It's all restored and ready to run, just waiting for me to build it a custom wooden stand and motor drive. It'll be my small bandsaw, for fine detail work.

The big hose hanging down is connected to the dust collector, and is a general vacuum hose, and is for cleaning up any sawdust that the main collection hoses miss. At the right front is my Ryobi spindle sander.
IMG_5437B.jpg


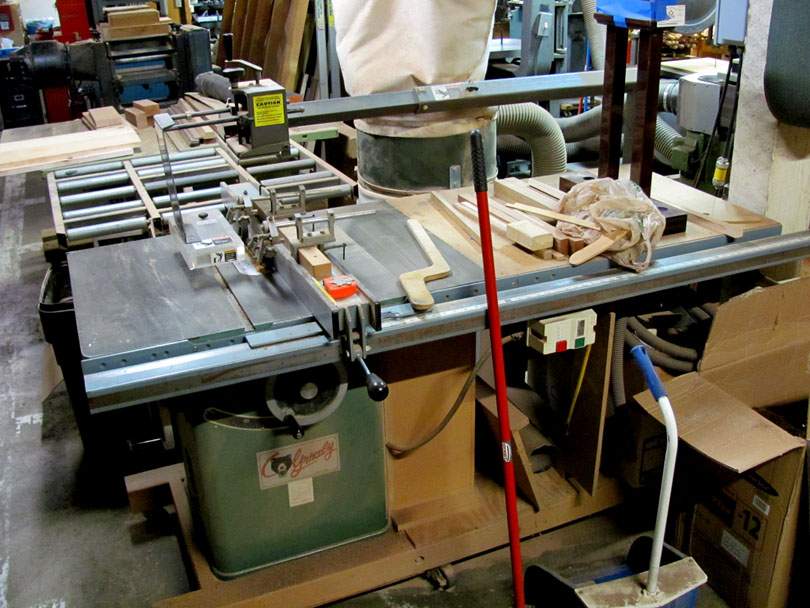
Around the front of the group is my Grizzly 10" table saw. A real workhorse. I have it fitted with a long Biesemeyer fence, an HTC overarm guard, and a rear roller table. It's a nice accurate saw, but is a little limited in horsepower for heavy ripping. So......
IMG_5438B.jpg


....Backed up against the Grizzly is the Monster Table Saw! It's 1938 Baxter D. Whitney No.66 Table Saw, a rare old machine. It weighs 2200 lbs and takes a 16" blade. Probably the heaviest table saw made in this size class. I acquired it a couple of years ago. I don't have it up and running yet, but I will someday soon. I'm setting it up specifically for heavy ripping of hardwoods. There are more pictures and story about it over on the Table Saw Safety thread.
IMG_5439B.jpg


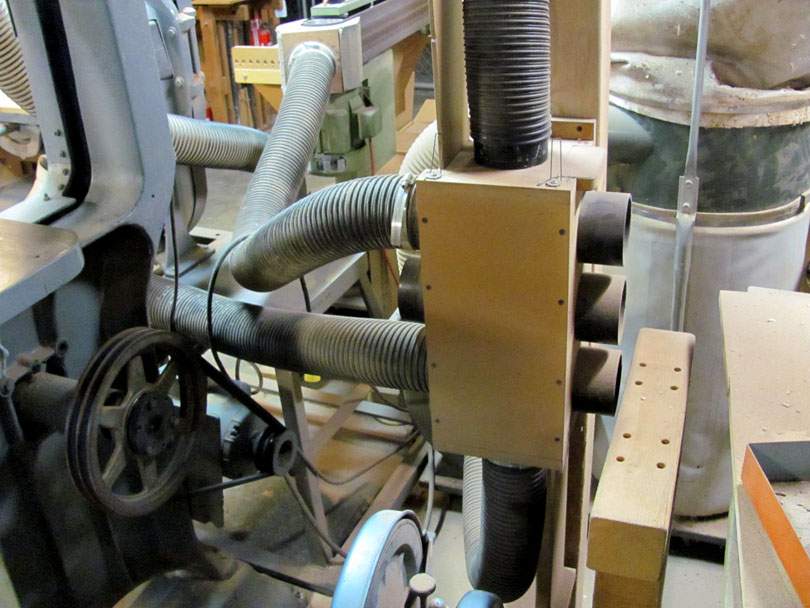
This is the selector valve for the dust collection. It's made from MDF, with two sliding triple gate valves. The bottom hose goes to the inlet of the dust collector. The upper hose goes to the overhead boom and the hanging hose for general vacuuming. The two sliding gate valves select from the six ports on the sides. Only two are connected to machines at the moment, the edge sander and the Davis & Wells 14" saw.
IMG_5442B.jpg
 
Well, hello George! I haven't heard from you in a while.

Yep, we're cozy and safe down here in the lab. It actually rained steadily all day today and is supposed to continue through tomorrow. The first real rain storm we've had since last February. I guess there are some problems with mud slides already. I'm sure the ashboarding is good up in the hills.

Come on by and visit, next time you are up in this neighborhood!
Hi Bruce, Glad to hear you're OK...I should come up for a visit, it's been way too long!
 
  • Like
Reactions: Bobo
Here are more of my woodworking machines, and the rest of the woodworking end of the shop.

Here are the two planers I use regularly. I use the Delta 12" planer for fine planing. It does a decent job, but it's light duty, and can't take off much at a time. You can see the MDF sub-table that I built for it. Much more stable than the factory sheet metal tables.

The mean-looking black machine is a 1938 Boice-Crane 1000 12" planer. Now that's a planer. It's capable of taking off 1/8" per pass. A beautiful solid machine; it weighs about 400 lbs. It runs and I use it a fair amount as my coarse planer. But I have some work to do on it. It needs a new set of knives, and I need to machine up a custom fixture kit to set them. Plus it needs a new base and a ductwork set to funnel the stream of chips into a can. Right now, it's open, and it throws an arc of chips about 6 feet. A mess to use, but it sure does the job. When I eventually get it all tuned up, I may get rid of the Delta.

The Delta planer is sitting on top of my Ultrasand 24" double drum sander. I bought this machine about ten years ago from Mike Lipe, thinking it would be really useful. When I was in Burbank, I didn't have enough 3 phase power to run it, so I kept it stored. Here in Fillmore I have plenty of power, so I finally got it up and running last spring. I thought it would be just the thing for flattening body tops and backs. I fussed with it for several months, and had a lot of problems. Trouble keeping the abrasive straps on the drums, and leaving uneven surfaces. And at best, it was really slow and made an enormous mess of fine dust. I'm not happy with it. For now, I'm keeping it and using it as a stand for the Delta planer. Maybe I'll eventually get back to it and figure it out.

IMG_5440B.jpg


Here are my two jointers. The big one is a 1950's Davis & Wells 6" Long Bed. A fine old machine that I picked up a few years ago. I had a Grizzly 6" jointer that I bought new in 1994. A good solid machine that served me well. When I found the Davis & Wells, I sold the Grizzly to my buddy John, a custom furniture builder down the hall.

When John got the Grizzly, he no longer needed the little jointer in the foreground. It's a 1950's Delta 4" jointer, a nicely made little machine. It had a bad motor, and John was literally going to toss it in the dumpster! No way was I going to let that happen. I kept it and fixed it, and it works fine. I may adapt it for some special purpose job.

The two blue machines behind it (I also have a third one) are Jewelry Buffers. Handy machines for polishing metal parts.

IMG_5441B.jpg


The funny looking thing in the foreground is my neck radiusing fixture. You may have seen it on some other threads. It's on wheels, and I roll it over in front of the router bench to use it. I keep it parked here.

Behind it is my long cutoff bench, with an old Craftsman radial arm saw and a DeWalt chop saw. I use the chop saw a lot, the radial arm saw not so often. I made that bench many years ago, with a long aluminum fence and sliding stop.

IMG_5443B.jpg


At the end of the cutoff bench is this big old Onsrud pin router. It weighs about 2000 lbs. Another Luthier closing down his shop abandoned it and gave it to me about 12 years ago. I have all the parts to get it back together, but I haven't gotten around to it yet. I have some ideas about making it into a special surface router machine. Or maybe fit it with an X-Y table and make it into a router mill? Another future project.

IMG_5444B.jpg


And here's my routing bench, which I described in detail over on the Router Planing Fixtures thread. I've upgraded its electrical harness since then.

IMG_5445B.jpg


And here's the racks of routers and power tools, and the most commonly used neck routing fixtures.

The old gray bandsaw is a 1939 Walker-Turner 16" model that I found here locally two years ago. I'm fixing it up, and it'll be going down the hall to Mike Lipe's shop.

IMG_5446B.jpg


One other thing of interest is this rack. It's a vertical lumber rack, but it also functions as a panel saw. You can't see it clearly, but there's a ledge along the bottom and the front uprights are all angled back and in line. I can drag 4 x 8 sheets of MDF and plywood, set them on there, and quickly saw them into big rectangles. Very handy, and doesn't use up much floor space.

IMG_5447B.jpg


That's about it for the woodworking end of my shop.
 
Last edited:
This is Tool Porn at it's finest! I just got some nice lumber from a local cabinetmaker, he has the biggest jointer I've ever seen, they call it the U.S.S. Enterprise because it kinda looks like an aircraft carrier. All old school American cast-iron, don't know what vintage. The bed has to be something like 24" wide. The guy bought it with the shop, so he basically arranged the tools around it so he wouldn't have to move it. I'll try to get a photo of it next time I'm there, the other tool geeks might appreciate such a Beast.
 
This week's excitement here in the Secret Underground Lab is.....conduit!! I'm in the process of completely rewiring my shop. Ugh. For the four years that I've been in here, I've been operating on temporary wiring. A whole bunch of heavy extension cords strung around behind benches and across the ceiling. Not blatantly unsafe, but definitely not up to code. I've had the permanent wiring all planned out for a long time, and I even bought most of the components a year ago. But I just hadn't gotten around to installing it. Now we're in the process of sorting out a whole zoning and building code mess with the city, so I have to do it.

I'm not a certified electrician, but I have many years of experience at it. I've always wired my own shops. And I'm quite knowledgeable about the codes. We have a pro electrician who operates his business out of our building. He checks my work and approves it.

I spent most of last week and this week getting all the boxes and conduit up on the ceiling. It's close to 400' of conduit. It's a complex system, because of all the machines I have, in different zones, and a mix of 120v, 240v and 3 phase power. Almost all of the conduit is done now, and I'll be pulling wire and connecting it up over the weekend.

Here's some artistry in conduit. I deliberately ran a group of main trunk lines right down the middle of the aisles, so they would be easy get to and work on later. I placed large junction boxes with straight runs of triple conduit tubes between them, as the main trunks. The triples are a 1" tube in the center, for the 120v circuits, and 3/4" tubes on each side for the 240v and 3 phase circuits. I had to space them down off the ceiling to get them under a bunch of existing conduit, and over the sprinkler system pipes.

IMG_5526B.jpg


IMG_5530B.jpg


From the big junction boxes, smaller branches of 3/4" and 1/2" conduit go off to other boxes on the ceiling. Some of the boxes on the ceiling get outlets for the various lights to plug in to. From the ceiling, 1/2" Armorflex drops down to boxes mounted on various workbenches and columns. They aren't connected yet in these pictures.

IMG_5527B.jpg


IMG_5529B.jpg


I've always wired my shops to put almost everything on switches. If I'm out of the shop, or not working in an area, I want everything off. Lights, machines, and all electrical outlets are shut off. I'm a firm believer that almost all fires in shops are caused by electricity. Some electrical connection overheats and starts something burning. The surest way to prevent fires in shops is to turn off the power when you are not using it. So in my shop, various zones and workbenches each have a switch, which turns on those lights, and all the outlets in that zone. The lights are the indicator that the power is on or off. When I leave the shop, even for a half hour, everything is shut off, except for one circuit to the desk which powers my computers. That's the way I like it for my own peace of mind.
 
I just got some nice lumber from a local cabinetmaker, he has the biggest jointer I've ever seen, they call it the U.S.S. Enterprise because it kinda looks like an aircraft carrier. All old school American cast-iron, don't know what vintage.
If it's a squarehead, stay the heck away from it - they like to be fed arms, starting from the fingers. The casting may be very large and impressive, but the head design is olde and scarye in the extreme.
 
Yeah, they don’t let customers anywhere near the tools at this place, lots of spinning blades. You wait in the outer office while they cut wood for you. I shoulda had them panel- sand it to my finish thickness too, curly maple tears out easy! I’ve seen some old jointers upgraded with the spiral pattern cutters, though I imagine they’d still remove an arm quite handily.
 
  • Like
Reactions: Bobo
This week's excitement here in the Secret Underground Lab is.....conduit!! I'm in the process of completely rewiring my shop. Ugh. For the four years that I've been in here, I've been operating on temporary wiring. A whole bunch of heavy extension cords strung around behind benches and across the ceiling. Not blatantly unsafe, but definitely not up to code. I've had the permanent wiring all planned out for a long time, and I even bought most of the components a year ago. But I just hadn't gotten around to installing it. Now we're in the process of sorting out a whole zoning and building code mess with the city, so I have to do it.

I'm not a certified electrician, but I have many years of experience at it. I've always wired my own shops. And I'm quite knowledgeable about the codes. We have a pro electrician who operates his business out of our building. He checks my work and approves it.

I spent most of last week and this week getting all the boxes and conduit up on the ceiling. It's close to 400' of conduit. It's a complex system, because of all the machines I have, in different zones, and a mix of 120v, 240v and 3 phase power. Almost all of the conduit is done now, and I'll be pulling wire and connecting it up over the weekend.

Here's some artistry in conduit. I deliberately ran a group of main trunk lines right down the middle of the aisles, so they would be easy get to and work on later. I placed large junction boxes with straight runs of triple conduit tubes between them, as the main trunks. The triples are a 1" tube in the center, for the 120v circuits, and 3/4" tubes on each side for the 240v and 3 phase circuits. I had to space them down off the ceiling to get them under a bunch of existing conduit, and over the sprinkler system pipes.

View attachment 2891229

View attachment 2891233

From the big junction boxes, smaller branches of 3/4" and 1/2" conduit go off to other boxes on the ceiling. Some of the boxes on the ceiling get outlets for the various lights to plug in to. From the ceiling, 1/2" Armorflex drops down to boxes mounted on various workbenches and columns. They aren't connected yet in these pictures.

View attachment 2891231

View attachment 2891232

I've always wired my shops to put almost everything on switches. If I'm out of the shop, or not working in an area, I want everything off. Lights, machines, and all electrical outlets are shut off. I'm a firm believer that almost all fires in shops are caused by electricity. Some electrical connection overheats and starts something burning. The surest way to prevent fires in shops is to turn off the power when you are not using it. So in my shop, various zones and workbenches each have a switch, which turns on those lights, and all the outlets in that zone. The lights are the indicator that the power is on or off. When I leave the shop, even for a half hour, everything is shut off, except for one circuit to the desk which powers my computers. That's the way I like it for my own peace of mind.

It looks neat Bruce, like professional job.
Except that it’s certainly better fitted to your personal needs than if anybody had done it for you.
You had it well prepared.
 
  • Like
Reactions: Bobo
Thanks, guys! I'm not a Master Electrician by any means, but I do have a lot of experience with fitting conduit and laying out the wiring of small shops. And I do have some pro background with heavy industrial wiring, but not so much in the specific residential/commercial field.

In my days at Lockheed, I worked ground support systems. I designed and project managed some huge mobile generator systems that supported aircraft. Big diesel gensets installed into containers with networks of switchgear and wiring. Some seriously big cables and connectors, and complex control wiring.

At Disney, I spent the last 5 years of my career there as the part time mechanical engineer and machinist in the electronics lab. It was actually several steps down from my previous position, but I took the job because it was fun, and I gained a tremendous amount of practical experience. I learned everything from surface mount circuit board repair to making up complex wiring harnesses for robots, to wiring up racks of computers that run major ride systems. That job was better than any school I could have gone to. We did so many different types of electrical/electronics jobs, something different every day. And my boss there, Don Clausen, was/is the best in the business. He taught me that there is some serious craftsmanship involved in making up wiring harnesses, to make them absolutely reliable in the field.

Back to my current shop, the wiring is complicated because I have so many machines. They are packed in tightly in random positions, and they need different voltages. And I need to be able to easily move the machines around, to clean around them, and to make space when a big one is moving in or out. So, it's complicated.

I'm not quite done, but I got a big chunk of the wires pulled through the conduit and hooked up. The 240v circuits are done and running. The 120v circuits to the chop saw bench and router bench are done. This afternoon is the 3 phase circuit to the machine shop, then the 120v circuits to the main machine shop bench and the drill press bench. A few more days, and I should be all done. I'm sore from all the climbing ladders and reaching up at the ceiling. Being an Electrician is tough work physically.
 
@Bruce Johnson I have some family members with a similar story arc as yours (minus the bass building luthier stuff) and they have always fascinated me with their ability to do such things and work for folks like skunk works/nasa etc

the world needs more people like you
 
  • Like
Reactions: Bobo
Cross-posted from the thread about weighing basses:

Here in the Secret Underground Laboratory, this is our official scale for weighing instruments. I have a personal passion for fine old machinery, so some new-fangled digital thing just wouldn't do.

This is a Toledo fruit scale from the 1930's, with a range of 0-30 lbs (the dial goes around 3 times). A beautiful piece of machinery, Toledo scales were considered to be the class of the field back then. This is what you'd see in the produce section of your local grocery store, for weighing your vegetables. It came with a stainless hanging bowl.

img_5538b-jpg.jpg


I found this scale on ebay about 15 years ago, and had it hanging in my old shop in Burbank for years. Here in Fillmore, I mounted it on this column in the hall right outside my shop. It's available for all of us Luthiers to use for weighing instruments, parts and packages. I built that hanging wood shelf hook thing, to make it real easy to set instruments and boxes on it. These days, customers are so fussy about weight that we check every instrument we build.

I calibrated it accurately at 8 lbs, and checked it at 6 lbs and 10 lbs, using steel bar stock.

If you want to check the calibration of your scale, steel bar stock is a simple way. Mild steel weighs 0.2833 lbs per cubic inch. Find a chunk of steel which weighs around 8 lbs. Then measure it accurately and do the math to calculate how much it actually weighs. Compare that against the scale's reading. That's how I calibrated this scale, placing the steel on the wood shelf and adjusting the scale to match the calculated weight.

For your reference, I put the same steel bar on several other scales we had around here. The mechanical bathroom scales were awful down in that range, off by 5 lbs or more. The digital bathroom scales were better, but more like 2 lbs off. Even a small tabletop postal scale I had was a pound off.
 
Are the little digital cooking scales accurate enough? They use them to weigh pinewood derby cars down to 1/10 Oz. Maybe difficult to balance them on that little platter? I don’t obsess over it, a heavy bass that’s well balanced will always be more comfortable than a light neck-diver for me.
 
  • Like
Reactions: Bobo
Well, that depends on the range of the scale. If you are trying to weigh things in the 6-10 lb range, you want to use a scale where that is in the middle of the scale's range, like a 0-20 lb or 0-30 lb scale. When you try to work at the bottom or top end of the scale's range, that's where you see the most inaccuracies.

Don't weigh an 8 lb bass on a 0-300 lb bathroom scale. Yeah, you can stand on the bathroom scale holding the bass, then not holding the bass, and subtract your weight. That improves the accuracy somewhat by getting into the working range of the scale. But, even in their working range, most bathroom scales have an actual accuracy of +/- 2%, which is +/- 6 lbs.

Now, the "doctor-style" bathroom scales, where you stand on the platform and slide the little weights, are much more accurate. They are generally within a pound through most of their range. But, is "within a pound" close enough when you are trying to accurately weigh an 8 lb bass?

Remember that resolution and accuracy aren't the same thing. Because a digital electronic scale reads out a resolution to 1/10 of an oz, that doesn't mean that it's accurate to 1/10 oz. I just looked up a typical digital kitchen food scale on Amazon. It has a range of 11 lbs/5 kg, and the advertising copy says it's "accurate to 0.1 oz or 1 gm". Yeah, right. They mean the resolution. Those numbers would mean the accuracy was 0.02%. On a $10 imported electronic device? Yeah, right. I'd be surprised if the actual accuracy was less than 1%. Expensive, tested laboratory scales are like 0.1%.
 
Bruce, thanks for the posts, these punch so many buttons with me.

There's an single-seat, ex-CIA Blackbird on display in Mobile, AL, complete with its' dual Buick V8 start-cart for those massive engines. Maybe before your days, but came to mind. Somehow amazing that Skunk Works (excuse me, Lockheed ADP !) experience was perfect for Disney !

Now that you have annotated spy shots of the unacknowledged site, are you hiring Cammo Dudes? Where do you park the Giant Black Triangles?

I've heard Mica Wickersham talk more than once about how they dread buying modern equipment if they can't find old heavy-metal vintage power tools, as new stuff just doesn't hold up, once you're talking non-CNC gear.

Glad you and so many others were spared by the fire.

All the Best and Much Success !
 
  • Like
Reactions: Bobo
Bruce can start selling Alembic his reconditioned American Iron! Can’t be too many people with the skills or desire to recondition old tools like that where you might have to make your own replacement parts. I dont think I’d buy an old saw if I had the money for a Saw-stop though. I’ve seen the video where the SaWstop inventor puts his own finger in the blade and gets a tiny scratch, that’s an improvement over a monster Delta/Rockwell.
 
  • Like
Reactions: Bobo
Bruce can start selling Alembic his reconditioned American Iron! Can’t be too many people with the skills or desire to recondition old tools like that where you might have to make your own replacement parts.
Any decent machinist can, if they are so inclined. Making it a paying proposition rather than a hobby that does not really pull it's freight is potentially difficult, though.

I dont think I’d buy an old saw if I had the money for a Saw-stop though. I’ve seen the video where the SaWstop inventor puts his own finger in the blade and gets a tiny scratch, that’s an improvement over a monster Delta/Rockwell.
Maybe. I'm used to keeping my fingers the dang out of the way. I know of one shop that changed to a saw-stop, and discovered the hard way (cost of the explosive cartridge and ruined blade, possibly new underwear as well) that lumber that was the least hint of not totally dry would set the thing off. I doubt it could be detuned much, if any, without risking more of a cut, but that makes it less useful to me.

Then again, I have a different approach to finger safety as my default - if I want to spend that much money, I could build a CNC saw (And I have in fact used the argument to support my CNC router purchase, though it is a bit annoying to saw with a router, so a more dedicated tool (or a tool head that will take a saw well on the same tool, with good software control on the motion) would be not so difficult to manage. Fingers several feet from the action. But the scariest finger chopper in my shop has no power at all.

03h0101s5.jpg
 
Last edited:
  • Like
Reactions: Bobo