• TalkBass has been independent since 1998. Add your voice.
    Create a free account to reply to discussions, view embedded media, and browse with fewer display ads.
    Join freeLog in
    Want zero display ads or expanded classifieds tools? Compare plans.

Inside The Secret Underground Laboratory

Oh, man....Just what I need ......Another cool old machine to add to my shop...

My buddy Thomas brought this over tonight, and donated it to the Johnson's Museum Of Antique Machinery. The new CNC wing.....

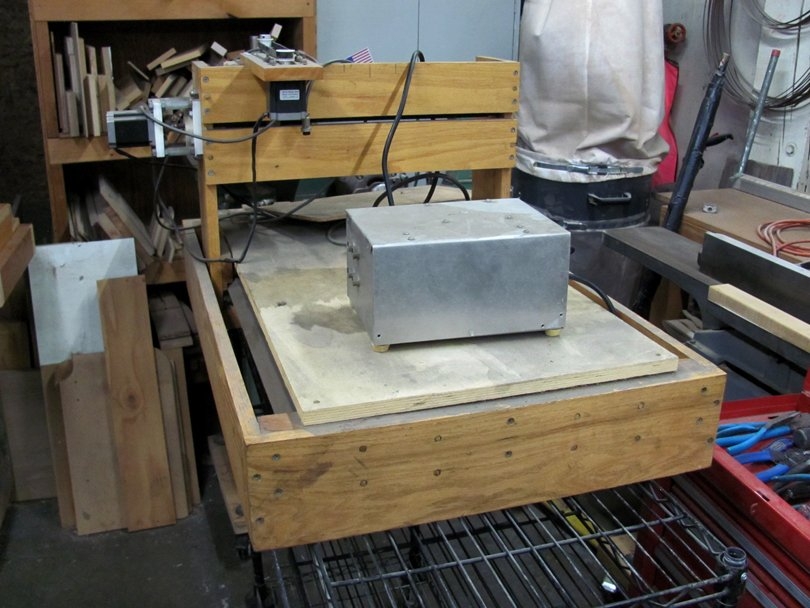
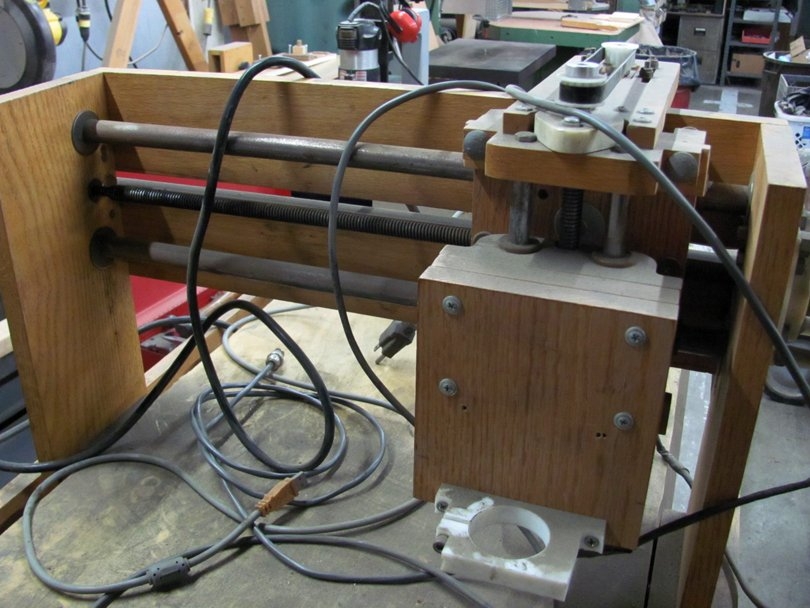
You guys will like this......It's a homemade 3-axis CNC machine, and its frame is beautifully made from Oak!
IMG_0865B.jpg


Yep, that's right, it's a simple CNC machine, and its frame is made completely from oak boards, carefully machined and fitted together. It was built by a friend of Thomas', who was a veteran cabinet maker. Sometime around 2000. He eventually gave it to Thomas, who upgraded the stepper motors and made the controller box.

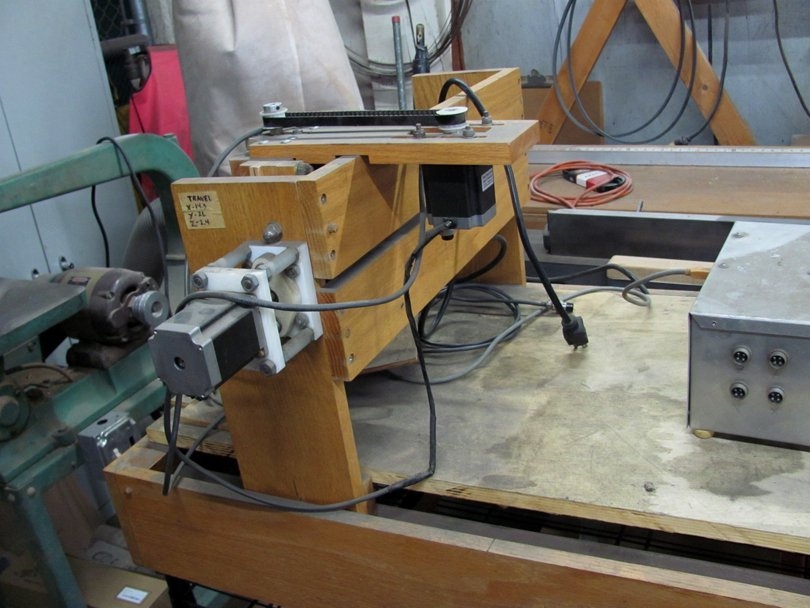
Supposedly, it's fully functional. Thomas had it fitted out with a Dremel tool as the spindle, and used it for engraving of wood and plastic. It can be plugged into a computer and run with simple software like Mach 3. He says it'll engrave fine lettering and seems to have accuracy down in the 0.002" range.
IMG_0866B.jpg


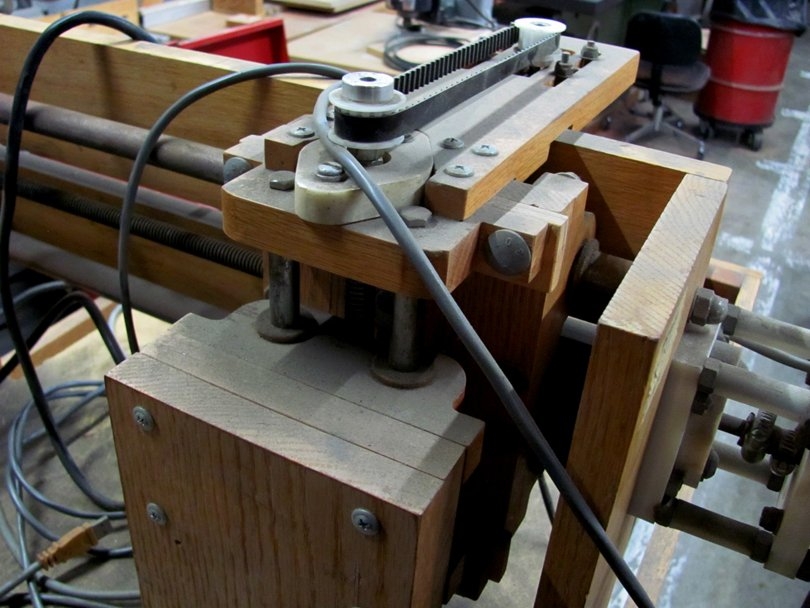
The frame is very well made; tightly fitted joints and dowel pins. It's strong and rigid. The guide rails are round and square steel bars with ball bearing wheels riding on them. The leadscrews are steel Acme thread. I think they are Nylon Zero-Backlash type, not ballscrews.
IMG_0867B.jpg


IMG_0869B.jpg


IMG_0872B.jpg


An XL toothed belt drive for the Z-axis.

My thought is to mount a small Trim Router head on it, and set it up for cutting MDF templates. For use with my hand routers and Pin Routers. It could be very useful just for that one purpose. I think I have an old small Rockwell router head around here somewhere. Although this frame is well made, it isn't sturdy enough to put a regular size router on there, and try to rout bass bodies. But it should be fine for cutting MDF templates with a 3/16" bit.

I'm going to try and find a nice oak bench or small desk to mount it on. Then match it up with an old computer, running XP.......

Like all my other cool machine projects, it's going to have to sit and wait for a while.
 
Toss a laser on and you have a laser engraver ready to roll. My Ur-ShopBot is (as was standard at the time) 2x10 and 2x4 framing lumber with Uni-Strut for the rails and patio door bearings rolling on it (at the corners.) They've abandoned it (I failed to keep up with spending 5x on upgrades what I did on the machine) and it will be a GRBL machine when I revive it. It does run on the original controller still, but it has some issues. And there are much better stepper drivers now.
 
Last edited:
I know you already have your other slotting setup but is it sturdy enough for cutting fret slots or fretboard inlays?

Hey Matt;

I knew you'd appreciate this machine......I think it would do fine cutting inlays. Maybe not super detailed ones, but normal reasonable shapes. I'll have to see what kind of accuracy it has when I get it running.

I doubt it would be very good at fret slots. Using a teeny end mill, I don't think the accuracy would be good enough. And I don't think the frame would be strong enough to mount a saw motor on it.

This machine does not have digital readout scales feeding data back into the controller. It only counts steps to the motors. Very old school CNC.
 
  • Like
Reactions: Matt Liebenau
Toss a laser on and you have a laser engraver ready to roll. My Ur-ShopBot is (as was standard at the time) 2x10 and 2x4 framing lumber with Uni-Strut for the rails and patio door bearings rolling on it (at the corners.) They've abandoned it (I failed to keep up with spending 5x on upgrades what I did on the machine) and it will be a GRBL machine when I revive it. It does run on the original controller still, but it has some issues. And there are much better stepper drivers now.

Hey T_Bone;

I guess that's a possibility. I don't think it has the accuracy to do real fine laser engraving, but it would probably work fine for cutting parts out of thin plastic or cardboard sheet.
 
Some Sunday evening fun! Moving heavy greasy old machinery around in my shop! That is fun, to me at least.

On the previous page, I showed the 1929 Hendey metal lathe that has recently arrived here. My buddy Thomas has agreed for me to keep it here and care for it, as part of my pre-1940's antique machinery collection. It's about 9 feet long and weighs around 3000 lbs. I've had it parked temporarily in the back hallway behind Unit 16.

So, I spent a month or two figuring out how and where to position it in my shop, surrounded by my other machines of the same era. And then I moved and re-positioned two shelving units to clear the space. And cleaned up and repackaged a lot of old junk in boxes, while I was at it.

By Sunday, everything was ready, and it was time to do the actual move......

IMG_1034B.jpg


Here's the technique for moving a machine like this, working by myself. A pallet jack and a set of Machinery Skates. Those yellow things are the skates; each one has four heavy steel rollers on the bottom and a round steel turntable on top. They are low profile and made to roll easily on a smooth clean concrete floor. These are what pro machinery movers use to move heavy machines around in factories. Thomas got the set somewhere, and gave them to me with the lathe.

The legs of the lathe are bolted securely to those two 2 x 6 steel tubes, and wood 4 x 4 blocks are screwed to the beams, under the ends. The wood blocks are the permanent feet for the lathe. That's how I mount most of my heavy machines, on 4 x 4 blocks or beams.

To get the lathe ready to move, I roll the pallet jack under one end at a time, between the wood blocks. Jack it up, unscrew the wood blocks, and slip the skates in their place. At first I put the skates under all four corners, and tried rolling it. It rolled easily, but it was too tricky to keep all four skates turned the right way. One would keep steering off on an angle on its own. When the pros use them, they usually have one man on each skate, using special handles to pull and steer them. I couldn't do that, working by myself.

I ended up in the configuration above......I put two skates under the rear headstock end. I secured them with chains to make sure they couldn't slide off. On the near tailstock end, I put the wood blocks back on, and just used the pallet jack to pull and steer. I pumped it up so the wood blocks were about 1/2" off the floor. That setup worked well. I was able to roll it along pretty easily by myself, going slowly and correcting the steering.

That's the general rule for moving heavy machinery. Slow and easy, steering carefully, sweeping all dirt and debris out of the path of the rollers. Wide stance, low to the ground, making sure it can't roll over if something slips at one corner.

IMG_1035B.jpg


I had to bring it down this hallway and through this opening. Before I started, I had to move other machines and workbenches and things out of the way to get enough clearance.....

IMG_1037B.jpg


Coming through that opening, it was a close fit between that column and the corner of that shelving unit. I had to do several short forward-and-backs to steer it at the right angle through there......

IMG_1038B.jpg


Then around the corner......

IMG_1039B.jpg


And into its new permanent home.....

IMG_1040B.jpg


Back onto all four skates for the final maneuvering and positioning......

IMG_1041B.jpg


I jacked up both ends, pulled out the skates, and reinstalled the wood blocks. The Hendey has landed!

You may notice that that's the back side of the lathe. I decided to position it this way for working clearance. I'll operate the Hendey from that aisle back behind it. Here on this side, I'll be positioning about three smaller machines, which are on casters. I'll operate them from the aisle on this side. But they can easily be rolled aside, to do heavier maintenance on the Hendey.

IMG_1042B.jpg


Here's the view from the back aisle, the operating side of the Hendey.

Next up, I'll be hanging a LED light strip over it, for better lighting. And get the other machines and benches back into their places.

It may be a while before I get time to work on the Hendey, cleaning it up and getting it dialed in. Lots of other priorities and machines and fixtures and basses......But the old Hendey has a nice secure home now.
 
This morning I finished moving the other machines back in around the Hendey lathe.

IMG_1044B.jpg


And there's most of my antique machinery collection, the old ones, gathered up in this one area of my shop. These machines are all from 1905 to 1940. With one exception, the little grey Traub in the foreground; it's from the mid '50's.

This area will be where I will work on these machines, restoring and repairing them. Eventually I'd like to have them all cleaned up and running, and available for use. Fix this whole area up like a 100 year old machine shop. Except with modern electricity and a concrete floor.

IMG_1045B.jpg


In the foreground is my 1907 Bardons & Oliver #0 Turret Lathe. To the left is my 1917 Rhodes Shaper.

IMG_1046B.jpg


The 1929 Hendey lathe fits right in, and becomes the centerpiece of the group. I'll be able to operate it from that back aisle.
 
As part of this whole furniture rearrangement to fit the Hendey in, I also reworked the Final Assembly Bench:

IMG_1047B.jpg


This is where I'll do the final assembly, setup and initial sound testing of my Scroll Basses. A clean padded bench, with a rack of standard tools.....

IMG_1048B.jpg


.....And my trusty Sabine tuner, a small GK amp, and of course, the infamous 1938 Philco radio. It's fitted with a GK 15" speaker, and serves as the Test Bench speaker cabinet. And all-around Icon and Mascot.

The extended testing happens down the hall in my Music Room, where I have my own personal collection of Scroll Basses, other basses, and other instruments. And an assortment of amps of all sizes.
 
Here are some more current pictures of the other workbenches in that area of my shop. I'm in the process of doing a major cleanup and reorganization of my whole shop. I'm arranging it specifically for long term steady production of.....Scroll Basses. I'm basically done with the custom work, repairs, and restorations.

IMG_1050B.jpg


Directly across from the Assembly Bench is the Electronics Bench........

IMG_1051B.jpg


This is where I build the pickups and assemble the control harnesses. That's my pickup winding machine on the right. All the molds and tooling for casting the pickup parts are in those shelves. This bench needs a serious cleanup and organization. It's covered with years of R & D debris.

IMG_1052B.jpg


A few feet away is the Spray Booth. This is where Jeremy and I do all our painting. Water-base polys only.

IMG_1053B.jpg


This bench is for wet-sanding and buffing out finishes......

IMG_1049B.jpg


It's also covered with debris right now. The cabinets under the bench are storage of electric wiring supplies. It'll be cleaned off soon. I have a list of finishes coming up.

IMG_1054B.jpg


A few more feet away is Finish Sanding Bench. This is for dry-sanding the finish coats, particularly the grain-filling with epoxy and level sanding the base coats.
 
And here are some rare exclusive pictures of my Secret Music Room! In February I took over the lease on this small room that's next to my other units. I decided to use it as a Music Room. A clean place where I can store all my various musical instruments, where I can have easy access to them for testing and just enjoying playing them. Or demonstrations for customers. Or even having a few friends over for a jam session.

I've got everything moved in now, but I haven't done any cleaning or decorating or making the room more comfortable. But I will eventually.

IMG_1055B.jpg


A cool old '50's SteelCase desk that was abandoned here in the building........The two white cabinets contain........

IMG_1061B.jpg


....Most of my Scroll Bass collection! The best of my vintage Ampegs, and the new ones that I've built and kept for myself.

IMG_1057B.jpg


On the desk are my two favorite workhorse amps; a Carvin PB-150 with a single 10, and a Carvin PB300 with a single 15. Both those amps have been serving me faithfully for about 38 years.

To the right is my SVT rig, for when I need to be Loud. A mid-90's SVT-III with a homebuilt 2-15 cabinet.

IMG_1056B.jpg


A shelving unit full of all kinds of instruments. A few more Ampegs, Rickenbackers, Carvins, weird old basses, a few acoustic and electric guitars, Two banjos, my old Conn trombone, and a bunch of excess cases and gig bags.

IMG_1059B.jpg


This is a nice old 1920's upright piano in walnut finish, on long term loan from a friend. I want to learn to play the piano in my retirement years. A few more random cube amps.

IMG_1062B.jpg


Some serious fun in the corner! Banjozilla and my old Kay upright.

IMG_1058B.jpg


Another big amp rig for testing; a JBL 1-18" cabinet and a rack of mixers and effects and a Peavey amp. Behind it are more misc amps and several vintage electronic keyboards. Including a 1989 Kawai analog synthesizer.

I hope I can find the time over this summer to work on this room.
 
Some more shuffling machinery around, and adding another piece of cool old antique furniture:

IMG_1107B.jpg


Down the hall, in the middle of the building, the construction crews are reworking an area into a new bathroom (Yay!). There was a small wooden room, which I think was a Foreman's Office. A timeclock and a rack of punch cards. Old time factory management. In that little room was this cool old desk. they were going to scrap it, but I said Hold, On Boys......That belongs in my shop. It matches my decor.

It's an old drafting table/desk from the '40's or '50's. Nice solid all-wood construction. The top drawing surface has a couple of degrees tilt. It's all messed up and has a sheet of Masonite nailed onto it. A big open dual footwell, with plenty of wear from feet.

So, I've adopted it into my machine shop, where it will become the bench for a couple of small drill presses. I brought it down the hall on a pallet jack, did a little bit of cleanup work on the legs, and started shuffling furniture around to make a space for it.

Good clean fun on a Saturday morning in the Secret Underground Lab......

IMG_1108B.jpg


The main machine going on this desk is my beautiful old 1925 Avey Sensitive Drill. I love this old drill press, and I use it almost daily, drilling teeny 2mm holes in stainless truss rod parts. It weighs about 125 lbs, a little more than I want to dead-lift by myself. So I wheeled up my trusty Engine Hoist to do the lift.

IMG_1109B.jpg


After a few minutes of gentle grunting, there it is, on the desk. Having it tilted like that is actually kind of interesting. Better visibility? If I don't like it, I can add a wooden wedge under it.

IMG_1112B.jpg


Two nice old wooden drawers, well made and strong. Good for some machine shop tooling.

IMG_1111B.jpg


And there it is, ready for use. I put one of my little import drill presses on there next to the Avey, and I'll be adding a second one. Those two are going to be set up for Pin Drilling. I'll talk more about them on the Metalworking thread.

IMG_1113B.jpg


Also finding a home on this old desk is my Super Micrometer. A classic old super precision measuring tool, as used in Inspection Labs in aerospace factories in the '50's to '80's. It measures down to 0.00001" over a 6" range. They were used for calibrating the Standards, which were used for calibrating the factories' Micrometers. It weighs about 120 lbs. Not a lot of practical use in the musical instrument business, but it was given to me for free, to save it from the dumpster. How could I refuse?

It will accurately check the diameter and insulation thickness of the magnet wire we use in winding pickups. It can tell whether the wire is 0.0026" or 0.0027" diameter.
 
Speaking of fine old antique machinery:

20250601_100849.jpg


I finally got my faithful old 1967 Ford F100 pickup running again this week! It hadn't started or moved in 2 years!!!!. It had a problem with a worn-out starter relay and a dead battery. And I just couldn't find the time or the physical energy to work on it......for 2 years. It was breaking my heart, seeing it sitting out there, silently and patiently, waiting for me to get around to it.

This year, my overall health and strength are much better, and I'm actually getting things done around here. On Tuesday, I put a new battery in it. A shot of Starting Fluid in the carb, held my breath, and turned the key.......To my amazement, it fired up! The engine seems to be okay and reasonably healthy. It was wonderful hearing that deep rumble through the cracked exhaust manifold. I drove it around the parking lot, checking out the transmission and brakes. Now I need to get some fresh gas in it and do some general maintenance. Get it fully road-worthy again.

This old truck did most of the runs when I moved my shop from Burbank to Fillmore, 12 1/2 years ago. It carried a lot of tonnage of stuff.

It was a beautiful Sunday morning, so I washed it. Took off a couple of years' of Fillmore dust and dirt. And put on its fresh registration sticker. It was good for the soul.
 
Oh man......That old truck has character and personality. Last evening, just after sundown, I was dozing off into a pleasant evening nap here in the Lab........

And my cell phone rang. It was Steve, from upstairs. He said "Your truck is calling for you". I scrambled outside and my truck was sitting there, with its horn blaring continuously! What the???? It doesn't have an alarm system. I opened the door and wiggled the horn ring on the steering wheel, and it stopped. Huh? It looks like the horn ring wasn't fully engaged to the bracket in the center of the steering wheel. It had somehow shifted and set off the horn relay. But.......I had been running it and had driven it around the block in the afternoon, and it hadn't done that. It waited until I was half asleep. Just to mess with me. For letting it sit for so long......
 
Oh man......That old truck has character and personality. Last evening, just after sundown, I was dozing off into a pleasant evening nap here in the Lab........

And my cell phone rang. It was Steve, from upstairs. He said "Your truck is calling for you". I scrambled outside and my truck was sitting there, with its horn blaring continuously! What the???? It doesn't have an alarm system. I opened the door and wiggled the horn ring on the steering wheel, and it stopped. Huh? It looks like the horn ring wasn't fully engaged to the bracket in the center of the steering wheel. It had somehow shifted and set off the horn relay. But.......I had been running it and had driven it around the block in the afternoon, and it hadn't done that. It waited until I was half asleep. Just to mess with me. For letting it sit for so long......

I sure hope it’s not what I’ve heard of happening on occasion, where the horn wire gets a spot worn through its insulation and grounds to the inside of the steering column. It can be an intermittent sounding of the horn, depending on the position of the wheel and which way it pulls the wire. Depending on the car, fishing a new wire through the column can be more or less of a nightmare, and never fun. On some Alfas, for instance, IIRC the wire goes through the steering box.
 
Better a horn wire than the planned obsolescence or questionable design in the Ford "thousand" series tractors, where the battery positive cable (unfused, since it's going to the starter relay) is routed in such a way that it tends to get a hole in it from the seam of the fuel tank. Great place for it to arc to ground, eh? Friend lost both tractor and the barn it was in to that one.
 
Last edited:
The Holiday/winter season is a good time to get some work done on my shop! Repairs, maintenance, and upgrades to active machines. Cleaning debris off of workbenches. Re-discovering tools that I forgot I had. Etc.

And upgrading my lighting! A few years back, I replaced most of the old florescent lamps in the main woodworking areas with modern LED lamps. I've been very happy with them. They provide better light, they are safe, use less than half the electricity, and are surprisingly cheap.

DSCF0457.JPG


In the woodworking shop, I did the installation like this. Long single strip fixtures, hanging from chains 8' off the floor. Each fixture is a 10' length of 1" PVC plumbing pipe with two 4' LED fixtures attached to it. Real simple and inexpensive to build. The LED fixtures are attached to the pipes with packing tape.

DSCF0458.JPG


I did this installation a few years ago, and it's covered in detail somewhere back in this thread. I made up 12 of these 10' fixtures. They've been working great, and I'm very happy with them. Good light coverage for the woodworking areas.

DSCF0455.JPG


Now I'm finally getting around to my (three) machine shop areas. I'm replacing all the old 4' twin tube florescent fixtures with 4' twin LED fixtures. Here's the first three of them, installed in my Small Machine shop a few days ago. These are hanging lower, 7' off the floor, and are centered over the metalworking bench, the Logan lathe and the Green Mill. I like this lighting better in the machine shop.

Next post, I'll show how I make up these fixtures, and the installation of 5 more in the Big Machine shop.....