
You could weld or bolt studs or fins to the central core to get heat from the fire to the bulk sand faster, via conduction in the metal. Safest method for the fire is to figure out how much fuel you need for the desired temperature rise, and stop loading when you've put that much in, and let it burn all the way out. Though you could also make an airtight cap for the tube.

Enjoy the benefits of a premium membership!
Upgrade Account
-
TalkBass has been independent since 1998. Add your voice.
Create a free account to reply to discussions, view embedded media, and browse with fewer display ads.
Join free Log in
Want zero display ads or expanded classifieds tools? Compare plans.
You are using an out of date browser. It may not display this or other websites correctly.
You should upgrade or use an alternative browser.
You should upgrade or use an alternative browser.
Inside The Secret Underground Laboratory
- Thread starter Bruce Johnson
- Start date
More options
Who Replied?
How do you plan to extinguish the fire after the sand is hot and rolled into the shop? Please be careful of combustion gasses in an enclosed shop. I'm sure you have good airflow so it probably won't be an issue. I know the sand won't light the cart on fire, but I'm thinking about the charging fire and the cart. Will the wood cart be OK? Using cutoffs and wood chips is a good eco-friendly source for the fire material. In my wood shop, I have a lot of mistake pieces to burn (hide the evidence). Do you know if the type of sand (course, fine, etc) will make a difference in the performance? I can't wait to see how this progresses. Very cool project. Thanks for sharing.
Hey Steve;
There's an important part missing that I haven't built yet. A shallow square cup made from steel, which slips down into the bottom of the steel furnace tube. Attached to it is a long length of 1/4" black iron pipe, which comes up out of the furnace tube and turns 90 degrees. That pipe is the air bleed. It has some small holes down at the bottom, right above the cup. At the top is a small needle valve and a quick-disconnect fitting to connect to an air line. I control a small flow of air down into the cup, to charge the fire and adjust the burn rate. The bleed tube also functions as a handle, that I can use to lift the cup up out of the furnace tube.
Yes, I'll completely extinguish the fire while it's outdoors, before rolling it into the shop. I'll disconnect the air line and pour a few ounces of water down into the top of the furnace tube. Then lift the whole air bleed and cup up out of it, carrying most of the remaining charcoal and ash. Set it into a bucket of water to quench any last embers. then leave it outside to dry until tomorrow. Any residual ash down in the furnace tube will be dampened by the water. That's the plan. No fire inside the shop. Just a box of hot sand, on wheels.
I could burn scrap wood from the shop in it. But I'm thinking that the charcoal will let me burn hotter and charge it up in a shorter time. I think a wood pellet or scrap hardwood fire would be longer and slower. But I'll try it and see. It could be that lower fire for 4 hours does a better job charging the sand than a hotter fire for 2 hours. I don't know.

You could weld or bolt studs or fins to the central core to get heat from the fire to the bulk sand faster, via conduction in the metal. Safest method for the fire is to figure out how much fuel you need for the desired temperature rise, and stop loading when you've put that much in, and let it burn all the way out. Though you could also make an airtight cap for the tube.
Hey T_bone;
I thought about that, but I'm not sure it would add that much efficiency to the heat transfer. The square steel tube inside the square box of sand is pretty good for surface area of the steel against the sand. That's also why I made it somewhat tall and slim. The fire will be contained within a 24" long x 4" square tube, fully in contact with the sand. The heat will propagate outwards from the center of the sand. And the outer sand will help insulate and hold the heat in as it all heats up.
Yes, I'll be setting a steel plate cap on top of the furnace tube while it's burning. Not airtight, but with some smaller holes. To hold most of the heat inside the tube. I'll adjust the fire size to keep the flames entirely inside the tube.
And yes, I'm planning to work out how much fuel to put in to burn it all up in one heat-up cycle; sand temp rise vs air bleed vs burn time.
Last edited:

I suspect anything that can conduct heat into the sand quickly can conduct it out again just as quickly.You could weld or bolt studs or fins to the central core to get heat from the fire to the bulk sand faster, via conduction in the metal.
More progress on the Sand Battery Furnace:
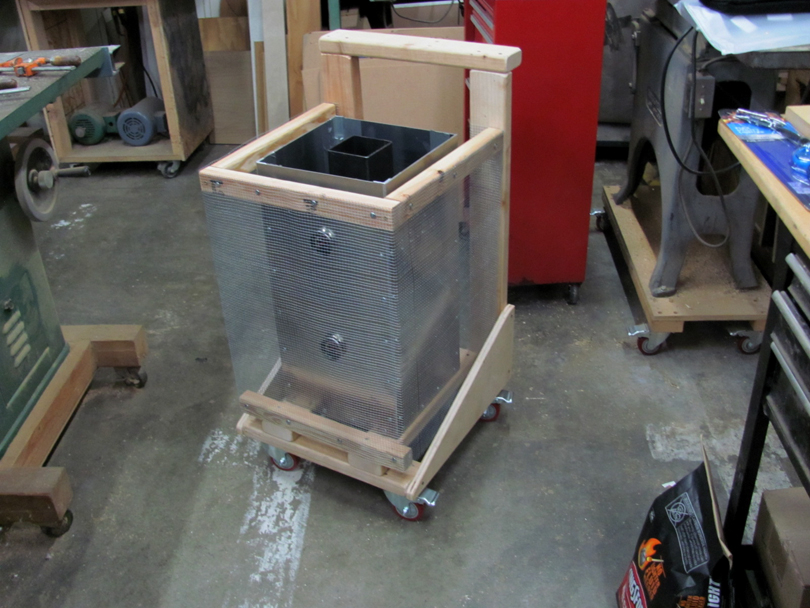
I made up the wire cloth guard. It's 1/4" grid steel wire cloth formed into a shell around the sand battery. This is to keep me from coming in contact with the box. The aluminum will generally be between 200 and 400 degrees, enough to get a nice burn. But not enough to ignite anything flammable.
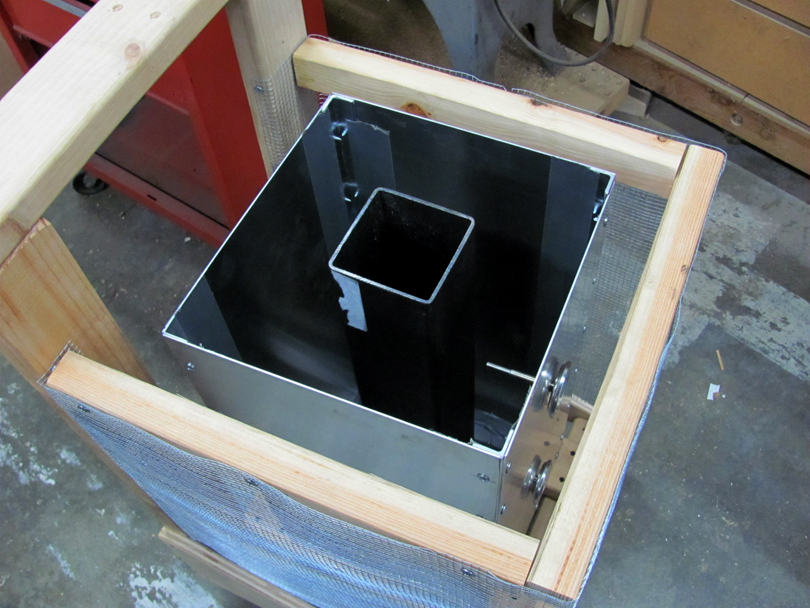
The guard stays on all the time. While it's outdoors with the fire going, I'll be draping four welding blankets over the box, inside the guard. They'll help to insulate the outside of the sand while it's being heated up, and provide a guard against any random sparks or embers. I'll pull the blankets out when I roll it inside.
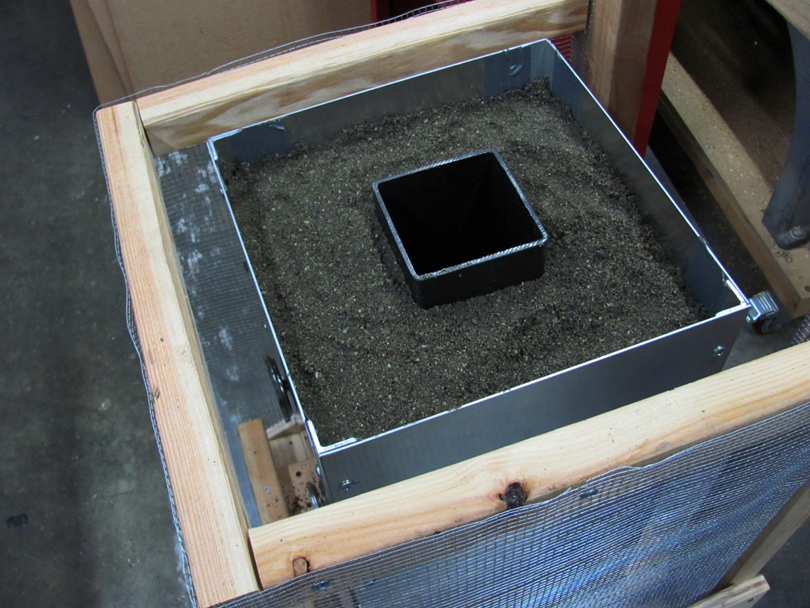
Filled with sand. I used four bags of Landscaping Sand from Home Depot; $6 each. The sand is a little damp right now, so I may get some free humidity with the first few heating cycles.
Only a few more parts to make up. I hope to fire it up, literally, this weekend and start some testing.
I made up the wire cloth guard. It's 1/4" grid steel wire cloth formed into a shell around the sand battery. This is to keep me from coming in contact with the box. The aluminum will generally be between 200 and 400 degrees, enough to get a nice burn. But not enough to ignite anything flammable.
The guard stays on all the time. While it's outdoors with the fire going, I'll be draping four welding blankets over the box, inside the guard. They'll help to insulate the outside of the sand while it's being heated up, and provide a guard against any random sparks or embers. I'll pull the blankets out when I roll it inside.
Filled with sand. I used four bags of Landscaping Sand from Home Depot; $6 each. The sand is a little damp right now, so I may get some free humidity with the first few heating cycles.
Only a few more parts to make up. I hope to fire it up, literally, this weekend and start some testing.
Last edited:
Spare copy of Fahrenheit 451 placed next to the thermometer. Handy thermal check...The aluminum will generally be between 200 and 400 degrees, enough to get a nice burn. But not enough to ignite anything flammable.

Presumably the first firing will be pretty steamy outside. If you get it hot enough (which will take more effort the first time due to having to boil the water) that first time, it should be done steaming until it gets damp from disuse over the summer, and that likely won't be near as damp as it is fresh from the store.

Spare copy of Fahrenheit 451 placed next to the thermometer. Handy thermal check...
Presumably the first firing will be pretty steamy outside. If you get it hot enough (which will take more effort the first time due to having to boil the water) that first time, it should be done steaming until it gets damp from disuse over the summer, and that likely won't be near as damp as it is fresh from the store.
Yeah, I'll probably do the first few heat/cool cycles mostly outside, until the sand gets dried out. I'll run a sequence of cycles, gradually increasing the amount of fuel and air. Work out how hot I want to make the fire, how hot to make the sand, and how long it takes to get the sand that hot. Figure out the most efficient heating combination to give it about 20 hours of useful heat indoors.
I'm not really looking for a lot of heat; I am in Sothern California. The "winter" season here is December-February, and my shop will only get down as low as 55 degrees for maybe a third of those days. And I'm only trying to heat it up into the 60-65 degree range. A small iron wood-burning stove in the corner would probably be plenty of heat. I'm trying to make a version that with no flames, no continuous feeding of fuel, and that can be rolled all around the shop.

BassHappy
Supporting Member
Hey Bruce
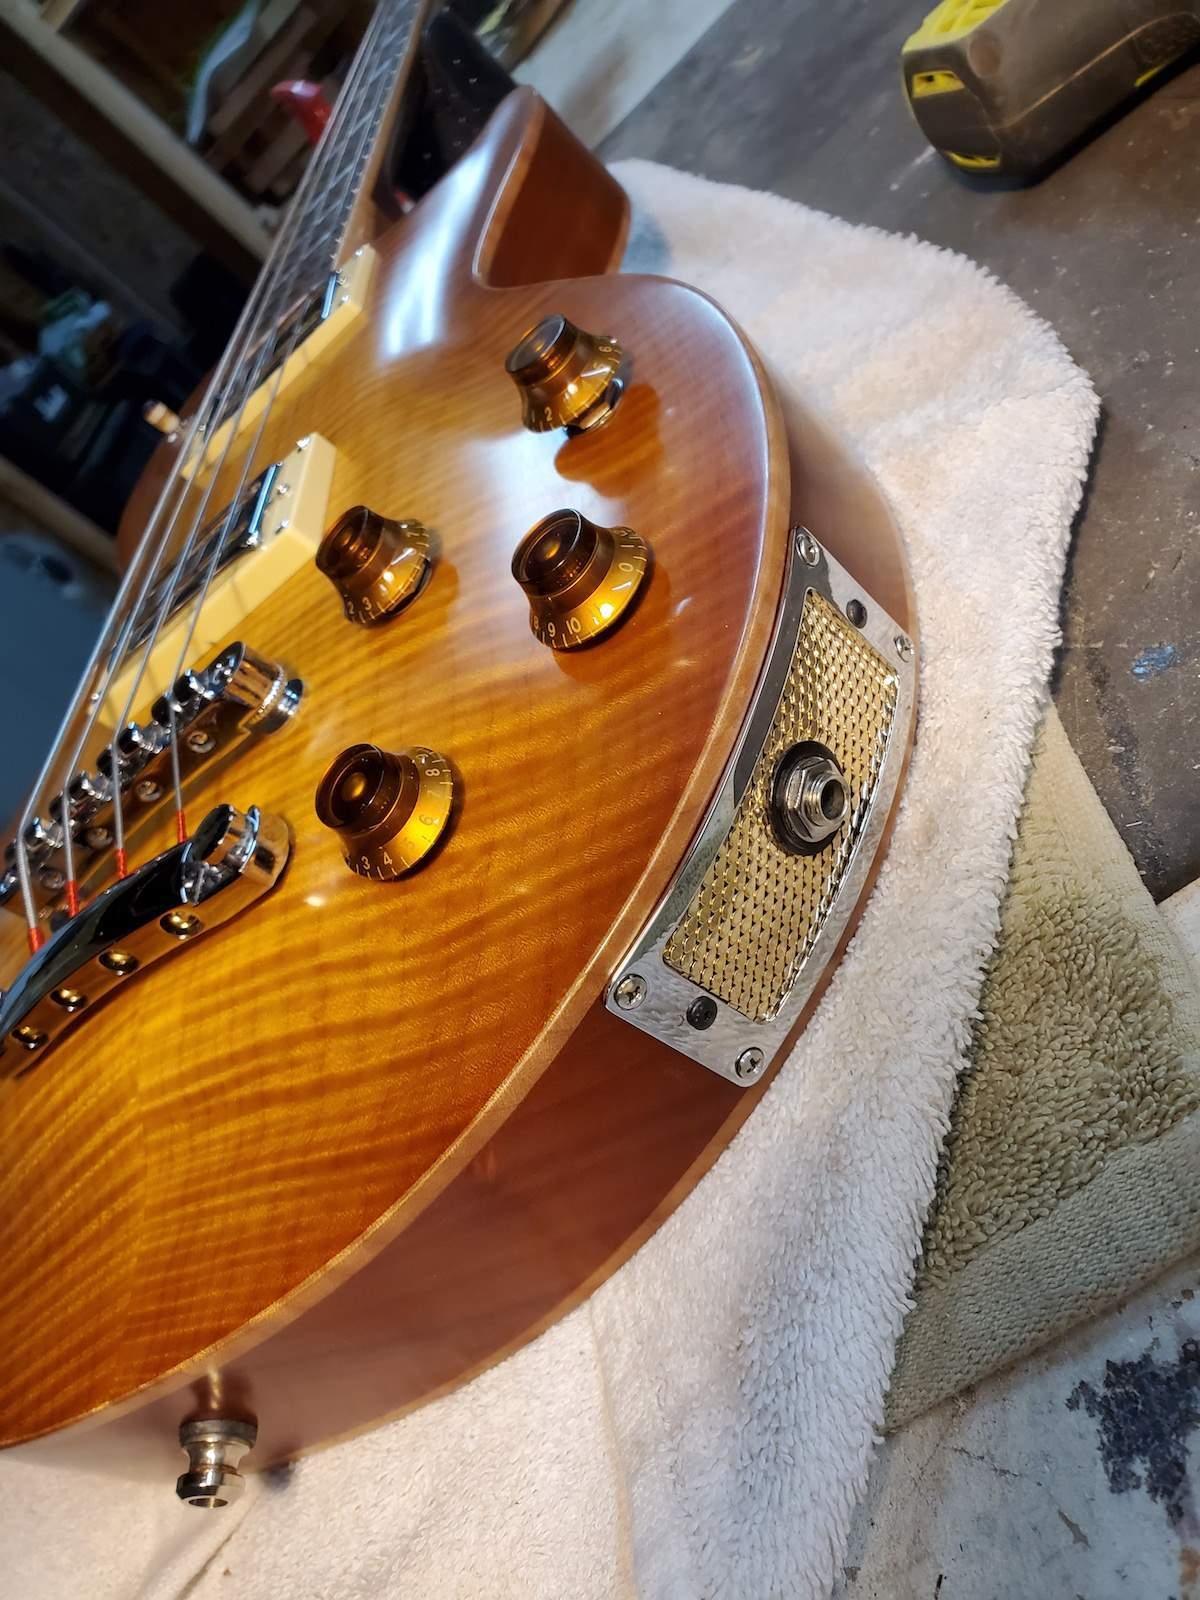
Just a quick note to let you know, finally getting around to having the Les Paul bass that Keith built for me refinished. A piece of finish chipped off long ago when Keith first shipped it to me. Been busy in the studio and haven't had time to deal with it until now. As you may remember, there is no rear cavity cover so Keith will get his extra long tweezers back out and disassemble it for me through the over-sized jack plate:
Then he will get it back to Pat for the re-finish. Paul Reed Smith donated the flamed maple top and back for this project.
I wanted you to know that Keith has asked me to ship it to you and he will pick it up there. Not sure if he mentioned it to you or not. I have a Reunion Blues Voyager and a Reverb bass box which I just used to ship PRS #11 off to Paul for some electronics work and I just got it back. The case seems great and worked fine. I got extra bumpers from Reunion Blues for the bottom of the case.
If all goes well, I will be taking it to UPS either monday or tuesday, so I guess you should look for it around end of next week. If this isn't a good plan, or good timing, I can wait to ship it. Please let me know. I also have an email in to Keith.and I can send you both the tracking number if you need it.
As always thanks a million! I appreciate you.
Just a quick note to let you know, finally getting around to having the Les Paul bass that Keith built for me refinished. A piece of finish chipped off long ago when Keith first shipped it to me. Been busy in the studio and haven't had time to deal with it until now. As you may remember, there is no rear cavity cover so Keith will get his extra long tweezers back out and disassemble it for me through the over-sized jack plate:
Then he will get it back to Pat for the re-finish. Paul Reed Smith donated the flamed maple top and back for this project.
I wanted you to know that Keith has asked me to ship it to you and he will pick it up there. Not sure if he mentioned it to you or not. I have a Reunion Blues Voyager and a Reverb bass box which I just used to ship PRS #11 off to Paul for some electronics work and I just got it back. The case seems great and worked fine. I got extra bumpers from Reunion Blues for the bottom of the case.
If all goes well, I will be taking it to UPS either monday or tuesday, so I guess you should look for it around end of next week. If this isn't a good plan, or good timing, I can wait to ship it. Please let me know. I also have an email in to Keith.and I can send you both the tracking number if you need it.
As always thanks a million! I appreciate you.
Last edited:

Hey Bruce
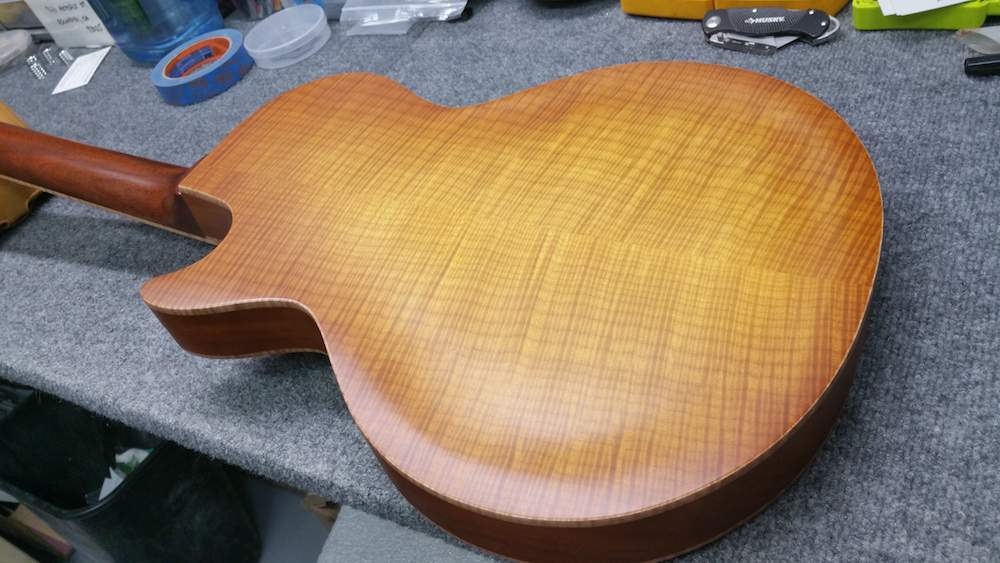
Just a quick note to let you know, finally getting around to having the Les Paul bass that Keith built for me refinished. A piece of finish chipped off long ago when Keith first shipped it to me. Been busy in the studio and haven't had time to deal with it until now. As you may remember, there is no rear cavity cover so Keith will get his extra long tweezers back out and disassemble it for me through the over-sized jack plate. :
View attachment 7089978
View attachment 7089982
Then he will get it back to Pat for the re-finish. Paul Reed Smith donated the flamed maple top and back for this project.
I wanted you to know that Keith has asked me to ship it to you and he will pick it up there. Not sure if he mentioned it to you or not. I have a Reunion Blues Voyager and a Reverb bass box which I just used to ship PRS #11 off to Paul for some electronics work and I just got it back. The case seems great and worked fine. I got extra bumpers from Reunion Blues for the bottom of the case.
If all goes well, I will be taking it to UPS either monday or tuesday, so I guess you should look for it around end of next week. If this isn't a good plan, or good timing, I can wait to ship it. Please let me know. I also have an email in to Keith.and I can send you both the tracking number if you need it.
As always thanks a million! I appreciate you.
The output jack plate is cool looking. I’ve repaired a few hollowbodies and fished electronics in and out through pickup routes or F holes. Doing it that way is just next level crazy! Hopefully crazy in a good way. Gotta admit though, no separate covers does look nice.
BassHappy
Supporting Member
Thanks Matt! I put together the jack plate with parts to match the pickups.The output jack plate is cool looking. I’ve repaired a few hollowbodies and fished electronics in and out through pickup routes or F holes. Doing it that way is just next level crazy! Hopefully crazy in a good way. Gotta admit though, no separate covers does look nice.
When Paul sent the billet, we realized it was thick enough for the top and the back, and I didn't have the heart to start carving holes in the back of that rather exquisite maple:
Keith is very gracious about it, and acts like it's no big deal - but taking it apart and putting it back together has to be a hassle!
Last edited:
Finishing up details on the Sand Battery Furnace:
I made up the furnace cup and air bleed assembly:
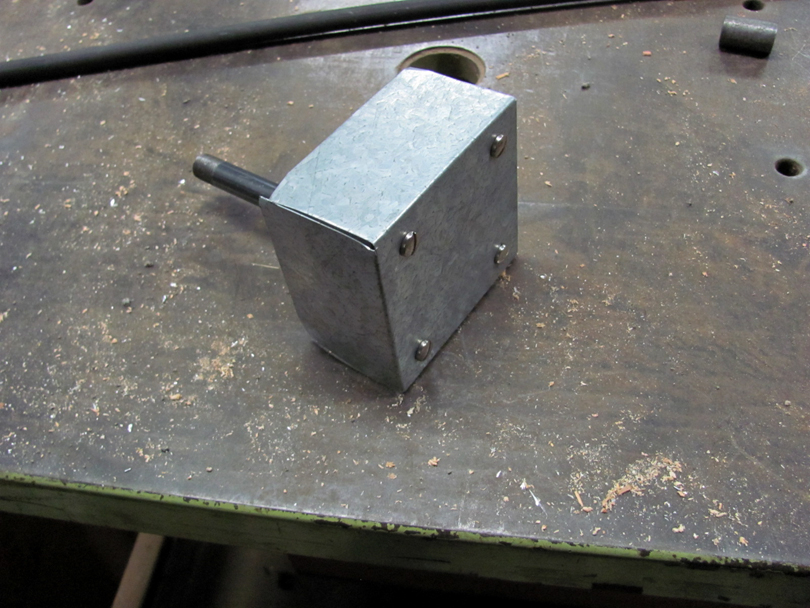
It 's a square pan made from a scrap of 20 ga galvanized steel, with the four sides folded up. The pan is screwed to a square of 3/16" steel plate, which is inside the pan.
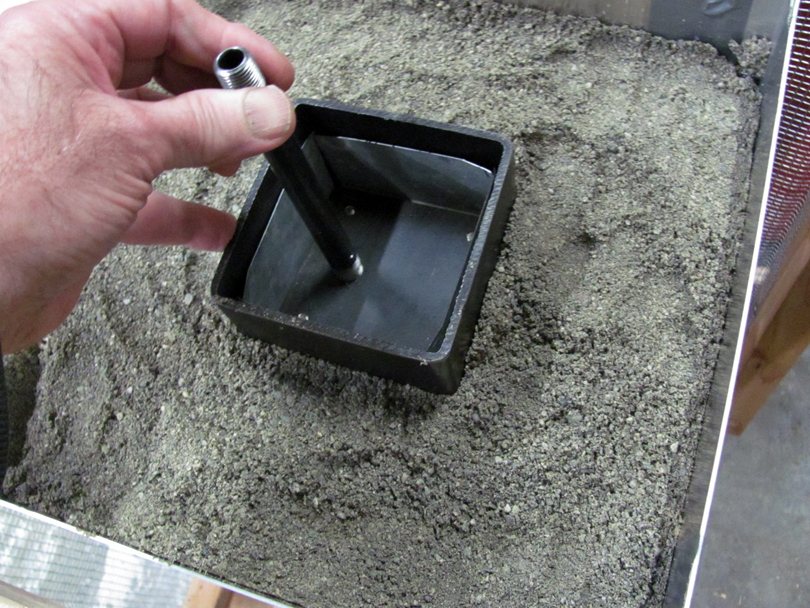
I drilled a 7/16" hole in the steel plate and tapped it 1/4" NPT. Then I screwed in a 6" length of 1/4" black iron pipe to be the air bleed tube. I drilled a single 1/8" hole in the side of the pipe down near the bottom, and turned the pipe so the hole is facing toward the center of the pan.
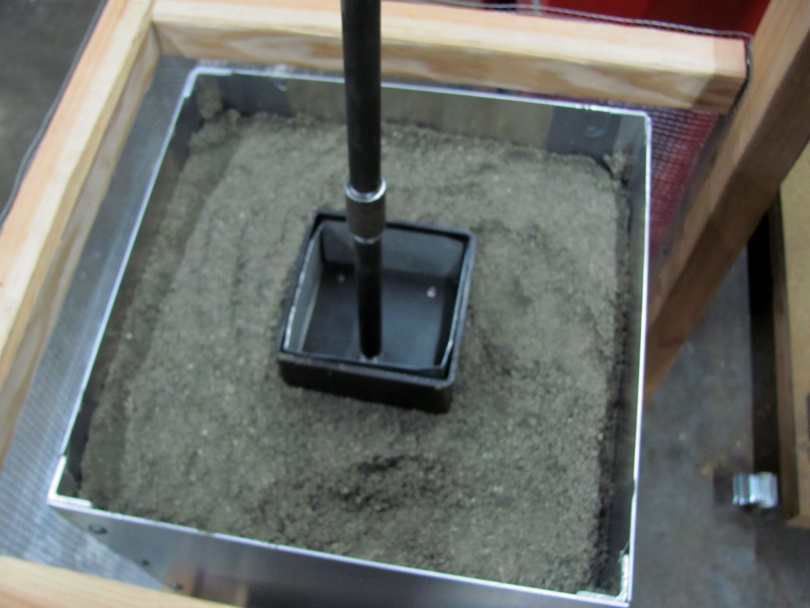
Here I'm testing the fit of the pan assembly down into the furnace tube.
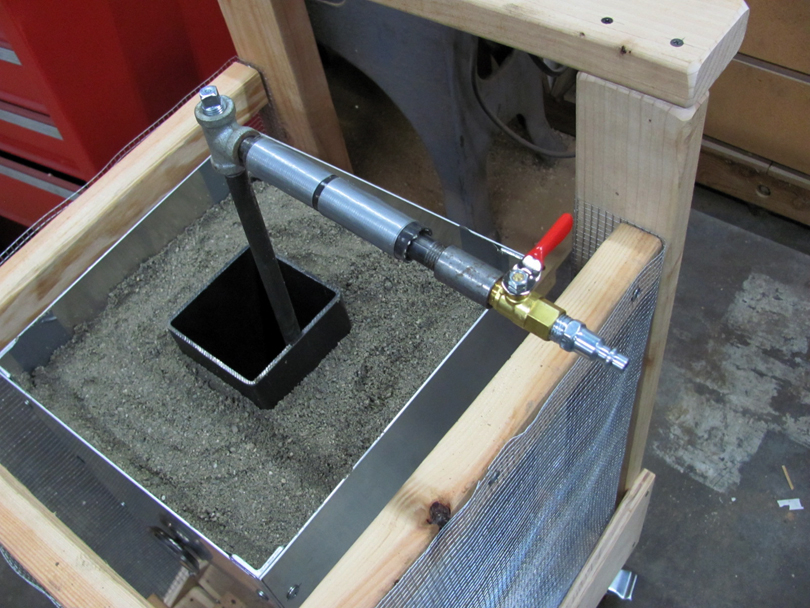
Here's the rest of the assembly: I extended the air bleed up with a 24" length of black iron pipe, turned it 90 degrees, and added a small ball valve and an air line fitting. A scrap of hose and Duct Tape around the horizontal pipe makes an insulated handle.
This whole air bleed pipe thing is a handle for lifting the pan up and down in the furnace tube.
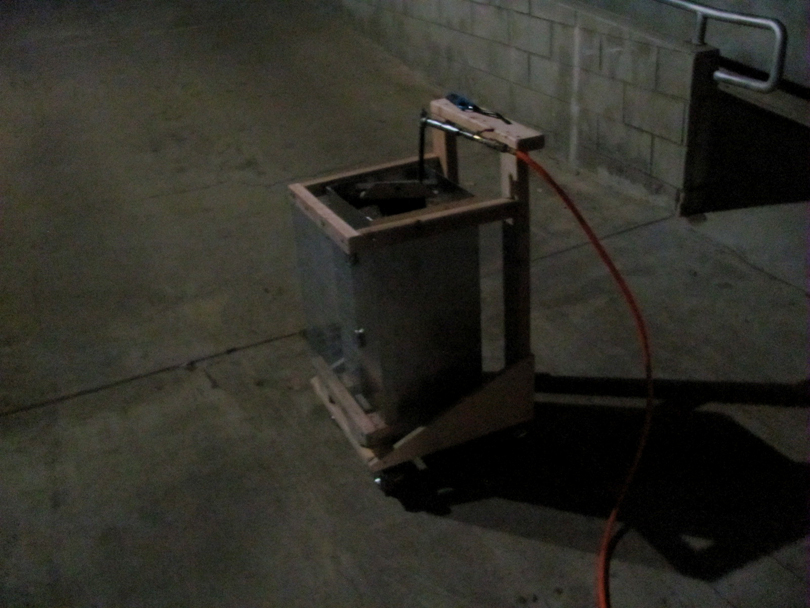
The testing begins! I rolled it outside onto the ramp about midnight last night, and literally fired it up!
I started out putting just 4 lumps of charcoal in the pan, lighting it, and slowly lowering it down to the bottom. I had some problems getting the charcoal lit, even though this was supposed to be Self-Starting charcoal. It kept going out a minute or so after I lowered it down. Even with the air bleed on.
I eventually figured out that I needed to provide some kindling to burn for maybe 10 minutes under the charcoal, to get the charcoal started. I packed a wad of paper in the pan and placed a couple of cutoffs of maple on it, then put the charcoal on top. That worked. I was able to get the charcoal lit.
I also found that being able to raise and lower the pan in the furnace tube is very useful. The best sequence seemed to be to light the kindling with the pan down about 6", and let it burn for maybe 10 minutes like that. When the charcoal starts glowing, lower it down to about halfway and start the air bleed. After another 15 minutes, lower it all the way down. Then more charcoal can be dropped in on top of it.
Today's modification is to add a few stops to the pipe, so I can latch the pan at two or three different heights within the furnace tube.
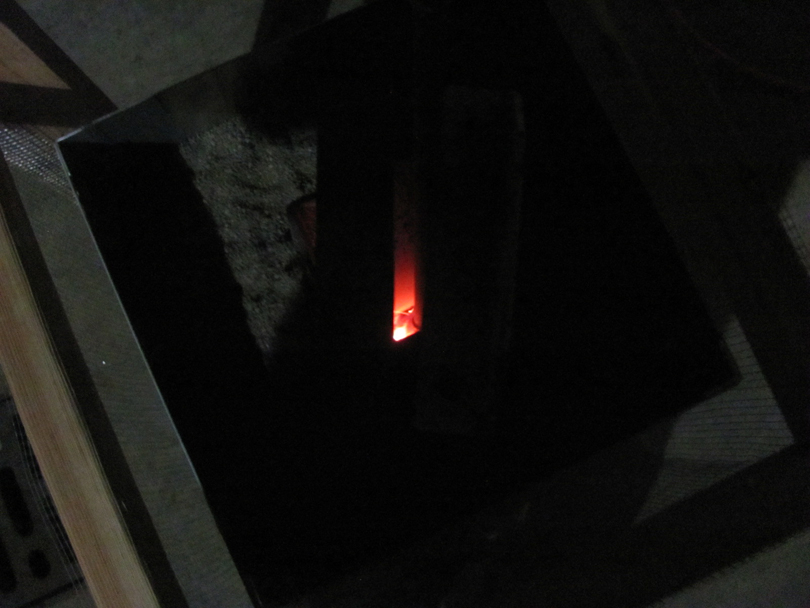
Burning through the first 4 lumps of charcoal took about a half hour, and it took the sand from 60 degrees to about 100 degrees. Then I burned 8 lumps, which took about an hour and got the sand up to around 140 degrees.
So it's basically working, although it's slower and consuming more fuel than I was hoping. However, the sand is still fairly wet, and I didn't have the insulating blankets on it.
More testing over the next few days. I'm going to burn a whole bag of charcoal in it and see what it takes to get the sand up to around 500 degrees. Get the water cooked out of it and see how it does indoors as a heater.
I made up the furnace cup and air bleed assembly:
It 's a square pan made from a scrap of 20 ga galvanized steel, with the four sides folded up. The pan is screwed to a square of 3/16" steel plate, which is inside the pan.
I drilled a 7/16" hole in the steel plate and tapped it 1/4" NPT. Then I screwed in a 6" length of 1/4" black iron pipe to be the air bleed tube. I drilled a single 1/8" hole in the side of the pipe down near the bottom, and turned the pipe so the hole is facing toward the center of the pan.
Here I'm testing the fit of the pan assembly down into the furnace tube.
Here's the rest of the assembly: I extended the air bleed up with a 24" length of black iron pipe, turned it 90 degrees, and added a small ball valve and an air line fitting. A scrap of hose and Duct Tape around the horizontal pipe makes an insulated handle.
This whole air bleed pipe thing is a handle for lifting the pan up and down in the furnace tube.
The testing begins! I rolled it outside onto the ramp about midnight last night, and literally fired it up!
I started out putting just 4 lumps of charcoal in the pan, lighting it, and slowly lowering it down to the bottom. I had some problems getting the charcoal lit, even though this was supposed to be Self-Starting charcoal. It kept going out a minute or so after I lowered it down. Even with the air bleed on.
I eventually figured out that I needed to provide some kindling to burn for maybe 10 minutes under the charcoal, to get the charcoal started. I packed a wad of paper in the pan and placed a couple of cutoffs of maple on it, then put the charcoal on top. That worked. I was able to get the charcoal lit.
I also found that being able to raise and lower the pan in the furnace tube is very useful. The best sequence seemed to be to light the kindling with the pan down about 6", and let it burn for maybe 10 minutes like that. When the charcoal starts glowing, lower it down to about halfway and start the air bleed. After another 15 minutes, lower it all the way down. Then more charcoal can be dropped in on top of it.
Today's modification is to add a few stops to the pipe, so I can latch the pan at two or three different heights within the furnace tube.
Burning through the first 4 lumps of charcoal took about a half hour, and it took the sand from 60 degrees to about 100 degrees. Then I burned 8 lumps, which took about an hour and got the sand up to around 140 degrees.
So it's basically working, although it's slower and consuming more fuel than I was hoping. However, the sand is still fairly wet, and I didn't have the insulating blankets on it.
More testing over the next few days. I'm going to burn a whole bag of charcoal in it and see what it takes to get the sand up to around 500 degrees. Get the water cooked out of it and see how it does indoors as a heater.
It's that season again......and I'm now the official Santa for the city of Fillmore. The other guys have retired and moved away, leaving just me. I've got six bookings so far this year, all in the next two weeks. Two official city events, two lobby shows for Christmas movies at the Fillmore Theater, a private club fundraiser, and one private family party at a big ranch.
This evening is the first city event, the Tree Lighting Ceremony on the front lawn of City Hall. I'll be sitting inside a glowing orb, posing for endless pictures with kids and adults. For about three hours, hundreds of kids. I did it last year, and the city really liked me. So, I'm back. Some serious Ho-Ho ing happening in Fillmore tonight.
This evening is the first city event, the Tree Lighting Ceremony on the front lawn of City Hall. I'll be sitting inside a glowing orb, posing for endless pictures with kids and adults. For about three hours, hundreds of kids. I did it last year, and the city really liked me. So, I'm back. Some serious Ho-Ho ing happening in Fillmore tonight.

Hey Bruce
Just a quick note to let you know, finally getting around to having the Les Paul bass that Keith built for me refinished. A piece of finish chipped off long ago when Keith first shipped it to me. Been busy in the studio and haven't had time to deal with it until now. As you may remember, there is no rear cavity cover so Keith will get his extra long tweezers back out and disassemble it for me through the over-sized jack plate:
View attachment 7089978
View attachment 7089982
Then he will get it back to Pat for the re-finish. Paul Reed Smith donated the flamed maple top and back for this project.
I wanted you to know that Keith has asked me to ship it to you and he will pick it up there. Not sure if he mentioned it to you or not. I have a Reunion Blues Voyager and a Reverb bass box which I just used to ship PRS #11 off to Paul for some electronics work and I just got it back. The case seems great and worked fine. I got extra bumpers from Reunion Blues for the bottom of the case.
If all goes well, I will be taking it to UPS either monday or tuesday, so I guess you should look for it around end of next week. If this isn't a good plan, or good timing, I can wait to ship it. Please let me know. I also have an email in to Keith.and I can send you both the tracking number if you need it.
As always thanks a million! I appreciate you.
Hello Rick!
Keith hadn't said anything to me, but okay, go ahead and send it to me. Although Keith has his own shop about 60 miles away these days, we still do some regular Luthier business. He comes up here once or twice a month to rent time on some of my specialty machines. And he routinely stops at Pat's shop. We help each other with different projects.
BassHappy
Supporting Member
Thanks Bruce!Hello Rick!
Keith hadn't said anything to me, but okay, go ahead and send it to me. Although Keith has his own shop about 60 miles away these days, we still do some regular Luthier business. He comes up here once or twice a month to rent time on some of my specialty machines. And he routinely stops at Pat's shop. We help each other with different projects.
Will get it out monday or tuesday and will get you and Keith the tracking number.
Did have a bit of a scare with the return of PRS #11. Fedex spilled oil all over the box. Happily, it didn't penetrate the cardboard. No harm done just a bit of a scare when I saw it:
Bought a new shipping box from Reverb for the Les Paul bass and called it a day.
Please forgive the intrusion and hijack of the thread.
Last edited:

Bruce sez: "I eventually figured out that I needed to provide some kindling to burn for maybe 10 minutes under the charcoal, to get the charcoal started. I packed a wad of paper in the pan and placed a couple of cutoffs of maple on it, then put the charcoal on top. That worked. I was able to get the charcoal lit."
Hi Bruce. That's the same way I start regular charcoal for my Weber grill in a chimney starter. I begin by squirting a piece of brown paper with cooking oil (plenty of that from Amazon shipments) and placing it below the charcoal. I've been doing it for years and it's the quickest, easiest way of getting charcoal to ignite. Light the paper, come back 10 minutes later to a bed of red hot coals. The huge side benefit was realizing that "charcoal starter" or "easy light" charcoal imparted a nasty flavor.
From working in a boiler service job many years ago I'm surprised that this sand battery isn't oriented horizontally so the fire would have a longer delay time within the tunnel. Horizontal fireboxes and heat exchangers are how many of the deluxe wood stoves (like Jo'tul...) are so efficient at converting combustible mass to BTU energy.
As with my chimney charcoal starter, a vertical firebox is hard to keep the heat from escaping the upper opening. I'll be interested in how your experiments turn out!
One of my favorite "woodworking" Youtube channels is Ish I tani Furniture and he details construction of a simple system that uses wood shavings and sawdust to heat his workshop. This sounds rather mundane, but the videos on his Youtube channel of him making Japanese furniture is beautiful, calming, and inspiring.
Ish i tan i sawdust stove:
Hi Bruce. That's the same way I start regular charcoal for my Weber grill in a chimney starter. I begin by squirting a piece of brown paper with cooking oil (plenty of that from Amazon shipments) and placing it below the charcoal. I've been doing it for years and it's the quickest, easiest way of getting charcoal to ignite. Light the paper, come back 10 minutes later to a bed of red hot coals. The huge side benefit was realizing that "charcoal starter" or "easy light" charcoal imparted a nasty flavor.
From working in a boiler service job many years ago I'm surprised that this sand battery isn't oriented horizontally so the fire would have a longer delay time within the tunnel. Horizontal fireboxes and heat exchangers are how many of the deluxe wood stoves (like Jo'tul...) are so efficient at converting combustible mass to BTU energy.
As with my chimney charcoal starter, a vertical firebox is hard to keep the heat from escaping the upper opening. I'll be interested in how your experiments turn out!
One of my favorite "woodworking" Youtube channels is Ish I tani Furniture and he details construction of a simple system that uses wood shavings and sawdust to heat his workshop. This sounds rather mundane, but the videos on his Youtube channel of him making Japanese furniture is beautiful, calming, and inspiring.
Ish i tan i sawdust stove:
Last edited:
Bruce sez: "I eventually figured out that I needed to provide some kindling to burn for maybe 10 minutes under the charcoal, to get the charcoal started. I packed a wad of paper in the pan and placed a couple of cutoffs of maple on it, then put the charcoal on top. That worked. I was able to get the charcoal lit."
Hi Bruce. That's the same way I start regular charcoal for my Weber grill in a chimney starter. I begin by squirting a piece of brown paper with cooking oil (plenty of that from Amazon shipments) and placing it below the charcoal. I've been doing it for years and it's the quickest, easiest way of getting charcoal to ignite. Light the paper, come back 10 minutes later to a bed of red hot coals. The huge side benefit was realizing that "charcoal starter" or "easy light" charcoal imparted a nasty flavor.
From working in a boiler service job many years ago I'm surprised that this sand battery isn't oriented horizontally so the fire would have a longer delay time within the tunnel. Horizontal fireboxes and heat exchangers are how many of the deluxe wood stoves (like Jo'tul...) are so efficient at converting combustible mass to BTU energy.
As with my chimney charcoal starter, a vertical firebox is hard to keep the heat from escaping the upper opening. I'll be interested in how your experiments turn out!
One of my favorite "woodworking" Youtube channels is Ish I tani Furniture and he details construction of a simple system that uses wood shavings and sawdust to heat his workshop. This sounds rather mundane, but the videos on his Youtube channel of him making Japanese furniture is beautiful, calming, and inspiring.
Ish i tan i sawdust stove:
Hey Rudy;
Thanks for those ideas! Using cooking oil on the paper and kindling wood sounds like a good way to get the charcoal lit. I think I'll try that.
When I was concepting out this thing, I did think about trying to make the furnace tube horizontal. But I wanted the sand battery fairly tall and narrow, so it was easy to move around in the aisles of my shop. And I couldn't come up with a good configuration for that.
I am thinking that the 2nd generation version would have a pyramid of steel plate triangles in the bottom of the square column of sand, with a smaller size chimney tube up the middle. And then the burner pan would be larger, maybe 10" square, that slips in underneath, from the side. To get more surface area heating the bottom side of the sand. The sand battery would straddle the pan during the heating, and the whole pan would be left outside.

Possibly a version that could be fired in the horizontal position and then tipped upright to roll inside?Hey Rudy;
Thanks for those ideas! Using cooking oil on the paper and kindling wood sounds like a good way to get the charcoal lit. I think I'll try that.
When I was concepting out this thing, I did think about trying to make the furnace tube horizontal. But I wanted the sand battery fairly tall and narrow, so it was easy to move around in the aisles of my shop. And I couldn't come up with a good configuration for that.
I am thinking that the 2nd generation version would have a pyramid of steel plate triangles in the bottom of the square column of sand, with a smaller size chimney tube up the middle. And then the burner pan would be larger, maybe 10" square, that slips in underneath, from the side. To get more surface area heating the bottom side of the sand. The sand battery would straddle the pan during the heating, and the whole pan would be left outside.
HoHoHo I'm looking forward to seeing pictures of this!!!It's that season again......and I'm now the official Santa for the city of Fillmore. The other guys have retired and moved away, leaving just me. I've got six bookings so far this year, all in the next two weeks. Two official city events, two lobby shows for Christmas movies at the Fillmore Theater, a private club fundraiser, and one private family party at a big ranch.
This evening is the first city event, the Tree Lighting Ceremony on the front lawn of City Hall. I'll be sitting inside a glowing orb, posing for endless pictures with kids and adults. For about three hours, hundreds of kids. I did it last year, and the city really liked me. So, I'm back. Some serious Ho-Ho ing happening in Fillmore tonight.
Well, I survived the Tree Lighting Ceremony! They had a record crowd, and it was well organized by the City. They even brought in a truckload of genuine snow and made a pile in the middle of a side street. So the kids could run around in it and have snowball fights. I even walked around in it and participated. It was good fun and a great idea. My band was there singing Christmas carols, and I sang one with them.
But I spent most of the four hours inside the lighted globe, posing for pictures. Santa's main job. Every Mom and Dad wants pictures of their kids with Santa. This year, they hired in a photo-taking machine with a woman operating it. It would take two pictures, nicely framed and lit, quickly. Mom would enter her phone number, and the pictures would be sent to her, no charge. The City paid for it. It worked well, and made it all faster and more efficient. I could see the pending picture in the screen as it counted down, which allowed me to make quick little adjustments in pose and expression. Almost all of the pictures came out well, good enough for families to treasure. And some were quite funny.
They gave me the link to their online file of the pictures, so I could save a few for my own memories. They logged 650 pictures from the machine! Plus I posed for at least 200 more while walking around. It was a grind, but it was fun.
Here are a few samples:
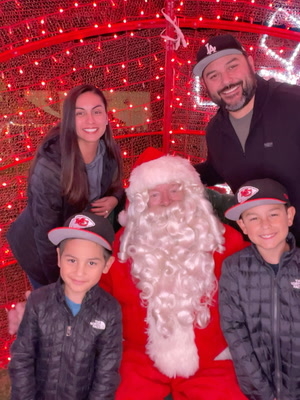

This little guy was being real tough and flashing the horns around, So I did this right as the picture flashed. The parents thought it was hilarious.
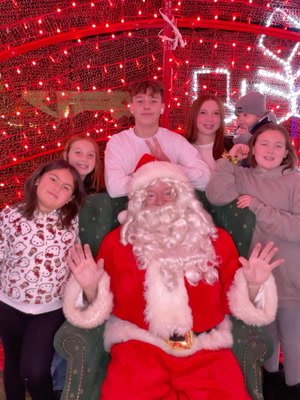
And of course, there's the smart-alec teenager doing the devil horns behind me.......
Coming up, I have three more Santa gigs this coming weekend and two next weekend....
But I spent most of the four hours inside the lighted globe, posing for pictures. Santa's main job. Every Mom and Dad wants pictures of their kids with Santa. This year, they hired in a photo-taking machine with a woman operating it. It would take two pictures, nicely framed and lit, quickly. Mom would enter her phone number, and the pictures would be sent to her, no charge. The City paid for it. It worked well, and made it all faster and more efficient. I could see the pending picture in the screen as it counted down, which allowed me to make quick little adjustments in pose and expression. Almost all of the pictures came out well, good enough for families to treasure. And some were quite funny.
They gave me the link to their online file of the pictures, so I could save a few for my own memories. They logged 650 pictures from the machine! Plus I posed for at least 200 more while walking around. It was a grind, but it was fun.
Here are a few samples:
This little guy was being real tough and flashing the horns around, So I did this right as the picture flashed. The parents thought it was hilarious.
And of course, there's the smart-alec teenager doing the devil horns behind me.......
Coming up, I have three more Santa gigs this coming weekend and two next weekend....


