• TalkBass has been independent since 1998. Add your voice.
    Create a free account to reply to discussions, view embedded media, and browse with fewer display ads.
    Join freeLog in
    Want zero display ads or expanded classifieds tools? Compare plans.

Jason's Refin

OK, here's Jason's lefty 6-banger in for an epoxy treatment on the fingerboard, and a complete refinish and gloss buff-out with hard clear coat. I'll show how I go about this step-by-step.
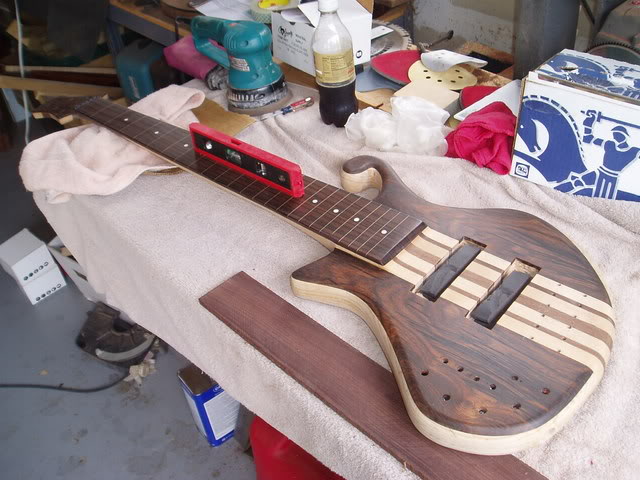
JasonRefin1.jpg


This is Jason's main axe so it has some decent wear on the mac ebony fingerboard. It also sports an ultra-thin oil finish that didn't get quite dry over the cocobolo top, and has worn through in more than a few places.

The very first thing is to spec out the instrument; I write down every important setup spec I can measure. We want to return the instrument to Jason already setup and in his wheelhouse.

Nut slot height above fretboard
Neck relief at #9
String action at #12
Pickup height above body
Saddle heights
Neck relief with strings off

Then map out all the electronics before gutting it...quite a job on this one, two tappable Bart soaps, 5 knobs, 5 switches, 2 battery cases, fretboard LEDs. Oy! :eek:
 
Next step is to tweek the truss rod until the neck (sans strings) is as close to perfectly flat as possible. Writing down (of course) how much rod adjustment you've done.

After that, the bass received a complete naptha wipe-down to remove dirt, grime and residual wax. Then went over the entire body with 400-grit. You can certainly shoot clear coat over an oil finish, but since this bass had also seen some wax, and since the oil finish was so thin (couldn't have been more than 1-2 coats), I went all the way down to wood all over.

The mac ebony board cleaned up nicely with 600 grit. Then wipe down with a dry towel, a thorough blow-down with compressed air, and another total naptha wipe-down. Dried overnight to gas off the naptha.
 
Now the epoxy treatment, good ol' System 3 Mirror Coat. I first make sure the instrument has a level resting place, both fore-aft and port-starboard. Since the Mirror Coat has a long working time and will self-level during flow-out, we want to make sure it doesn't all flow in one direction and build up unwanted thickness somewhere.

JasonRefin2.jpg


JasonRefin3.jpg
 
You can see that the board has a slight radius, something greater than 20".

I tape off the sides with clear packing tape (so I can see through it) to prevent run-off on the board edges. Then mix up the epoxy (making sure you have a thoroughly mixed batch), and let it sit for 30 minutes before using it, so the bubbles work themselves out.

Then I apply the epoxy slowly and smooth it with a paper business card. The main thing here is to make a layer of uniform thickness all up & down the board, not worrying too much here about streaks (since it will self-level), but also not pushing down too hard on the card as this will nearly expose the wood. For this board, I used maybe 1-1/2 tablespoons of epoxy total.

JasonRefin4.jpg
 
After another 30 minutes, I inspect the epoxy for new bubbles and for low spots (they appear as "dents" in the wet epoxy). These I take care of by using a small wooden coffee stirrer (Starbucks!) with the end wet with the epoxy. Just touch the bubbles (every single tiny one!), or dab on a little epoxy into the low spots, and it will all self-level again.

JasonRefin5.jpg
 
OK, the weather cooperated this weekend (read: low humidity), so I was able to get 3 coats of clear on in a single day, including scuff-sanding in between.

But the first job was to cover the center of the epoxied fretboard and knock down the edges...there is an ever-so-slight radius on this board, which causes the epoxy to accumulate at the edges as levels itself. So I cover the center the board with masking tape and use a file to smooth down the edges.

JasonRefin11.jpg


Then the tape was removed, the rest of it was levelled with 600 grit and covered again with tape before spraying. Eventually a second coat will go on the board once the spraying is done.
 
Now the spraying....the first coat goes on cut by 20% with a slow-reducer lacquer thinner, so that it will soak into the remaining wood grain nicely. For this purpose, the bass hangs vertically.

JasonRefin6.jpg


I lay down a good wet coat, and it is dry to the touch in an hour...ready for scuff sanding after 2 hrs. Runs & sags are leveled out with my razor blade scraper...the edge of a new blade is drawn across a screwdriver shaft to bend the edge over ("turn the hook"), then the outer edges are covered with scotch tape leaving the working part of the blade in the center...very effective for knocking down runs so they are level with the surrounding finish.

JasonRefin9.jpg


First scuff-sand is 400-grit to bring most of the finish down to the level of the pores in the cocobolo, swamp ash and walnut, which are not entirely filled by the first coat.

The second coat is full-strength (not thinned), it is dry to the touch in 10 minutes, ready for sanding in an hour (600 grit dry). Still a little wood grain peeking through, so another coat full strength. And this is how it looks after coat #3.

JasonRefin8.jpg


By the looks of it, I will need probably one or two more coats thinned down to 20% with the slow-reducer thinner, so that I can get almost perfect flow-out. For these final coats I'll lay the instrument down horizontally, so that I can shoot a semi-thick coat and let it self-level.
 
I lay down a good wet coat, and it is dry to the touch in an hour...ready for scuff sanding after 2 hrs. Runs & sags are leveled out with my razor blade scraper...the edge of a new blade is drawn across a screwdriver shaft to bend the edge over ("turn the hook"), then the outer edges are covered with scotch tape leaving the working part of the blade in the center...very effective for knocking down runs so they are level with the surrounding finish.

Thats a great tip... I'm definitely going to have to bone up on my finishes, got to do a few soon...

Why is the Bass backwards... :D
 
Shawn, the product is Chemcraft Plastofix Light, it is a 2-part catalyzed conversion varnish applied with a Grizzly HPLV gun. I get it locally in Rockville MD at a place called Industrial Wood Finishes. As I recall its about $80 for a gallon of the varnish and a quart of the catalyst together.

I'm told that Sherwin Williams has a similar product called Water White conversion varnish.

As with any catalyzed finish....the fumes will kill you faster than crack. A respirator with activated charcoal filters, long-sleeved shirt, nitrile gloves and safety glasses are a must. I don't have a spray booth, so I shoot outdoors when I can.