• TalkBass has been independent since 1998. Add your voice.
    Create a free account to reply to discussions, view embedded media, and browse with fewer display ads.
    Join freeLog in
    Want zero display ads or expanded classifieds tools? Compare plans.

Lady 5Jane - Headless, Fretless 5 String Prototype (With Piano Pins)

A template bit bearing blew out during the routing of the neck pocket, but fortunately I caught it before it went astray and ruined the channel route. It's my first bearing failure, and it feels like a rite of passage. ;)

DSC_0584_zps192d3265.jpg
 
  • Like
Reactions: av500
I pulled out my Craftsman 1/2" template bit to pull off the bearing and stop collar to use with the Stewmac bit that had the bearing explosion and discovered that the collar's set screw was missing. A trip to Sears with the bit to see if they had a set screw I could use lead to them very generously replacing the whole bit. I am going to email the folks at Stewmac and see if I can get a replacement bit or some bearings to get it fixed, but for the time being I have a bearing to work with.

I was able to complete the route, and the next step is to shape the neck's heel to fit the angle of the channel.

DSC_0601_zpsacf520f7.jpg
 
Looking good. Are you planning on painting it a colour or just leaving it natural?

I pulled out my Craftsman 1/2" template bit to pull off the bearing and stop collar to use with the Stewmac bit that had the bearing explosion and discovered that the collar's set screw was missing.

Unfortunately, those router bits are famous for that. It's precisely why I haven't bought one. :rollno:
 
Looking good. Are you planning on painting it a colour or just leaving it natural?

Thanks! I am still trying to decide what to do in that regard, but I won't be painting it. I really like the wire brushed finish with black dye accenting the grain, but I want the fingerboard to strongly contrast with the body. I might just darken up the fingerboard, or go all black with it. You can see in the picture a pair of blemishes on the fingerboard that break the continuity a bit, and a darker fingerboard would allow mt o hide that more easily. That being said I REALLY like the fingerboard grain. I am spending more time on this that I expected, especially with it being a rough prototype. Decision, decisions....
 
Hey Michael;

One note about grinding the aluminum: I make all my own bridges and tailpieces from aluminum and brass, with plenty of 3-D contouring. I use a 4 1/2" angle grinder for the rough shaping, and then smooth it out with files.
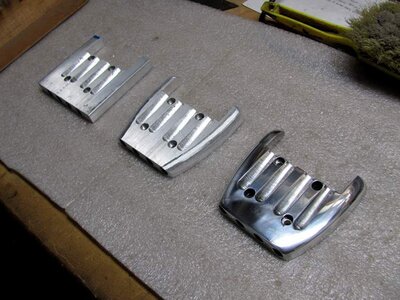
The key thing with the grinder is to use a very coarse sanding disk on a rubber backing disk. I think mine are 60 grit. Then do the shaping with a very light touch. Just glide it over the surface, supporting most of the weight of the grinder with your arms. If you do that, the aluminum will cut fairly quickly, without clogging up the disk. If you have to lean into it, then you'll just be melting the aluminum into the abrasive.

Cool project, some interesting experiments.
 
  • Like
Reactions: michaelwayneharwood
Here's the tailpiece assembly that I make up for my AMB-2 model basses. It's made from 1/2" x 4" 6061 aluminum bar stock. I start by milling and drilling the basic holes and slots. Then I attach it to a wooden holder block and shape all the contours with the angle grinder, smooth it out with files, sand it to a smooth surface, and send it out for chrome plating. Total labor time is about 1.5 hours each.

Working with aluminum isn't really that much different from working with wood. Don't be afraid of making your own custom metal parts. It isn't that hard.

IMG_2161B.jpg IMG_2489A.jpgIMG_2470A.jpg
 
Last edited:
Call me crazy, but I am finding the mistakes I make in this build therapeutic. There's something very satisfying about the thought process of correcting things that go wrong, and the lessons learned are valuable. When I first cut the angle of the neck on one side last week I went all the way to the bottom of the heel, which left a gap at the body/neck transition. A small block of wood set that to right. When cutting the other side this evening I went a bit too far due to a miscalculation on the radius of my table saw blade, and 1/8" strips were glued in to fix that booboo.

These are great things to have happen during this build, and hopefully it will reduce the number of corrections needed in the next build which is for someone other than me.

DSC_0153_zpsb4e460ba.jpg

DSC_0156_zps046401b5.jpg

DSC_0154_zps59abc687.jpg
 
NICE, I haven't seen this thread before, I like the use of flooring a lot. And oak, I'm not sure why oak isn't used more.
Have you seen this guy's tuning peg method? Thought you might like it. I drilled out some of those pegs, they aren't all pretty , but the holes aren't sharp at least, popping them in the mail tomorrow. I'm trying to buy that exact same table saw from a guy on craigslist, but he keeps postponing, looks solid.

[Invalid or Expired Link Removed]
 
  • Like
Reactions: michaelwayneharwood
A small channel was routed in the neck pocket for the piezo bar, and the bar was embedded in hot glue. The hot glue provides a buffer that is *supposed* to eliminate, or at least drastically reduce, piezo quack and clank. Worst case scenario this transducer sounds terrible, but I am looking forward to the sound test...

DSC_0157_zps0794bcd7.jpg

DSC_0158_zpsd9218b4d.jpg
 
I may have missed it, but are you going to add some sort of buffer or preamp for the piezos? Supposedly they actually pick up the full range, but need an impedance-matching buffer to do so. (Never got the chance to try one myself, though.)

From what I understand, piezos are EXTREMELY high-impedance, on the order of multiple megohms, and when combined directly with the inherent capacitance of most amplifier circuits, that creates a high-pass filter around 100-200 Hz. Hence the stereotypical brittle/tinny piezo sound.
 
Last edited:
@TheJoshinator - I never did mention that, did I... ;) I will definitely be experimenting with preamps, buffers, etc. Rather than an off the shelf unit I am planning on wiring up my own, and there are a ton of good schematics on the web like this one. If I can get decent sound out of the piezo stack I will most likely skip adding magnetic pickups in the short term for aesthetic reasons - I really like the way it looks without the pups. I am going to put in one more piezo in the neck pocket (a disc type) to experiment with different styles of transducers as well.
 
A 1/8" round over was applied to the fingerboard, and some quick sanding was done. Lot's more sanding is imminent. ;) Thanks to a reminder by @TheJoshinator that all of the needed parts for the Piezo buffer/preamp are not in hand an order from Mouser Electronics was made. Once the order is in hand a second disc Piezo will be mounted in the neck channel, and then I will be able to glue the neck on.

If the Piezo system can be tweaked to provide decent sound then the build will be absent of magnetic pickups and knobs. Balance between the various Piezo transducers will be handled by small 500k trimmer pots inside the control cavity. While this will not allow for tweaking balance "on the fly" the aesthetic is more important to me in this case than tonal options. All EQ and volume tweaking can be done in my DAW, or with pedals if I ever decided to play a gig with this bass, though I doubt I will be faced with that situation anytime soon.

;)

DSC_0159_zpsdb516b53.jpg

DSC_0162_zps8bbf6db1.jpg