Enjoy the benefits of a premium membership!
Upgrade Account
-
TalkBass has been independent since 1998. Add your voice.
Create a free account to reply to discussions, view embedded media, and browse with fewer display ads.
Join free Log in
Want zero display ads or expanded classifieds tools? Compare plans.
You are using an out of date browser. It may not display this or other websites correctly.
You should upgrade or use an alternative browser.
You should upgrade or use an alternative browser.
Maple + Mahogany short scale
- Thread starter rdrr
- Start date
More options
Who Replied?
Daaaaaamn.. LOVE where the headstock blends with the neck. Thats some beautiful wood working man. Good luck! 
Very nice job on the headstock. The headstock maple veneer looks more like flame than quilt. Whereas the body is a gorgeous quilt. That should look spectacular when it's finished.
What glue did you use for the headstock veneers?
What glue did you use for the headstock veneers?

Thanks for the kind words guys. Any success I have in this is due in large part to the information I've gathered on this forum. Yeah, it's definitely alembic-ish. I was going for something that was a cross between a les paul and a stanley clark alembic sig model and this is what I came up with. I alos really like the way that alembic does the headstock neck transition and wanted to give it a go. Actually I tried a bit on my first bass but you'll notice that there are no pictures of the back of the headstock anywhere to be found for that 
cocobolo, you're right it is flame not quilt. Right now I've been using titebond for everything but have noticed now that it's bone dry around here that the wood seams to be a bit more affected by the moisture in it, swelling and the like. So far nothing horrible but something that I need to account for in the future.
cocobolo, you're right it is flame not quilt. Right now I've been using titebond for everything but have noticed now that it's bone dry around here that the wood seams to be a bit more affected by the moisture in it, swelling and the like. So far nothing horrible but something that I need to account for in the future.
I see, so the glue may be causing some minor problems.
Perhaps what you could do would be to wipe a very thin glue layer on both sides of each joint - emphasis on VERY thin - and dry the wood to be glued in a low temp oven for several hours immediately before glue-up.
That should help with any swelling trouble. Or try hide glue, which shouldn't cause the apparent problem.
Plus, when doing the glue up itself, use a couple of heavy cauls - and start the clamping pressure right in the centre of the wood. Leave that for a couple of minutes to squeeze out a bit, tighten it up some more - and then add the rest of the clamps around the centre clamp and work your way out. That should leave the minimum amount of glue in the joint.
Don't take the clamps off for 24 hours+ to get as much of a cure as possible under pressure. A nice warm area to dry in helps as well.
Gotta say again that headstock is looking might fine.
Perhaps what you could do would be to wipe a very thin glue layer on both sides of each joint - emphasis on VERY thin - and dry the wood to be glued in a low temp oven for several hours immediately before glue-up.
That should help with any swelling trouble. Or try hide glue, which shouldn't cause the apparent problem.
Plus, when doing the glue up itself, use a couple of heavy cauls - and start the clamping pressure right in the centre of the wood. Leave that for a couple of minutes to squeeze out a bit, tighten it up some more - and then add the rest of the clamps around the centre clamp and work your way out. That should leave the minimum amount of glue in the joint.
Don't take the clamps off for 24 hours+ to get as much of a cure as possible under pressure. A nice warm area to dry in helps as well.
Gotta say again that headstock is looking might fine.
Managed to get a bit more done over the last couple weeks
Tuner holes drilled.
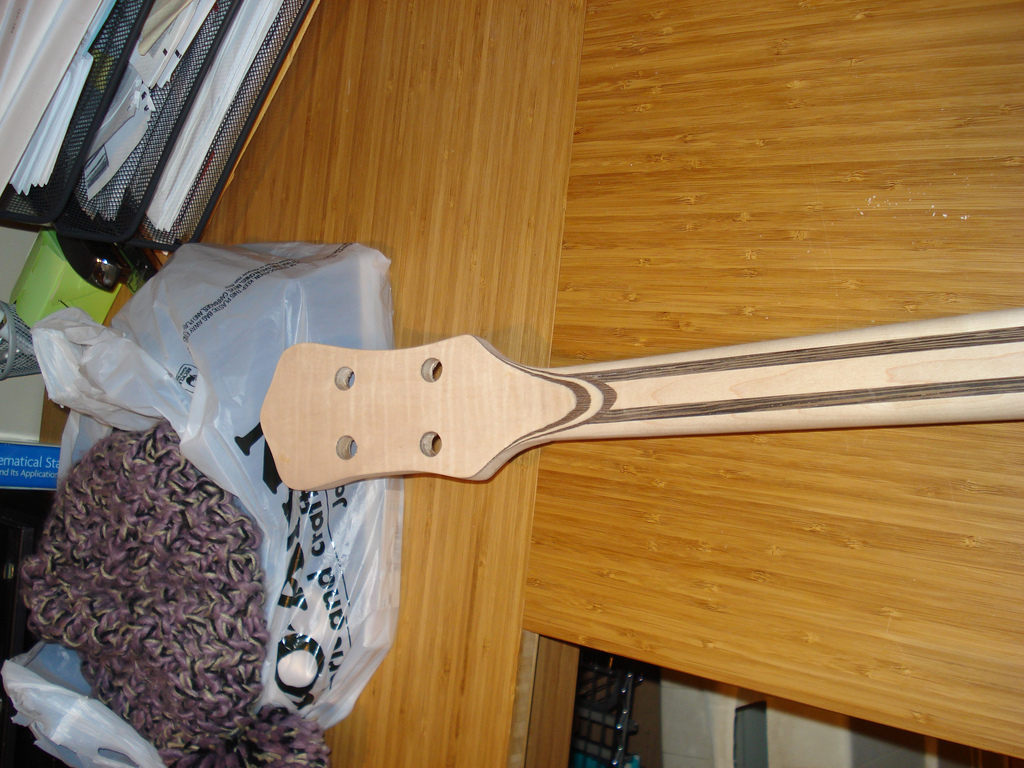
Body wings glued on and tail end trimmed and shaped, and body leveled.
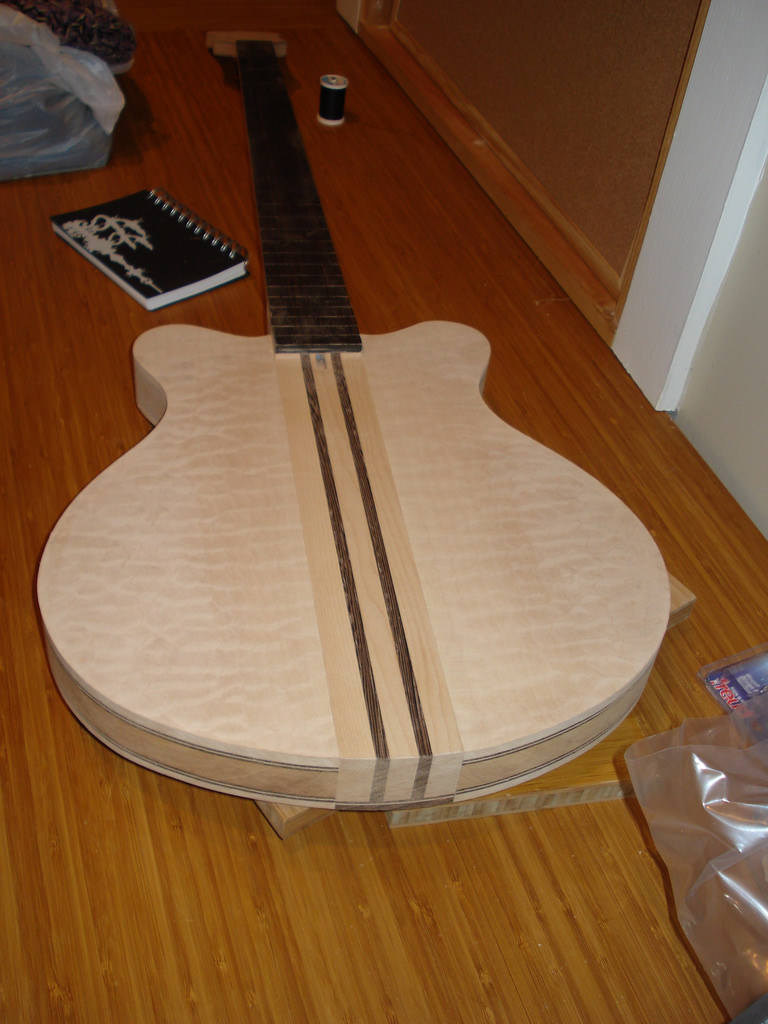
Heal section starting to take shape. Still some more blending that needs to be done but it's getting close.
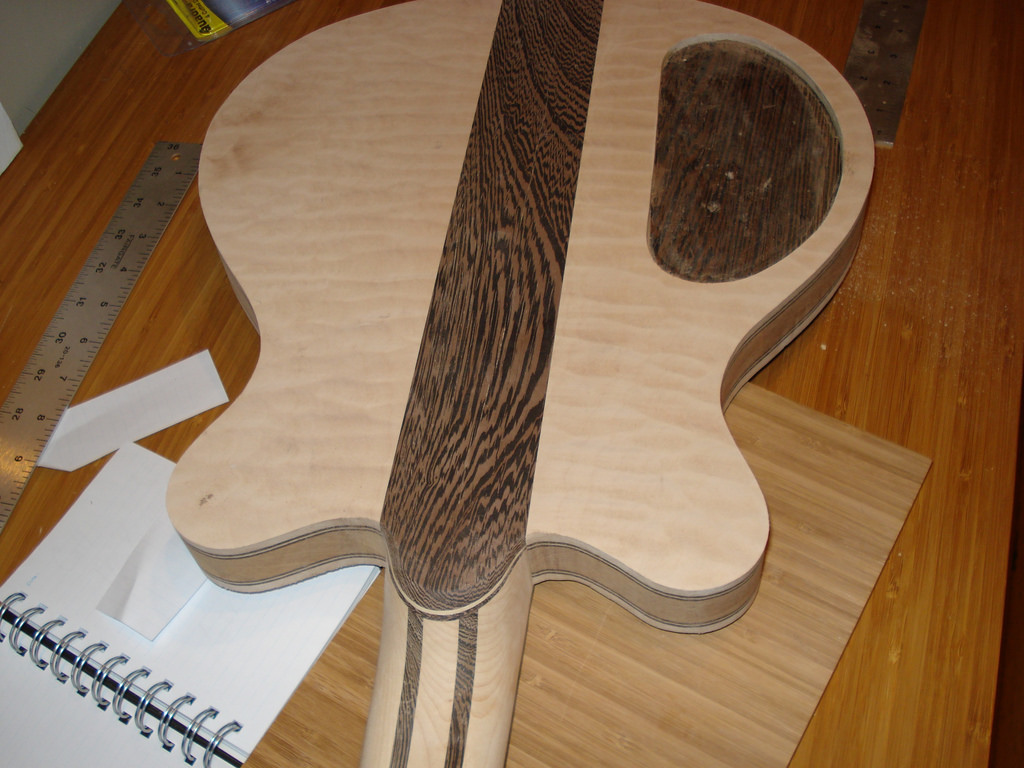
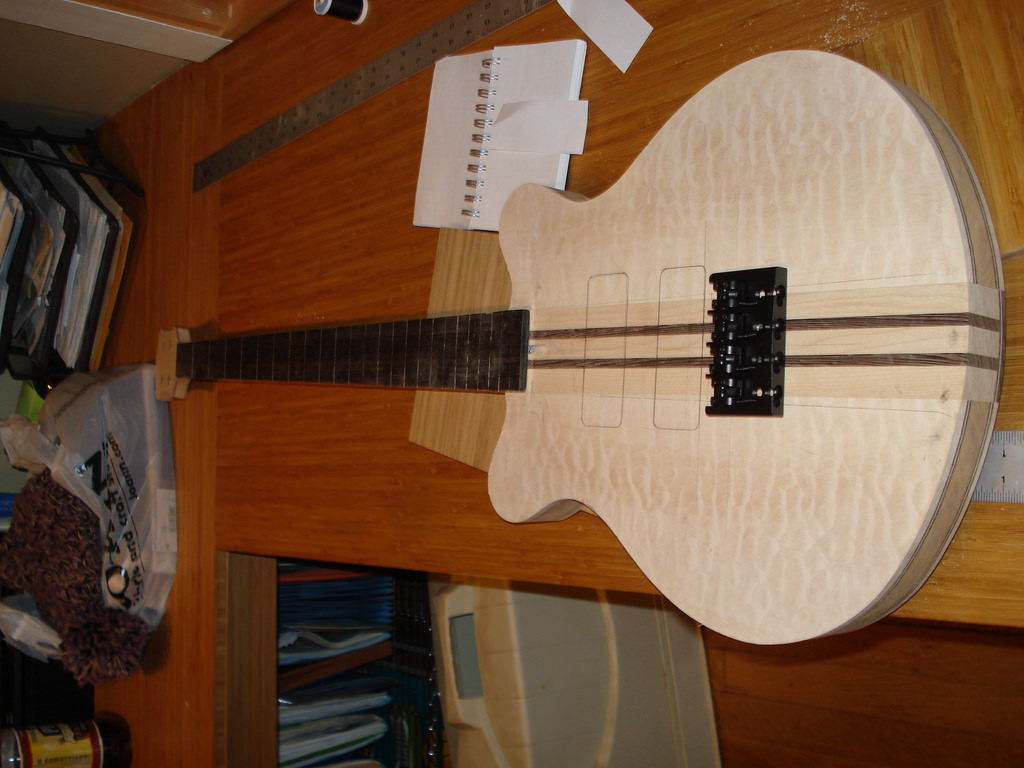
Quick idea of pickup and bridge location.
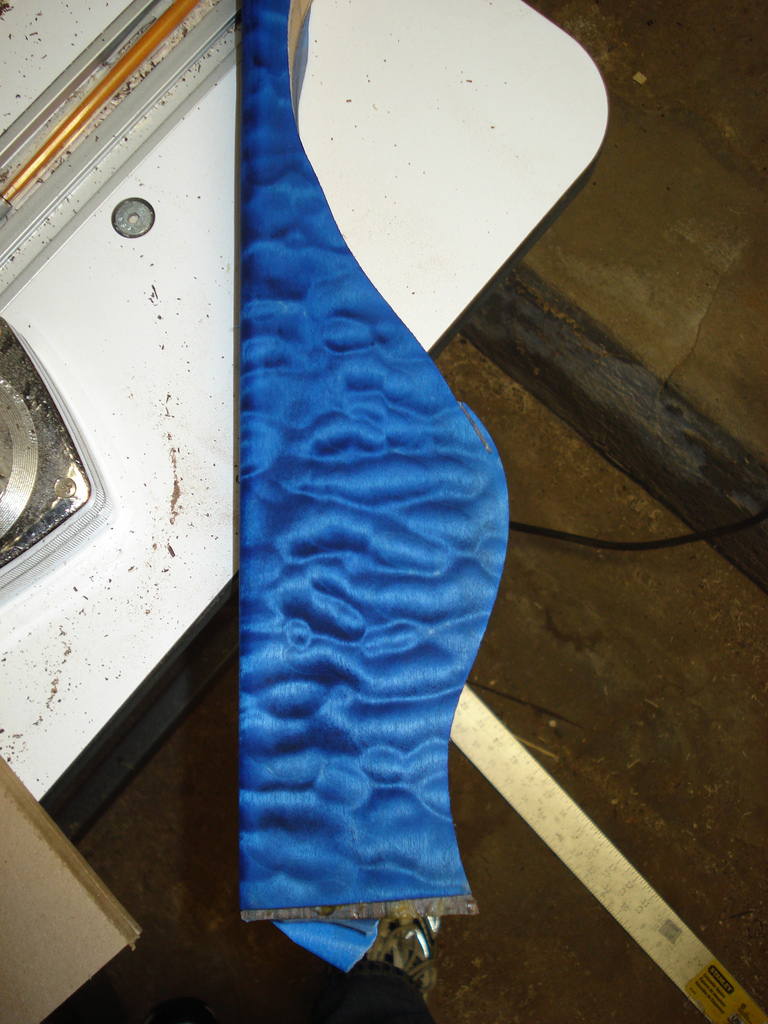
I've still been toying with the idea of doing a colored finish on the quilted. I still have not decided whether or not to do it but I did get a quick color test on one of the wind cutouts.
For the pickups I got a bit lazy and bought a template that supposed to be sized for the barts I have for this bass. The template seams a bit oversized though. There's a 1/16 inch gap all around which when I put the pickups in looks a bit big. So what is everybody else doing for a gap around the pups?
I'm also a little undecided about what type of round over to do on the body so any suggestions are welcome.
Tuner holes drilled.
Body wings glued on and tail end trimmed and shaped, and body leveled.
Heal section starting to take shape. Still some more blending that needs to be done but it's getting close.
Quick idea of pickup and bridge location.
I've still been toying with the idea of doing a colored finish on the quilted. I still have not decided whether or not to do it but I did get a quick color test on one of the wind cutouts.
For the pickups I got a bit lazy and bought a template that supposed to be sized for the barts I have for this bass. The template seams a bit oversized though. There's a 1/16 inch gap all around which when I put the pickups in looks a bit big. So what is everybody else doing for a gap around the pups?
I'm also a little undecided about what type of round over to do on the body so any suggestions are welcome.

I once filled the gap around a pickup that had been routed too large by lining the pickup cavity edges with a contrasting veneer. When trimmed and sanded it looked like it was intentional...
I haven't done the routes yet so I dont have to resort to that, but it's good tip, thanks.I once filled the gap around a pickup that had been routed too large by lining the pickup cavity edges with a contrasting veneer. When trimmed and sanded it looked like it was intentional...
Nice looking build. I would do a natural finish though. Not that I'm not a fan of dyed quilt, but when it's next to wenge it always makes the bass look like some kind of strange hard candy to me.
I really like the look of dyed quilt but I am more and more leaning toward keeping it natural. I like the way it looks now and after doing the test piece the more I look at it the less I like the color mixed with the mahogany, I think it would look better if it was a maple core.
i love it.
this will be the most beautiful bass in the luthier corner this year. hands down.
wow, thanks a bunch but I'm not so sure about that. There are a good number of very talented people on this forum that have been doing it a lot longer then I have, but thanks again, truly is a nice compliment to have.

headlikeahole
Commercial User
Absolutely gorgeous man! I can not believe how well the headstock came out. I wont lie when i saw the first few pictures you posted of the headstock i thought to myself what a mess this guys making out of the headstock. Upon seeing it all shaped I can say i was horribly wrong. Beautifully done sir. IMO i think you'd be crazy to dye the maple blue. Keep it natural I think using bright blue dye would cheapen the look of the instrument. Just my opinion.
Thanks, Im liking the ways the headstock transition is coming out. Could be better but just need more practice, so I guess that means more builds I figured if it came out like crap it could at least serve as a tutorial for what not to do.
I definitely keeping the body natural. Hopefully I can get it to the point this weekend where I can start prepping for finishing next weekend. Pretty certain I have a torn rotator cuff and want to get this finished up before the doc tells me I need surgery and I wont be able to do anything for a couple of months.
I figured if it came out like crap it could at least serve as a tutorial for what not to do.I definitely keeping the body natural. Hopefully I can get it to the point this weekend where I can start prepping for finishing next weekend. Pretty certain I have a torn rotator cuff and want to get this finished up before the doc tells me I need surgery and I wont be able to do anything for a couple of months.
this build actually inspired me to build an arch top bass, its not one, but its got that vibe to it.

As amazing as that blue looks... a natural finish would definitely go well with your color scheme. Absolutely gorgeous bass...
Thanks for the compliments guys.
Yeah, I'm with ya on that one. The original plan when I started it was to do the blue dye but once everything started coming together I came to the realization that it's way nicer without it.
I saw that I cant wait for that build to begin. I see what ya mean about this one too. The original plan in my mind was to do a fairly big roundover on the edges but the more I look at it the more I think I'll just knock the edges down a bit and leave it. I'm really liking it the way it is.
As amazing as that blue looks... a natural finish would definitely go well with your color scheme. Absolutely gorgeous bass...
Yeah, I'm with ya on that one. The original plan when I started it was to do the blue dye but once everything started coming together I came to the realization that it's way nicer without it.
this build actually inspired me to build an arch top bass, its not one, but its got that vibe to it.
I saw that I cant wait for that build to begin. I see what ya mean about this one too. The original plan in my mind was to do a fairly big roundover on the edges but the more I look at it the more I think I'll just knock the edges down a bit and leave it. I'm really liking it the way it is.
id be particial to binding on this one.
I thought about that. Just a bit scared of routing the channel for the binding near the neck area. I know I could as close as possible with a router and then do the last little area by hand, also a frighting proposition but something I think I could do. I traced the outline of a binding on it as it is now and it looks pretty nice. Damn , now I'm trying to decided on what type of binding. I like the idea of a wenge contrast strip on the inside of the binding.
mikeyswood
Inactive