• TalkBass has been independent since 1998. Add your voice.
    Create a free account to reply to discussions, view embedded media, and browse with fewer display ads.
    Join freeLog in
    Want zero display ads or expanded classifieds tools? Compare plans.

Marcus Miller 5 string Jazz

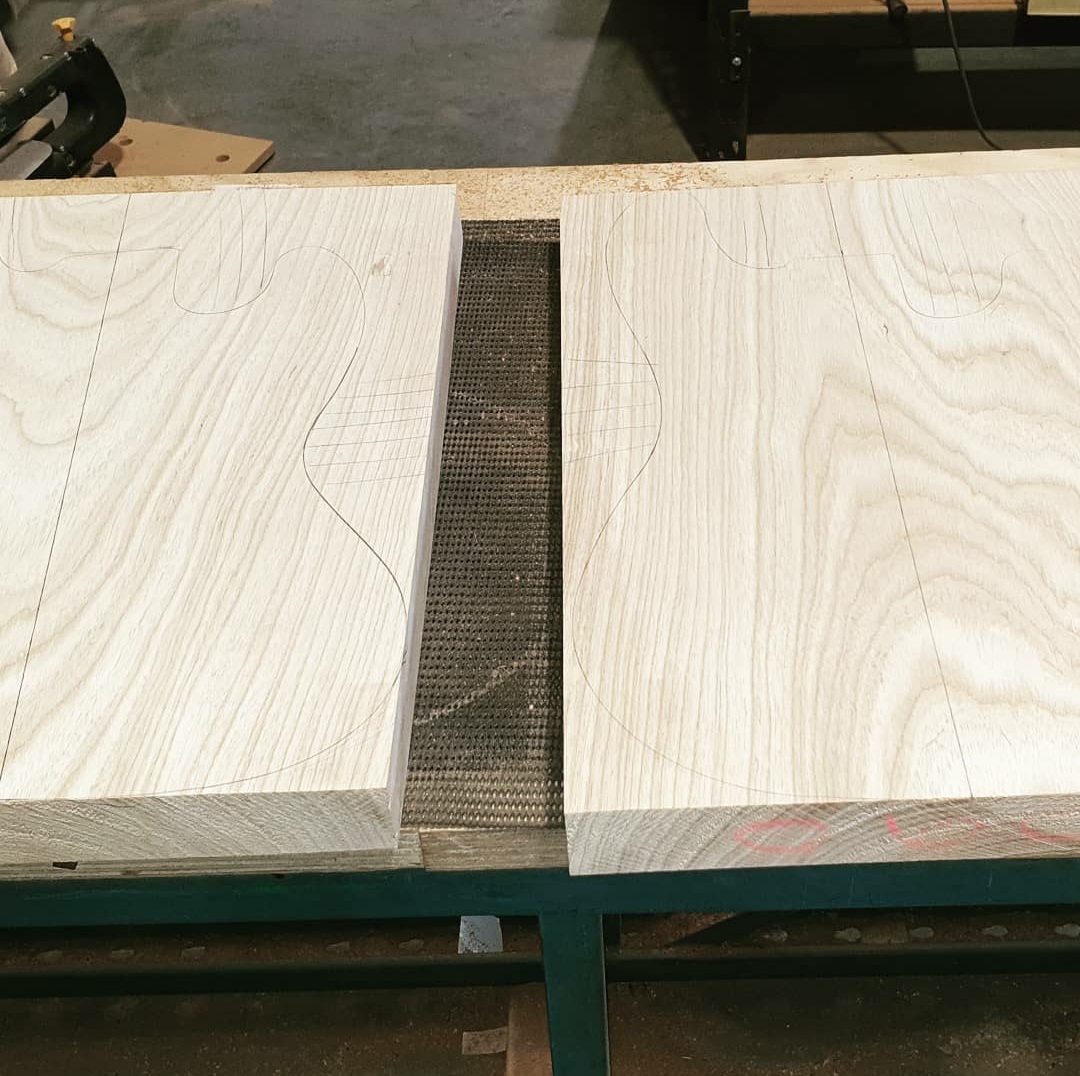
Way back I purchased two pieces of swamp ash to save on shipping just one from USA to AUS.
The first was for a P bass build.

I thought for this piece I'd build a jazz bass.
I used to have a natural finish MIJ marcus miller 4 string that I quite enjoyed but had to sell to make ends meet.

This bass will be a 5 string along those lines.
I did start this build at the very end of 2019 but had to shelve it due to the world ending. I have since finished the P bass (I might do a build thread for that too) and have gotten back to this one recently.

Specs that i have nailed down:
BODY - swamp ash
NECK - Maple 22 fret
SCALE - 35
HARDWARE - Chrome
BRIDGE - Babicz
PICKUPS - Bartolini singularity P2
PREAMP - East Marcus Miller
TUNERS - Hipshot USA ultralight

Here's some pics from waaay back when I started
20240824_044108.jpg


20240824_045432.jpg


20240824_045449.jpg
 

Attachments

  • 20240824_044035.jpg
    20240824_044035.jpg
    474.2 KB · Views: 10
  • Screenshot_20240824-043956_Instagram.jpg
    Screenshot_20240824-043956_Instagram.jpg
    680.8 KB · Views: 14
  • 20240824_044955.jpg
    20240824_044955.jpg
    570.9 KB · Views: 14
Last edited:
I started the neck a couple of weeks ago. 4 piece maple with a nice flame.
Probably should have gone 3 pieces and glued an off cut on for the extra bit of headstock

20240810_153037.jpg


That's the P bass I recently finished using the other blank of swamp ash.
I used it to trace the headstock and then altered it to make it work with the tuning machine locations
20240810_153222.jpg


20240810_155902.jpg


Got the truss rod channel routed out before calling it a day
20240810_171039.jpg
 

Attachments

  • 20240824_141141.jpg
    20240824_141141.jpg
    4.9 MB · Views: 11
Did a little more on Friday, I had the day off work.

20240830_123929.jpg


Routed out some pickup cavities. Unfortunately I left the east preamp at home otherwise I would have routed for that too.
20240830_140442.jpg


Filed a truss rod access slot
20240830_142321.jpg


Cut a piece of flame maple for the fretboard.
One of the guys who frequents the workshop has a CNC machine and does a bit of work for the rest of us. I'll be asking him to sort out some cream blocks and binding for me.
20240830_124322.jpg
 
Last edited:
Got to the workshop a little late yesterday but got a few hours of work done

I bought the East Marcus Miller Pre new for this build a while back and of course one came up used for a good price straight after
I bought that too - I might make a 4 string version down the track.
The controls are:
POTS - Vol/Blend, Mid level/Mid Freq, Bass/Treb with push/pull treble bright switch,
Passive tone with push/pull active passive switch.
SWITCH - passive mode pickup selector (both pickups/bridge only)

I'll be wiring the pickups backwards so I can select between both or neck only I passive mode.
20240921_141656.jpg


A lot of sticky tape goes into making a bass
20240921_145748.jpg


All those pots in the control plate means the jack will be in the side of the body.
20240921_151505.jpg


even more tape. Here its protecting the body from the drill chuck while make holes to connect wiring from here, there, and everywhere.
20240921_153320.jpg


20240921_160349.jpg


I didn't get pics of the battery box route in the back.
Also I forgot to route space for the pickup selector switch. That will end up in front of the pots in the pickguard
 
Here's a shot of the battery cavity I cut last week
20241004_114344.jpg


This week I routed a spot for the battery cover
20241004_120439.jpg


I wanted to use a neck plate for the aesthetic, however the carbon rods in the neck lined up with the holes in a standard plate so I went with plan B
20241004_123247.jpg


This way will show off more grain i guess
20241004_124722.jpg


Last job for the day was persuading a thin strip to fit into the truss rod route and glue it in.
I managed to forget again to route space for the preamp switch.

20241004_140412.jpg
 
Its been a minute.
I had to move house.

Got back into the workshop today

spent way too long hand sanding the body down with 180.
had done the front and back last time with an orbital.
20241115_135635.jpg


Next up I used that red bristled little guy (pictured above) in the impact driver/drill to tear out the grain.
The lighting at the workshop is to enable good vision of what you're working on, so finding shadows for this pic was difficult.
the contrast in grain height was a more noticeable in person. The valleys appeared a lot deeper.
20241115_144728.jpg


20241115_144739.jpg


20241115_144812.jpg


Then a couple of clear coats. The colour contrast really becomes noticeable here. Unfortunately so do all the imperfections.

I realised here that I should have sanded a little before tearing the grain and been meticulous afterwards.
There are brush marks from tearing out the grain.
I could have sanded the clear coat off and gone for it but I'd just spend about 1.5 - 2 hours sanding so wasn't in the mood to do it all over again.

This bass will now be having a matte finish.
this isn't so bad. Im not sure the grain contours, my skill/patience level and a high gloss are compatible.
20241115_155227.jpg


While waiting for coats to dry I machined down the truss rod shim to close to level then finished it by hand with scraper and block sander.
20241115_152351.jpg


20241115_153116.jpg


20241115_160200.jpg


Finished the day off with two coats of "Japanese brown". Here the valleys in the grain that was torn out really becomes noticeable.

20241115_161553.jpg


The intention from here is to lightly sand back so the brown remains in the grain valleys only but leaving bare timber on the high sections. Then spraying a yellow tint, think the middle of a 3 tier sunburst. The brown should show through the tint and contrast well against yellow.
I'm leaning towards leaving it there but there is a part of me contemplating not sanding the sides and having a tobacco burst.
 
Last edited:
So I decided against the tobacco burst which cost me about 2 to 3 hours of hand sanding the edges down after orb sanding the front and back in about 10 -15 minutes.

I did of course orb sand the edges where I could. However, as the surface contact area is much smaller a very Very light touch is required. I erred on the side of caution and stopped short with the orbital and switched to a block then just folded paper in the hard to reach spots.

20241129_135613.jpg


Pics out of order for comparison before and after sanding. I believe this is what's called a Ceruse finish. The brown is still in the deeper sections and running my hands over it I can feel the 'topography'.
20241129_142203.jpg


My CNC'd block cavities came back so they got glued in.
20241129_130804.jpg


To the right is the hanging stick. The unintentional burst of my basses brown over some previous instruments purple (and god knows what in between) is really doing it for me. I've got another 5 string jazz body started (among others) that I haven't yet settled on a colour. I'm pretty certain it will be this.
20241129_135101.jpg


Bare timber, wiped down to get rid of any dust.
20241129_161842.jpg


20241129_161851.jpg


Vs a couple of clear coats
20241129_165154.jpg


20241129_165210.jpg
 
Last edited:
First day back in the new year.

Now that the frets are in, I filed an angle into them on either side of the fret board.

20250124_125450.jpg


20250124_125502.jpg


Next onto the headstock.
Started with the router to step the thickness down.

20250124_133323.jpg


20250124_133352.jpg


Then clamped it in a jig to keep it perpendicular, and with the sanding bobbin radiused from the fretboard height to the new headstock height before filing then finishing the sanding off by hand.

20250124_134505.jpg


20250124_134526.jpg


20250124_145352.jpg


20250124_151743.jpg


Prior to Christmas I started painting the body. But the yellow felt too much. So today I sanded that off to start again.

20250124_154810.jpg


20250124_155431.jpg


This dog looks MUCH bigger in person (especially the head).
I must have been orb sanding the body for longer than his/her liking. It came from the other side of the workshop to look at me with disdain for about 2 seconds then trotted back off to his/her original spot.
20250124_154935.jpg
 
Last edited:
Gees I haven't posted on this in 6 months.
I've done a bit here and there. Here are the pics

Shaping the neck
20250214_131725.jpg


20250503_134630.jpg


20250503_142159.jpg


20250503_142212.jpg


20250503_142238.jpg


20250503_160425.jpg


There were 2 imperfections on the headstock so I carved them out and tried to make it look it look fancy in the process
20250627_113056.jpg


One of the imperfections couldn't be removed (the brown spot up high), so I think the shaping on the headstock will end up being a solid colour.
20250627_113106.jpg


Side dots in
20250627_120927.jpg


20250627_121600.jpg


And finally a bit of putty to fill in the fret slots
20250627_142635.jpg


20250627_142906.jpg
 
What is "Japanese brown"? I could only find patina spray for metals

20250801_112434.jpg


I'm in Australia so not sure if this is available or called the same thing everywhere
 
  • Like
Reactions: joover