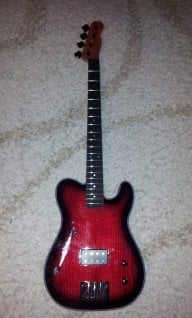
I just wanted to document my progress on a bass I bought in high school from a pawn shop for about $150. I don't know much about it's origins (what brand of copy it is). It originally came with some DiMarzio p-bass pickup in the neck position and the original pickup in the bridge position (it didn't work, unfortunately). It also had the bridge replaced with a Badsss II Bridge which I promptly took off and put on my jazz bass. I had also painted it at one point with auto paint and removed it shortly thereafter, but that is why there is blue all over the body. The pickguard is some cheap plywood I got at an arts and crafts store that I stained.
A few years ago I ripped out all of the frets to make it a fretless. I went the Jaco route, popped the frets out (with all the finesse of a gorilla) and filled the slots with wood putty. I tried to epoxy the neck and it did not turn out well, so I scrapped it all off. I also replaced both pickups. The bridge is a jazz pick up (i'm not sure the brand) and the is a seymour duncan p-bass pickup.
Here is my plan for this old girl. First, I'm going to sand the whole thing down so I can refinish it with either Tung Oil or Tru-Oil (open to thoughts ). Next, I'm going to focus on the neck as there are some areas that need some TLC before I try my hand at putting on an epoxy (the System 3 Mirror epoxy) to get a smooth glassy finish.
After getting the body ready to go, I plan on replacing the pickups with Rickenbacker pickups or rick replacements. I have a hi gain pup for the neck that I bought from Rickenbacker directly. I will likely use the seymour duncan bridge pup to replace the j-pup currently in there. I'm replacing the fender bridge with a Hipshot bridge and the pickguard with a black rick pickguard from allparts. I'm also going to buy the black pickup plate cover from these guys ([Invalid or Expired Link Removed]) to finish it up. I'd like make a replacement trussrod cover, but I'm not certain what I want shape I want. I'm also thinking about replacing the tuning keys (the ones on it currently are fine but it might be cool to change it up if I have the cash).
I'll keep posting updates as I go along and I'm happy to take any suggestions, tips, or the like. Cheers!
A few years ago I ripped out all of the frets to make it a fretless. I went the Jaco route, popped the frets out (with all the finesse of a gorilla) and filled the slots with wood putty. I tried to epoxy the neck and it did not turn out well, so I scrapped it all off. I also replaced both pickups. The bridge is a jazz pick up (i'm not sure the brand) and the is a seymour duncan p-bass pickup.
Here is my plan for this old girl. First, I'm going to sand the whole thing down so I can refinish it with either Tung Oil or Tru-Oil (open to thoughts
). Next, I'm going to focus on the neck as there are some areas that need some TLC before I try my hand at putting on an epoxy (the System 3 Mirror epoxy) to get a smooth glassy finish.After getting the body ready to go, I plan on replacing the pickups with Rickenbacker pickups or rick replacements. I have a hi gain pup for the neck that I bought from Rickenbacker directly. I will likely use the seymour duncan bridge pup to replace the j-pup currently in there. I'm replacing the fender bridge with a Hipshot bridge and the pickguard with a black rick pickguard from allparts. I'm also going to buy the black pickup plate cover from these guys ([Invalid or Expired Link Removed]) to finish it up. I'd like make a replacement trussrod cover, but I'm not certain what I want shape I want. I'm also thinking about replacing the tuning keys (the ones on it currently are fine but it might be cool to change it up if I have the cash).
I'll keep posting updates as I go along and I'm happy to take any suggestions, tips, or the like. Cheers!