• TalkBass has been independent since 1998. Add your voice.
    Create a free account to reply to discussions, view embedded media, and browse with fewer display ads.
    Join freeLog in
    Want zero display ads or expanded classifieds tools? Compare plans.

Need help on sticking down a lifting poly(?) finish crack

Stealth57

Supporting Member
Aug 28, 2020
11,488
67,427
NorCal
www.bigteardrop.com
This is a 2014 Epiphone Classic IV Pro with a white poly (hard plastic) finish. The top rear horn must have been hit as there are some small crack lines, but one bigger piece that is lifting off the face.

I am a bit paranoid about prying it up enough to get some superglue under it so I can clamp it down. Hoping a finishing repair expert here can give me some advice on the repair. Thanks in advance.
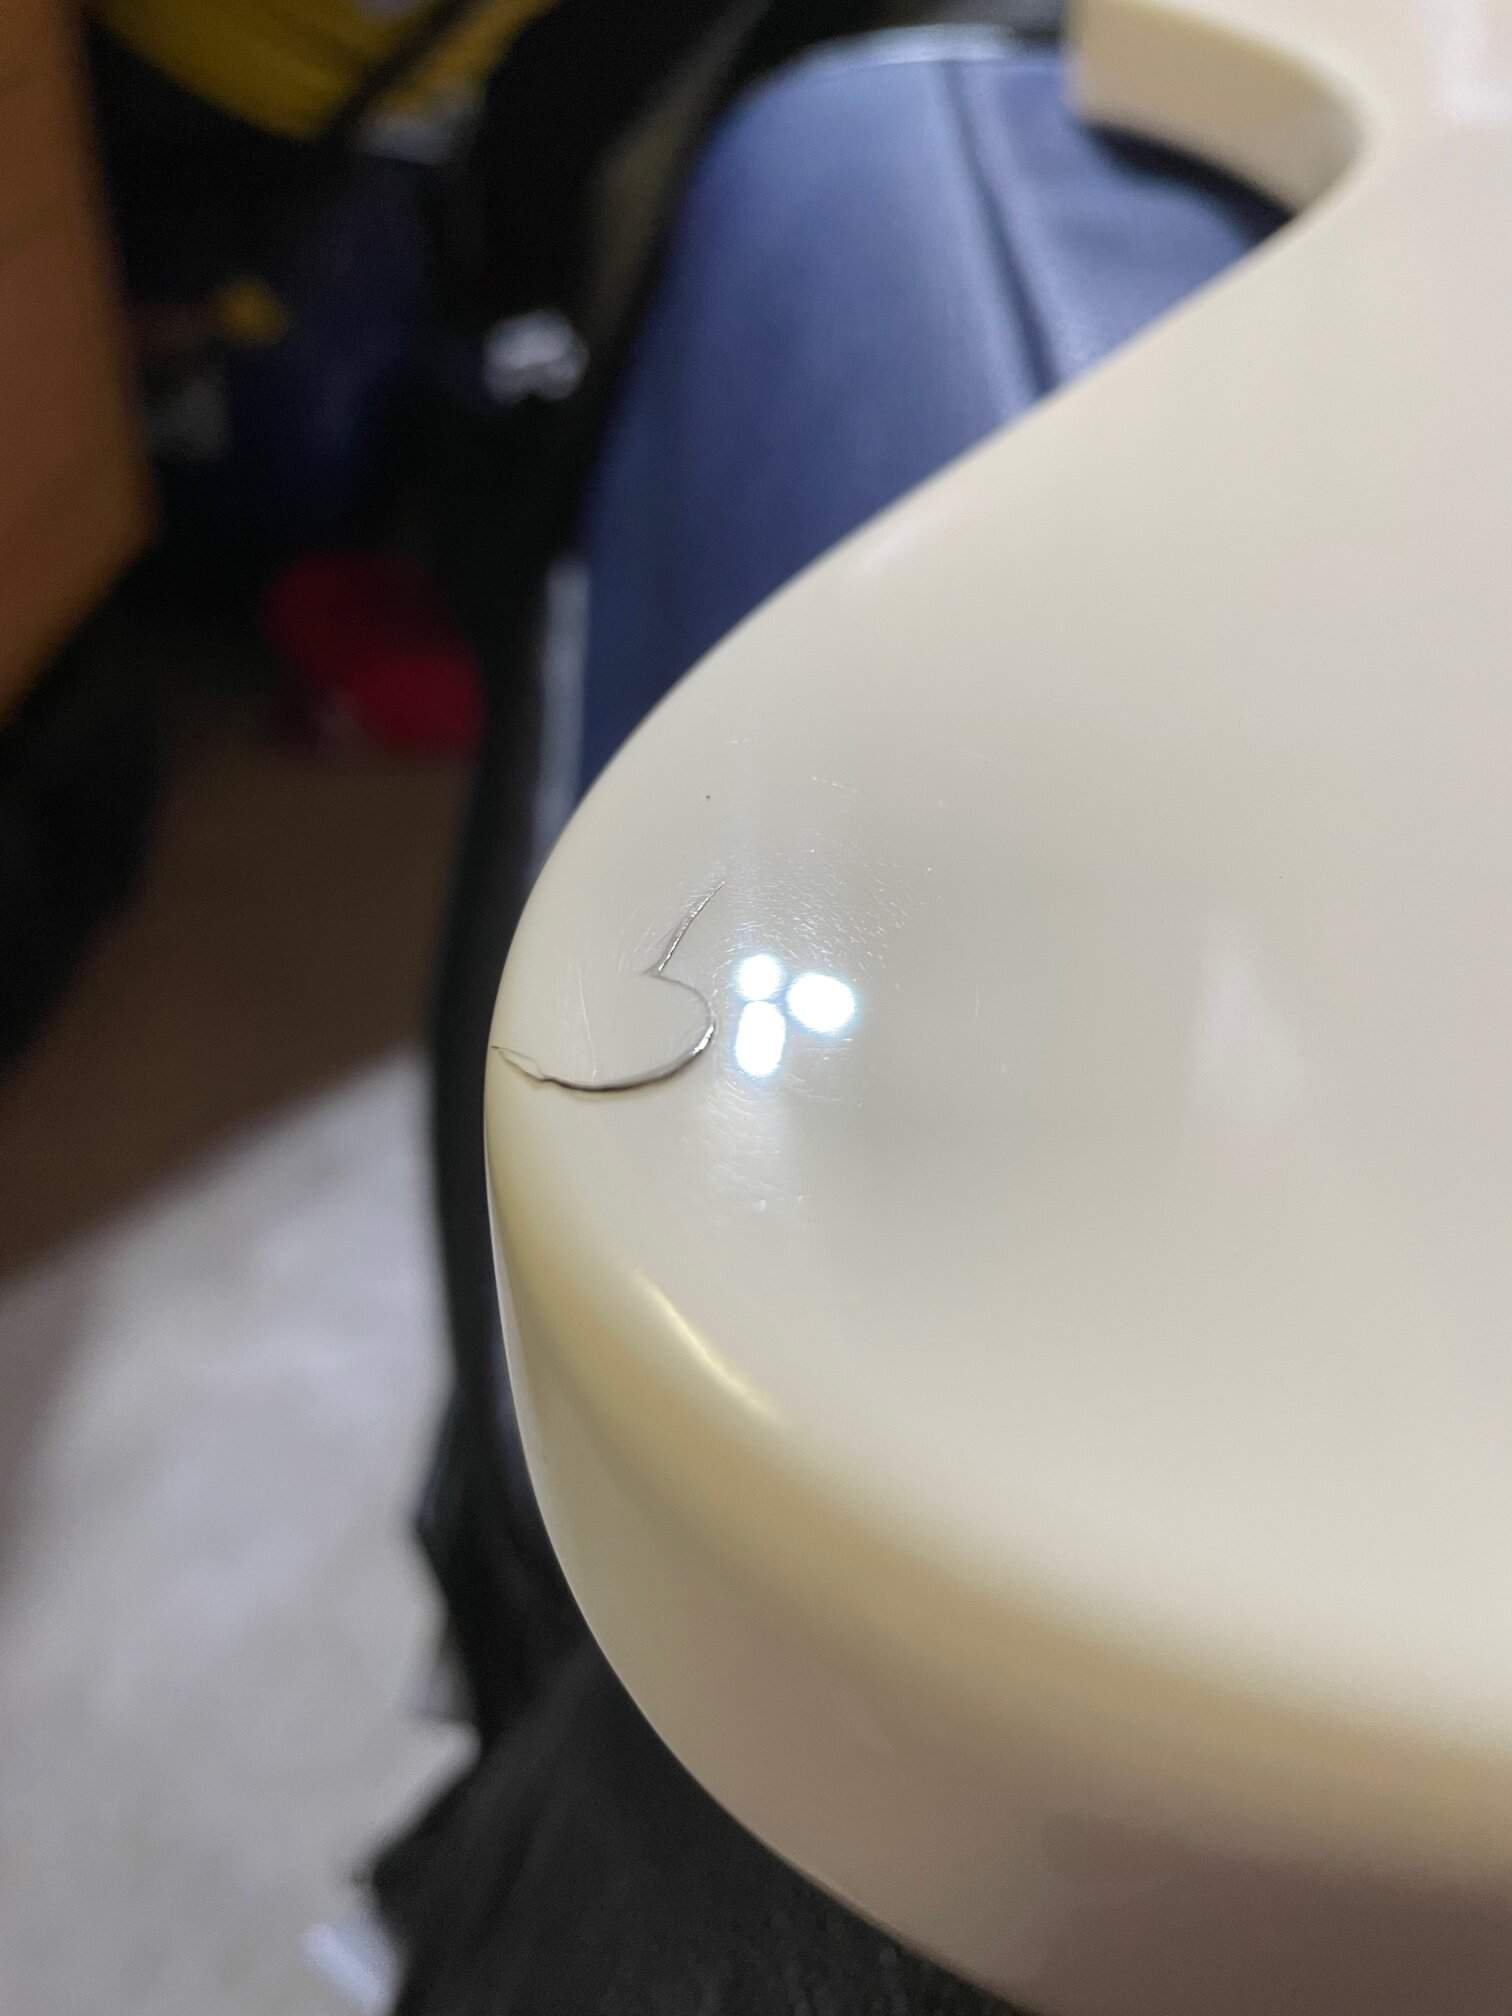

IMG_1453.jpg
 
  • Like
Reactions: JRA
It looks like there's some dirt in the crack. I'd probably start by wiping it with naptha.

Thin super glue will wick incredibly well. No reason at all to try to peel the chip back up. You really need the smallest possible droplet of glue and it'll suck itself under the chip like magic. If you're not super comfortable with thin super glue, practice on scrap. It'll run everywhere and make a mess if you use too much. If you're still not confident, drip a big huge drop of it onto a scrap piece of plastic or into a little dixie cup, then use an xacto knife to pick up a tiny drop and apply it to the crack, as if the knife was an old fashioned quill pen.

On chips like this that are kinda-lifted, I like to take a piece of masking tape, stick a much shorter piece to the sticky side, non-sticky side down and wax wax that short piece - basically to create a little waxed "bandaid." Then, drop the glue onto the edge of the chip and give it a few seconds to wick in, then trial-press it down with my fingernail to see if any glue runs out. Clean up the runout. then use the waxed tape to hold the chip flat while it cures.
 
It looks like there's some dirt in the crack. I'd probably start by wiping it with naptha.

Thin super glue will wick incredibly well. No reason at all to try to peel the chip back up. You really need the smallest possible droplet of glue and it'll suck itself under the chip like magic. If you're not super comfortable with thin super glue, practice on scrap. It'll run everywhere and make a mess if you use too much. If you're still not confident, drip a big huge drop of it onto a scrap piece of plastic or into a little dixie cup, then use an xacto knife to pick up a tiny drop and apply it to the crack, as if the knife was an old fashioned quill pen.

On chips like this that are kinda-lifted, I like to take a piece of masking tape, stick a much shorter piece to the sticky side, non-sticky side down and wax wax that short piece - basically to create a little waxed "bandaid." Then, drop the glue onto the edge of the chip and give it a few seconds to wick in, then trial-press it down with my fingernail to see if any glue runs out. Clean up the runout. then use the waxed tape to hold the chip flat while it cures.

Yep, what dwizum said. This is a job for CA glue. A tiny drop, gently, carefully. Glue the chip down, then fill any gaps. File and sand; polish. Done with patience, it will be an invisible repair.
 
What would you suggest if gaps need filling?

Same thing, CA glue. But the normal viscosity glue or gel, not super-thin. Careful drops, letting them dry naturally, no accelerator. Build the drops up slowly until the gap is filled slightly overflowing. Gentle trim to level with a fine file. Sand and polish to a gloss. CA glue is similar chemistry to poly paint.
 
Titebond III, applied with a syringe. Wax paper over it, thin cork cauls, and a wooden clamp. Dry overnight. Peel wax paper and wipe excess.

CA glue is ideal, for gluing poly to wood, but for this purpose, Titebond III will be good enough...and it's extremely easy to clean up afterward, without needing to level and buff the finish to get rid of the squeezout after the glue dries.

I have fixed many a poly chip this way. It made the repairs exceptionally easy, and not one of them has ever come off.
 
Last edited:
  • Like
Reactions: Stealth57
It looks like there's some dirt in the crack. I'd probably start by wiping it with naptha.

Thin super glue will wick incredibly well. No reason at all to try to peel the chip back up. You really need the smallest possible droplet of glue and it'll suck itself under the chip like magic. If you're not super comfortable with thin super glue, practice on scrap. It'll run everywhere and make a mess if you use too much. If you're still not confident, drip a big huge drop of it onto a scrap piece of plastic or into a little dixie cup, then use an xacto knife to pick up a tiny drop and apply it to the crack, as if the knife was an old fashioned quill pen.

On chips like this that are kinda-lifted, I like to take a piece of masking tape, stick a much shorter piece to the sticky side, non-sticky side down and wax wax that short piece - basically to create a little waxed "bandaid." Then, drop the glue onto the edge of the chip and give it a few seconds to wick in, then trial-press it down with my fingernail to see if any glue runs out. Clean up the runout. then use the waxed tape to hold the chip flat while it cures.

This, but try and source a syringe for application would be my vote. Definitely mask off the area around where you're working... Made this mistake when fixing a hole in my bathtub.
 
Stewmac has a good video on drop filling with CA. I use the razor blade trick he explains here. If you're not used to finish repair, this lays it all out pretty well, from start to finish. The only difference for you is that you need to glue the chip down first. Then, if needed, you can drop fill to get it level and invisible.


just wanna say how much I love his videos. I'll spend hours watching instead of working ... I mean, while I'm working hahah. But seriously he is the best
 
If it was me, I would wait for a night I was tired and only had a short time to work on it. I would assume it's a 5 minute easy job. Since my work bench is a mess, I would do it on the kitchen table. I wouldn’t bother to get any of the necessary tools together before beginning, plenty of time for that later. I would open the CA glue, squeeze… nothing, squeeze again… still nothing, squeeze while looking at the tip, it squirts out on my hands and drips on the table. Having a generous amount on my hands and not wanting to waste it, I would try to scrape some off into the crack. Then without thinking I would press the chip into place but now I have CA glue fingerprints is several spots. Now I run for a paper towel and try to wipe my hands, the table and the guitar but end up with white fuzz stuck to everything. The crack is glued but a little raised. Hours of work follow to remediate all the damage done. Yes fictional but closer to reality than I would like to admit.
 
If it was me, I would wait for a night I was tired and only had a short time to work on it. I would assume it's a 5 minute easy job. Since my work bench is a mess, I would do it on the kitchen table. I wouldn’t bother to get any of the necessary tools together before beginning, plenty of time for that later. I would open the CA glue, squeeze… nothing, squeeze again… still nothing, squeeze while looking at the tip, it squirts out on my hands and drips on the table. Having a generous amount on my hands and not wanting to waste it, I would try to scrape some off into the crack. Then without thinking I would press the chip into place but now I have CA glue fingerprints is several spots. Now I run for a paper towel and try to wipe my hands, the table and the guitar but end up with white fuzz stuck to everything. The crack is glued but a little raised. Hours of work follow to remediate all the damage done. Yes fictional but closer to reality than I would like to admit.
Sounds familiar, just haven't done that to a bass yet...other projects, well that's a different story.
 
A follow up question. I did the low viscosity CA and clamped it down. Followed the sanding info in the StewMac video. I only have up to 2500 grit wet sand paper. The area around the fix is now nice and flat and smooth. But, the gloss finish is now dull. Do I need to get even finer paper or is there another way to restore the gloss? The video went with a much finer grit before using a polishing compound.
 
Much finer grit and/or polishing compound is the answer. Depends on how scratchy it is. 2500 grit is plenty fine enough if you start with a more aggressive compound. There are a lot of "right" ways to do this, it really depends on the products you want to use or what you have on hand.

If you have products you've used on a car to polish out scratches, they'll likely work just fine. No need to go buy a bunch of stuff.
 
Much finer grit and/or polishing compound is the answer. Depends on how scratchy it is. 2500 grit is plenty fine enough if you start with a more aggressive compound. There are a lot of "right" ways to do this, it really depends on the products you want to use or what you have on hand.

If you have products you've used on a car to polish out scratches, they'll likely work just fine. No need to go buy a bunch of stuff.
Thanks. I went 600, 1000, 1500, 2000, and 2500. The surface is scratch free, just dull in low angle light.

Side question, if I find a spot of CA in an area that I don't need to sand, can I use acetone to remove it or will it hurt the finish?
 
Acetone is a powerful solvent. Test it on an area of the bass you don't care about (i.e. if there's finish in the pickup cavities or neck pocket). It would be dangerous to say to go ahead and use it.
 
  • Like
Reactions: Stealth57
OK, I made it to the final step and not sure of the right product to use next. I glued down the flap using thin CA. I then filled the cracks with thick CA. I let things cure for a few days and then used the razor blade trick from the video. It was then from 600 dry to 2500 wet paper. Everything feels smooth and there are no visible scratches; however, the sanded area is dull if you shine a light at an angle. I have tried two different car polishing products that I am sure are very light (clear coat safe).

Any suggestions for a good polish that will restore the shine?

IMG_1612.jpg