• TalkBass has been independent since 1998. Add your voice.
    Create a free account to reply to discussions, view embedded media, and browse with fewer display ads.
    Join freeLog in
    Want zero display ads or expanded classifieds tools? Compare plans.

New Build

After I cut the edge, I filed the sides.
 

Attachments

  • 6 string fan fret 10-28-09 005.jpg
    6 string fan fret 10-28-09 005.jpg
    42.2 KB · Views: 95
  • 6 string fan fret 10-28-09 007.jpg
    6 string fan fret 10-28-09 007.jpg
    35.1 KB · Views: 117
I was able to inlay my logo in the heasdstock today, I used hide glue to glue down the piece of abalone awhile back. I used a exacto knive to trace the outline and then using a 5 in 1 tool and a lighter I lifted the abalone piece up.
 

Attachments

  • fan fret headstock 002.jpg
    fan fret headstock 002.jpg
    33.4 KB · Views: 93
  • fan fret headstock 004.jpg
    fan fret headstock 004.jpg
    23.2 KB · Views: 110
After that I used my chisel and mallet to deepen the cut lines from the exacto knive. A drimel tool with #111 cutter works great for inlay work. I save the saw dust, after it's inlayed I use the saw dust and super glue to fill in the over cuts.

Does anybody have any commits? I feel all alone in my postings.:confused::bawl::smug:
 

Attachments

  • fan fret headstock 005.jpg
    fan fret headstock 005.jpg
    22.4 KB · Views: 114
very cool build. i have a question, do you have any tips for radiusing a wide fretboard like that? im building a 7 string and i got a radius block from stewmac but its not as wide as the FB. fyi i already cut the taper on my fretboard.

I made my own radius block. I used to have a link to a website that showed how to make one, you might have to google "making a radius block" or something like that.

The one that I made isn't quite wide enough at the upper end of the f.b., so I work it back and forward as I move down the f.b. Another thing that helps is to mark a center line and two lines about a 3rd of the way in from the edge of the fb. when the line disapear your done and it helps to see if you have high spots too.
 
J-

What tooling are you using for your fretwork? The reason I ask is because I'm trying to figure out what I can get away with from Lowe's and Home Depot vs. ordering as a specialty product from Stewmac or LMI.

Lonnybass
 
J-

What tooling are you using for your fretwork? The reason I ask is because I'm trying to figure out what I can get away with from Lowe's and Home Depot vs. ordering as a specialty product from Stewmac or LMI.

Lonnybass

I was planing on using pyamid frets from Stew Mac, but I didn't have enough. With those frets I use a triangle file from Home Depot and ground down the edge with a grinder, I use tape in between the frets to keep from maring the fb.

On this build I used a med jumbo wire instead from a local guy (Allparts wire). A fret file is really much easier to recrown, IMO. If your in a pinch and need to recrown with out using a fret file you can do what I've done in the past, a triangle file with the edge ground down (it's a pain). As far as leveling the frets I just have a standard 10" metal file from H.D., but then I also have a diamond tool sharpener I bought from Woodcraft for the finer work.
 
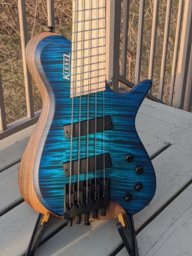
I was able to make the control cavity cover and router it out. I used two pieces of wenge with small neodymium magnets sandwiched inbetween for the cover. Then I installed 1" drywall screws into the body to hold the cover, worked out pretty good.
 

Attachments

  • fanned fret control cav 016.jpg
    fanned fret control cav 016.jpg
    27.1 KB · Views: 78
  • fanned fret control cav 017.jpg
    fanned fret control cav 017.jpg
    31.5 KB · Views: 80

Latest posts