• TalkBass has been independent since 1998. Add your voice.
    Create a free account to reply to discussions, view embedded media, and browse with fewer display ads.
    Join freeLog in
    Want zero display ads or expanded classifieds tools? Compare plans.

Noob questions: Repairing a twisted P neck

Hello everyone!

I have decided to take a stab at fixing a twisted MIM P neck that I have been holding onto for a couple of years now. I don't consider myself a luthier by any stretch of the imagination, but I do all of my own setups and for a few years, I was into woodworking and made my own dovetail drawers. This project is a "let's see if I can do it" type of venture and if it blows up, at least I tried. If I get that far, it'll be my first time installing and finishing frets. I'm having fun with it so far, and I'm wondering if I can get some advice as I continue on this little journey.

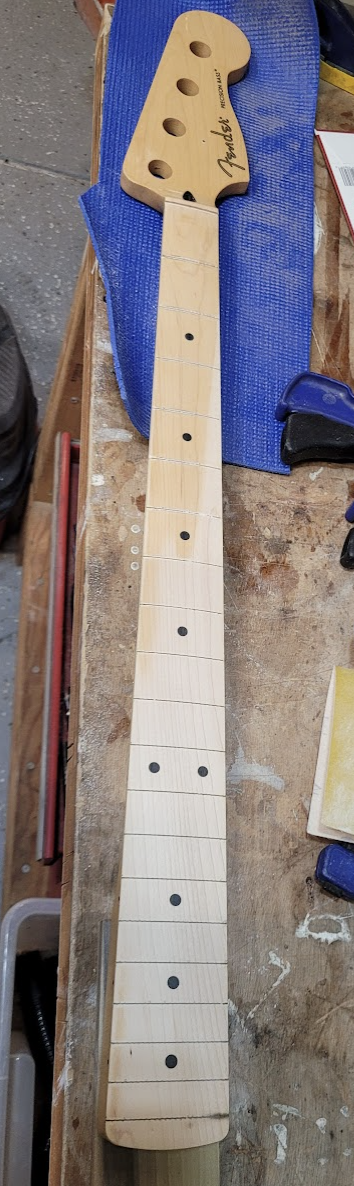
I have already removed the frets and sanded the fretboard starting with 150, and then 320 using a radius sanding block to remove the twist. I plan to finish it off with 800 before installing the frets. The twist was basically about a 3/32" dip on the treble side at the nut, so I made sure the neck was straight at the center on the dots and on the bass side and then I sanded the treble side of the neck starting at the top of the neck (15-21st frets), working my way up that side of the fretboard until the treble side was as straight and even with the rest of the neck. Eventually, I got there and the straightedge is flat across the entire fretboard.

I guess my first question is…did I take the right approach? If so, what advice and guidance might be out there as a next step? Any rookie 'gotchas' that I should be aware of? A couple of thoughts that I have are…

- I mentioned above finishing the fretboard with 800 grit. Is that too smooth or should I go further?

- Will I need to deepen the fret slot grooves after taking so much off?

- have I boogered it up to the point that I am I doomed? :rolleyes:


upload_2022-11-26_10-0-42.png


upload_2022-11-26_10-1-14.png


upload_2022-11-26_10-1-45.png
 
Well, if you got the twist out and the neck doesn't continue to move oddly you're good. Yes, you will probably need to deepen the fret slots at least where you sanded and check the rest. Figure out what frets you're going to use and go that deep, maybe a few thousands more. It's not a bad idea to use a triangle file and chamfer the fret slots before you install them. You'll also need to refinish the board but I'm sure you probably knew that.

On the sandpaper, I don't usually go past 320 grit for a clear finish, 220 for opaque. The finish needs some roughness for a mechanical bond.
 
  • Like
Reactions: npbassman
First of all: no, you're not doomed. That looks pretty good so far.:thumbsup:

For refinishing the fretboard you don't need to go all the way to 800. 240 or 320 would be enough. Make sure that you sand the old finish, too. If you finish it with a similar than the old finish, you can just lightly sand the remaining finish with 320 and finish over that. If you decide to use a different finish (e.g. oil), I'd sand a little bit more so that the old finish is removed on the entire fretboard.

The fret slots should be deepened, @Matt Liebenau already explained that.

Luckily the inlays dots are deep enough. Those dots are typically 1.5-2mm thick, so depending on the twist it is possible to sand through them. Didn't happen here, all is good.

3/32" is a lot of wood to remove by hand sanding. I would have planed it first because you end up with a more flat and true finish.
True, you can do this a lot quicker by hand planing, but I think sanding is the better approach for a first-timer. It's slower, but more controlled. Hand planing a fretboard radius takes practice.

One more thing: I recommend a small clamping caul on the top of the heastock when clamping it down. Cork, fabric, foam, felt, whatever you have handy, this can prevent finish scratches if you accidentally move the neck while sanding.
 
Hello everyone!

I have decided to take a stab at fixing a twisted MIM P neck that I have been holding onto for a couple of years now. I don't consider myself a luthier by any stretch of the imagination, but I do all of my own setups and for a few years, I was into woodworking and made my own dovetail drawers. This project is a "let's see if I can do it" type of venture and if it blows up, at least I tried. If I get that far, it'll be my first time installing and finishing frets. I'm having fun with it so far, and I'm wondering if I can get some advice as I continue on this little journey.

I have already removed the frets and sanded the fretboard starting with 150, and then 320 using a radius sanding block to remove the twist. I plan to finish it off with 800 before installing the frets. The twist was basically about a 3/32" dip on the treble side at the nut, so I made sure the neck was straight at the center on the dots and on the bass side and then I sanded the treble side of the neck starting at the top of the neck (15-21st frets), working my way up that side of the fretboard until the treble side was as straight and even with the rest of the neck. Eventually, I got there and the straightedge is flat across the entire fretboard.

I guess my first question is…did I take the right approach? If so, what advice and guidance might be out there as a next step? Any rookie 'gotchas' that I should be aware of? A couple of thoughts that I have are…

- I mentioned above finishing the fretboard with 800 grit. Is that too smooth or should I go further?

- Will I need to deepen the fret slot grooves after taking so much off?

- have I boogered it up to the point that I am I doomed? :rolleyes:


View attachment 4885410

View attachment 4885411

View attachment 4885412

You're doing fine. That's what we call Mechanical Straightening. You are assuming that the wood has twisted as much as it's going to, and now you are trimming the wood to make it straight again. In this case, the twist wasn't too bad, and you were able to trim it out taking off some thickness of the fingerboard.

I agree with the other guys' suggestions. Sand the maple to 220 or 320 to prepare it for the new finish. You need to go through all the slots with a slotting saw and depth stop, to make sure they are all to full depth. That will make some marks on the surface, so do that before the final sanding.

Have you decided what kind of finish you are going to put on the fingerboard? I recommend that you wipe or spray on one or two coats before putting in the new frets. Then, after the frets are all done, put on one or two more coats, right over the frets. Don't put it on too thick. After it's cured, a light polishing will take the finish off the crowns of the frets. You want the finish to flow up the sides of the frets, forming a seal against moisture.

I assume you've been reading up about the fretting process? Do all the steps in order: installing the frets, trimming the ends, leveling, crowning, polishing. Take your time, and do each step right before moving on. And don't worry if you make a few mistakes and have to back up. Fretwork isn't difficult. It just requires patience and close inspection.

If you haven't seen it already, here's a classic old thread of mine where I mechanically repair a bad twist on an Ampeg neck. Same principle as what you are doing, but a more drastic twist.

Fixing A Badly Twisted Neck....By The Mechanical Method
 
@Bruce Johnson Thanks for the link!

Why do you not recommend a zero fret on a fretless bass?

Because it's way too high, and makes the first few note positions too stiff. When I do use a zero fret, like on these vintage Ampeg restorations, I file the fret down to about 0.025" high, in a wedge shape. That's about as low as you can go. But to play well, it would need to be 0.010"-0.015" high.

And, it gives the open notes a distinctly different tone from the rest of the notes. Because the string is resting on a metal edge vs on wood with a finger pad damping it.

For those two reasons, on a fretless bass, I recommend a conventional bone or plastic nut, with the slots cut down to 0.010" above the surface.

Or, get fancy like I do and install a zero block; a block of ebony set into the fingerboard, with its top surface trimmed to 0.010" above the fingerboard surface.
 
OP here with a quick update. I haven't done much work on this due to work and stuff, but I spent some time on this project this weekend and I think it's going well so far. I ended up sanding the rest of the old finish off the fretboard and the fretboard is still straight, so I'm very happy with that. I also found a thin saw blade in my toolbox (I used my digital caliper to ensure it was slightly narrower than the bottom part of the fret that goes in the groove, minus the tang) and I deepened the fret grooves. I then took a triangle file to the grooves as Matt suggested above. Then, I took the leap and installed the frets based on my youtube research. :laugh: . So far I think they came out OK, but please take it easy on me :D. I didn't have a proper fret cutting tool so I used a pair of electrical pliers to cut them down. I dropped some thin super glue in the slots after I put them in and then I carefully filed them down. Next is the leveling, which probably won't happen until after Christmas when I have some more time. Thanks for looking and I'm open to any advice on what I should have done to make it easier on myself and what I should do moving forward. This has been really fun and a great learning experience. Sincere thank you to everyone again for the replies to my original post and for the advice and encouragement! Thanks!

upload_2022-12-11_18-26-48.png


upload_2022-12-11_18-27-34.png


upload_2022-12-11_18-29-7.png


upload_2022-12-11_18-29-47.png


upload_2022-12-11_18-30-9.png
 
Last edited:
Well folks, here it is - the final result! I'm not sure I would pay someone else for the job I did because visually, you can tell it was done by a rookie, but I'm pretty proud that I was able to take on the task, level out the neck and perform a full fret job. However, as far as playability goes, I swapped the neck onto an existing Am Pro Jazz that I have, set it up and...the thing plays like butter! It's the best this J has ever played and I'm happy (and confident enough) to try and level, crown and polish the original rosewood neck that I swapped it with.

I few things that learned along the way...

  • I think I went a little too far when I leveled the frets, but in the end there was still enough to make it work.
  • I think I need to invest in a real crowning tool because the $10 amazon tool I got is really cheap and it left me with what I think is an unnecessarily rough surface after I crowned them.
  • You'll notice that I decided to not finish it and I just tung oiled the fretboard. Yea, you can tell the shade difference, but 1) I got impatient and wanted to finish the job to see how it played :laugh: and 2) I really didn't want to get into spraying nitro or laquer, especially since it was -9 in my garage all last week. I was an autobody painter in my younger days and I suspect it would have run into some serious curing issues.
  • I ended up using a little dremel tool to final polish the frets. The tape was still on but as you can, that resulted in getting dark compound stuck underneath all of the fret ends, which resulted in me manually cleaning up every one with an exacto knife. There's got to be a better way??
Thanks again to everyone who read my post, for the replies, advice and guidance along the way. I really appreciate it. Happy New Years to all!

Mike

upload_2022-12-31_15-11-54.png


upload_2022-12-31_15-12-45.png


upload_2022-12-31_15-13-20.png

upload_2022-12-31_15-13-38.png

upload_2022-12-31_15-14-41.png