I'm hoping to hear other people's experiences and any tips in using the Realist SoundClip.
Paid about $350 Cdn for this New/in box
Instrument: Double Bass 1949 Kay M1 (La Bella 7720L)
Much though I love my bass, I wouldn't describe it as a virtuoso instrument. It's been played for all of its 62 years... which provides wonderful character... but questionable musicality.
And although I am (much) younger than my bass... This pretty much describes my playing too.
However, as a spoken word performance poet, I have a very good ear for tone, articulation and timbre - I also act as my own sound engineer when recording and so I'm sensitive to soundscapes and the combined effects of voice and instrument.
Installation:
Obviously, it's a piece of cake to install... improperly. The clip is basically a small "G" clamp that you attach to the bridge. You stick a 1/4 inch jack into the bottom and off you go.
As the instructions strongly hint - Location is highly critical... But also (as the instructions only gently hint) the adjustable weights on the bottom seem to make a huge difference.
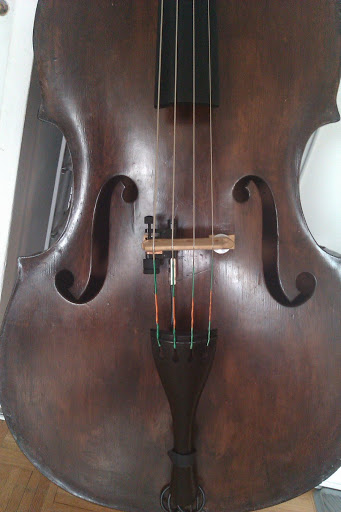
After at least an hour of fiddling around, I settled on the "E" side just above the adjuster... and slightly towards the A string.
I experimented with it positioned on the "G" side and at the centre point of the arc of the bridge. Each of these positions created a different "balance" between the strings and seemed to emphasize one string over the other in terms of articulation. The final position seemed to give both the E and A some extra oomph.
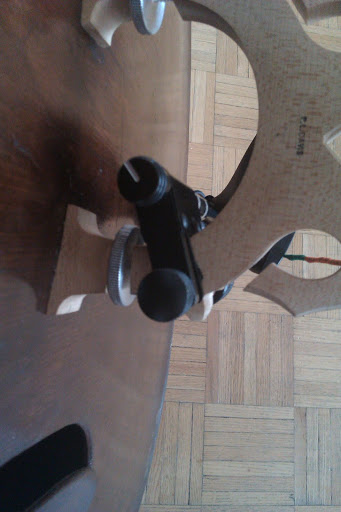
I found a sweet spot (pretty close to one of the recommended locations) that provided a large amount of "meat" for the clamp to bite into. Also, to maximize the amount of contact, I didn't mount it perpendicular to the bridge, but angled the faceplates of the clamp at a slight angle.
One thing that wasn't on the instructions ... but that I am very glad that I tried out... was placing the spine of the G clamp on the interior of the bridge rather than dangling on the outside. There are some obvious cosmetic values to this... It makes the wiring far less conspicuous. In the attached photos, you can see the metal jack... but were it not for that, you'd never notice it.
The other thing I changed was that I ran a 2 foot cable down which I intend to make semi-permanent... I just use a an extension patch chord from there to the amp... My experience was that it was almost impossible to put the Jack in and out of the SoundClip without mucking up its position. By using a small cable to take the connection down towards the endpin... That saves a lot of grief... plus, I can spend a bit of time fixing it in place for the cosmetics.
I also think that positioning the spine of the G clamp on the interior changes the centre of gravity and perhaps the torsion stress on the bridge. Most of the weight is directly below the point of contact itself, so the weight shift would be subtle... But then, this thing seems to be pretty subtle.
Taking the weights on and off definitely made a difference. Firstly, it seemed to have a "grounding" effect on tone. The sound was stronger, more vigorous and cleaner. This makes some sense, since adding mass to the bridge would make it more stable... Also, the weights reduce false harmonics (wolf tones)... FYI, the human ear is very good at processing these undertones in voicing and although we find it difficult to distinguish them clearly... it has a substantial effect on our understanding of the notes.
I left the full compliment of weights on, because the extra mass had a favorable acoustic effect on my instrument... I imagine that a bass which was already pretty robust to start off with, would benefit less - This really does amount to personal taste.
I think it's really important to get all this acoustic stuff sorted out, before moving on to amplification... otherwise there are just too many variables to handle.
When it came to amplification... the degree of articulation is almost disturbing... Having played an electric upright, I can say that it moved the tone into that realm. There is an "electric" quality that runs contrary to the organic feel which is so attractive about the double bass. Again, this is physics at work here and not surprising... but it was a little alarming to hear for the first time.
Also, if your pitch is a bit off... The articulation makes it a lot more apparent. On the plus side, it adds a lot more range to the instrument and it adds sustain for days. Personally, I like mucking around with harmonics for effect... and so I like to set the mid tones a little higher. That said, one can get a much more traditional sound by flattening out the response and compression.
By the way, a very nice touch is the ability to fine-tune the volume right at your fingertips... Most sound engineers have no idea how to mike/balance a bass ... But if you do a sound check with the onboard volume at midway... then once you are actually performing at full tilt... you can make sure that you are not lost... or howling with feedback.
As to the darkness of the instrument... it's much easier to add "darkness" than it is to add "articulation"... Decidedly low-tech but very effective, one can slightly mute the strings at the bridge with some material like a scarf, boxer shorts or a Persian cat... although the latter can damage the patina a little.
There's no escaping the fact that as good as the SoundClip transducer (like every other transducer) is only transmitting the sound waves that are evident in the solid parts of the bass... namely the wooden bits.
What's lost is the subtlety that's provided by the large volumes of air that are thrown about by the instrument. The "work around" that I've come up with is using an additional mike to supplement the overall effect. Obviously, feedback is a big problem... but the idea I'm working on is that the mike is just to add "character" to the tone.
I'd welcome suggestions on this one...
Overall, I'd have to give the Realist SoundClip a very, very enthusiastic thumbs up. To be honest, I'm glad I bought it before I read too many online reviews or I would have been put off. The observations that this can produce a tone that is too "bright" and missing the darkness that we all love... is true. HOWEVER, it can also produce those dark effects too.
For geeks like me who like to play with tonality... and who are comfortable mucking around with their rig it's a great choice... for folks who like to "set it and forget it"... maybe not so much.
I welcome any and all feedback or tips,
N.
Paid about $350 Cdn for this New/in box
Instrument: Double Bass 1949 Kay M1 (La Bella 7720L)
Much though I love my bass, I wouldn't describe it as a virtuoso instrument. It's been played for all of its 62 years... which provides wonderful character... but questionable musicality.
And although I am (much) younger than my bass... This pretty much describes my playing too.
However, as a spoken word performance poet, I have a very good ear for tone, articulation and timbre - I also act as my own sound engineer when recording and so I'm sensitive to soundscapes and the combined effects of voice and instrument.
Installation:
Obviously, it's a piece of cake to install... improperly. The clip is basically a small "G" clamp that you attach to the bridge. You stick a 1/4 inch jack into the bottom and off you go.
As the instructions strongly hint - Location is highly critical... But also (as the instructions only gently hint) the adjustable weights on the bottom seem to make a huge difference.
After at least an hour of fiddling around, I settled on the "E" side just above the adjuster... and slightly towards the A string.
I experimented with it positioned on the "G" side and at the centre point of the arc of the bridge. Each of these positions created a different "balance" between the strings and seemed to emphasize one string over the other in terms of articulation. The final position seemed to give both the E and A some extra oomph.
I found a sweet spot (pretty close to one of the recommended locations) that provided a large amount of "meat" for the clamp to bite into. Also, to maximize the amount of contact, I didn't mount it perpendicular to the bridge, but angled the faceplates of the clamp at a slight angle.
One thing that wasn't on the instructions ... but that I am very glad that I tried out... was placing the spine of the G clamp on the interior of the bridge rather than dangling on the outside. There are some obvious cosmetic values to this... It makes the wiring far less conspicuous. In the attached photos, you can see the metal jack... but were it not for that, you'd never notice it.
The other thing I changed was that I ran a 2 foot cable down which I intend to make semi-permanent... I just use a an extension patch chord from there to the amp... My experience was that it was almost impossible to put the Jack in and out of the SoundClip without mucking up its position. By using a small cable to take the connection down towards the endpin... That saves a lot of grief... plus, I can spend a bit of time fixing it in place for the cosmetics.
I also think that positioning the spine of the G clamp on the interior changes the centre of gravity and perhaps the torsion stress on the bridge. Most of the weight is directly below the point of contact itself, so the weight shift would be subtle... But then, this thing seems to be pretty subtle.
Taking the weights on and off definitely made a difference. Firstly, it seemed to have a "grounding" effect on tone. The sound was stronger, more vigorous and cleaner. This makes some sense, since adding mass to the bridge would make it more stable... Also, the weights reduce false harmonics (wolf tones)... FYI, the human ear is very good at processing these undertones in voicing and although we find it difficult to distinguish them clearly... it has a substantial effect on our understanding of the notes.
I left the full compliment of weights on, because the extra mass had a favorable acoustic effect on my instrument... I imagine that a bass which was already pretty robust to start off with, would benefit less - This really does amount to personal taste.
I think it's really important to get all this acoustic stuff sorted out, before moving on to amplification... otherwise there are just too many variables to handle.
When it came to amplification... the degree of articulation is almost disturbing... Having played an electric upright, I can say that it moved the tone into that realm. There is an "electric" quality that runs contrary to the organic feel which is so attractive about the double bass. Again, this is physics at work here and not surprising... but it was a little alarming to hear for the first time.
Also, if your pitch is a bit off... The articulation makes it a lot more apparent. On the plus side, it adds a lot more range to the instrument and it adds sustain for days. Personally, I like mucking around with harmonics for effect... and so I like to set the mid tones a little higher. That said, one can get a much more traditional sound by flattening out the response and compression.
By the way, a very nice touch is the ability to fine-tune the volume right at your fingertips... Most sound engineers have no idea how to mike/balance a bass ... But if you do a sound check with the onboard volume at midway... then once you are actually performing at full tilt... you can make sure that you are not lost... or howling with feedback.
As to the darkness of the instrument... it's much easier to add "darkness" than it is to add "articulation"... Decidedly low-tech but very effective, one can slightly mute the strings at the bridge with some material like a scarf, boxer shorts or a Persian cat... although the latter can damage the patina a little.
There's no escaping the fact that as good as the SoundClip transducer (like every other transducer) is only transmitting the sound waves that are evident in the solid parts of the bass... namely the wooden bits.
What's lost is the subtlety that's provided by the large volumes of air that are thrown about by the instrument. The "work around" that I've come up with is using an additional mike to supplement the overall effect. Obviously, feedback is a big problem... but the idea I'm working on is that the mike is just to add "character" to the tone.
I'd welcome suggestions on this one...
Overall, I'd have to give the Realist SoundClip a very, very enthusiastic thumbs up. To be honest, I'm glad I bought it before I read too many online reviews or I would have been put off. The observations that this can produce a tone that is too "bright" and missing the darkness that we all love... is true. HOWEVER, it can also produce those dark effects too.
For geeks like me who like to play with tonality... and who are comfortable mucking around with their rig it's a great choice... for folks who like to "set it and forget it"... maybe not so much.
I welcome any and all feedback or tips,
N.