
Enjoy the benefits of a premium membership!
Upgrade Account
-
TalkBass has been independent since 1998. Add your voice.
Create a free account to reply to discussions, view embedded media, and browse with fewer display ads.
Join free Log in
Want zero display ads or expanded classifieds tools? Compare plans.
You are using an out of date browser. It may not display this or other websites correctly.
You should upgrade or use an alternative browser.
You should upgrade or use an alternative browser.
REHOUSING Behringer BSY600 thread
- Thread starter Dazonbass
- Start date
More options
Who Replied?

And you better believe its NEVER leaving my board! It's gonna compliment everything else nicely as well.
yer dang right Fabe!
GUTS
Link Removed
Link Removed
Process? You desolder the pots and jacks aaaaand put new, off board ones in! There's no way (unless you wanted to drive yourself mad) you could desolder these components without a proper desoldering gun ( I use a Hakko 808) and even then it's not fun. The Radioshack desoldering pump is garbage. Desoldering braid is about as fun to use as shaving dry. If it were in a larger enclosure, perhaps a 1590BB, you could use long metal standoffs and screws through the two center holes on the board instead of the industrial strength hot glue I used.
GUTS
Link Removed
Link Removed
Process? You desolder the pots and jacks aaaaand put new, off board ones in! There's no way (unless you wanted to drive yourself mad) you could desolder these components without a proper desoldering gun ( I use a Hakko 808) and even then it's not fun. The Radioshack desoldering pump is garbage. Desoldering braid is about as fun to use as shaving dry. If it were in a larger enclosure, perhaps a 1590BB, you could use long metal standoffs and screws through the two center holes on the board instead of the industrial strength hot glue I used.
...long post...
When desoldering components with many/big legs, that I don't mean to reuse, I often clip-off as many legs as possible, then I don't have to worry about heating them all at once, but can pick out the pieces until few enough remain to make it possible to get them out in one go.
But dang that looks sweet. Nice tight fit, what enclosure is that?
Sorry if I sounded a bit snappy with the "Guts?" comment.

hats off to you Dan, you did a better job than I would have been able to.
Hugh thanks for sharing your experience.
Hugh thanks for sharing your experience.
hey Dan nice job. What enclosure size did you use?
125B.
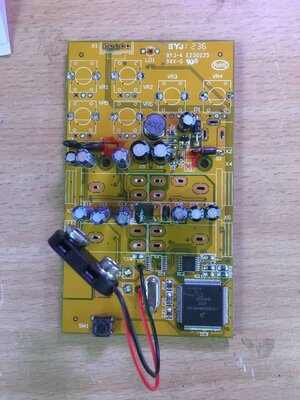
it's definitely soldered by a machine (except maybe the battery snap connection/ maybe the jacks). There are no legs whatsoever, especially for the main components which are surface mount, and the pots are so teeny there's nothing at all to clip off. The longer you heat a joint over and over the more susceptible the components nearby are to overheating and potential failure.
Just found this thread. The switch on my BSY is a POS and I wanna try this chassis swap....... It would be a great help to have an itemized parts needed list that is specific and comprehensive w/ info on number of linear/ audio taper pots, # of stereo and mono jacks, type of wire etc. Anyone with experience wanna tackle this?

I'm going to re-animate this thread:
Just a general tip for getting rid of the lead-free solder that's so prevalent these days: Melt a blob of your regular solder onto the lead-free patch that you want to remove, then reheat and apply your braid, solder-sucker, whatever. The solders will mix, lowering the melting point of the lead-free stuff. Works like a charm (as long as there's space on those tightly-packed PCBs.
Just a general tip for getting rid of the lead-free solder that's so prevalent these days: Melt a blob of your regular solder onto the lead-free patch that you want to remove, then reheat and apply your braid, solder-sucker, whatever. The solders will mix, lowering the melting point of the lead-free stuff. Works like a charm (as long as there's space on those tightly-packed PCBs.

Looks like no one's posted in here for a while 
I picked up a BSY600 cheap off gumtree and had a lot of fun with it. I really liked the expression pedal function, so I thought, why not build it into a wah enclosure.
I took some of photos of the build. Here's a list of what I did to get it going.
- Desoldered all the jacks and pots off the board to relocate them to the sides of the wah.




I picked up a BSY600 cheap off gumtree and had a lot of fun with it. I really liked the expression pedal function, so I thought, why not build it into a wah enclosure.
I took some of photos of the build. Here's a list of what I did to get it going.
- Desoldered all the jacks and pots off the board to relocate them to the sides of the wah.
- Drilled out the wah enclosure for the knobs and jacks.
- Shortened the pot shafts and knobs and mounted them to some sub-PCBs on the side of the pedal.
- Removed the top PCB standoff in the wah enclosure so the main board could fit under the jacks.


- Shortened the pot shafts and knobs and mounted them to some sub-PCBs on the side of the pedal.
- Removed the top PCB standoff in the wah enclosure so the main board could fit under the jacks.
- Extended the wires to the sub-PCBs, jacks, power jack, switch, LED, expression pot and toggle switch.
(The toggle switch turns the expression pedal function on and off, so you can use the pedal as if there's no expression pedal connected also)
- Finished the enclosure with a chemical aluminium blackener, then rubbed it back with light sandpaper to give it a brushed stainless steel type look.


(The toggle switch turns the expression pedal function on and off, so you can use the pedal as if there's no expression pedal connected also)
- Finished the enclosure with a chemical aluminium blackener, then rubbed it back with light sandpaper to give it a brushed stainless steel type look.
- Made a clear acrylic base plate and put some LEDs in there to help let me know when the pedal is on and off.
And that's it done for now. Works just like the compact pedal, with the added convenience on an inbuilt expression pedal. I really like the expression pedal functionality. I rarely turn it off. Kind of a cool twist on a standard wah, just for us bassists


And that's it done for now. Works just like the compact pedal, with the added convenience on an inbuilt expression pedal. I really like the expression pedal functionality. I rarely turn it off. Kind of a cool twist on a standard wah, just for us bassists
Brilliant and looks awesome!!- Extended the wires to the sub-PCBs, jacks, power jack, switch, LED, expression pot and toggle switch.
(The toggle switch turns the expression pedal function on and off, so you can use the pedal as if there's no expression pedal connected also)
- Finished the enclosure with a chemical aluminium blackener, then rubbed it back with light sandpaper to give it a brushed stainless steel type look.
View attachment 2982595 View attachment 2982596 View attachment 2982597 View attachment 2982598 View attachment 2982599 View attachment 2982600 View attachment 2982601 View attachment 2982602 View attachment 2982603 View attachment 2982604 View attachment 2982605 View attachment 2982606 View attachment 2982607 View attachment 2982608 View attachment 2982609


