• TalkBass has been independent since 1998. Add your voice.
    Create a free account to reply to discussions, view embedded media, and browse with fewer display ads.
    Join freeLog in
    Want zero display ads or expanded classifieds tools? Compare plans.

Restoration: Roadstar (II) to hell

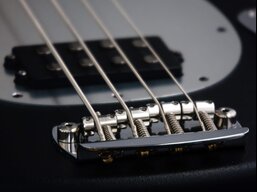
Whilst it looks immensely cool and relic'd, it's really quite bizarre.
From what I can tell, it's copper plated aluminium - which (my science hat tells me) is a pretty bad combination: add a little electrolyte (sweat/sea water etc.) and POW! Galvanic corrosion.
Copper is eating the aluminium.
(and explains the battery-like residue)

I like science.
... but I'm open to other interpretation if I've got it completely wrong.

The bridge on mine started turning exactly the same way, and I wiped it down after every session. Very much like an old battery corroding.

And the headstock looks like a crown when you get some big old vintage chrome tuning keys in there.

Man, I miss that bass. It would be so hip and unique right now. And my wife doesn't understand why I've nearly stopped selling basses.
 
If any of you who are following this thread have never seen or owned one of these basses, you don't understand what the strap "buttons" look like. I said "wings" in my first posting, it's double triangles. Very original idea.
 
$(KGrHqRHJEIE88cr4FWiBPWnhsjWq!~~60_35.jpg


These. Ask handofseven for any better pics, he has a few of these in his stable.
 
If any of you who are following this thread have never seen or owned one of these basses, you don't understand what the strap "buttons" look like. I said "wings" in my first posting, it's double triangles. Very original idea.

I know the ones you're talking about.. They look like boomerangs. They're on most early to mid 80's Ibanez. All my Roadstars have them... It's actually somewhat rare to find them still installed, most people seem to take them off. Of the 7 Roadstars I've owned, I think only 2 still had both boomerang strap buttons. One or none seems to be the norm...


Dangit Rojo! Nice pic. You so fast!!! :D
 
Whilst the 'boomerang' (singular, sadly) is still bubbling away in the pot, I thought you might like to feast your eyes on these monsters:

P4040628.jpg


Phwoah!!!

To my overwhelming joy, ALL of the coils are intact. :hyper:
(whoop!)

From personal experience: I know I've spent many an hour searching for the resistance values of various pickups, in the hope that (one day) I'd get around to creating my own pickup masterpiece.
So, for the record (all values in Ohms):

Bridge:
9.47k (red-black)
9.26k (blue-yellow)

Neck:
9.22k (red-black)
9.24k (blue-yellow)

Similarly, this was 30mins well spent:

Original_Roadstar_Wiring.jpg


Hope it's of help to someone... some day... maybe.

Proper striping of lacquer/paint shall commence tomorrow (as I have the day off work). Yay!
 
  • Like
Reactions: DanAdams
Dangit Rojo! Nice pic. You so fast!!! :D

Google, baby! Those are on ebay somewhere. Never snapped a pic of the ones I had.

That wiring diagram is awesome. Good work! When I got mine, I swapped the push/push pots for push/pull and wired them series/parallel so they were hum-cancelling in both modes. Easy mod to do, still had tonal options out the wazoo!
 
$(KGrHqRHJEIE88cr4FWiBPWnhsjWq!~~60_35.jpg


These. Ask handofseven for any better pics, he has a few of these in his stable.
Funny, but up until a few years ago, I had a whole box of these in my workshop. They were collected over the years through replacing them for people who wanted straplocks, etc. I think they must have been standard fare on lots of matsumoku guitars because I've also taken them off Vantage, Aria, etc. They are a cool concept, but they aren't as secure as straplocks...
 
Hokay!
I don't know what lacquer Ibanez used in the 80's, but it was tough as nails (and over a millimetre thick in places).
Heat gun was burning the paint before the lacquer blistered; paint/lacquer stripper sat for hours without a mark; had to resort to good ol' fashioned elbow grease.

Worth it though ;)

P4060629.jpg


Paint seems to have been impacted under the bridge, so I'm tempted to leave it rather than create a slight depression by sanding out.

Neck is awesome though.
(and dog is lazy)

P4060631.jpg


I'll tidy up the dings on the headstock-corners later.

Really tempted to leave the neck natural (oil/wax) rather than re-colour and lacquer it. Only problem is that neck pocket is noticeably looser without all the lacquer... although I guess I could shim it... thoughts?

P4060632.jpg


Let the restoration continue!
 
What great basses Ibanez have made (still does), particularly these Japanese lines of late 70s- mid 80s. Yours is a great example
Their quality is inversely proportional to how they are rated when compared to a Fender...

Keep up that restoration, I´m sure it will turn out great, and the instrument totally worth it :bassist:

Regarding the neck pocket, you can leave it as tight as you want using ash veneer. You can even use a dark veneer as wengue or ebony, turning the need into profit, an accent line. It´s not a hard one either. Depending on your intention, if you want to restore it or really transform it, I would even think of wood housings for those pups and also wooden knobs...
There are so nice things that can be done there, because of both, the nice outcome and also the fun of doing them!
 
Looking good! Natural would look nice, though I'd love to see a transparent stain on there.

The gap around the neck would probably be less obvious with a darker color finish. However, the veneer as suggested above would work well.

Keep us posted!
 
I'd definitely leave that neck natural and shim the pocket with veneer if needed.

I'd probably use rattle-can lacquer rather than oil, 'cause I like gloss finishes, but either way that neck looks great!

I'm a real sucker for those old Ibby basses. You get major karma points for bringing this one back to life - with the added bonus of getting to play it, too!
 
Hokay!
I don't know what lacquer Ibanez used in the 80's, but it was tough as nails (and over a millimetre thick in places).
Heat gun was burning the paint before the lacquer blistered; paint/lacquer stripper sat for hours without a mark; had to resort to good ol' fashioned elbow grease.

Worth it though ;)

P4060629.jpg


Paint seems to have been impacted under the bridge, so I'm tempted to leave it rather than create a slight depression by sanding out.

Neck is awesome though.
(and dog is lazy)

P4060631.jpg


I'll tidy up the dings on the headstock-corners later.

Really tempted to leave the neck natural (oil/wax) rather than re-colour and lacquer it. Only problem is that neck pocket is noticeably looser without all the lacquer... although I guess I could shim it... thoughts?

P4060632.jpg


Let the restoration continue!

Holy cow! This looks great. I have one of these I bought new back in the day and played the crap out of it. At one point I tried to strip the finish many years ago. I scuffed the finish with some fine sandpaper and the hit it with some stripper. The stripper I used didn't do anything whatsoever to whatever that bass is finished with (just like you found). I punted and played it several more years with the new 'flat' finish created when I scuffed the finish.

I need to know how you did this because I am inspired to try again. By 'elbow grease' do you mean sand paper? Details, please.

I had been working on a plan to cut the wings off a remake them with some pieces of maple and purple heart I have in the garage. Seeing yours, however, makes me think this is not necessary.

Looking forward to seeing how you decide to finish this. Please keep posting your progress!
 
By 'elbow grease' do you mean sand paper? Details, please.

Yes indeed.

Note: My proper tools are in transit (as I've just moved country) so I'm having to make do with whatever I can beg/borrow/improvise, so don't judge me...
(judge away!) :D

P4070639.jpg


Used the orbital sander (medium grit, nothing too coarse) for flat sections (i.e. back and front); the sheet sander for around the sides. I'd use the mechanical sanders to get through the lacquer then switch to hand (blocks and pads) to go through the paint (to preserve as much wood as possible).
For the inside curves of the horns I taped some sandpaper to a hole-cutter, shoved it on the end of a rusty drill, and used it like a spindle-sander.

Before anyone calls me heavy-handed, if I'd been dealing with a hair-thin nitro finish, I'd probably have done most of it by hand - the lacquer on the Roadstar was made of kryptonite.

Got distracted by other projects and a mysterious animal hiding in my wood pile today...

P4070634.jpg


... it's called a 'spitfire' apparently?!
(Looks nothing like a plane...)

More progress tomorrow.