
I thought I would throw together a short pictorial about what I do to make high quality cables for guitar and bass. Please feel free to add anything you do if you make your own as well!
First, here's what you need:
1) soldering iron with a wide and flat tip in the 35W+ range
2) solder - I like 63/37 tin-lead eutectic solder from Kester
3) cable - I use Canare GS-6 for this but I also like the stuff that ProEL (in Italy) is selling
4) heat-shrink tubing of 3/8" diameter (pre-shrunk)
5) 1/4" connectors - Switchcraft 280 is the industry standard for longevity and ruggedness (you can practically drive over these with cars!)
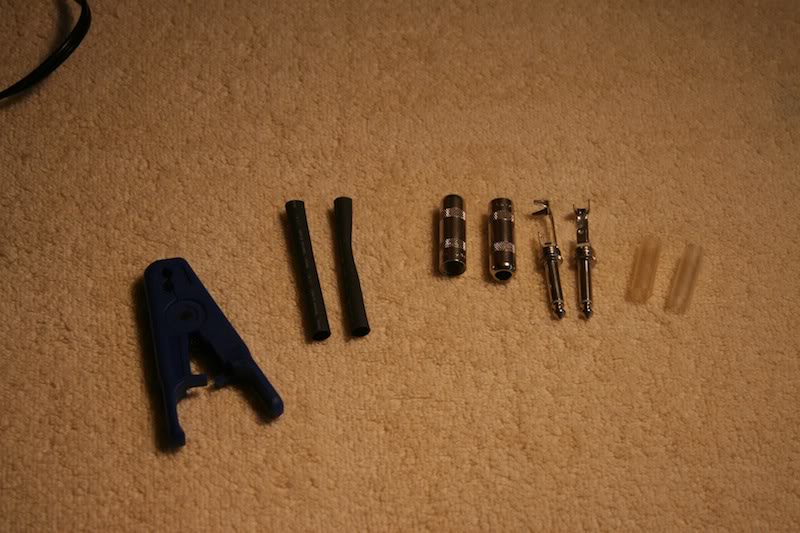
6) Something to cut wires - preferably a cutter meant for stripping coax cable (the blue handled tool in the first picture)
Here's all the pieces laid out for all to see:
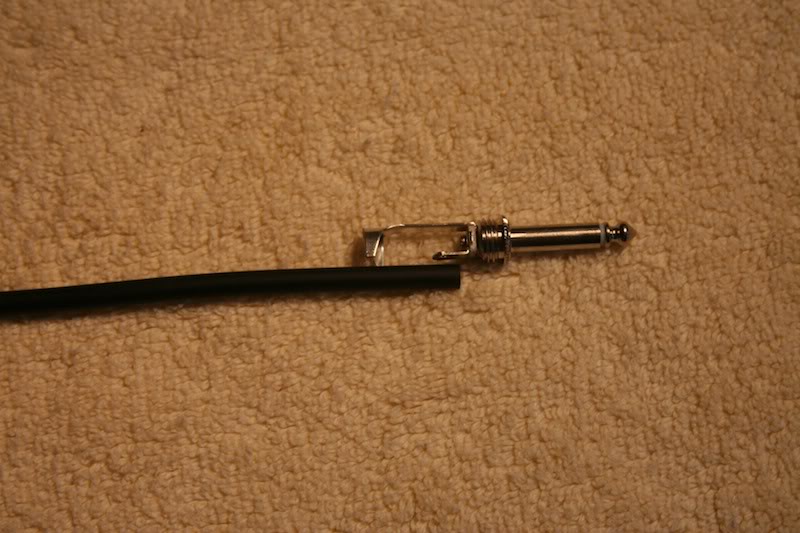
Start by seeing how much outer insulation needs to be stripped: you can lay the cable inside of the plug until it is about 1/16" from contacting the center plug conductor. Here's what that looks like:
Then you strip the outer insulation, leaving enough to make sure that the portion of the cable under the cable crimps still has insulation (you don't want the crimps to be contacting the shield as this weakens the cable and provides a flex point where it can later break).
Here's a pic of a stripped cable of the correct length (you can leave more insulation if you want, but you want as much of the braided shield available for soldering as you can get):

You next need to unbraid the shield using a small screwdriver or sharp pencil. Once it is all unbraided you can twist it into a solid wire:

Now comes a critical step: Canare cable has an extra electrostatic shield that is there to help reduce noises in the cable as it is bent (which is in turn caused by changes in the cable's capacitance). It's important to cut off this shield near the point where it comes into proximity with the center conductor, as it's fairly easy to make a weak short through this plastic to your center signal wire. This will cause a ~100k ohm short that won't be picked up by a cable tester, but it will wreck havoc with the loading on your pickups!
In any case, carefully strip this outer shield back to the point where your braided shield is twisted. Here's what that looks like (it's very thin, so a light touch with a razor blade does the trick). You want to make sure you only go through this shield and not through the center insulation:

Next strip the center insulation back from the tip about 1/8" or so:

Next, carefully bend the center conductor post down about 20 degrees so that the center conductor has a fairly straight shot to make it through the mounting hole in the post. You can then push the center conductor through the hole and align the braid wire to be touching along the bottom of the plug. After this is done, you can crimp the barrel connectors down onto the outer insulation. This is what it looks like if it's done correctly (notice there are no whiskers of the center conductor reaching down and touching the shield braid...if there are, correct it now otherwise your new cable will be shorted):

The mechanical ruggedness of this plug comes from the crimps: you should not be able to pull the wire from the plug at this point (it should feel solid). I would wiggle the cable and see if the cable moves in the crimp, and if it does do you should crimp a little harder...otherwise the shield braid and center conductor will become mechanical connections and the plug won't last! You want a solid mechanical connection at the crimp, but you don't want the cable crushed either!
The plug is ready for soldering. Heat up your iron, and clean the tip until it's bright and shiny. Tin the tip with a little solder, then hold the iron under the center conductor. You can then apply the solder to the top of the center pin, and the solder should flow down the wires making up the center conductor and through the hole to the bottom side where the iron is heating.
Do not put the tip of the iron on the top of the plug and apply solder to the top-side of the connection. It's asking for cold solder joints that will often break after you've assembled the plug (and by Murphy's Law probably during a gig). Here's what it should look like after soldering (notice how shiny it looks and how it's flowed down the center conductor and up the center pin):

Next comes the braided shield. Same rules here: hold the iron under the plug, and apply the solder directly to the braid. It will start flowing along the bottom of the plug. Feed in enough solder so that the entire braid is soaked and shiny:

Leave the plug to cool for 5 minutes, as it will be very hot after this step, and if it's hot it will completely botch up the next part of this, which is....
...the heat shrink tubing. Some don't apply this, but I've found it's great strain-relief for the cable. Cut about three inches of tubing, and run it along and over the enter center assembly of the plug:

Shrink the tubing with a hot air gun, or if you're careful with a lighter. Here's what that looks like:

Be sure to heat all of the tubing, because it must be shrunk down tight around the crimps to add the strain relief (you can clearly see the imprint of the crimps in the tubing in the picture above which means it's shrunk tight).
Next you can thread the plastic shell carrier onto the other end of the cable and down over the plug. This carrier prevents the cable from coming into contact with the brass outer shell, which gives yet another layer of protection for the plugs from points of strain:

Now you can thread on the outer plug casing, and one end of the cable is complete!

The other end is done in the same fashion, however let me bold this part:
BE SURE TO place the other outer casing, THEN the other plastic shell carrier, THEN the other piece of heat shrink tubing on the cable before starting the other side!!!! If you skip this step in haste, you'll be cutting off a brand new plug and starting over as there's no way to get these on after the other side plug is installed.
I test new cables by plugging them in and playing them: if everything went ok you won't hear anything other than your bass. If the sound is extremely dark and muffled then you probably forgot to cut off the electrostatic shield and you have a high-impedance short from center conductor to sleeve: an ohm-meter will confirm this as it should read 'infinite' when set on a 200k ohm scale (between tip and sleeve). If it reads down near zero ohms then you have a direct short from center conductor to sleeve, which means the center conductor was probably touching on one end. If you follow this closely and everything looks the same as above you probably won't have any problems.
The main variation to this procedure is to use a right-angle plug on one end (Switchcraft 226 if memory serves), which is used mainly on Jazz-basses with the output jack on a metal control plate.
Feel free to comment or post your recipes!
First, here's what you need:
1) soldering iron with a wide and flat tip in the 35W+ range
2) solder - I like 63/37 tin-lead eutectic solder from Kester
3) cable - I use Canare GS-6 for this but I also like the stuff that ProEL (in Italy) is selling
4) heat-shrink tubing of 3/8" diameter (pre-shrunk)
5) 1/4" connectors - Switchcraft 280 is the industry standard for longevity and ruggedness (you can practically drive over these with cars!)
6) Something to cut wires - preferably a cutter meant for stripping coax cable (the blue handled tool in the first picture)
Here's all the pieces laid out for all to see:
Start by seeing how much outer insulation needs to be stripped: you can lay the cable inside of the plug until it is about 1/16" from contacting the center plug conductor. Here's what that looks like:
Then you strip the outer insulation, leaving enough to make sure that the portion of the cable under the cable crimps still has insulation (you don't want the crimps to be contacting the shield as this weakens the cable and provides a flex point where it can later break).
Here's a pic of a stripped cable of the correct length (you can leave more insulation if you want, but you want as much of the braided shield available for soldering as you can get):
You next need to unbraid the shield using a small screwdriver or sharp pencil. Once it is all unbraided you can twist it into a solid wire:
Now comes a critical step: Canare cable has an extra electrostatic shield that is there to help reduce noises in the cable as it is bent (which is in turn caused by changes in the cable's capacitance). It's important to cut off this shield near the point where it comes into proximity with the center conductor, as it's fairly easy to make a weak short through this plastic to your center signal wire. This will cause a ~100k ohm short that won't be picked up by a cable tester, but it will wreck havoc with the loading on your pickups!
In any case, carefully strip this outer shield back to the point where your braided shield is twisted. Here's what that looks like (it's very thin, so a light touch with a razor blade does the trick). You want to make sure you only go through this shield and not through the center insulation:
Next strip the center insulation back from the tip about 1/8" or so:
Next, carefully bend the center conductor post down about 20 degrees so that the center conductor has a fairly straight shot to make it through the mounting hole in the post. You can then push the center conductor through the hole and align the braid wire to be touching along the bottom of the plug. After this is done, you can crimp the barrel connectors down onto the outer insulation. This is what it looks like if it's done correctly (notice there are no whiskers of the center conductor reaching down and touching the shield braid...if there are, correct it now otherwise your new cable will be shorted):
The mechanical ruggedness of this plug comes from the crimps: you should not be able to pull the wire from the plug at this point (it should feel solid). I would wiggle the cable and see if the cable moves in the crimp, and if it does do you should crimp a little harder...otherwise the shield braid and center conductor will become mechanical connections and the plug won't last! You want a solid mechanical connection at the crimp, but you don't want the cable crushed either!
The plug is ready for soldering. Heat up your iron, and clean the tip until it's bright and shiny. Tin the tip with a little solder, then hold the iron under the center conductor. You can then apply the solder to the top of the center pin, and the solder should flow down the wires making up the center conductor and through the hole to the bottom side where the iron is heating.
Do not put the tip of the iron on the top of the plug and apply solder to the top-side of the connection. It's asking for cold solder joints that will often break after you've assembled the plug (and by Murphy's Law probably during a gig). Here's what it should look like after soldering (notice how shiny it looks and how it's flowed down the center conductor and up the center pin):
Next comes the braided shield. Same rules here: hold the iron under the plug, and apply the solder directly to the braid. It will start flowing along the bottom of the plug. Feed in enough solder so that the entire braid is soaked and shiny:
Leave the plug to cool for 5 minutes, as it will be very hot after this step, and if it's hot it will completely botch up the next part of this, which is....
...the heat shrink tubing. Some don't apply this, but I've found it's great strain-relief for the cable. Cut about three inches of tubing, and run it along and over the enter center assembly of the plug:
Shrink the tubing with a hot air gun, or if you're careful with a lighter. Here's what that looks like:
Be sure to heat all of the tubing, because it must be shrunk down tight around the crimps to add the strain relief (you can clearly see the imprint of the crimps in the tubing in the picture above which means it's shrunk tight).
Next you can thread the plastic shell carrier onto the other end of the cable and down over the plug. This carrier prevents the cable from coming into contact with the brass outer shell, which gives yet another layer of protection for the plugs from points of strain:
Now you can thread on the outer plug casing, and one end of the cable is complete!
The other end is done in the same fashion, however let me bold this part:
BE SURE TO place the other outer casing, THEN the other plastic shell carrier, THEN the other piece of heat shrink tubing on the cable before starting the other side!!!! If you skip this step in haste, you'll be cutting off a brand new plug and starting over as there's no way to get these on after the other side plug is installed.
I test new cables by plugging them in and playing them: if everything went ok you won't hear anything other than your bass. If the sound is extremely dark and muffled then you probably forgot to cut off the electrostatic shield and you have a high-impedance short from center conductor to sleeve: an ohm-meter will confirm this as it should read 'infinite' when set on a 200k ohm scale (between tip and sleeve). If it reads down near zero ohms then you have a direct short from center conductor to sleeve, which means the center conductor was probably touching on one end. If you follow this closely and everything looks the same as above you probably won't have any problems.
The main variation to this procedure is to use a right-angle plug on one end (Switchcraft 226 if memory serves), which is used mainly on Jazz-basses with the output jack on a metal control plate.
Feel free to comment or post your recipes!







 Why the heck cant we just use stripped wire and a screw instead?


