• TalkBass has been independent since 1998. Add your voice.
    Create a free account to reply to discussions, view embedded media, and browse with fewer display ads.
    Join freeLog in
    Want zero display ads or expanded classifieds tools? Compare plans.

Save my splitting neck, with your knowledge!!!

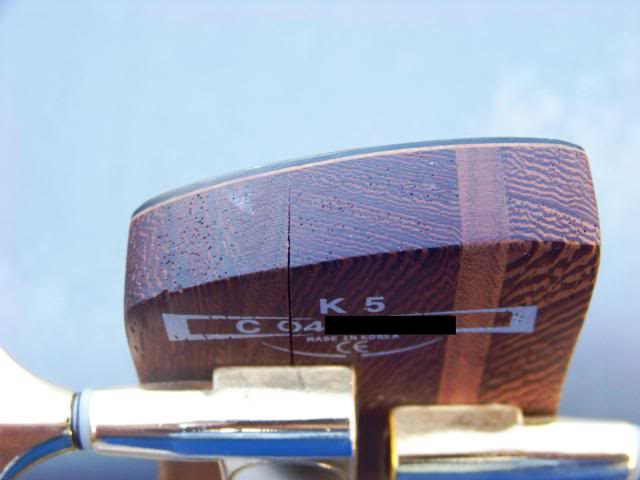
I've had my bass since new. Over time I noticed it was developing cracks in the headstock right from where the securing screws of the tuners went into the neck laminate. Should I remove the neck and hardware or just the hardware and inject gorilla glue or epoxy into the cracks? Then use pistol grip vise clamps to hold it together? the neck is unpainted, and only uses wood oil if that helps any. Any advice will be appreciated. Thanks! Please see attached 3 photos for details.
Jake

HEADSTOCKFULL.jpg


BOTTOMSPLIT.jpg


K5HEADSTOCKTIP.jpg


http://i201.photobucket.com/albums/aa40/enfieldjake/music/HEADSTOCKFULL.jpg

http://i201.photobucket.com/albums/aa40/enfieldjake/music/BOTTOMSPLIT.jpg

http://i201.photobucket.com/albums/aa40/enfieldjake/music/K5HEADSTOCKTIP.jpg
 
What kind of ibanez? Is that your K5? Depending on the monetary/emotional/sentimental value, you might want to have a go at it yourself, but only you can answer this question. Ya gotta be prepared to deal with it if you mess it up. Even competent luthiers have a boo-boo now and then, its part of the job.

Mikey's spot on though, epoxy is not appropriate here and gorilla glue is not appropriate in joinery at all (IMHO). If this were brought to me, I'd remove all the hardware first and blow the dust/debris out of the cracks with filtered compressed air. Then I'd fab up a couple of custom-shaped cauls to clamp that headstock and test-clamp it to see if I could close the splits entirely. If I could, I'd inject cyanoacrylate (CA) glue in the cracks and clamp 'er up...
 
the CA in question isn't exactly the same as super glue, and can be had with different flavors. I can't say which would be best, but a good place to find it is hobby shops, it is the adhesive of choice for R/C aircraft also.

Tite-Bond and Mercury Adhesives are the two brands I know off the top of my head.
 
ZAP ADHESIVES make a tried & true cyanoacrilate product for RC model builders that I have used successfully for many years.

It comes in different cure times from instant to a gel that takes awhile to cure, giving you more "work time" before it cures.

Rule #1 Don't get it on your skin or it will glue you to whatever else it touches! Wear gloves!

Be aware that this stuff is powerfully strong and that it CURES rather than DRIES. It is a chemical reaction with the air that cures it and the tighter and thinner the seam, the faster and stronger it cures. It is not a "filler" glue in that it isn't designed to fill open spaces.

So the tighter the better. I'd recommend you follow the advice from the above TBers about the clamping etc, and use the slowest curing CYA glue they have.

Practice on some pieces of scrap wood to get a feel for how it works and how much glue to use (use it sparingly)

Put it in the gap, then quickly clamp it tight - swiftly.
Then spray it with ZAP ACCELERATOR and it will trigger the curing instantly. You'll see a light puff of smoke from the glue curing (don't breathe the fumes) and voila! you're done!

Any excess can be lightly sanded carefully.
Good luck. :hyper::bassist:;)
 
NO! To everything in the post above. :mad:

The brand doesn't matter. It will be either methyl or ethyl cyanoacrylate and the functional group has no appreciable effect on the adhesion in this instance. :scowl:

Acetone takes it off of your skin. Nearly every girl carries acetone on her person.

CA can be used as gap filler.

Use medium viscosity.

Do not use accelerator.
 
NO! To everything in the post above. :mad:

I cracked up on this. But I agree - no to everything in the above post.

The brand doesn't matter. It will be either methyl or ethyl cyanoacrylate and the functional group has no appreciable effect on the adhesion in this instance. :scowl:

Yep, they all bond like crazy in small quantities. The tighter the fit, the better, especially the really thin stuff.

Acetone takes it off of your skin. Nearly every girl carries acetone on her person.

Known as "nail polish remover", and it will dissolve, or at least soften all CA glues, as far as I can tell.

CA can be used as gap filler. ...Use medium viscosity.

My favorite example of this was when Dan Erlewine used CA to repair a chip in a Strat neck w/ a rosewood board by using the black CA and just repeatedly drop-filling the chip/ding until it was slightly over level, then shaving it down with a razor blade.

Do not use accelerator.

+1000 Every time I have used accellerator, it has left a very visible white linem and has appeared to reduce the bonding strength, probably because the glue hardened prior to making it's way in to all the little nooks and crannies of the joint (isn't capillary action fun?).

You might also use PVA or aliphatic glue on that, if you could find a way to get it down in the gap. As an aside, is it splitting right along the neck laminations? That's what I think I see in the picture, but I can't be sure that my iPhone is representing it correctly...
 
Before going to the fix, let's look at the problem and its cause.

Problem (observation):
You have two lamination seams separating. They seem to be separating towards the back of the neck, and still together at the front. One of the seams splits by a tuner screw, comes back together, and splits again at the volute. The other seam is split in the vicinity of a tuner screw, and then all the way up to the top of the headstock.

It is assumed that when the bass was manufactured/purchased, this was not the case.

Causation (analysis):
For them to separate, there must be two coexisting factors:
a. A force causing tension at the seam
b. Insufficient opposition to this force by the glue joint.​

Let's look more closely at some possible contributors to these two conditions. (letters reference the previous paragraphs.)
a1. The force may be caused by the tuner screws at the seams, combined with insufficient pre-drilling. However, split-together-split separation of the outer seam would seem to counter-indicate this as a sole cause.
a2. It could be due to warping/twisting of the wood, perhaps made worse by a1.
b1. The joint could be improperly formed (boards not flat, smooth, and parallel).
b2. The joint could have insufficient glue.​

a1 is probably contributing. The open-closed-open seam mentioned in a1 seems to imply that a2 would be at least partially to blame. b1 and b2 might be contributors, also.

What can we do to test? Measure the response to removing the screws. (more observation: ) Take the strings off; measure the gap separation by inserting a business card as far as possible at specific places, and drawing a line on the card where it emerges from the crack. Then remove the two screws, and check again. It may close up partially, completely, or not at all. This maybe be important to know when figuring a course of action. Why?

(analysis) Because, if twisting of the wood caused the seams to separate, then even if you glue the seams closed under clamping pressure, the tension will be re-introduced and sealed back in the joint, and will stress the new glue line. And at that point, you are hoping that the stress is not so great that it will either re-split the new glue, or split the wood.

Fix (action):
Here are some possibilities.
1. You can go back to Ibanez, and ask for a new new bass, if it is not discontinued. This is my suggestion for a first course of action - even if it an older bass. It can't hurt to ask. A person presenting a logical case in a straightforward, unemotional manner will hopefully at least be listened to.
2. You can re-glue, with clamps. This will work fine and look good, unless embedded tension re-splits the joints. If a1 and b2 were the only reasons for the failure, and you re-pre-drill the screws, this could be just fine.
3. You can re-glue, without clamps or with partial clamping, using gap-filling glue. This will not be as attractive, but may be less prone to re-split.


That's what I've got, though certainly there are other possibilities I've missed.

BTW in my experience with CA specs, while they do bond with gaps, the strength goes down as the gap increases. Some CA's are more sensitive to this than others, but all I've run into so far have this characteristic.
 
Before going to the fix, let's look at the problem and its cause.

Problem (observation):
You have two lamination seams separating. They seem to be separating towards the back of the neck, and still together at the front. One of the seams splits by a tuner screw, comes back together, and splits again at the volute. The other seam is split in the vicinity of a tuner screw, and then all the way up to the top of the headstock.

It is assumed that when the bass was manufactured/purchased, this was not the case.

Causation (analysis):
For them to separate, there must be two coexisting factors:
a. A force causing tension at the seam
b. Insufficient opposition to this force by the glue joint.​

Let's look more closely at some possible contributors to these two conditions. (letters reference the previous paragraphs.)
a1. The force may be caused by the tuner screws at the seams, combined with insufficient pre-drilling. However, split-together-split separation of the outer seam would seem to counter-indicate this as a sole cause.
a2. It could be due to warping/twisting of the wood, perhaps made worse by a1.
b1. The joint could be improperly formed (boards not flat, smooth, and parallel).
b2. The joint could have insufficient glue.​

a1 is probably contributing. The open-closed-open seam mentioned in a1 seems to imply that a2 would be at least partially to blame. b1 and b2 might be contributors, also.

What can we do to test? Measure the response to removing the screws. (more observation: ) Take the strings off; measure the gap separation by inserting a business card as far as possible at specific places, and drawing a line on the card where it emerges from the crack. Then remove the two screws, and check again. It may close up partially, completely, or not at all. This maybe be important to know when figuring a course of action. Why?

(analysis) Because, if twisting of the wood caused the seams to separate, then even if you glue the seams closed under clamping pressure, the tension will be re-introduced and sealed back in the joint, and will stress the new glue line. And at that point, you are hoping that the stress is not so great that it will either re-split the new glue, or split the wood.

Fix (action):
Here are some possibilities.
1. You can go back to Ibanez, and ask for a new new bass, if it is not discontinued. This is my suggestion for a first course of action - even if it an older bass. It can't hurt to ask. A person presenting a logical case in a straightforward, unemotional manner will hopefully at least be listened to.
2. You can re-glue, with clamps. This will work fine and look good, unless embedded tension re-splits the joints. If a1 and b2 were the only reasons for the failure, and you re-pre-drill the screws, this could be just fine.
3. You can re-glue, without clamps or with partial clamping, using gap-filling glue. This will not be as attractive, but may be less prone to re-split.


That's what I've got, though certainly there are other possibilities I've missed.

BTW in my experience with CA specs, while they do bond with gaps, the strength goes down as the gap increases. Some CA's are more sensitive to this than others, but all I've run into so far have this characteristic.


Great analysis.

The first thing to do is to take it to an Ibanez dealer. Have them make a warranty claim for you. This is instrument is still in their catalog. They should be willing to swap the necks. They will not provide a new neck to you directly. They will not provide a new neck until the old one is in their hands. They may want to charge for the new neck.

As far as the repair goes, it is pretty straight forward. There are a few things to note. The old glue needs to be removed from the joint. Open the crack as much as possible without causing further damage to the neck. The safest way to do it is with a hot knife or some shim stock. Resist the temptation to use small pieces of sandpaper. It has a nasty habit of tearing inside the joint and remaining there. It is a major headache to remove once it is stuck. Heat the knife, insert into the crack, and hold for a few seconds. It will melt the glue and stick to the knife or shim. Remove, clean and repeat. When it is clean, create clamping cauls at a complementary angle to the angle of the sides of the head stock. This will enable the clamps to exert force straight across the workpiece.

As far as glue goes, CA is problematic for this kind of work. It has little shear strength. It is not particularly flexible. Clean up involves harsh chemicals. Open time (the time it takes to set) is short, even with the heavy viscosity types, which allow all of a minute or so to get it done. Acetone mixed with CA while cleaning destroys the bonding capacity of the glue.

Polyvinyl resin (white, like Elmer's) and aliphatic resin (yellow, like Titebond) are better choices. They have good shear strength. Clean up is done with with water and a clean rag. Contamination from the water is not much of a problem. Open time for Titebond is seven minutes, plenty of time to apply clamps, adjust the pressure and begin clean-up. Even dried glue can be cleaned up the same way, it just requires a bit more elbow grease.