• TalkBass has been independent since 1998. Add your voice.
    Create a free account to reply to discussions, view embedded media, and browse with fewer display ads.
    Join freeLog in
    Want zero display ads or expanded classifieds tools? Compare plans.

Second bass: Maple/cherry fretless piezo, plus some side projects

Dec 21, 2018
6,375
14,279
Some of you may remember my recent thread, where I posted about finishing my first bass:

First bass, Zombie build, completed after 19 years

Well, I finished that on December 25, it's been about 6 weeks and I've started a second bass - plus a few side projects, which I mention more as an explanation of why the bass build will be slower than I'd prefer, although it will hopefully be quicker than the first bass I built!

I've always wanted to try a fretless. I've had a good mental image of what I want this bass to be for some time now, although the details have changed a bit as I've started to actually execute.

I've also always wanted to try a bass with an acoustic-style bridge, a semi-hollow body, and a piezo pickup under the saddle - no magnetic pickups, no (visible) controls, and so on. The goal with this approach is a good sounding instrument, but more importantly one with simple, clean lines. I want the whole instrument to look clean, fairly simple, modern, and sleek. A big part of my inspiration for this design is the furniture styles I enjoy - I like plain simple styles like Shaker and mid-century modern.

Which brings me to the first side projects: I figured I'd try to build at least one thing for the house, and one thing as a gift, for every bass I build. That should keep me on a good rhythm of different project styles. So after finishing the first bass, and before starting this one, I threw together a little side table for a spot next to a chair in our sitting room that's been empty since we moved here:

IMG_20190129_140118.jpg


I found this piece of crotch walnut with a big bark inclusion that resulted in a void along the front edge, and I thought it would be really cool to try to cut a dovetail to fit into the inclusion, and a big butterfly tenon to hold the inclusion stable. Once I'd sized that leg I cut the other 3 to match.

Now that that's out of the way, we can start on the bass...

I have some plain hard maple for the neck, and a bunch of leftover cherry from furniture projects. I like to keep every scrap of wood and re-use what I can, the body wings for this bass are unused "practice" pieces for a trestle table that I never finished. I'm also using some extra strips of cherry in the neck from that same table project. I've never seen or heard a bass with cherry in it, but I know enough about it from furniture work to trust that it'll be OK. At least the neck will be mostly hard maple, so it should be stable.

Anyways, I sawed up the neck blank and glued it together last week:

IMG_20190202_143739.jpg


Then I cut it square and true on the table saw.

IMG_20190203_124650.jpg


The maple is nice straight grain and almost perfectly quartered. The cherry has some really gentle quilt figure, which should give it an interesting texture once it's finished. here's the neck blank from the side:

IMG_20190203_124713.jpg


After getting the neck put together, I resawed a big chunk of gently flamed maple for the top of the body. Resawing something this big on the table saw isn't my favorite thing to do, but I don't have a bandsaw right now (a problem I hope to solve in the immediate future):

IMG_20190203_133304.jpg


The woods I'm using in this build are pretty subdued compared to the more wildly-figured and exotic things I used in the first bass. No bubinga or wenge here, folks. Just good old fashioned New York State hardwoods. (Except the fingerboard, which will be ebony!)

I laid the body wing billets next to the neck blank to sketch the body shape. It's a near copy of the shape of my first bass, although thickened up a bit, mostly to keep the horns in proportion with the thickness of the body. My first bass was barely 1 1/8" thick, this one will be more like 1 3/4" and I didn't want narrow little horns on such a thick body. Anyways, here's the money shot of the body outline:

IMG_20190203_132313.jpg


The chunk of cherry on the left is BARELY big enough, which makes me happy, since it means I'm maximizing the material and minimizing waste!

After that, I set the project aside and started on another side project. A few years ago, my brother (and avid guitarist) heard about the Gretsch factory liquidation and managed to get a few old bodies. I ended up with a body from an early Corvette. It's been on a shelf since then. I have a daughter who's got a birthday this summer, she's expressed an interest in guitar so I'm going to build out this body for her birthday present this year:

IMG_20190204_193149.jpg


I'm going to route the pickup slot big enough for a filter-tron and I'm building a neck from scratch from more leftover maple. I had the neck all laid out to make from a single piece of flatsawn maple (a-la Fender) but I found a brilliant piece of flamed maple at Home Depot of all places. It's only 3/4" x 1.5" but it's 8 feet long, perfect to get a nicely figured stripe down the middle of a 3 piece neck. So I cut the maple up and glued up a neck blank, then I realized I had exactly enough of the plain maple board left to make a second neck, so I did.

IMG_20190203_105949.jpg


Here's a closeup of the flamed maple, next to a piece of birdseye I plan on using for the fretboards. The birdseye is left over from the butterfly tenon I cut for that tabletop way up in the first photo:
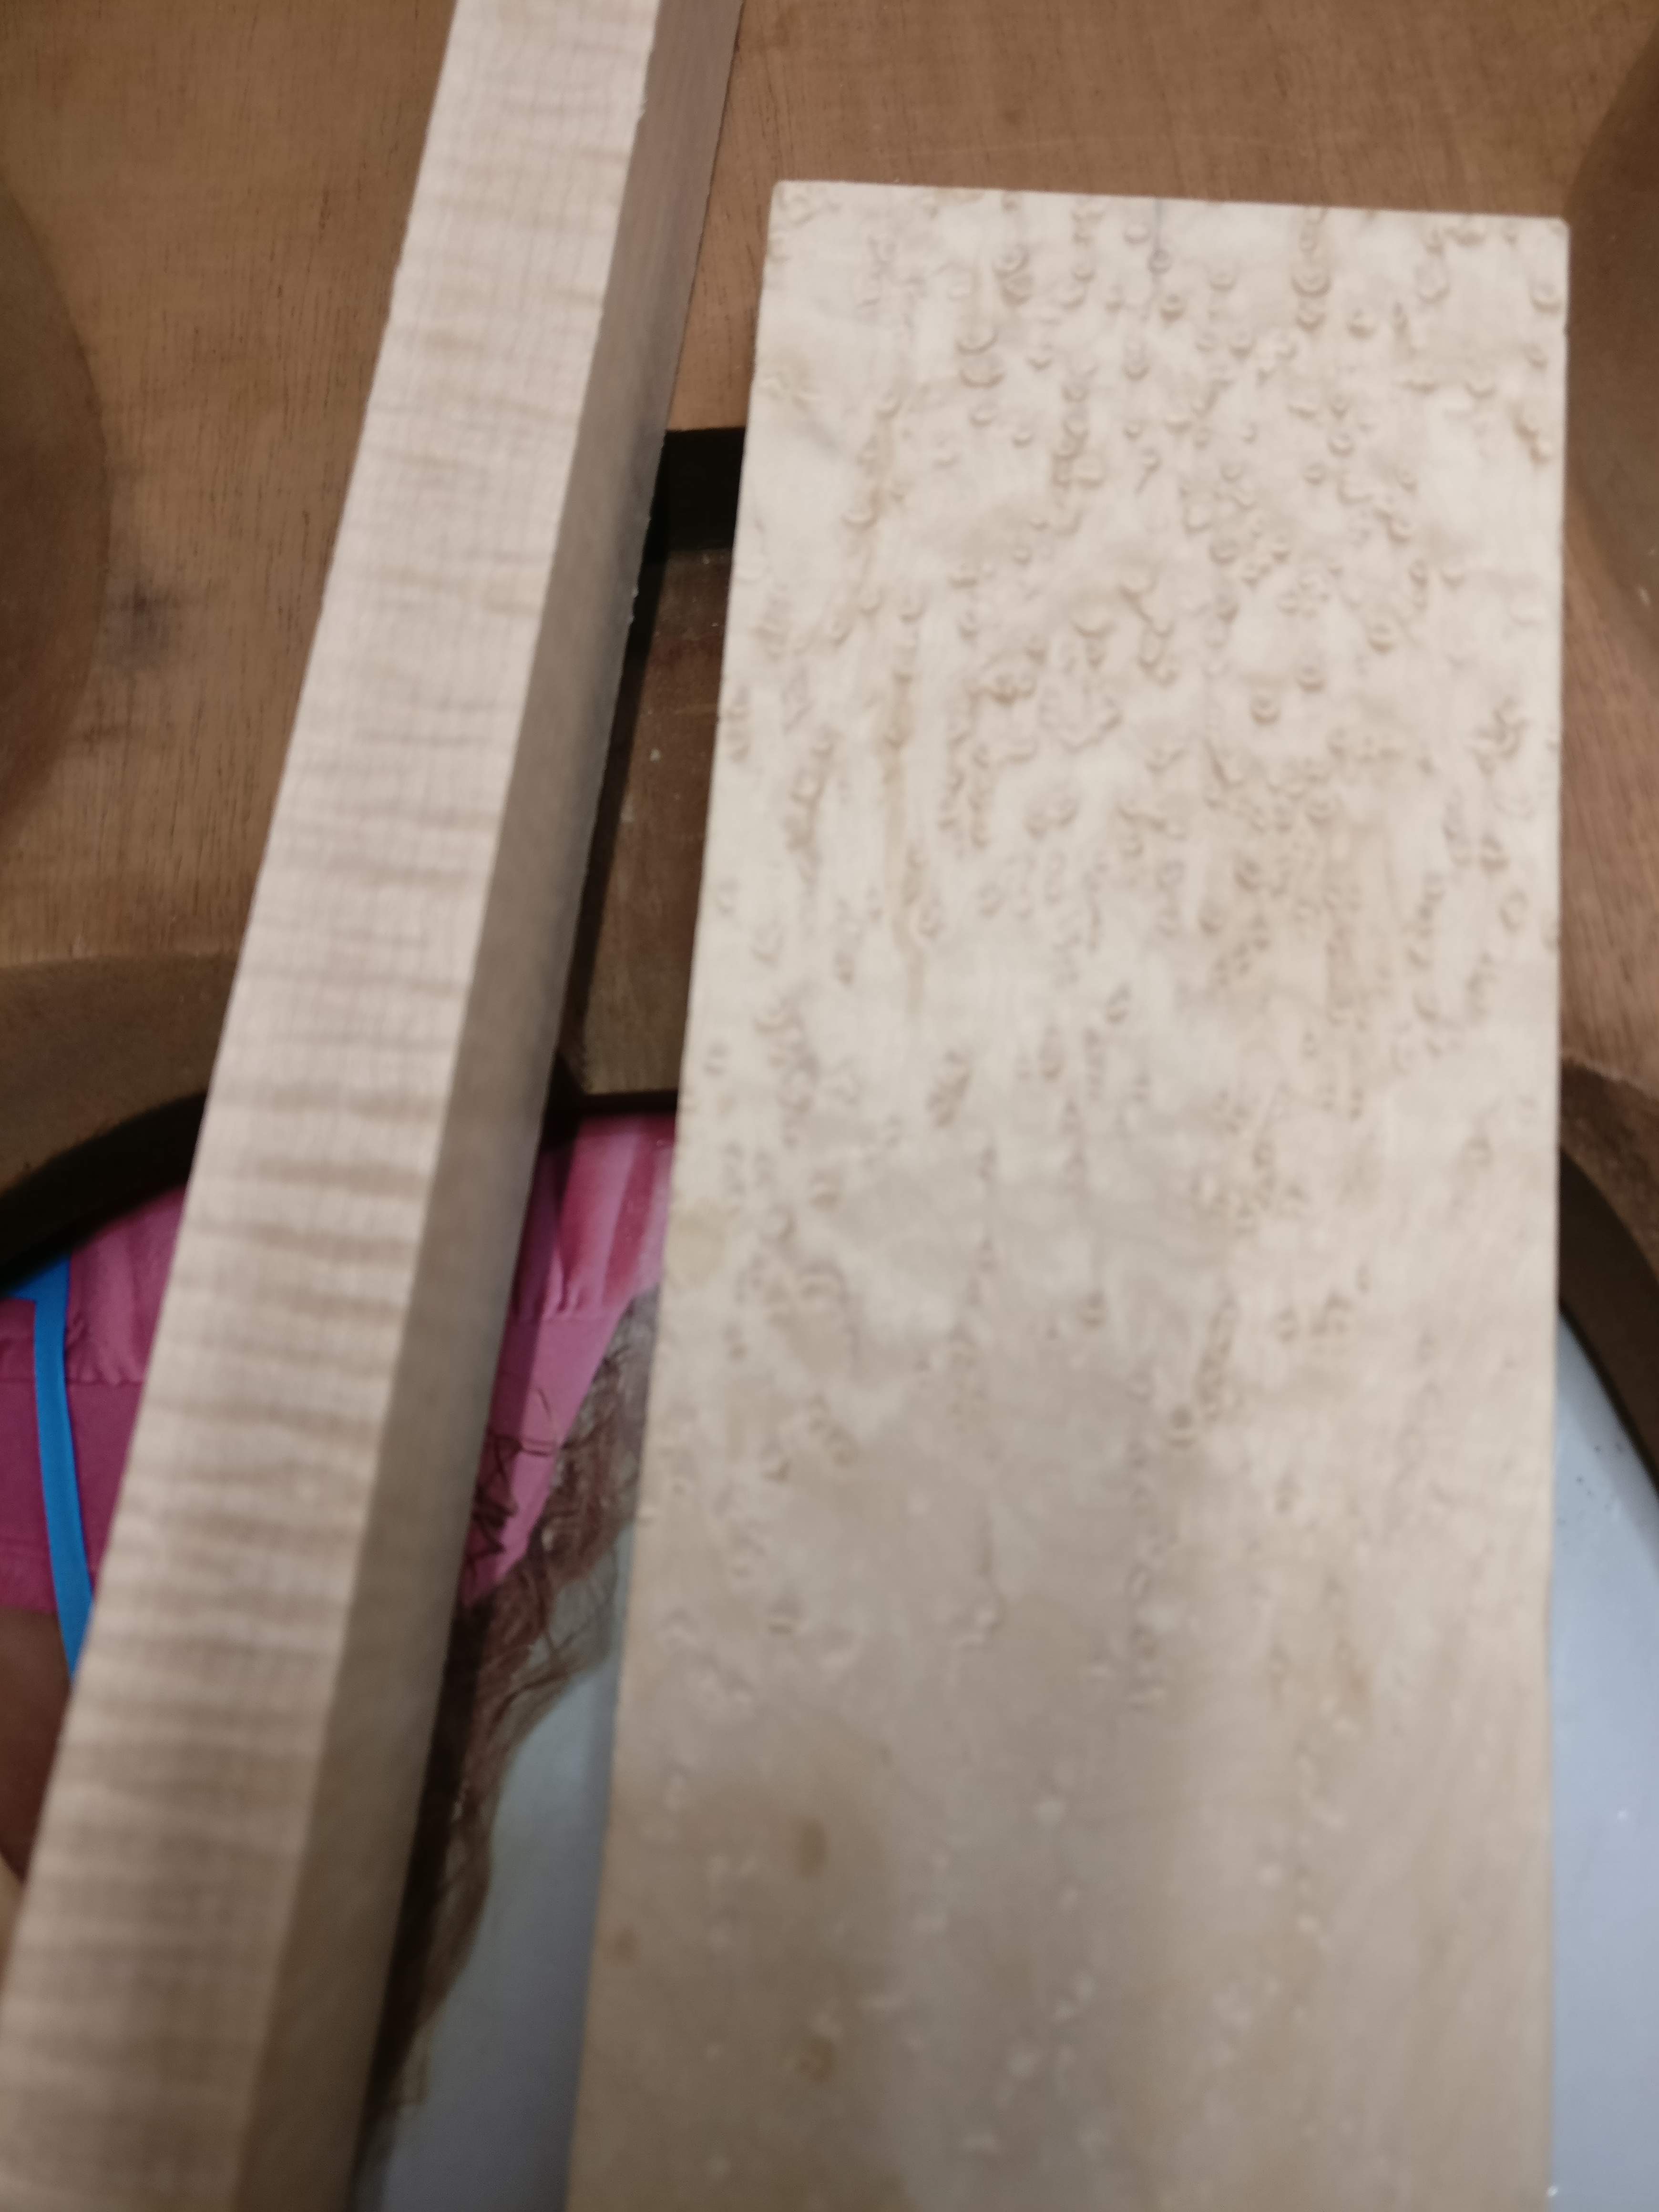
image-20190129_134134.jpg


And that, folks, brings us full circle and gets the project(s) caught up. No real plans on when I'll work on the bass next but I'll update here when I do.
 
So I was laying in bed awake this morning at bolt o'clock (4:40) thinking about my comment above that this bass will be all NY native hardwoods except the ebony fingerboard.

I've got lots of nice maple. It's clearly hard enough for a fingerboard and I am sure I can figure out a finish that would be durable under the nylon tapewounds I plan to use on this thing. Why not have a nice maple fingerboard?

I found this thread, which had plenty of eye candy photos of nice fretless maple:

Fretless Maple Fingerboard?

I really love maple, in general. I could saw some cherry veneer to line it (I don't think I want to brave an unlined fretless as my first fretless experience). Unless someone can convince me otherwise, I think I may give this a try.
 
Go for it! A poly finish may be tough enough for tapewaounds but CA or epoxy is more time consuming then difficult.

I have had lined fretless boards before but now I prefer dots on the sides where the positions would be or a contrasting line along the top edge of the board (which I stole from someone on here but I don’t recall who).
 
Go for it! A poly finish may be tough enough for tapewaounds but CA or epoxy is more time consuming then difficult.

I have had lined fretless boards before but now I prefer dots on the sides where the positions would be or a contrasting line along the top edge of the board (which I stole from someone on here but I don’t recall who).

I'm gonna go for the maple. Why not. I'm sure I can get a good finish on it - probably CA, if not just poly (which I like in general). I have a piece of maple all picked out:

IMG_20190209_111717.jpg


It's got some heartwood in it which will probably come through as it's sanded to thickness, which will look pretty interesting I bet.

Love the table project. That might be a fun design (the butterfly tenon in the bark void) for a bass body.

The table was fun. Good idea regarding the butterfly on a bass. It would have to be JUST the right piece of wood, I have seen a few basses and guitars with bark inclusions or big cracks and it doesn't always turn out nicely (IMHO at least).

My wife has been away for work this weekend so I got a good solid 6 or 8 hours in the shop. Lots more progress than I expected to be making this quickly. Updates to follow as soon as I get the photos sorted...
 
  • Like
Reactions: Matt Liebenau
First, I made a sled with a rail set at 13 degrees to cut the headstock scarfs. I thought I had a photo but apparently I don't. After getting the headstocks cut off, all three neck blanks went into a router planing jig to get flattened and trued up.

IMG_20190209_153643.jpg


Full credit to our own @Bruce Johnson for the inspiration to use router planing jigs on these parts. It's certainly the easiest method.

Once the blanks were true, I slid a wedge under the blanks and planed the face of the scarf joint true.

IMG_20190209_150806.jpg


Buncha guitar necks!

IMG_20190209_130732.jpg


Glued the headstocks all back on and then took a break from instruments to throw something together with the scraps. I didn't want my wife to feel left out so I made a little jewelry tray from the leftover curly maple (from the guitar necks) and a cutoff of thin cherry for the bottom. Just simple rabbet/dado joints in the corners and a slot along the bottom of each side for the bottom, which is floating so it'll be able to move with the seasons:

IMG_20190210_105143.jpg


Once it was fit and glued, I took it back to the table saw and cut slots along each long edge, and I cut matching sticks of cherry from the cutoff on the back of the bass neck:

IMG_20190210_142949.jpg


The cherry strips will lock the rabbets in the dados. Not that they were going anywhere, but I like it when a "structural" element like this is also a nice visual detail. After gluing in the cherry strips I cut little square pegs to plug the ends of the slot from the bottom, sanded it, and put a coat of poly on it:

IMG_20190210_175751.jpg


Okay, back to the instruments. Once the scarfs on the necks were glued, I put them back in the router planing jig and planed the faces flat to clean up the scarfs. I made a boo boo with one of the guitar necks, there was a big bit of sawdust under where it clamps to the jig, which meant that it got planed to about a 4 degree angle instead of perfectly flat. I guess I'll have to save that neck for a guitar with a carved top, and use the other one for the corvette.

Once the necks were done, I put them aside and planed the cherry body wings flat and true, in the same router jig:

IMG_20190210_150946.jpg


I put the cherry up to the neck and re-sketched the body outline, this time including marking out the 12th and 24th frets, the soundhole (no, its not round!) and the bridge. I LOVE LOVE LOVE this part of the process. There are few things in life as satisfying as sketching on wood with chalk.

IMG_20190210_172711.jpg


I should also mention that when I was laying out the neck to cut the scarf, I decided to do this as a 32" scale bass. I have only ever had 34" basses and I feel like the 32" length will fit with the overall character I want for this. It'll help keep it a little lighter and more compact, too. I slid the bridge pretty far down towards the tail, too, which combined with the shorter scale has the effect of pulling the whole neck down into the body quite a bit. I was hoping to set this up as a two octave (24 fret) fingerboard, but the 24th position was REALLY deep into the body (near the middle of the soundhole) given those changes. So, it'll be more like a 22 fret bass.

After the sketching (which involved re-drawing the lower horn about a billion times) I got out the jigsaw and cut the pieces out:

IMG_20190210_174549.jpg


Turns out there was a bass inside those old pieces of discarded furniture practice!
 
I've been stuck on the visual appearance of the maple fingerboard against the maple top. There won't be any contrast. I can't get over that! This has lead to multiple trips to my wood pile to find a suitable replacement with no success - so I turned to ebay and found a semi local seller who had some nice walnut, pre-sawn and thickness sanded. I bought two tops worth, I'll choose the best looking one when they arrive.

This seller had a "buy three items get 20% off" promo going on. Well, I am never one to turn down a good sale, so I also bought an acoustic back/sides set, also in nicely figured walnut. It was cheap because of some minor flaws near the edges of what would be a typical dreadnought outline. It was practically free once the discount on the two tops came into play.

What the heck am I going to do with an acoustic back/side set? Wellllll... I have always wanted a uke bass! And that extra guitar neck blank would make a great neck, cut down a bit... So I guess it's time to buy some rubber strings.
 
Day off today so the necks went in the router planing jig to get truss rod slots cut.

I used the ubiquitous two way rods in blue shrink wrap that are sold by many on ebay and elsewhere. Here's a trial fit in the bass neck:

IMG_20190218_102624.jpg


Truss rod on the bass will be adjusted through the soundhole so the nut is at the body end.

After that, I was pondering how much sweat it was going to take to sand all these fingerboards to radius so I figured, this is a problem that can be solved with a router jig! I did some googling, some thinking and mocking up, then cut some plywood and ended up with this:

IMG_20190218_135734.jpg


The foil tape was put on to shim the faces of the sliders to get a slop-free fit against the mdf base.

I cut some scrap wood as a test and then cut the three birdseye boards to radius. I have to say, I am incredibly happy with how this turned out. These boards will need very little fine-grit finish sanding to get a perfect surface. It's hard to show how good the surface is in photos so I didn't bother trying, you'll just have to take my word for it.

I used the same 1 1/8 freud down shear bit I use for planing, by stepping the router base across the curved rails about 1/8" at a time, the facets pretty much disappear against each other.

After getting the fingerboards shaped I decided to carve the guitar neck. I need to get some veneer for the volute on the bass neck so I can't carve it yet, so I figured I'd get the guitar neck out of the way first:

IMG_20190218_145014.jpg


IMG_20190218_161843.jpg


IMG_20190218_161901.jpg
 

Attachments

  • IMG_20190218_162307.jpg
    IMG_20190218_162307.jpg
    784.3 KB · Views: 119
The electronics arrived yesterday!

IMG_20190219_193433.jpg


Piezo element to go in the (acoustic-style) wood bridge I have yet to make. The steel box is a buffer/preamp enpin combo, and that's a tiny condenser mic inserted into it's second input. I'm sure there won't be much in terms of volume from the mic, but I was curious to see what it would do in a semi-hollow instrument like this.

At the top is the control plate, it's three thumbwheels - piezo volume, piezo tone, and mic volume. That plate was the central feature for me from a design perspective. I knew I wanted "hidden" controls instead of knobs on the face of the instrument. My first thought was to put sliders or thumbwheels along the edge of the instrument, next to the jack plate, but I was a little nervous about having them so "exposed" and prone to catching on clothes/etc while playing - or getting damaged if the edge of the bass was knocked against something.

I knew I wanted a soundhole, versus f holes, and I had seen acoustic guitars with soundhole-mounted thumbwheels. So I figured that would be the best route for this instrument. I was planning on getting a "plain" buffer for the piezo and then putting my own thumbwheels after it for volume and tone, but this unit came with this nice little panel already built, so here it is!

Some day I'm going to combine instrument making with one of my other favorite hobbies, electronics - and build my own preamps/etc but for this project I just wanted something finished I could put in. I sketched the final shape of the fingerboard end and the soundhole to match it up to the control plate - the soundhole is flat on three sides and curves to match the fingerboard along the top. The controls will go along the right side of the soundhole, so they'll be under the e string. I'm the kind of guy who adjusts volume/tone controls once in a great while at most, so having them a little hard to reach (down under the string) isn't a big deal, and in fact is exactly what I wanted, to keep them out of sight and prevent them from cluttering the overall look of the instrument.

Not sure when I'll get to work on the bass next, maybe this weekend, but I need to get a new fret saw soon since I can't find the one I used on my last fretboards 20-some years ago. I'm also waiting on some veneer I ordered on ebay last week to add some accent lines before I can do any more shaping or gluing. The walnut top plates are due to arrive today, so I'll get to pick which I'm using.

And - I think I've figured out a way to incorporate the butterfly tenon into this bass, but I don't really have anything to reveal yet since at this point it's just a half-baked idea in my head. But I'm excited, since it'll help me achieve my "clean" design in another spot on the bass...
 
The walnut arrived. It's really beautiful, top shelf wood. The seller packed it with a bunch of freebie small cutoffs of other fancy wood. I think I have a new favorite ebay wood vendor.

IMG_20190221_060000.jpg


He'd sketched telecaster outlines on the wood, I went over it with a rough outline of this bass to get an idea of fit. Hard to choose between the two. Both sets have some significant warp in at least once piece, once they've sat in my shop for a few days I'll plane them flat. They're both just a hair under 1/2" thick so there's plenty of material to bring them down flat.

Still no sign of the veneer I ordered on the 14th. I'm thinking about cancelling the order and going with a different vendor. It doesn't even show as shipped yet on eBay, which is kind of ridiculous. I want to get the headstock laminations in place so I can start shaping this thing.
 
Time for this body to go on step one of a weight loss program:

IMG_20190224_174314.jpg


I was originally going to just glue the cherry wings on and route the whole thing hollow, but since I got the nice walnut for the top, I figured I'd use this maple on the back and just saw cut the cherry wings before gluing. It's certainly quicker than drilling/routing that whole area.

I'm going to cut the neck blank back too (weight loss step two!), now that I have a plan figured out it's really going to be more of a set neck than a neckthrough, although I'll still be building the body around the neck versus building two parts separately and then gluing them together.
 
I had a few minutes here and there in the workshop over the weekend. First I glued up the maple panel for the back:

IMG_20190303_105735.jpg


Then it was time to work on some fret/fingerboards. I'd mentioned this in another thread, but the last time I slotted a fretboard was nearly 20 years ago - unfortunately, I've lost track of both the slotting miter box and my fret saw (which was a "brand name" one, shame it's missing). I wanted to play with small hobby saws this time, out of the joy of experimentation, instead of just buying another luthier-specific saw. So I bought a handful of small Zonas, a Harbor Freight flush cut saw, and a Marples dovetail saw. Plus I had 3 small saws around the shop already. I made test cuts with all of these and measured with feeler gauges, then tried putting frets in the slots.

It turns out there's a pretty big variance among "approved" saws that people talk about using, in terms of slot width. I've heard people mention the Zona 350 and 380, and the Marples and Harbor Freight saws, but to my measurements, they all cut a bit too wide. All of them took a fret, but with varying degrees of loose-ness (from "that's gonna fall right out" to "that would probably work") I'm sure some of these saws work great for the people who talk about using them, but I wanted to get as close to spec as I could. Turns out this was pretty easy. The two Zonas (350 and 380) just needed a bit of set taken out and they cut perfectly measured slots. I am using the 350, since it cuts on the pull, which I prefer.

Next up, the box. I had a scrap of the bass neck lamination in my scrap box, so I used that. For a depth stop, I hot-glued a scrap of cherry to the side of the blade, so it'll just touch the top of the board when the slot is perfect.

IMG_20190302_123122.jpg


I printed some templates with fretfind2d, taped them to the boards, and sawed away. I did the guitar fretboard first, then slotted the bass fretboard, since it's going to be lined with cherry veneer to match the stripes in the neck lam.

Fretboards done, I went back to the bass for weight loss, phase two - and hacked off the end of the neck blank. I'm leaving the thin cherry "heel block" the full length of the body as a reinforcement for the maple on the back and a way to tie the neck to the tail. I glued a little angled strip of maple along the end of the neck blank and that cherry in order to ease the abrupt end of the neck. Although in the zoomed-in photo below it looks like I did a terrible job gluing this maple to the cherry, so maybe I should cut it out and replace it...

The neck blank is taller than the cherry wings, in order to allow the fretboard to stand proud of the top of the body. In addition, I want the very end of the fretboard to float above the body without support, like a fingerboard on a bowed instrument does - just the last inch or so. Also, since the neck blank is wider than the fingerboard, I needed to relieve the perimeter of the fingerboard's shape to allow the top to sit down at the correct level, flush with the cherry body wings. To accomplish this, I routed the face of the neck blank back to the profile of the fingerboard, accounting for the relief at the end for the fingerboard overhang. This is a complicated description for something that would be easier to just show in a photo:

IMG_20190303_183408.jpg


The cherry body wings are just set in place to check the depth of the routing, they're not glued on yet. Next up will be neck shaping, although I still haven't gotten the stupid veneer order I placed on Ebay back on Feb 14th so I can't really shape the volute yet...
 
Nice. I just got some cherry at the wood place last week, I think I'm going to do a cherry/mahogany instrument next. I like your side projects, I need to find more of those to do!

My dad was an antiques dealer who specialized in early American furniture. He used to refer to cherry as "America's Mahogany." I do think it's true to an extent. The color has a softness and richness that's not present in any other domestic wood IMHO. I like it over mahogany because the grain isn't as open, and I like it over maple because the coloration and grain is a little more interesting (sometimes). I do find it needs a very sharp tool for how light it is, it's softer than maple but isn't as forgiving. It almost has a "rubbery" quality where it wants to crush a bit when you're chopping down into it with a chisel for instance, instead of cutting cleanly.

Like I said above I don't know how it'll do in terms of instrument making (if you're the type that believes in wood tone) but it's certainly structurally viable. And at the risk of starting a tonewood debate, tapping on a cherry log gives a musical ring like no other hardwood I've ever handled. It's almost bell-like.

I've got a cherry tree behind my pool that's got to be 3+ feet in diameter at the base, and has a big gnarly burled fork in the trunk right above ground level. I'm almost waiting for it to get damaged in a windstorm so I can slice it up for furniture.
 
Good timing on that! Glad I'm not the only one using cherry.

I was looking at the parts before work this morning, mentally prepping for the next steps, when I realized the truss rod won't work as is. First, it's too long, it's gonna stick out past the end of the cut back neck blank which doesn't feel right. So I ordered another that's shorter.

The bigger problem is, with the fingerboard raised up above the body and the truss rod slot routed to position it right below the fingerboard, the adjustment barrel on the end of the rod is basically in-plane with the walnut top. Somehow I was mentally expecting it to be below the top. I could route a little slot into the top to allow access, but I really don't want it visible and I definitely don't want a truss rod cover right there. I could turn the rod around and have it adjust at the headstock, but I don't want a cover there either. I could route the slot deeper and put a shim on top of the rod - that would allow the adjustment barrel to sit below the top, in the soundhole, as planned, but it would mean less material behind the rod on the back of the neck...
 
IMG_20190308_071145.jpg


Before work this morning I laid the truss rod in the channel and set the walnut on the routed ledge to take a closeup of how they align height-wise so I could plan the best approach. I feel like the rod is way too high to try to access via the soundhole, I'd have to make the channel significantly deeper. With my plan for the fingerboard overhanging above the body, I think I can notch the walnut and allow access under the end of the fretboard via a ball-end Allen wrench without the notch being super obvious.
 
I'm going ahead with the notch under the fingerboard for the fret rod. Decision made, that means I know I don't have to route the truss rod slot any deeper, so I can go ahead with creative clamping to get the body wings glued on.

This is a big turning point for me, because it's actually shaped like a bass after this...

IMG_20190308_203438.jpg


Hoping to get a few minutes tomorrow morning to glue the back on.
 
  • Like
Reactions: 5tring