

Enjoy the benefits of a premium membership!
Upgrade Account
-
TalkBass has been independent since 1998. Add your voice.
Create a free account to reply to discussions, view embedded media, and browse with fewer display ads.
Join free Log in
Want zero display ads or expanded classifieds tools? Compare plans.
You are using an out of date browser. It may not display this or other websites correctly.
You should upgrade or use an alternative browser.
You should upgrade or use an alternative browser.
Semi-hollow Starfire style 4 string bass build
- Thread starter Drake Custom
- Start date
More options
Who Replied?
- Aug 24, 2010
- 440
- 1,082
- Disclosures
- Builder/Owner:Drake Custom Bass Guitars
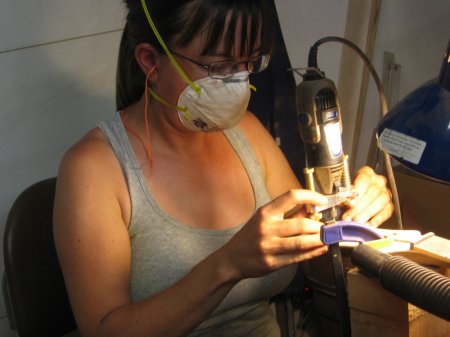
Thanks for the feedback everyone. The "Deadhead" comment was not lost one me. In fact the last bass I built like this had the oval inlays inspired by Phil's Alembic modified Guild Starfire. I gave my inlay artist some photos of Phil's bass to work off of during the design phase. Speaking of my inlay artist, she has completed the headstock inlay for this current beast as you will see in the next two photos.
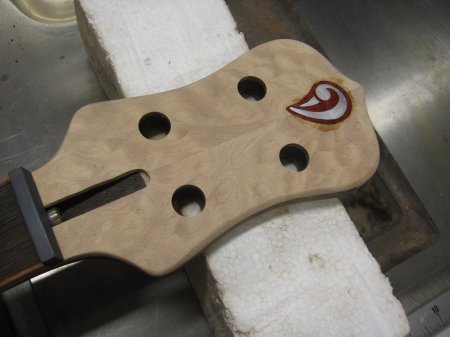
Yes, I can see the superglue around the inlay...and I will be sanding it back before finishing. The MOP is set into Bloodwood.
Below are just two more shots during the finishing stage. I look to have her completed within the next week. I am waiting on a Hipshot Super Tone bridge to arrive so that I can drill the bushing holes. I love the look of this top wood. The back, if you recall, is made of 4 pieces of Mahogany. I think they match up fairly well.
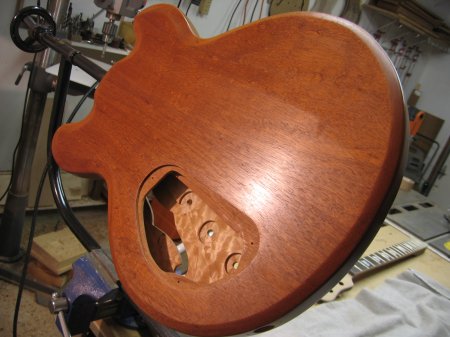
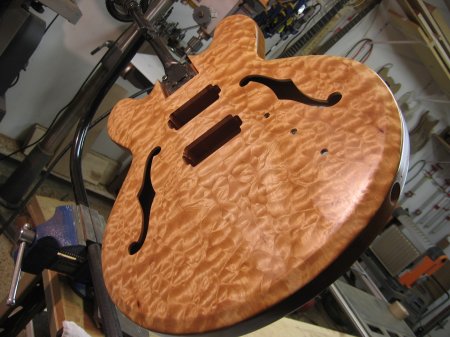
Yes, I can see the superglue around the inlay...and I will be sanding it back before finishing. The MOP is set into Bloodwood.
Below are just two more shots during the finishing stage. I look to have her completed within the next week. I am waiting on a Hipshot Super Tone bridge to arrive so that I can drill the bushing holes. I love the look of this top wood. The back, if you recall, is made of 4 pieces of Mahogany. I think they match up fairly well.

- Aug 24, 2010
- 440
- 1,082
- Disclosures
- Builder/Owner:Drake Custom Bass Guitars


I just checked yout website, Drake.
I must thank you and congratulate you for the delicious pictures of such real guitars and basses that let the raw beauty of the wood they are made of be seen.
I must thank you and congratulate you for the delicious pictures of such real guitars and basses that let the raw beauty of the wood they are made of be seen.


- Aug 24, 2010
- 440
- 1,082
- Disclosures
- Builder/Owner:Drake Custom Bass Guitars
Thanks guys. I do love the look of wood and do not wish to ever cover it up with paint. Having said that...I will be trying out some dyes soon but the dyes will still show the natural grain of the woods. I will try paint only if a customer requires it and it will not be cheap as I do not have a paint booth.
Sorry, no progress shots as there has been little change in the overall appearence of this instrument. Wiping on oil does not change the looks of the bass much. I am waiting for the Hipshot Supertone bridge to arrive. I received one but it was the 3 point style and I need the 2 point. The 2 point style is a little lower than the 3 point and it has less of a footprint. These bridges are perfect for set neck angled styled basses. They were designed to replace the Gibson stock bridges. See the first photo for the 2 point bridge. An example of the 3 point is in the second pic of a bass I did a while back.
[Invalid or Expired Link Removed]
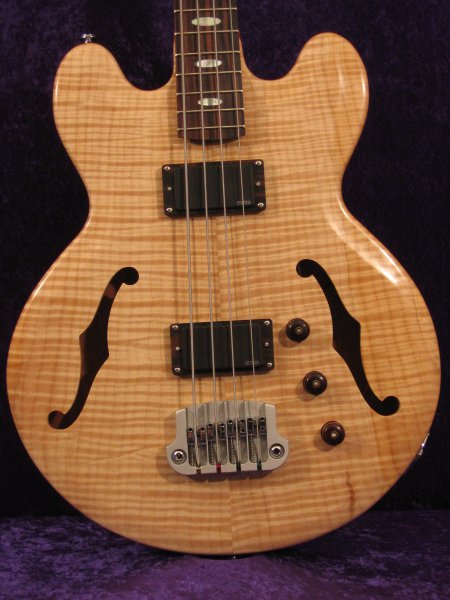
Another option I wish to try sometime is this next one. The Hipshot D style.
[Invalid or Expired Link Removed]
Thanks for looking at my build. I will have pics of the neck install and the final finished bass in a week or so. Check back then.
Sorry, no progress shots as there has been little change in the overall appearence of this instrument. Wiping on oil does not change the looks of the bass much. I am waiting for the Hipshot Supertone bridge to arrive. I received one but it was the 3 point style and I need the 2 point. The 2 point style is a little lower than the 3 point and it has less of a footprint. These bridges are perfect for set neck angled styled basses. They were designed to replace the Gibson stock bridges. See the first photo for the 2 point bridge. An example of the 3 point is in the second pic of a bass I did a while back.
[Invalid or Expired Link Removed]
Another option I wish to try sometime is this next one. The Hipshot D style.
[Invalid or Expired Link Removed]
Thanks for looking at my build. I will have pics of the neck install and the final finished bass in a week or so. Check back then.

Thanks guys. I do love the look of wood and do not wish to ever cover it up with paint. Having said that...I will be trying out some dyes soon but the dyes will still show the natural grain of the woods. I will try paint only if a customer requires it and it will not be cheap as I do not have a paint booth.
Sorry, no progress shots as there has been little change in the overall appearence of this instrument. Wiping on oil does not change the looks of the bass much. I am waiting for the Hipshot Supertone bridge to arrive. I received one but it was the 3 point style and I need the 2 point. The 2 point style is a little lower than the 3 point and it has less of a footprint. These bridges are perfect for set neck angled styled basses. They were designed to replace the Gibson stock bridges. See the first photo for the 2 point bridge. An example of the 3 point is in the second pic of a bass I did a while back.
[Invalid or Expired Link Removed]
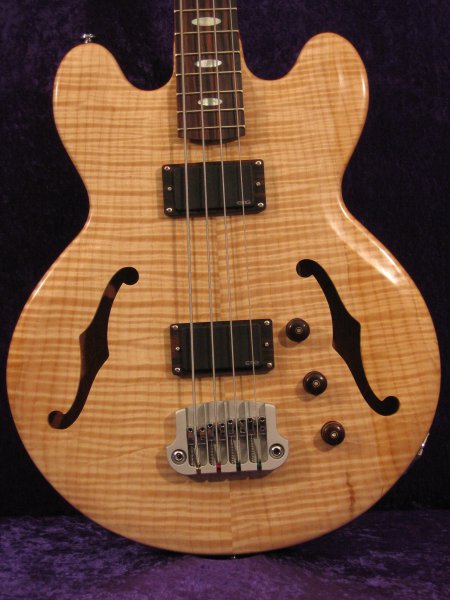
Another option I wish to try sometime is this next one. The Hipshot D style.
[Invalid or Expired Link Removed]
Thanks for looking at my build. I will have pics of the neck install and the final finished bass in a week or so. Check back then.
Awesome stuff.. and. Nice website ..

Rickett Customs
Commercial User

Musiclogic
Commercial User
- Aug 6, 2005
- 6,505
- 75
- 60
- Disclosures
- Owner/Builder: HJC Customs USA, The Cool Lute, C G O
I like the black over the satin chrome, but I like the Supertone better....just because Jason likes the D....LMAO 
Nice job Drake
Nice job Drake
- Aug 24, 2010
- 440
- 1,082
- Disclosures
- Builder/Owner:Drake Custom Bass Guitars
My first choice would probably be black hardware. I went with the chrome as I had some tuners laying about that needed to be used. I will probably try the D style bridge someday and when I do I probably will do the string through the body style rather than buy the tail piece to go with it. I always like a smaller bridge footprint on the face of a semi-hollow bass. I should have gone with it on this one but I think the D style may be shorter and my neck angle was too great to use it one this one. Next time.
I will post some pics of the neck being glued in very soon.
I will post some pics of the neck being glued in very soon.


wow...that's really nice...one more to add to the ever-growing GAS list. How much would it be to order a bass like this?

I'm in awe. Incredible. My dream bass is similar to this but a six string.
that's what I'm building once I finished my current set of builds.

that's what I'm building once I finished my current set of builds.
Very nice! I look forward to seeing your progress.
- Aug 24, 2010
- 440
- 1,082
- Disclosures
- Builder/Owner:Drake Custom Bass Guitars
Hey all. I have been quite busy with some other custom builds but I thought that I should get back to you with some progress shots of the process I use to set a neck. I have done several trial runs with my process and have proven to myself that this technique works. I have searched and searched for info on set necks and there does not seem to be much out there. There was one post on TB that was supposed to be great but the pictures were gone. Being a visual type of guy I was frustrated.
Most set necks I have encountered were of the Gibson tenon variety but I use a Thompson style approach. I just make the heel extra thick and glue the bastard in. Ok, there is more to it than that but not much.
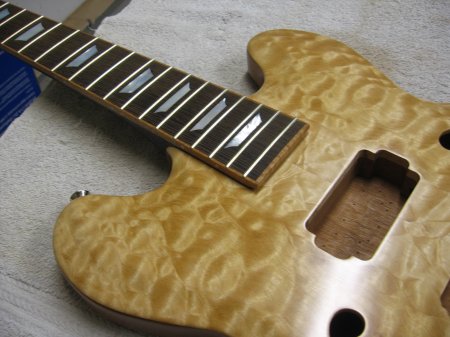
First I check and re-check the fit and that the neck is at the right angle for the bridge. I had to remove some material from the bottom of my neck heel as the bridge was a little lower than I planned. One tip I may pass on is that it is best to have the bridge intended to be used, be present during the layout phase so you will not have to do this. I did not and have had to make adjustments accordingly. Also you have to check and make sure that the heel and bottom of the pocket are smooth and very flat so that they bond well together.
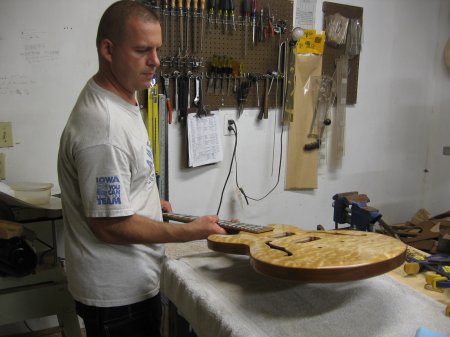
Did I mention fit? A tight fit is essential. A typical mass produced bolt on neck/pocket would not work too well. I like to have the pocket so that I can press the neck into place and lift the body with just friction. The neck should go in smoothly as you do have to have some space for glue. If you have to stand on it to get it into the pocket it is too tight.
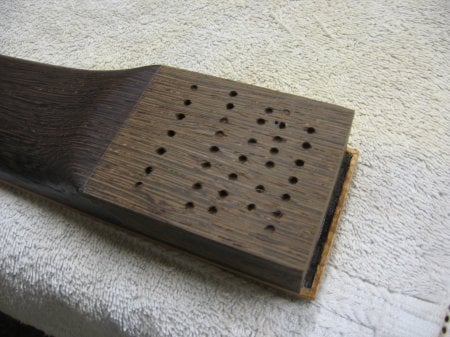
When I finished my neck with some oil (as it was Wenge) I masked off the area that will receive glue. I used plain masking tape covered by packing tape so that the oil or naphtha, that I use to clean the wood, will not soak through and contaminate the wood. I also drilled some holes to soak up any excess glue and help give the joint a mechanical bond. You will see why in a bit. You are not drilling to China with the holes so an eighth of an inch will do. Don't want to mess your truss up do ya?
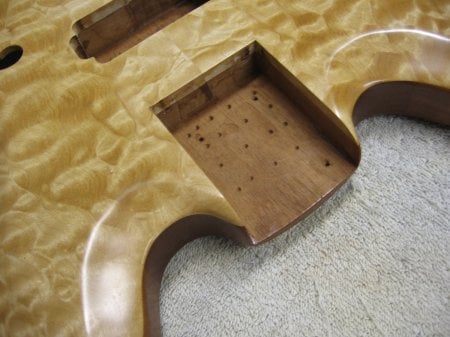
I did the same drilled holes with the bottom of the pocket.
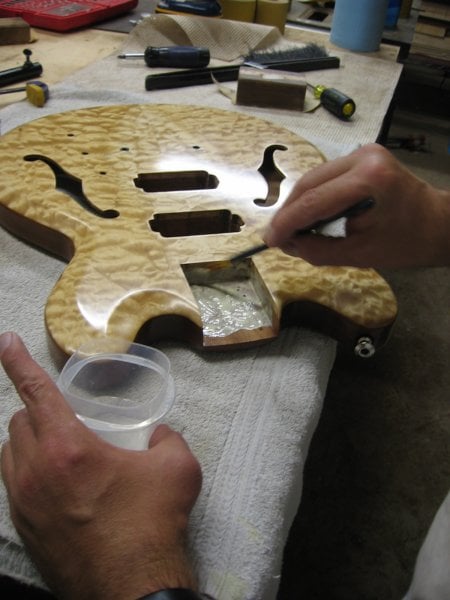
Now I apply some Titebond Type II (blue cap) wood glue as it holds strong but if I ever have to remove the neck, this glue melts with hot water/steam. Another tip...don't build anything that can't be repaired or revearsed if needed. Notice that I did not cover the last half inch from the edge of the pocket. This is to keep the squeeze out from working its way into the pores of my Wenge neck. The holes that were drilled into the neck heel and pocket also soak up the glue.
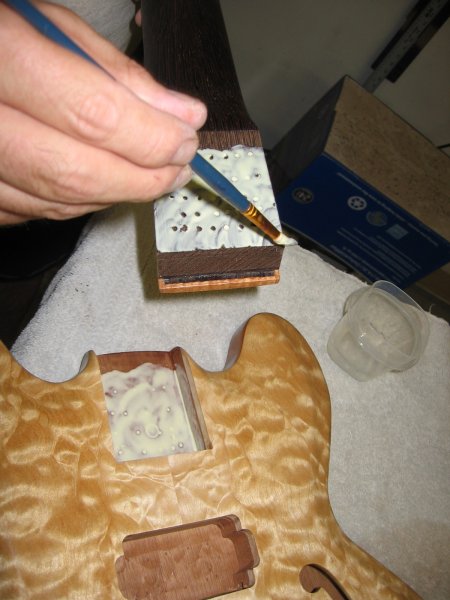
I apply a little glue to the heel of the neck as well. I use a artist type brush and dip it into water to help wick the glue deep into the wood. I covered the side of the pocket with glue and let the whole mess soak in a bit before putting the neck into the pocket. Please note that I did not apply glue to the sides and end of the neck heel or if you do, let it soak in and wipe of the excess or you will have glue out on the face of your bass.
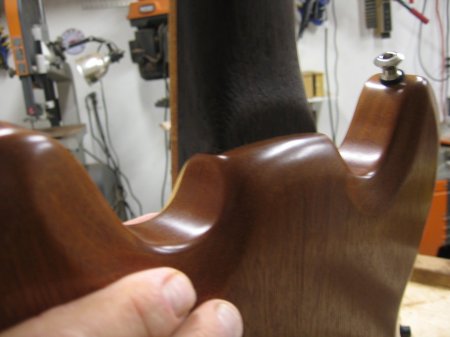
This is the results I like to see. Wenge being as porous as it is looks really bad if you get wood glue into the pores. Been there and done that.
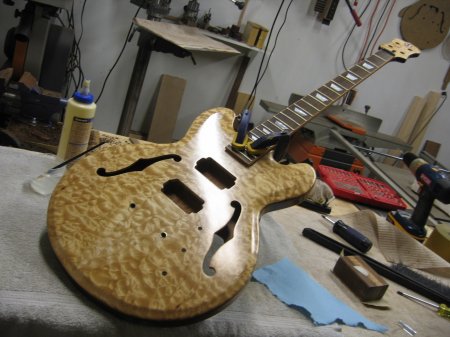
Into the clamps she goes over night.
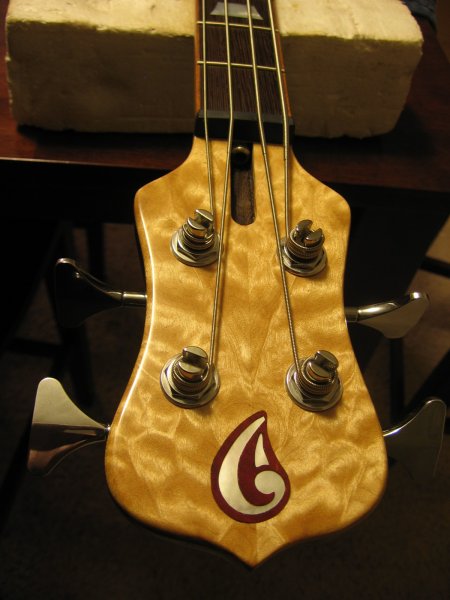
Sorry, I have forgotten to show the completed inlay that Rosie did.
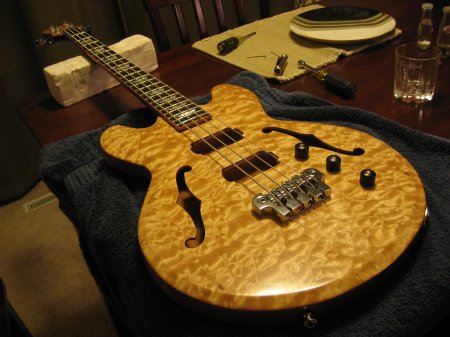
Finally she is in the the assembly stage. Next time I will have finished pics.
Thanks so much for the comments and the feedback that you have all sent. Until next time.
Most set necks I have encountered were of the Gibson tenon variety but I use a Thompson style approach. I just make the heel extra thick and glue the bastard in. Ok, there is more to it than that but not much.
First I check and re-check the fit and that the neck is at the right angle for the bridge. I had to remove some material from the bottom of my neck heel as the bridge was a little lower than I planned. One tip I may pass on is that it is best to have the bridge intended to be used, be present during the layout phase so you will not have to do this. I did not and have had to make adjustments accordingly. Also you have to check and make sure that the heel and bottom of the pocket are smooth and very flat so that they bond well together.
Did I mention fit? A tight fit is essential. A typical mass produced bolt on neck/pocket would not work too well. I like to have the pocket so that I can press the neck into place and lift the body with just friction. The neck should go in smoothly as you do have to have some space for glue. If you have to stand on it to get it into the pocket it is too tight.
When I finished my neck with some oil (as it was Wenge) I masked off the area that will receive glue. I used plain masking tape covered by packing tape so that the oil or naphtha, that I use to clean the wood, will not soak through and contaminate the wood. I also drilled some holes to soak up any excess glue and help give the joint a mechanical bond. You will see why in a bit. You are not drilling to China with the holes so an eighth of an inch will do. Don't want to mess your truss up do ya?
I did the same drilled holes with the bottom of the pocket.
Now I apply some Titebond Type II (blue cap) wood glue as it holds strong but if I ever have to remove the neck, this glue melts with hot water/steam. Another tip...don't build anything that can't be repaired or revearsed if needed. Notice that I did not cover the last half inch from the edge of the pocket. This is to keep the squeeze out from working its way into the pores of my Wenge neck. The holes that were drilled into the neck heel and pocket also soak up the glue.
I apply a little glue to the heel of the neck as well. I use a artist type brush and dip it into water to help wick the glue deep into the wood. I covered the side of the pocket with glue and let the whole mess soak in a bit before putting the neck into the pocket. Please note that I did not apply glue to the sides and end of the neck heel or if you do, let it soak in and wipe of the excess or you will have glue out on the face of your bass.
This is the results I like to see. Wenge being as porous as it is looks really bad if you get wood glue into the pores. Been there and done that.
Into the clamps she goes over night.
Sorry, I have forgotten to show the completed inlay that Rosie did.
Finally she is in the the assembly stage. Next time I will have finished pics.
Thanks so much for the comments and the feedback that you have all sent. Until next time.


