
- Sep 8, 2008
- 161
- 8
- Disclosures
- Endorsing Artist: S.I.T. Strings, Nordstrand Pickups, WB Gear,

TalkBass has been independent since 1998. Add your voice.
Create a free account to reply to discussions, view embedded media, and browse with fewer display ads.
Join free Log in
Want zero display ads or expanded classifieds tools? Compare plans.
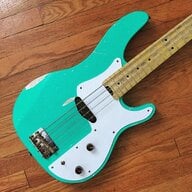
Hmm ... I'm very curious about something. Could you do me a monster sized favor and measure the distance between Fret 12 and the centerline of the neck pickup? I'm neck deep in a project bass that is being used as a test bed to gather data about various pickup locations (see the "X-Bass" link in my signature). I have some theories regarding placement of the neck pickup in direct relationship with the location of the bridge pickup and how those positions affect the general tone of a given bass.I posted a couple of live shots with this bass earlier in this thread but finally got around to taking a couple of decent pics of it today. Referred to as my "Scourge", it's a MIM Pbass with EMGs in a JPJ config and wired up v/v/v @18v. View attachment 344002
View attachment 344003


Hmm ... I'm very curious about something. Could you do me a monster sized favor and measure the distance between Fret 12 and the centerline of the neck pickup? I'm neck deep in a project bass that is being used as a test bed to gather data about various pickup locations (see the "X-Bass" link in my signature). I have some theories regarding placement of the neck pickup in direct relationship with the location of the bridge pickup and how those positions affect the general tone of a given bass.
If it's a hassle, don't worry one tiny bit about doing it. But if it's no trouble, and you don't mind I'd really appreciate it. I'm guessing it's near 8.5".
Thanks .... simply GORGEOUS bass! Another sexy girl in a black dress.
Perfect. Thank you.Not a problem at all from the 12th fret to the centreline of the neck pickup is darn near 9 inches exactly. Keeps the p/u just clear the pick guard screw.

Call me dopey ... I didn't know there was any other way .. ?What kind of wood is that you used for the template? I gotta say, screwing it to the body with some countersunk screws was pure dead brilliant!
AACK!! I hadn't taken notice. (I guess it worked though). Hmm ... I'll go with screws, thanks!Steve Doner taped his on. (Dopey!)
What kind of wood is that you used for the template? I gotta say, screwing it to the body with some countersunk screws was pure dead brilliant!
Wow ... *thisSNsucks* .. . thanks HEAPS for posting a stepxstep for that.
Now, what type of bit did you use? My (new/unused) Bosch is a 1/2" but it came with collets for 1/2 and 1/4 ... just in case that spec makes any difference.
Also, was the Forstner bit modified or are there ones that do not have the centering tip-point on them as-made? The one I used on the X-Bass has the centering tip but I just took it to the bench grinder and carefully zipped it off (being certain to not zot the cutting edges with the stone). Was that a good thing I did there or was that a practice directly from the University of Rednech Tech (URT)?
The wood is just some 1/4" thick craft plywood I had laying around. I should have used some 1/2" just for rigidity, but this worked out just fine.
Yeah the screws worked out well. I had actually mounted the pickguard and control plates onto the wood and traced them, then removed them and drew out where I could route that way none of the routing would be exposed.
Heres a pic of everything mounted to the board:

And it was helpful so i could make sure everything could fit the routes BEFORE routing:

The holes were there already, so I figured I'd use them. A quick minute to countersink and there ya go.
It was really helpful for alignment purposes too, but I use double sided tape most of the time.
No problem! I used a 1/2" bit for a bulk of it, and then followed up a few of the tighter curves with a 3/8" bit just to clean them up a bit. I could have just called it a day after the 1/2" though.
The Forstner bit I used had the centering tip, it just doesn't show up in the pic of it chucked up, but look at the marks on the body, centering tip marks are there.
I have a J bass with Dimarzio Area J pickups and a mudbucker. Also have an additional bridge pickup I'd like to add and am wondering about the best positioning.
One option is to make it into a double J pickup (cut the ears off and glue them together). The other option is to install them in separate cavities which would allow for using different heights.
The other question is whether to go closer to the bridge or closer to the neck with the second pickup. Toward the bridge would be 60's positioning (I think) but toward the neck might be more practical in terms of bridge-only tone...kinda like a Stingray.
Any suggestions from this group?
I would go with keeping the two J pickups each in their own hole -- in other words, don't combine them into one pickup.
If there is room, I would put the additional pickup on the neck side of the existing pickup. There's a lot more you can add to the mix there tonally IMO.
And for what it's worth, Warmoth offers on option of routing the bridge pickup closer to the bridge, and they call it a '70s reposition.
Hey thanks for the input Blue. I think I got my 60's and 70's mixed up. Going toward the neck I would have to glue them together or have a custom PG made...but I agree on probably being more useful tone-wise.
Is there a reason you can't or don't want to modify the pickguard you have on it now?