
• TalkBass has been independent since 1998. Add your voice.
    Create a free account to reply to discussions, view embedded media, and browse with fewer display ads.
    Join freeLog in
    Want zero display ads or expanded classifieds tools? Compare plans.

Single cut fretted 4 build neck thru

After a few years away from playing bass, I came back swinging (er pluckin). Back then I started a Rickenbacker replica that never quite made it. I've always been a fan of the custom build clear finish basses so this time around I am going to try my hand at my own design.
I have most, if not all, the tools available to me at my friends shop. He's been in the carpentry and finishing business for as long as I can remember.
I am still waiting for a few things to arrive, wood really.
Going to be a black walnut top and back, maple core, wenge and purpleheart laminated neck. I have some nordstrand big singles on the way, and plan to go passive.

Here is the design.
[Invalid or Expired Link Removed]

Let me know what you think
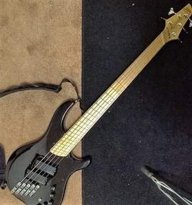
 
Keep in Mind that you will need to have 1-2 degrees of neck angle and that makes the single cut bass side angle much farther past the fretboard. I just did a neck through single cut and this was trickier than i imagined. Or one can plane down the top so your Bridge sits lower, or route out the exact bridge shape into the body. Best of luck.
 
Care to elaborate on how you overcame this?

My body design is rather small. Its about 13 inches wide and 18 inches long. Not sure how high the bass side horn will raise up with the 1-2 degree neck angle. Many people have made single cut neck thru's, can anyone chime in on how they handled this?
Would it look horrible if I planed the bass side horn flat in with the neck? If so I can carve the area around the bridge to bring it a bit lower to compensate?

Thanks for the comments so far!

Picking up my wood tomorrow. Picks when I get it home!

Phil
 
I bought the wood yesterday, and milled it down at my friends shop. Pictures however were taken in my basement this morning. I picked up the cocobolo for use as the top and back, however I would be able to get 2 beautiful fingerboards out of them so I can't decide. Originally ordered some bookmatched walnut for the top. It hasn't arrived yet, but if it does not show up by the time my neck is ready to go, I will go with the cocobolo top. The pau ferro is from my last bass project. It is fairly nice, but pales in comparison to the cocobolo.

Cocobolo
[Invalid or Expired Link Removed]

Ash core
[Invalid or Expired Link Removed]

Wenge purpleheart laminate neck
[Invalid or Expired Link Removed]

Pau ferro fingerboard wood
[Invalid or Expired Link Removed]

Possible Configuration
[Invalid or Expired Link Removed]

and my hardware thus far. Black hipshot ultralites, lmii trussrod, hipshot A bridge.
[Invalid or Expired Link Removed]

Still waiting on a few things to arrive, but now I can get started with the neck.
 
You don't have to have an angled neck. It all depends on what bridge you want to use and how proud of the body you want your fretboard to be...

Yes you do. Without Neck angle the action would be super super high. The inherent neck angle of only 1-2 degrees allows not only comfort but enough to raise a (hipshot) bridge for an easily adjustable action. Or one can lower the bridge into the body flush mounting. Putting neck angle is easy, PM for details if you really can't figure it out.
 
Yes you do. Without Neck angle the action would be super super high. The inherent neck angle of only 1-2 degrees allows not only comfort but enough to raise a (hipshot) bridge for an easily adjustable action. Or one can lower the bridge into the body flush mounting. Putting neck angle is easy, PM for details if you really can't figure it out.

You don't HAVE to have any neck/body angle. Hell, you halfway explained that yourself in a previous post.

illmusician said:
Or one can plane down the top so your Bridge sits lower.
 
Yes you do. Without Neck angle the action would be super super high. The inherent neck angle of only 1-2 degrees allows not only comfort but enough to raise a (hipshot) bridge for an easily adjustable action. Or one can lower the bridge into the body flush mounting. Putting neck angle is easy, PM for details if you really can't figure it out.
Good gravy man, get your facts in line before you lambaste someone else. Putting in a neck angle is easy yes, but necessary? Absolutely not...
 
I'd be looking forward to this build and would sub it if it weren't for the fact that the photos are unecessarily large and make viewing this thread a little too time consuming.


Edited my pictures to make the page thread better. Sorry about the large ones, didn't really notice they were slowing things down until you mentioned it.

I have tomorrow off, so I will try and get some work done on the bass. I wish I would have used a scarf joint for the head stock angle rather then cutting it down from a thick blank. However this way allows me to improve my skills on the band saw.

Also decided to go with the cocobolo top and back since it doesn't look like my walnut is coming... Time to file a complaint with paypal and ebay.
 
Good gravy man, get your facts in line before you lambaste someone else. Putting in a neck angle is easy yes, but necessary? Absolutely not...

I thought i was answering the topic question for advise, not arguing every possible way to make a neck through. My advise was for a new builder that most likely has access to a belt sander or maybe thickness sander, the easiest way to set a neck angle. Maybe I am ignorant to the companies that route a bridge flush-mounting it into the top (or to the depth that a neck without an angle needs into the body), or plane off the top of the body for a top (covering neck laminates) or solid wings that sits just below the fingerboard line, after the neck is made and glued to the wings without any removal of the fingerboard. If you or anybody else can enlighten me I would be surprised.
The dude already showed he was using a hipshot. So i know how thick the bridge is, my facts were inline. Like you stated neck angle is not necessary but neither is putting support braces on sides of an acoustic but we all do, trussrods in general are not necessary but we all do it, using wood or hide glue instead of epoxy (most builders do, simply for expected future repair/maintainance), I can go on for much longer. but im going to bed
 
You don't have to have an angled neck. It all depends on what bridge you want to use and how proud of the body you want your fretboard to be...

here is a chance to redeem yourself Beej, we all want to learn :scowl:

First find me a bridge that is thin enough to be shorter than the thickness of a normal radius-ed fingerboard "usually starting at a flat 1/4" " with the base and saddles in consideration for minimum height.
:eyebrow:

Or

Find me a builder/example that offers fingerboards radius-ed (much more than 1/4" after radius) that are as tall as a Hipshot bridge with the standard specs of a chrome or nickel Bass bridge style A.
:smug:
 
here is a chance to redeem yourself Beej, we all want to learn :scowl:

First find me a bridge that is thin enough to be shorter than the thickness of a normal radius-ed fingerboard "usually starting at a flat 1/4" " with the base and saddles in consideration for minimum height.
:eyebrow:

Or

Find me a builder/example that offers fingerboards radius-ed (much more than 1/4" after radius) that are as tall as a Hipshot bridge with the standard specs of a chrome or nickel Bass bridge style A.
:smug:

Dude, think about it this way. Instead of having to have a super thick fingerboard, make it so the neck would not be flush with the body without the fingerboard glued on.
 
I had an accident...
Was making lots of progress on the neck today, and while using a router to shape the taper of the neck, the guide bearing spun off and I dug about an 1/8th inch into it. Needless to say I am not happy. The bit itself was sliding out of the router, and after I set my depth accordingly the screw holding the guide bearing on made contact with the work bench. Screw loosened off and sent the bearing flying.
$50 of wenge into the trash :bawl:
After that I decided to cut out my wings on the band saw. Atleast they came out nice.

Pics
Before
[Invalid or Expired Link Removed]

After
[Invalid or Expired Link Removed]

Wings cut out with a test neck I did a few years ago.
[Invalid or Expired Link Removed]

Going to have to go pick up some more wood this week.
