• TalkBass has been independent since 1998. Add your voice.
    Create a free account to reply to discussions, view embedded media, and browse with fewer display ads.
    Join freeLog in
    Want zero display ads or expanded classifieds tools? Compare plans.

Special Edition Build Off - Ampeg AEB lookalike

I made up this AMUB-2 with a walnut-faced pickguard. This was plain-back walnut veneer epoxied down onto 1/16" black Garolite sheet. The Garolite is really strong structurally, and is easily machined.

View attachment 3787934

If you want to make your walnut into a removable "pickguard", you need to reinforce the back somehow. Epoxy it down to a Garolite sheet, or an aluminum sheet. Or, coat the back with epoxy and a cloth like carbon fiber or fiberglass. Some kind of thin reinforcement. Then, fasten it down to a flat board and use a router sled to thin it down.
Man, that's a good looking bass. What bridge is that?
 
  • Like
Reactions: TN WOODMAN
What bridge is that?

That's my standard bridge and tailpiece on my AMB-2/AMUB-2 models. I make them up from scratch here. I recently showed the whole process on the Love Of Ampegs Part 2 thread:

love of Ampeg and other Scroll Basses, Part 2

The tailpiece starts down partway on page 148, post #2956. The bridge process starts on page 153, post #3059. In those pages, I also go through how I make most of the other hardware, including the pickguard, neck plate, strap buttons, etc. It's one of my Walnut AMB-2's that I just completed.
 
That's my standard bridge and tailpiece on my AMB-2/AMUB-2 models. I make them up from scratch here. I recently showed the whole process on the Love Of Ampegs Part 2 thread:

love of Ampeg and other Scroll Basses, Part 2

The tailpiece starts down partway on page 148, post #2956. The bridge process starts on page 153, post #3059. In those pages, I also go through how I make most of the other hardware, including the pickguard, neck plate, strap buttons, etc. It's one of my Walnut AMB-2's that I just completed.
Cool stuff thanks.. although there's a lot of chatter to scroll through in that thread lol.
 
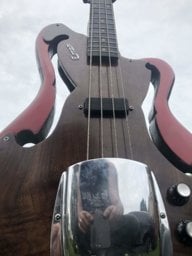
SO the updated plan is this, I'll inlay the walnut 'scratchplate' leaving about 1/16" proud of the body (hopefully). I'll do the wiring through the F hole like I would for a traditional semi hollow. The walnut figure will pop nicely (naphtha on for effect here).

IMG_2495.jpg
 
The chatter is part of the fun!

Yes, the chatter is fun, and it's also an important part of gathering up the history. The whole point of that thread is to gather up everything known about the Ampeg-style Scroll Basses, and consolidate it all into a permanent, researchable record. People from all over the world contribute hard info, pictures, stories, and anecdotes about Scroll Basses. Many of the folks posting are themselves fascinating parts of the Scroll Bass story. I'm the Keeper Of The Flame, who has become the Expert and I've brought the Scroll Bass design back to life. I contribute all the historical info that I know, plus technical knowledge about the original Ampegs and my new ones.

That's why I referred Englishman to that thread when he was getting started on this project. That thread is the world's biggest library of info on Ampeg-style Scroll Basses. Really.
 
SO the updated plan is this, I'll inlay the walnut 'scratchplate' leaving about 1/16" proud of the body (hopefully). I'll do the wiring through the F hole like I would for a traditional semi hollow. The walnut figure will pop nicely (naphtha on for effect here).

Yeah, that should work. You should be able to fish all the controls and wiring working through the F-holes. Just plan everything out carefully before you glue the walnut face plate down.
 
What about just screwing the walnut on, like an extra thick pickguard? Or even just using magnets? With your plan to relieve it into the face of the bass, it should "stay put" I'd imagine. Either way, you'd be able to take it off for wiring.

The walnut is such an elegant shape. It almost looks like a one shoulder evening gown.
 
Another quick suggestion: You should reinforce the walnut faceplate over the control cavity area. It would be really risky to have the jack and pots mounted only to the walnut. Cut a plate of 1/16" aluminum fitting over the whole control cavity area and epoxy it onto the underside of the walnut. It will also function as part of the shielding.