
Enjoy the benefits of a premium membership!
Upgrade Account
-
TalkBass has been independent since 1998. Add your voice.
Create a free account to reply to discussions, view embedded media, and browse with fewer display ads.
Join free Log in
Want zero display ads or expanded classifieds tools? Compare plans.
You are using an out of date browser. It may not display this or other websites correctly.
You should upgrade or use an alternative browser.
You should upgrade or use an alternative browser.
Special Edition Build Off: The Thumfinizenvette
- Thread starter dwizum
- Start date
More options
Who Replied?

For reference here's the thread I got the preamp design from:
Invalid Link Removed
I re-drew it in easyeda and did a pcb layout that's mostly surface mount and is about the size of a 9v battery. I chose this design because it has a really low component count compared to most bass preamp designs, and it uses the J201 fet, which I've used several times in buffers for piezos, those all sounded awesome - warm and clear - so I'm excited to hear how this will sound.
Invalid Link Removed
I re-drew it in easyeda and did a pcb layout that's mostly surface mount and is about the size of a 9v battery. I chose this design because it has a really low component count compared to most bass preamp designs, and it uses the J201 fet, which I've used several times in buffers for piezos, those all sounded awesome - warm and clear - so I'm excited to hear how this will sound.

So, I got the last coat of finish on and it looks great.
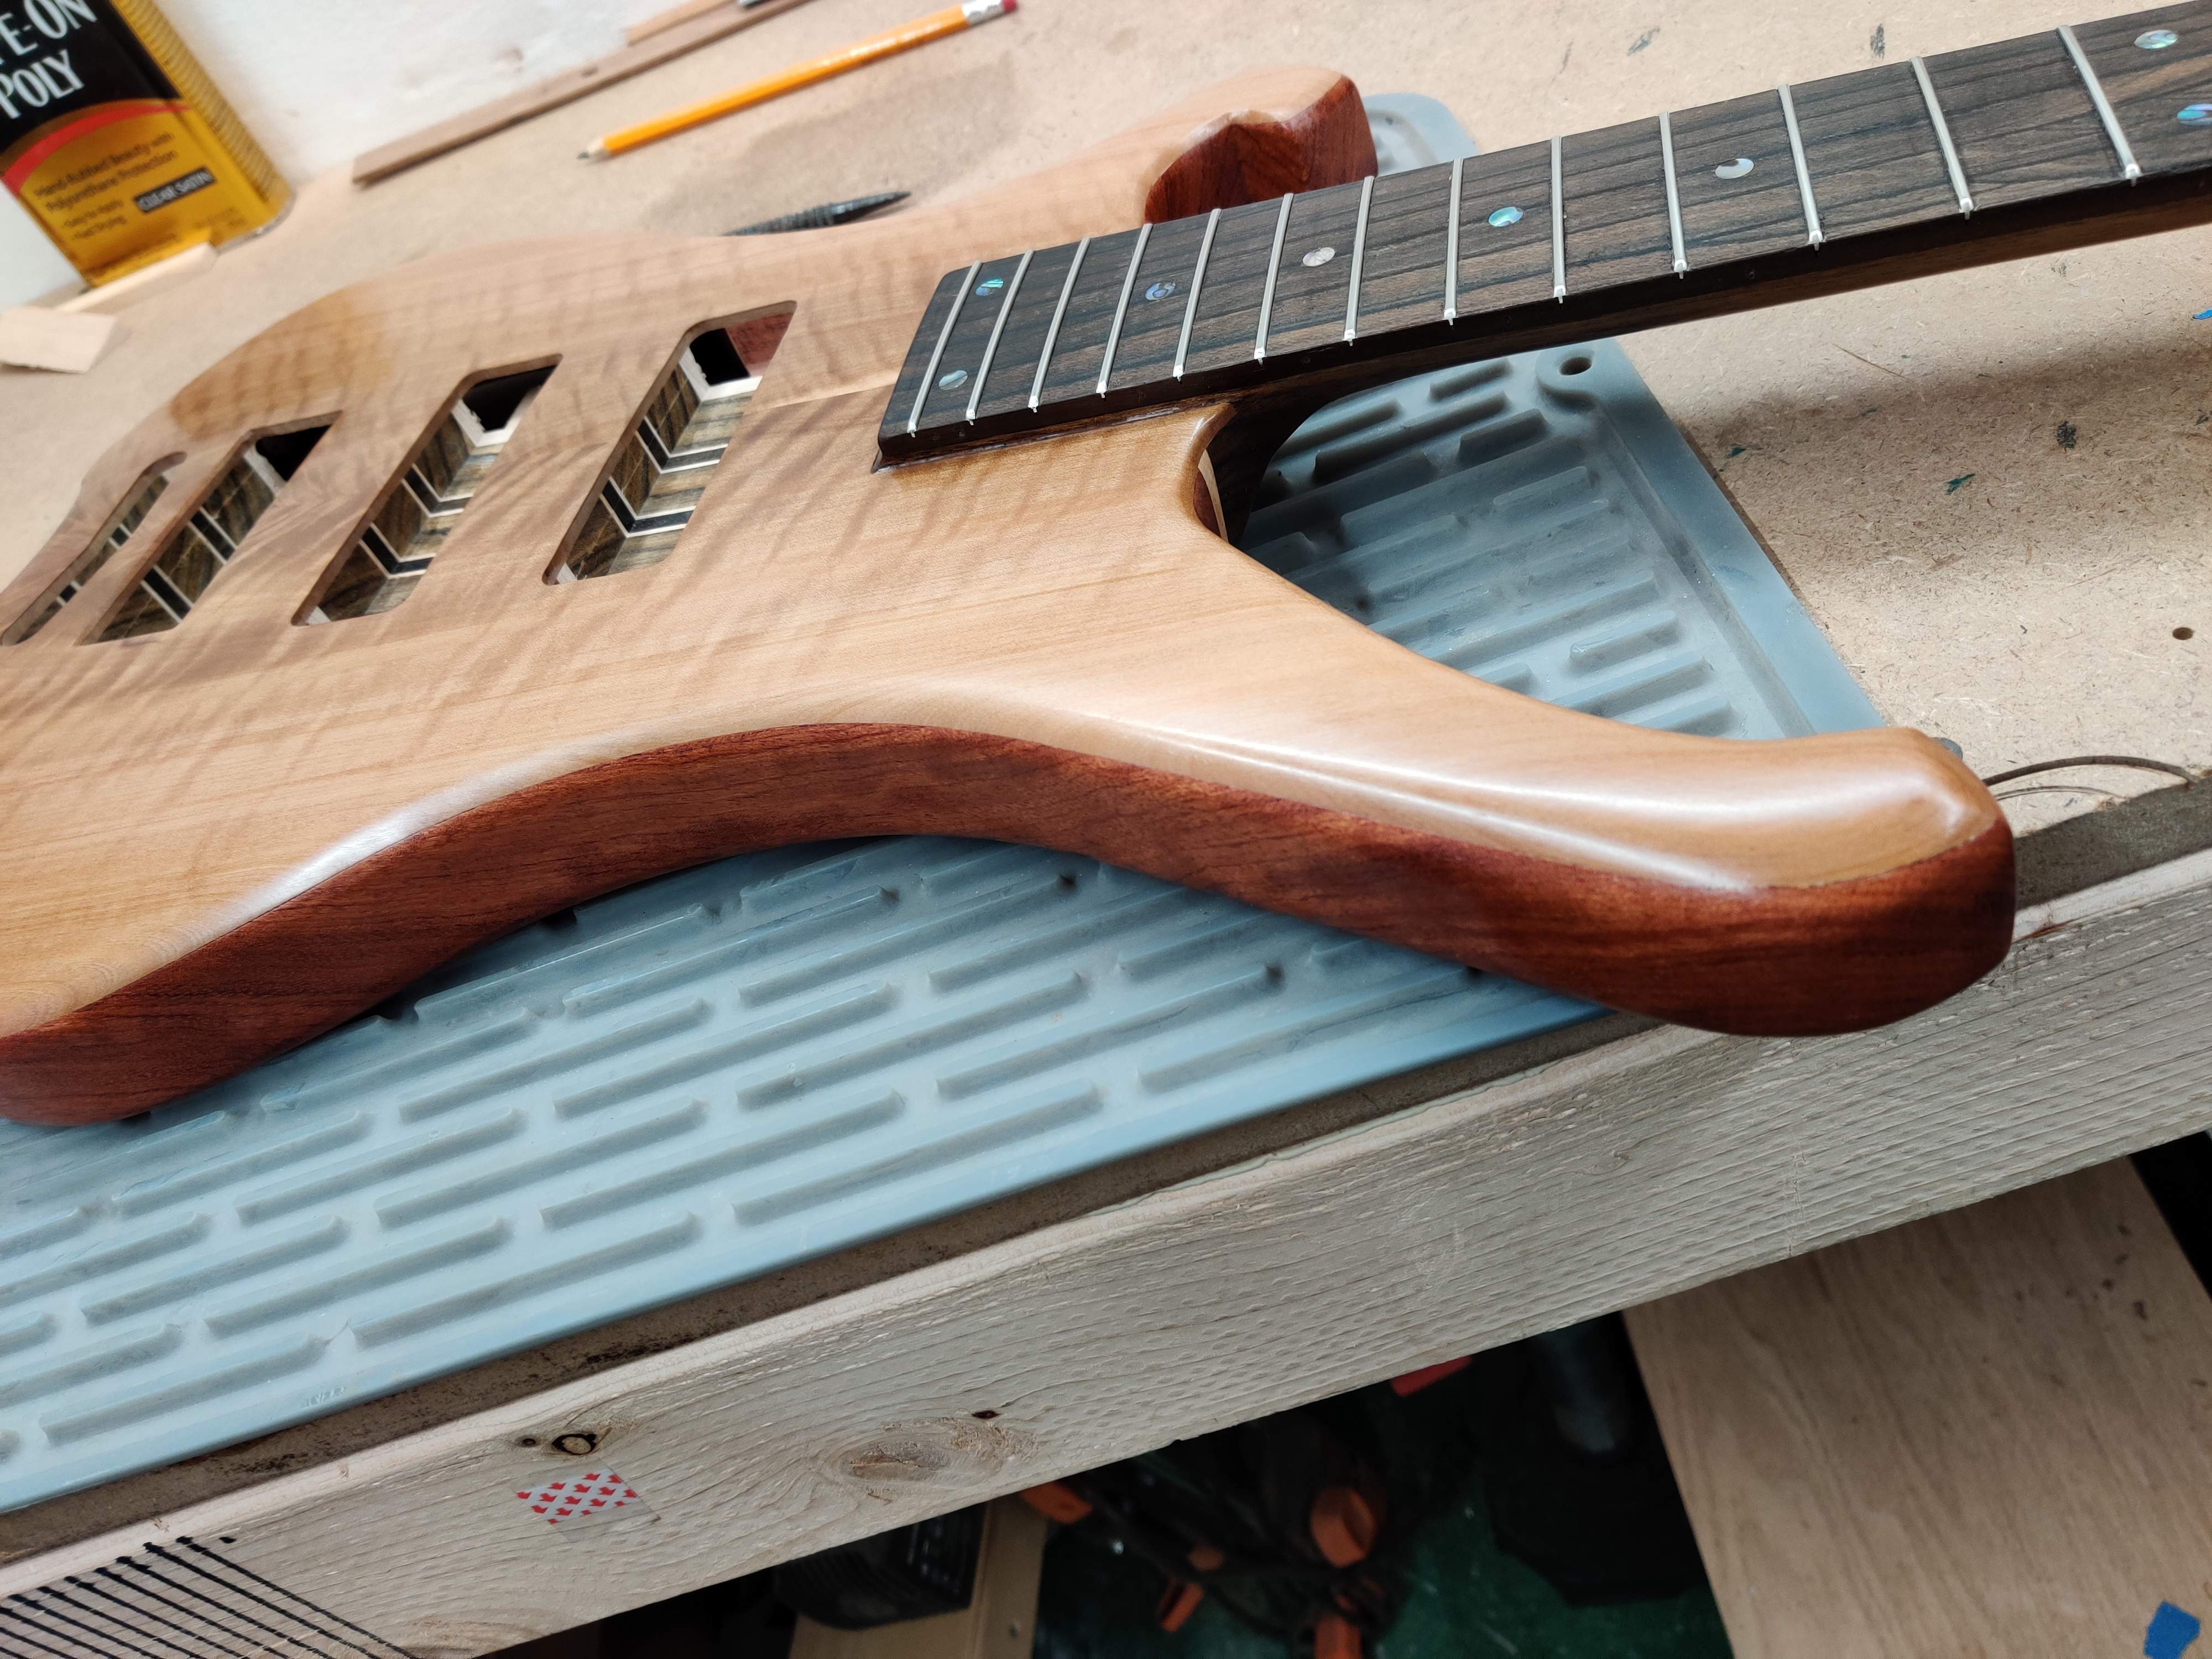
I also got the preamp put together.
The finish was well cured by this morning, so I set out to start working on hardware, but then I realized I never put side marker dots in the fretboard. So I drilled and glued them in. I'll have to touch up the finish once they're fully dry.
I've been nervous about the strength of the top around the controls, since the top wood is not exactly super strong, and it's only about 1/8" thick. I didn't want a bump to the controls to punch the wood out. So I cut a little piece of 22 gauge steel plate to fit that part of the cavity, drilled the holes in it, and epoxied it in. It's in clamps now, but I did snap a photo before gluing it in.

I also got the preamp put together.
The finish was well cured by this morning, so I set out to start working on hardware, but then I realized I never put side marker dots in the fretboard.
So I drilled and glued them in. I'll have to touch up the finish once they're fully dry.I've been nervous about the strength of the top around the controls, since the top wood is not exactly super strong, and it's only about 1/8" thick. I didn't want a bump to the controls to punch the wood out. So I cut a little piece of 22 gauge steel plate to fit that part of the cavity, drilled the holes in it, and epoxied it in. It's in clamps now, but I did snap a photo before gluing it in.
Classical guitars don't have dots!
Tell me about it!

I will freely admit that I am used to having them as a visual cue when playing, but also I just like the way they look. And I like putting them in - I like the process of laying out my whole "collection" of dots, sorting them into similar color piles, and then laying them out in order and playing with different color combos. This time I went from a sort of silver/blue at the head end of the neck through a pure white in the middle and then fading to silver/green up at the 24th fret.

- Apr 18, 2008
- 16,013
- 1
- 31,725
- Disclosures
- I'm highly opinionated and extremely self-assured
I buffed out the finish with some wax tonight and mounted the pickups, tuners, and bridge.
Just to confuse you simple minded right handed people, I put the pickups in backwards.

Actually I did it for a good reason, because when they're this way around the wires exit the pickups right at the cavity opening. If I mounted them the "right" way around, the wires would have to travel along under the pickups to get over to the cavity.
On a different subject, I had a question in PM asking for more details on the radius routing jig. I want to say again that I basically ripped this idea off others who did it, but I'm happy to share my version.
I use it with my normal "rails" from my router planing setup. They're built up from 1/2" mdf cut into strips. There's a flat strip on the bottom to provide a base, and vertical strip that's 3" tall (I think?) that the router sled rides on. There are a series of shorter strips on the inside of the vertical, both to act as reinforcement and to act as "steps" to put thinner workpieces on top of.
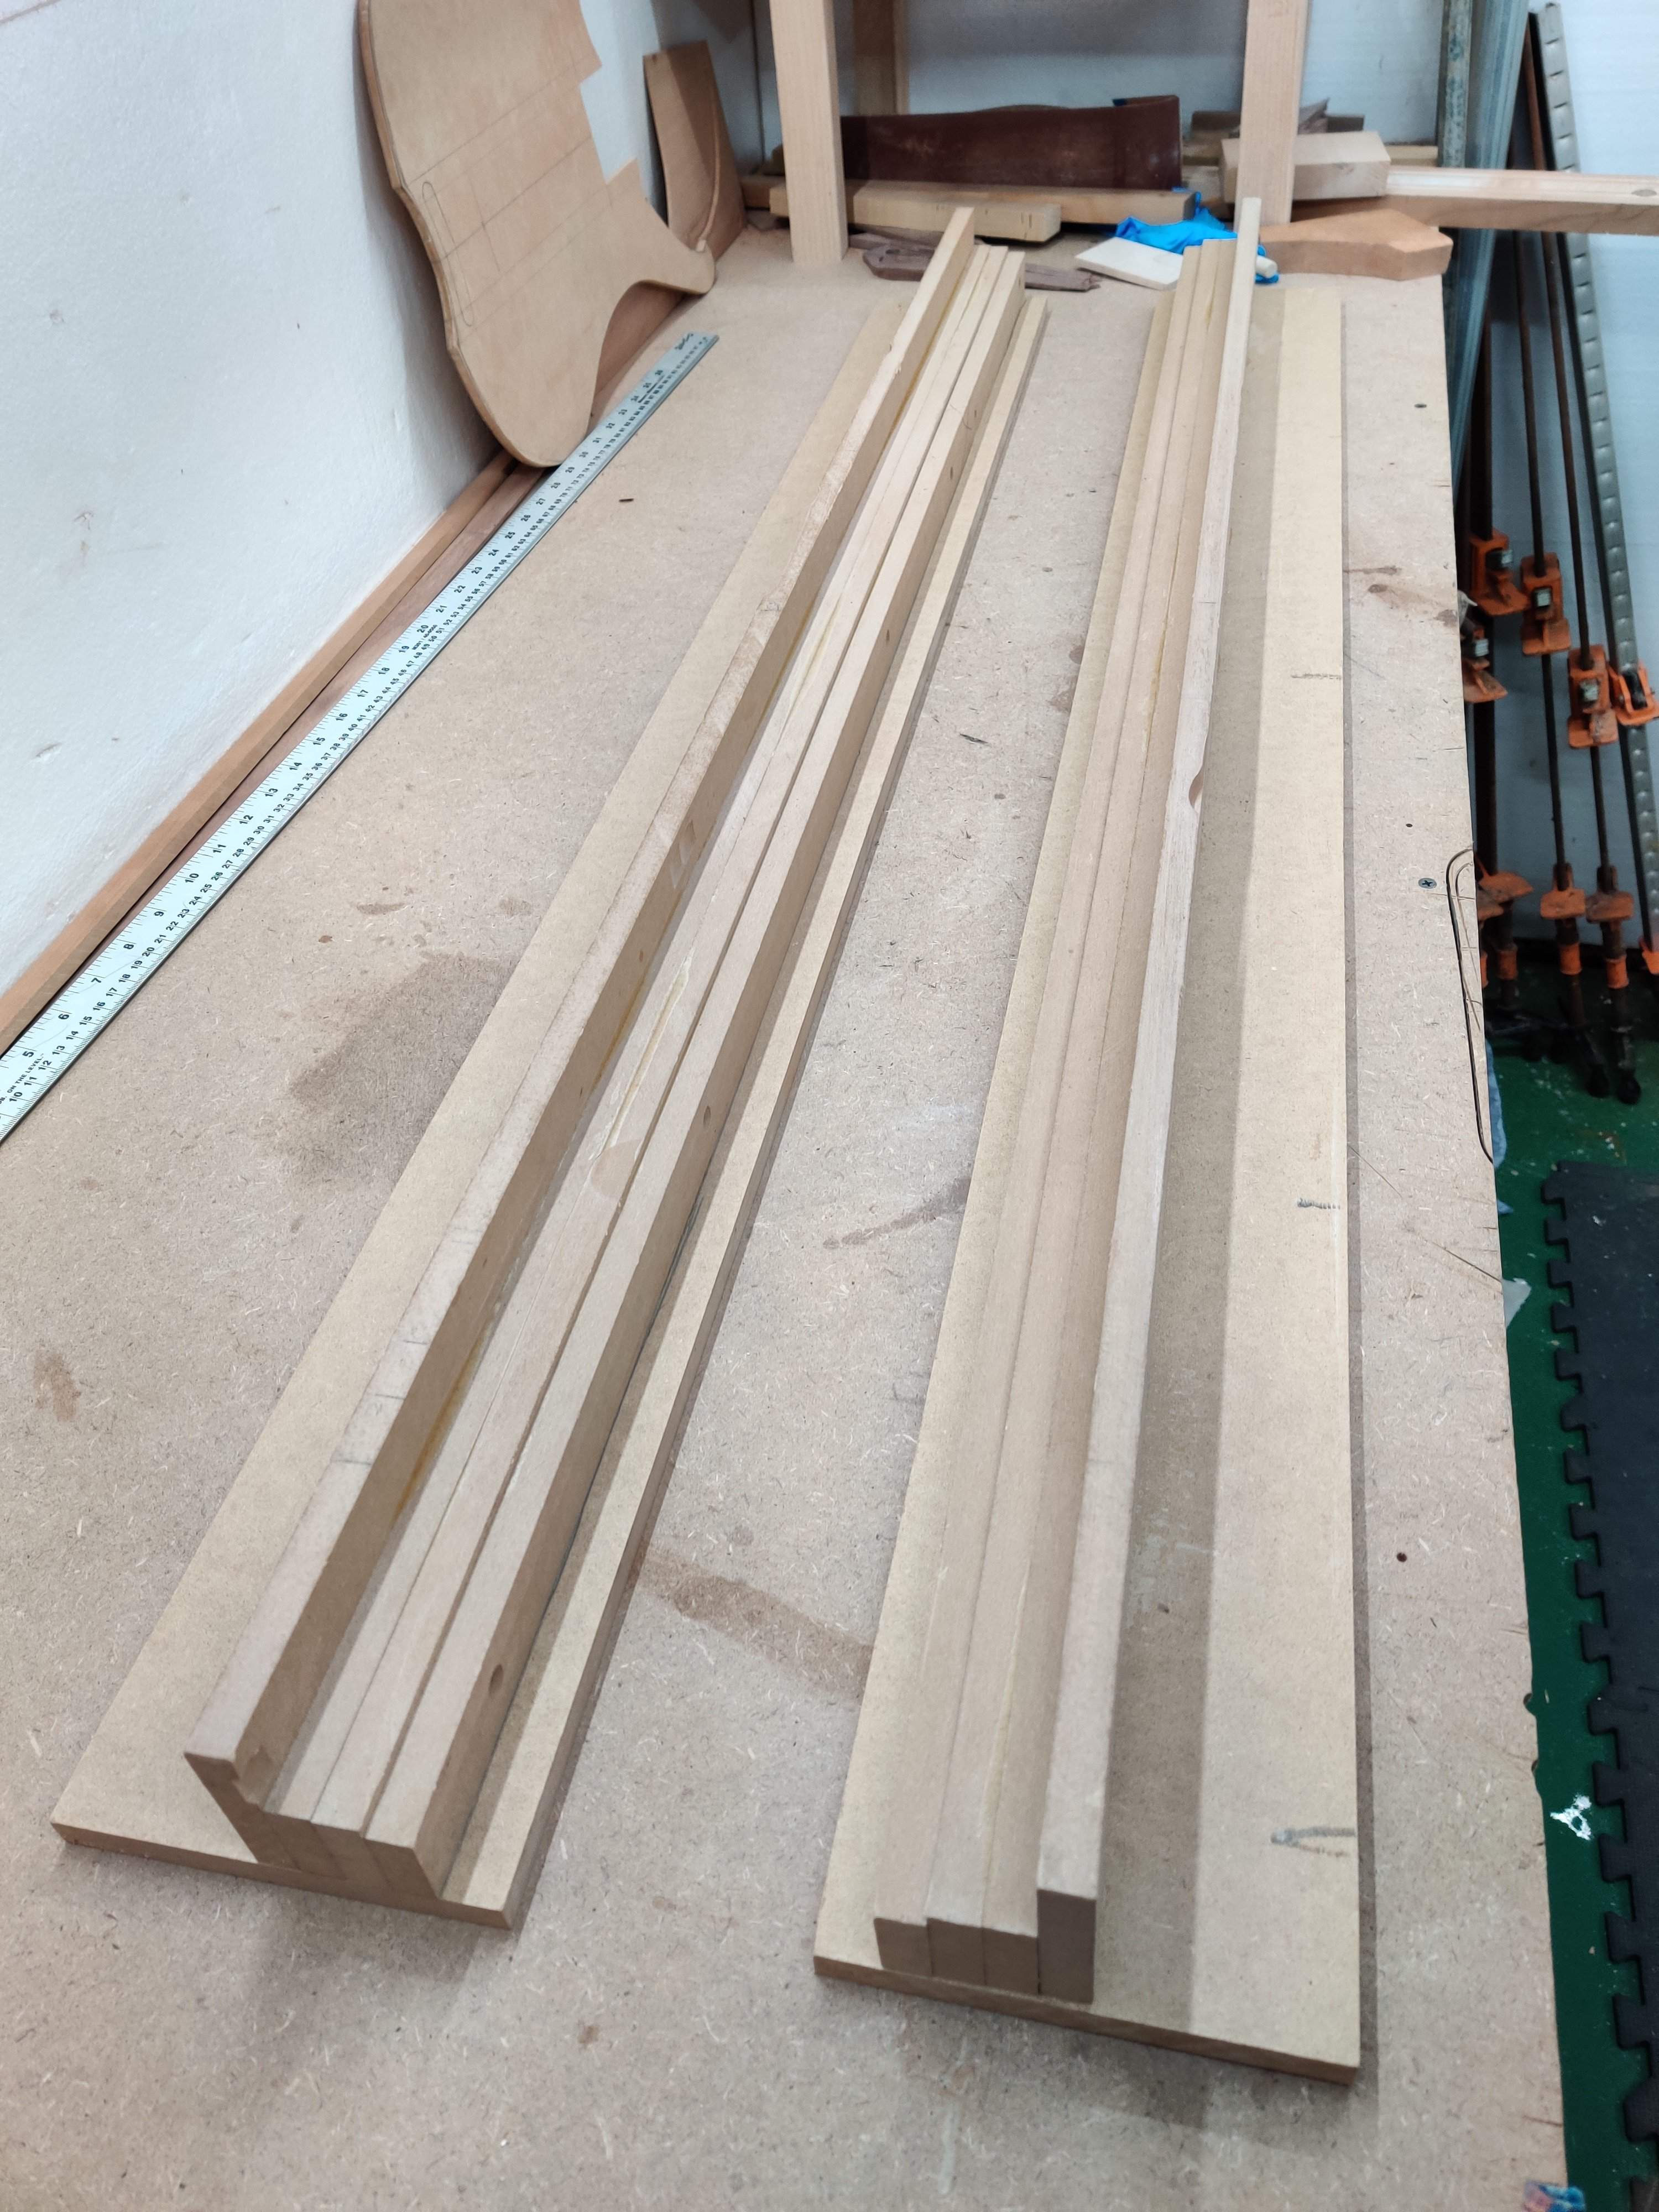
The rails are free standing, they're not attached to the table or each other. When I'm using this jig, I put a long bar clamp on each end of the rails to basically turn them into a giant clamp and clamp the workpiece in between them. I clamped a hunk of cherry between the rails here for demonstration purposes:

That's shown with the router in my normal planing sled. The idea is that you move the sled back and forth and side to side and the blade is held at a constant height over the workbench, so it cuts the workpiece flat and true. I slide the router from left to right along the far edge of the workpiece, then move it towards the front of the bench an inch (the bit is 1 1/4") and slide it right to left. Then forward an inch, left to right and repeat as needed.
The radius jig works on the exact same principle, except the curved rails on the radius sled cause the router to move along a curve. So, basically, as you go left to right, you're cutting along a straight path. And every time you "index" a step forward for the next path, you follow a curve. The end result is that the workpiece is carved into a shape that resembles a slice of a giant cylinder.
I showed the curved sled earlier, here it is again:
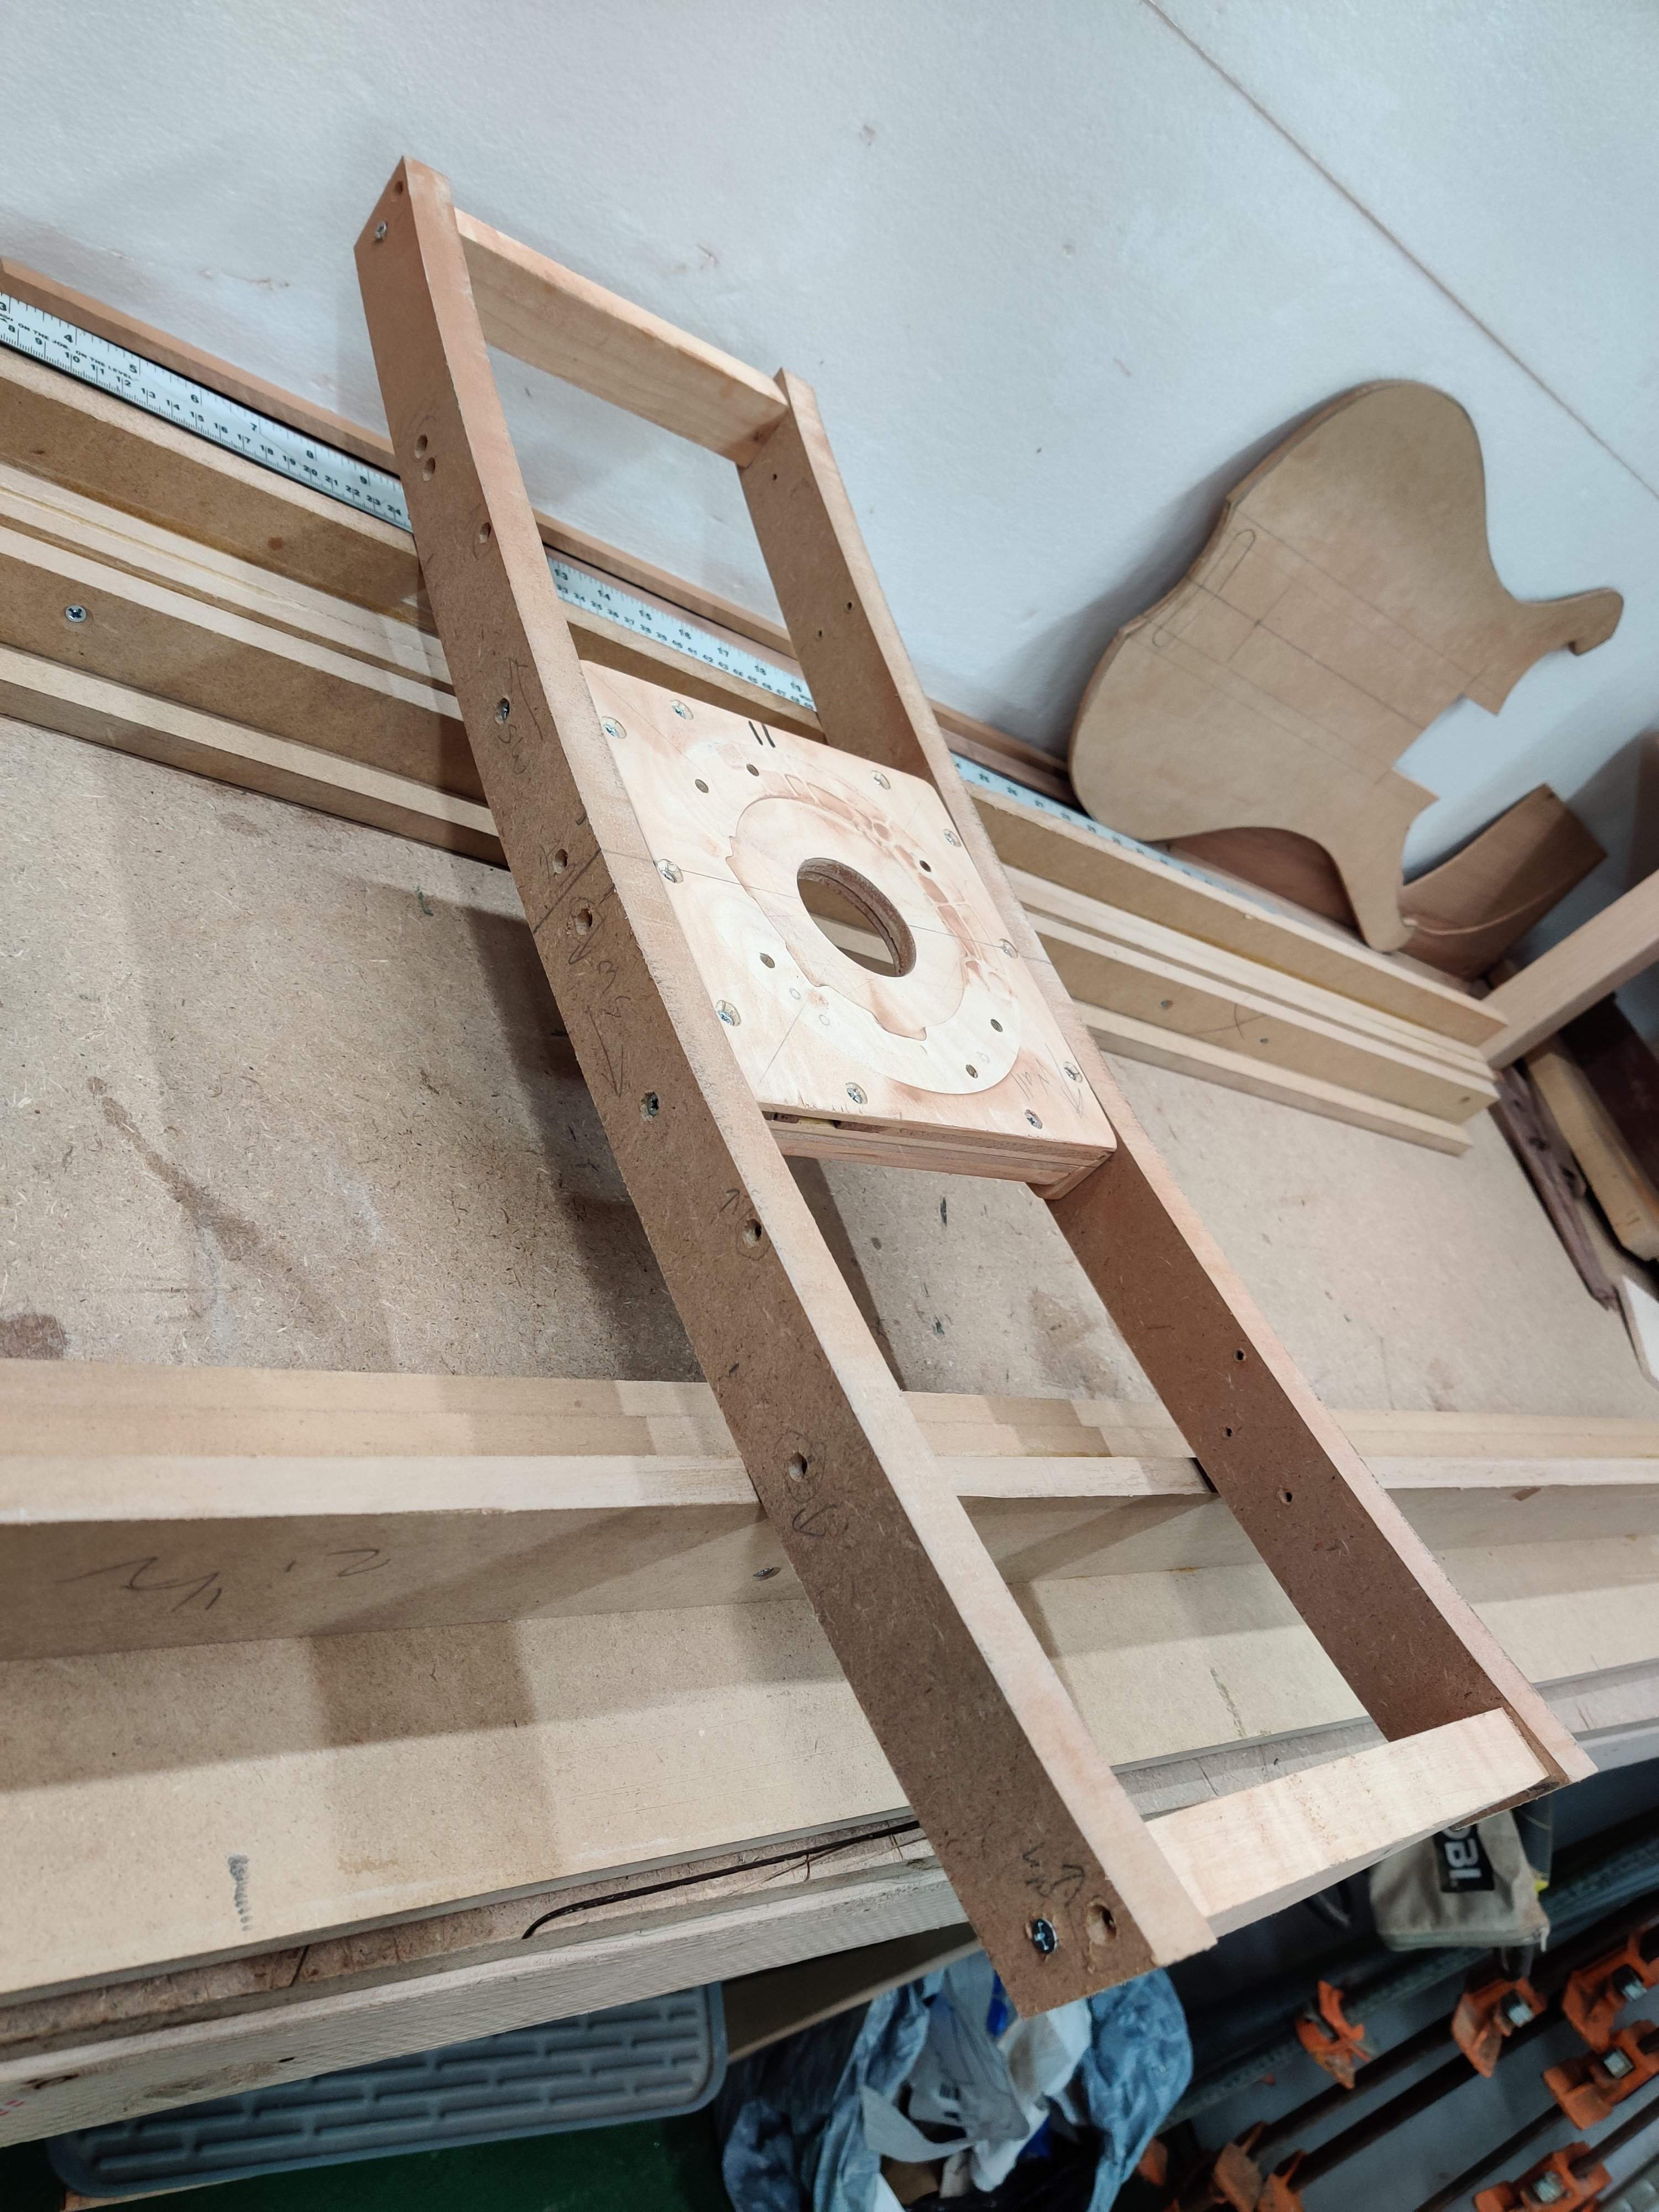
I drew the curve for the rails by making a giant "compass" - I tied a piece of string to the leg of a chair, and then tied a pencil at the desired radius, then I drew a curve on a piece of 3/4" mdf. Then I moved the mdf 1 1/2" closer to the chair and drew another curve, so I ended up with two parallel curves 1 1/2" apart. Then I sawed the curved rail, traced it, and sawed the other curved rail. I screwed the two curved rails together and sanded them to the line with a belt sander.
The end rails are just maple scraps. The platform in the middle is 1/2" plywood with reinfocement rails on it. The platform is screwed between the curved rails, it's removable so you can flip the rails over and use them for either concave or convex carving.
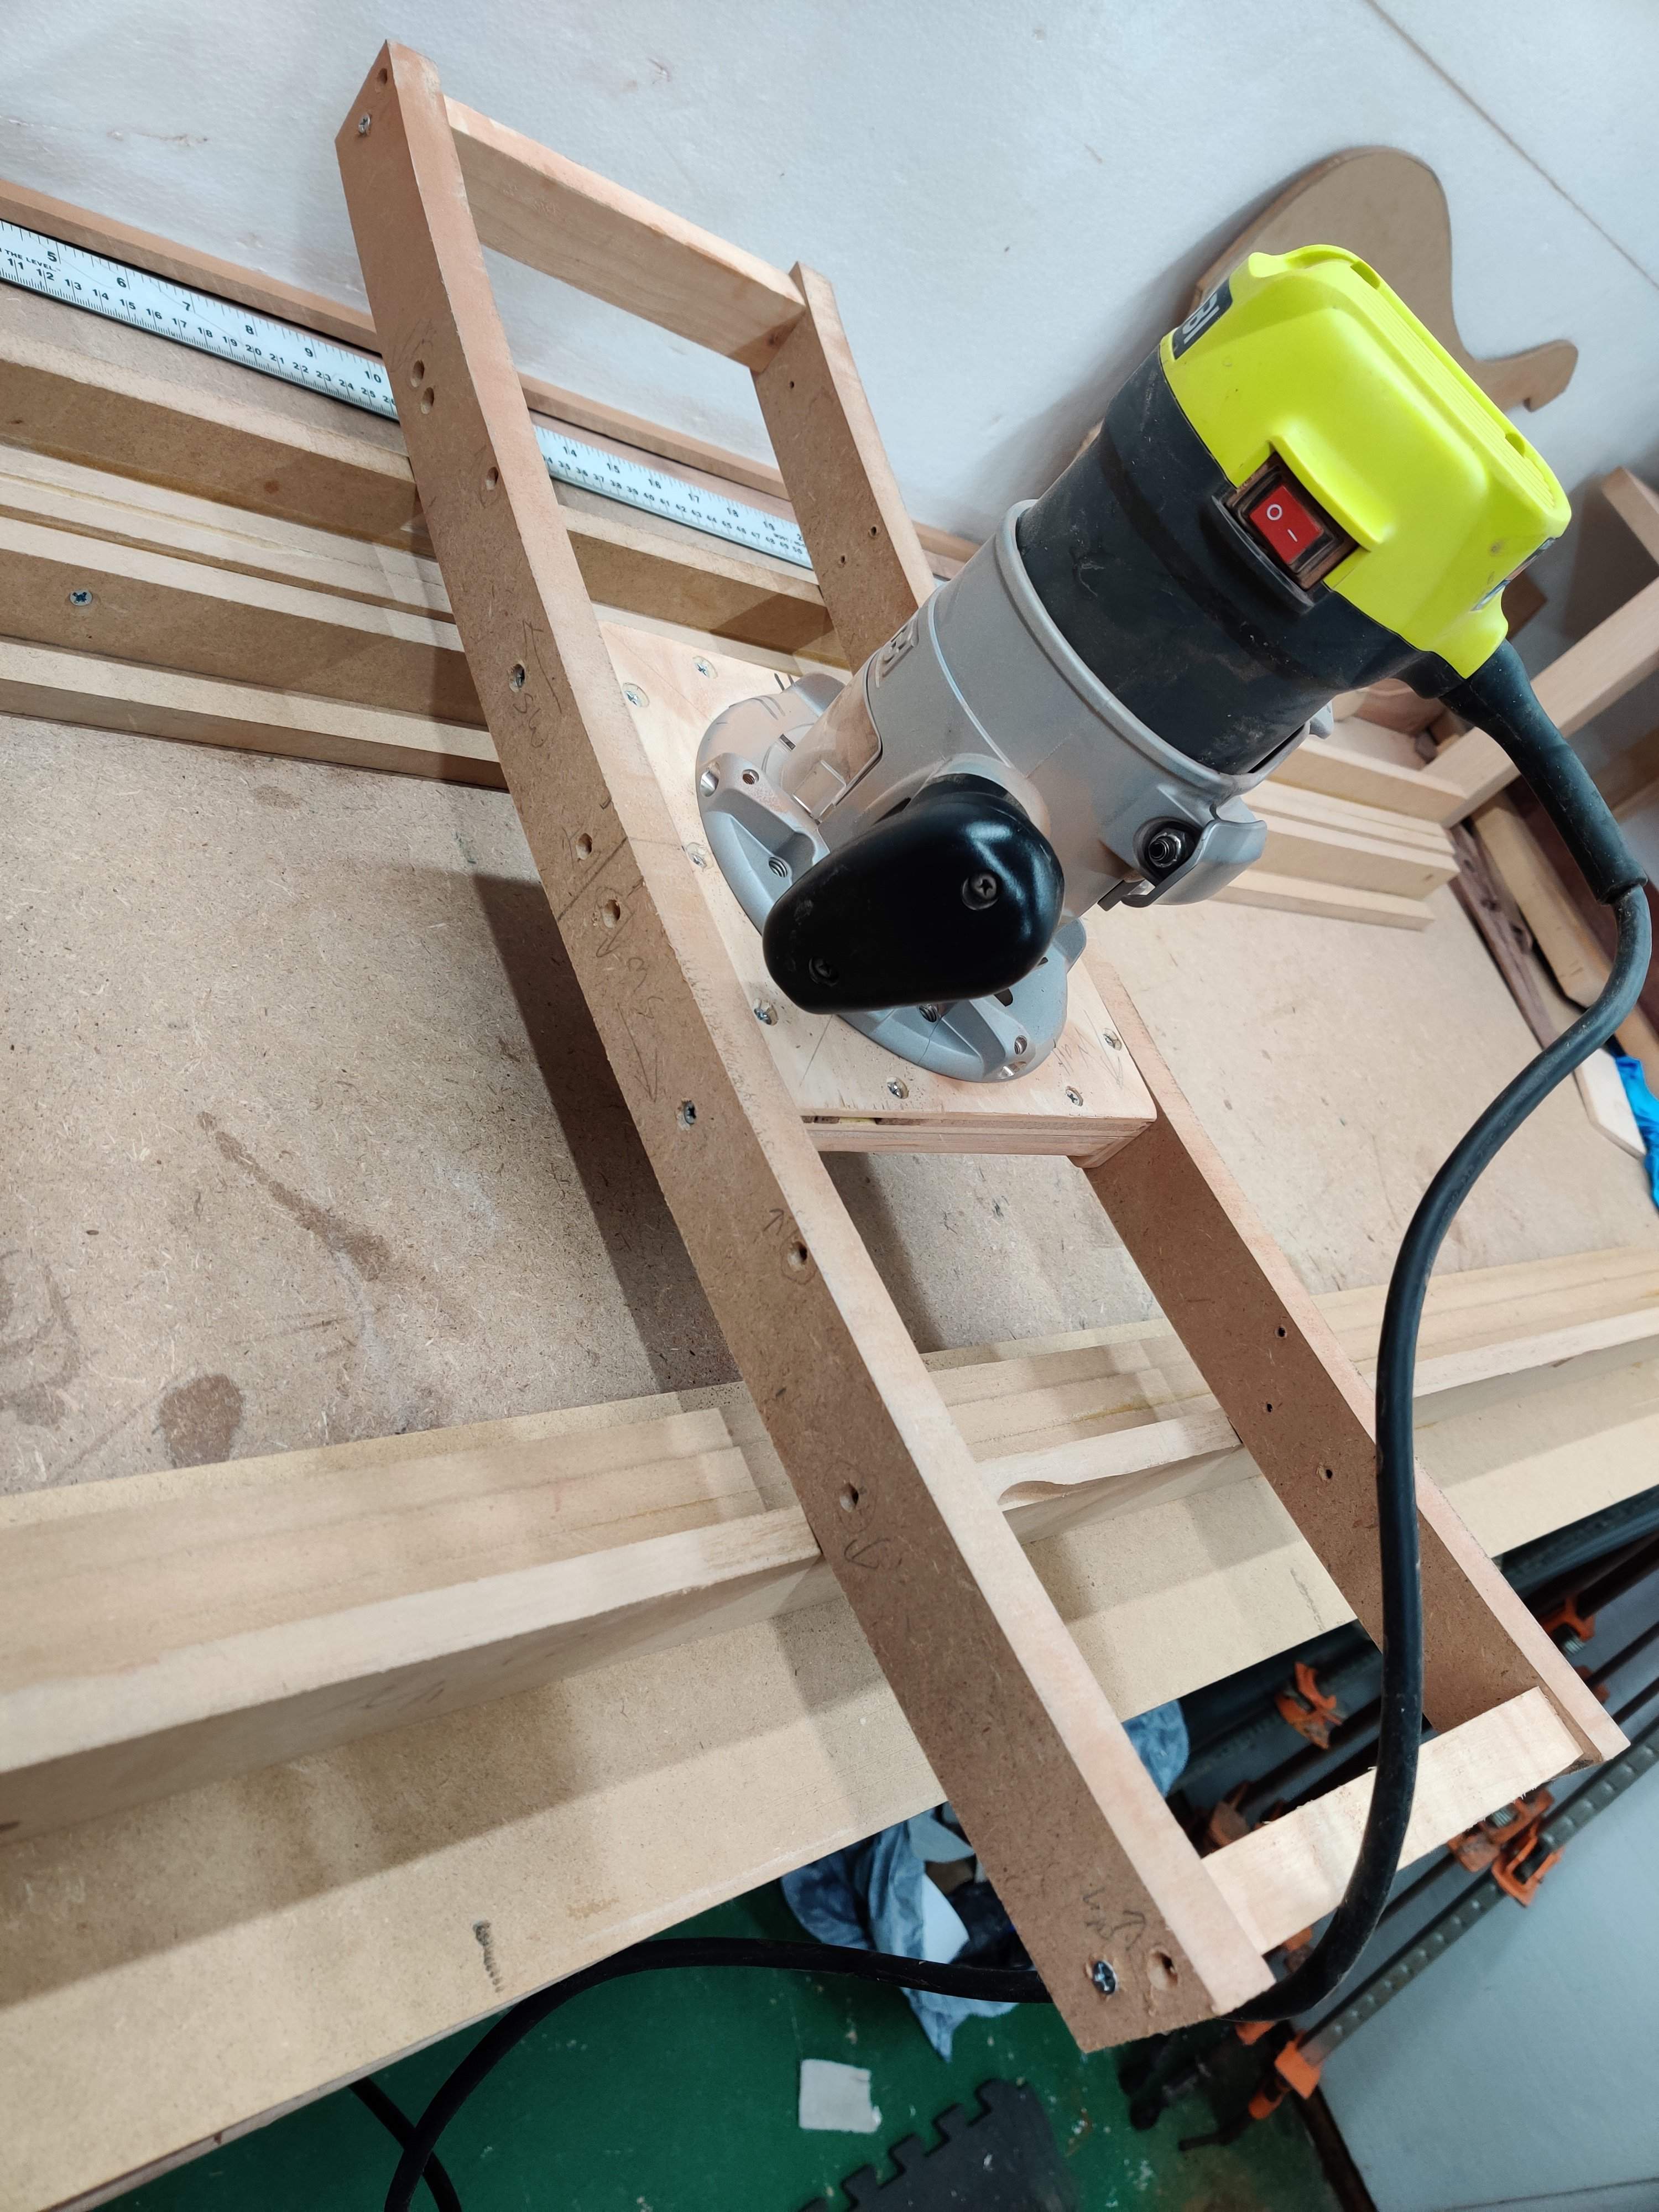

The trick with this is sizing and positioning the platform between the rails such that your router has enough adjustability in terms of depth in order to actually get the bit down to the workpiece. I found that I barely had enough travel with my router to get the bit far enough down, it only sticks down about half an inch below the rails - I actually had to shim the bass up off the workbench to get it close enough to the router.
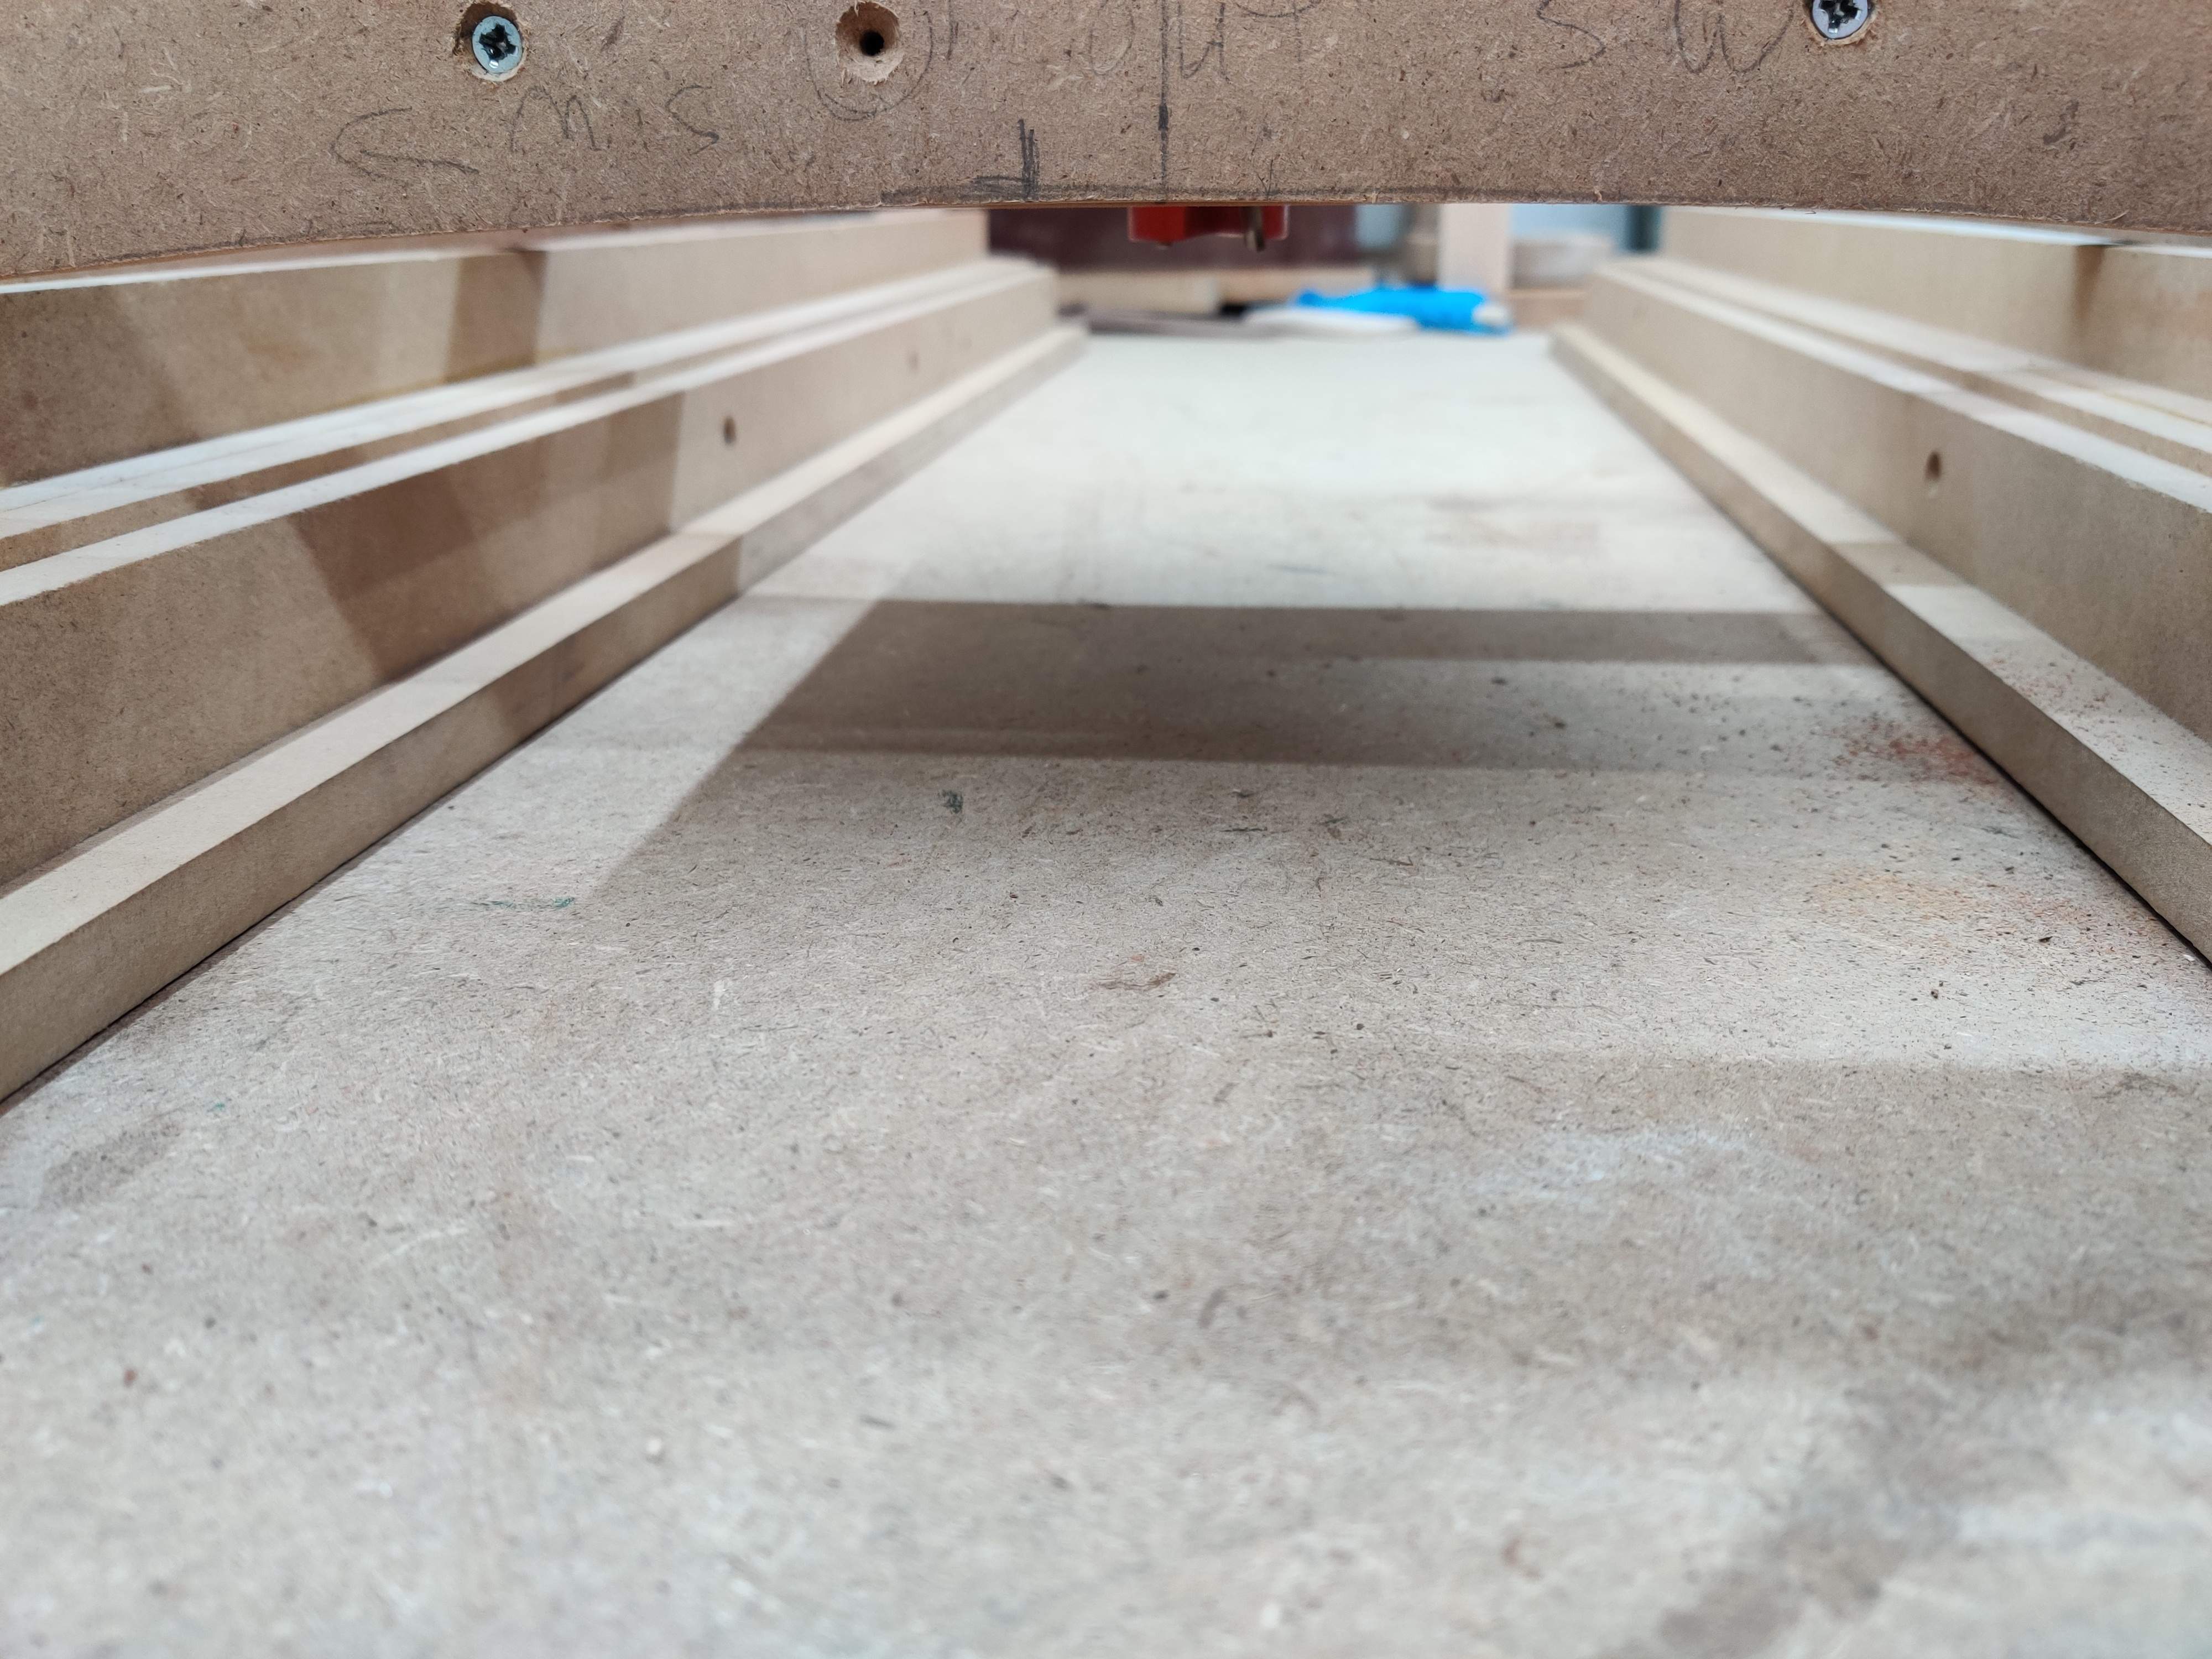
I used the common 1 1/4" diameter Freud mortising bit that most people seem to use for router planing. It worked great. The surface was completely true and even and just needed final sanding.
Hopefully this helps people understand how the jig worked - let me know if there are any questions!
Just to confuse you simple minded right handed people, I put the pickups in backwards.
Actually I did it for a good reason, because when they're this way around the wires exit the pickups right at the cavity opening. If I mounted them the "right" way around, the wires would have to travel along under the pickups to get over to the cavity.
On a different subject, I had a question in PM asking for more details on the radius routing jig. I want to say again that I basically ripped this idea off others who did it, but I'm happy to share my version.
I use it with my normal "rails" from my router planing setup. They're built up from 1/2" mdf cut into strips. There's a flat strip on the bottom to provide a base, and vertical strip that's 3" tall (I think?) that the router sled rides on. There are a series of shorter strips on the inside of the vertical, both to act as reinforcement and to act as "steps" to put thinner workpieces on top of.
The rails are free standing, they're not attached to the table or each other. When I'm using this jig, I put a long bar clamp on each end of the rails to basically turn them into a giant clamp and clamp the workpiece in between them. I clamped a hunk of cherry between the rails here for demonstration purposes:
That's shown with the router in my normal planing sled. The idea is that you move the sled back and forth and side to side and the blade is held at a constant height over the workbench, so it cuts the workpiece flat and true. I slide the router from left to right along the far edge of the workpiece, then move it towards the front of the bench an inch (the bit is 1 1/4") and slide it right to left. Then forward an inch, left to right and repeat as needed.
The radius jig works on the exact same principle, except the curved rails on the radius sled cause the router to move along a curve. So, basically, as you go left to right, you're cutting along a straight path. And every time you "index" a step forward for the next path, you follow a curve. The end result is that the workpiece is carved into a shape that resembles a slice of a giant cylinder.
I showed the curved sled earlier, here it is again:
I drew the curve for the rails by making a giant "compass" - I tied a piece of string to the leg of a chair, and then tied a pencil at the desired radius, then I drew a curve on a piece of 3/4" mdf. Then I moved the mdf 1 1/2" closer to the chair and drew another curve, so I ended up with two parallel curves 1 1/2" apart. Then I sawed the curved rail, traced it, and sawed the other curved rail. I screwed the two curved rails together and sanded them to the line with a belt sander.
The end rails are just maple scraps. The platform in the middle is 1/2" plywood with reinfocement rails on it. The platform is screwed between the curved rails, it's removable so you can flip the rails over and use them for either concave or convex carving.
The trick with this is sizing and positioning the platform between the rails such that your router has enough adjustability in terms of depth in order to actually get the bit down to the workpiece. I found that I barely had enough travel with my router to get the bit far enough down, it only sticks down about half an inch below the rails - I actually had to shim the bass up off the workbench to get it close enough to the router.
I used the common 1 1/4" diameter Freud mortising bit that most people seem to use for router planing. It worked great. The surface was completely true and even and just needed final sanding.
Hopefully this helps people understand how the jig worked - let me know if there are any questions!


Thank you so much for posting those pictures and taking the time to explain, it’s a really nice implementation and something that I’m sure others of us will find useful!
Good point, I don't remember seeing any body-size radius jigs there...
- Apr 18, 2008
- 16,013
- 1
- 31,725
- Disclosures
- I'm highly opinionated and extremely self-assured
Upsidedownstrands?
At any rate, in the interest of full disclosure within the Luthier's Corner family, I am going to share what may be the most frustrating and embarrassing mistake I've made in recent memory.
I went down to the shop at lunch time (advantages of working from home!) to pick away at the hardware install and I figured I'd put the strap buttons on. Nice quick 5 minutes of work, right?
So I got the drill out, measured and marked for both holes, punched them, drilled them, and went to screw the buttons on. That's when I realized my mistake.
I drilled the hole in the tail correctly, but I put the other hole on the WRONG FREAKING HORN. I drilled the end of the lower horn instead of the upper one.


I'm not sure if I should laugh or cry, so I figured I'd post here and let you guys do either one on my behalf, as you see fit.
Anyways, I went ahead and drilled a new hole on the correct horn. I'll do a sawdust fill on the lower one and I'm sure no one but me will ever know it's there, but man oh man...

At any rate, in the interest of full disclosure within the Luthier's Corner family, I am going to share what may be the most frustrating and embarrassing mistake I've made in recent memory.
I went down to the shop at lunch time (advantages of working from home!) to pick away at the hardware install and I figured I'd put the strap buttons on. Nice quick 5 minutes of work, right?
So I got the drill out, measured and marked for both holes, punched them, drilled them, and went to screw the buttons on. That's when I realized my mistake.
I drilled the hole in the tail correctly, but I put the other hole on the WRONG FREAKING HORN. I drilled the end of the lower horn instead of the upper one.
I'm not sure if I should laugh or cry, so I figured I'd post here and let you guys do either one on my behalf, as you see fit.
Anyways, I went ahead and drilled a new hole on the correct horn. I'll do a sawdust fill on the lower one and I'm sure no one but me will ever know it's there, but man oh man...

I drilled the hole in the tail correctly, but I put the other hole on the WRONG FREAKING HORN. I drilled the end of the lower horn instead of the upper one.
View attachment 3807468
I'm not sure if I should laugh or cry, so I figured I'd post here and let you guys do either one on my behalf, as you see fit.
Ouch, sorry to hear that. I have made enough stupid mistakes to know how you feel.
As you point out, it is a small thing in the grand scheme of things so fix it and enjoy it. Or, alternatively, put another strap button on there and call it a Hendrix edition!
I feel your pain... on my current build I have made a couple of ridiculous brain-farts. It's so easy to make a silly mistake.
The bass clearly knows that it’s Wrong handed and the universe is trying to correct that.
Just kidding! That’s a bummer, but the bass is no less beautiful...Just a stunning build!
Just kidding! That’s a bummer, but the bass is no less beautiful...Just a stunning build!

- Apr 18, 2008
- 16,013
- 1
- 31,725
- Disclosures
- I'm highly opinionated and extremely self-assured
I am laughing my butt off at your expense right now!!!!


I’m sure Madame Karma will make me pay for that later......
I’m sure Madame Karma will make me pay for that later......

Tone hole, that's a tone hole, what mistake? YOUR bass doesn't have a tone hole?


