
Enjoy the benefits of a premium membership!
Upgrade Account
-
TalkBass has been independent since 1998. Add your voice.
Create a free account to reply to discussions, view embedded media, and browse with fewer display ads.
Join free Log in
Want zero display ads or expanded classifieds tools? Compare plans.
You are using an out of date browser. It may not display this or other websites correctly.
You should upgrade or use an alternative browser.
You should upgrade or use an alternative browser.
Specialized Holding Fixtures for Luthier Work
- Thread starter Bruce Johnson
- Start date
More options
Who Replied?
Cool thread.
I've been putting off a routing job on the back of a Les Paul body, and any suggestions would be welcomed. Since the top is arched, just clamping a couple of boards across the body is out, and a clamping arrangement involving something carved to cradle the curved top is a bridge too far.
I've read several posts from people who use double sided tape, and tried it myself with mixed results. Sometimes the templates have crept or slipped a little, in testing, and I don't trust it
The body in question is mahogony with a glassy urethane finish, and I want to rout on the flat side.
Tom
There's two things to consider here: 1. Holding the guitar body on the workbench and 2. holding the template in place while routing.
For holding the body on the arched top I would recommend bench cookies. These are little rubber pads, four of them should support the body well. If needed, you can gently clamp it down.
You already mentioned the slipping issue with double sided tape. To keep the template in place I'd use the superglue and masking tape trick. Put a pieces of masking tape on the template and on the corresponding places on the body. Then put a thin strip of superglue on the masking tape and press the template on. It should hold in place in just a few seconds. You're just gluing masking tape to masking tape here, no glue should go on the body or template itself.
The masking tape and superglue mount is less flexible than double sided tape and doesn't slip. Also, it is easier to remove after routing.


Cool thread.
I've been putting off a routing job on the back of a Les Paul body, and any suggestions would be welcomed. Since the top is arched, just clamping a couple of boards across the body is out, and a clamping arrangement involving something carved to cradle the curved top is a bridge too far.
I've read several posts from people who use double sided tape, and tried it myself with mixed results. Sometimes the templates have crept or slipped a little, in testing, and I don't trust it
The body in question is mahogony with a glassy urethane finish, and I want to rout on the flat side.
Tom
When I'm faced with clamping a flat routing template to a curved surface I usually do it using cork padded shims cut to the proper thickness. See photo #79 HERE.
Cool thread! Here is a very simple jig I use to drill a pocket in the end of a bridge pin for a large pearl dot:
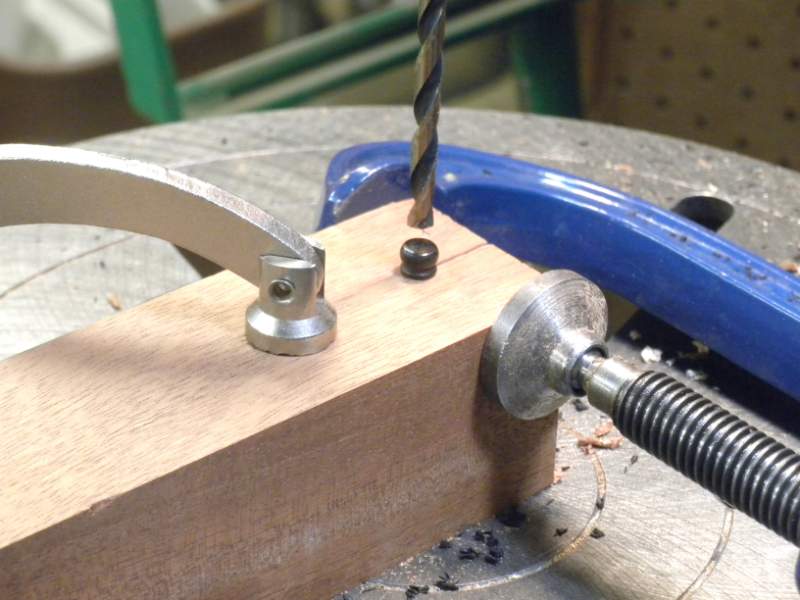
The tapered hole for the pin is centered around a straight hole, which is used to center the jig on the drill press.
The tapered hole for the pin is centered around a straight hole, which is used to center the jig on the drill press.

To keep the template in place I'd use the superglue and masking tape trick. Put a pieces of masking tape on the template and on the corresponding places on the body. Then put a thin strip of superglue on the masking tape and press the template on. It should hold in place in just a few seconds. You're just gluing masking tape to masking tape here, no glue should go on the body or template itself.
The masking tape and superglue mount is less flexible than double sided tape and doesn't slip. Also, it is easier to remove after routing.
I've routinely used blue painter's tape and hot glue during wood turning of bowls (reversing to remove a tenon). The blue tape protects the completed, sanded surface and the hot glue goes onto the tape and the woodscrap used to hold the piece for the next step. It NEVER failed me. Blue Bowl Reversing

Cool thread.
I've been putting off a routing job on the back of a Les Paul body, and any suggestions would be welcomed. Since the top is arched, just clamping a couple of boards across the body is out, and a clamping arrangement involving something carved to cradle the curved top is a bridge too far.
I've read several posts from people who use double sided tape, and tried it myself with mixed results. Sometimes the templates have crept or slipped a little, in testing, and I don't trust it
The body in question is mahogony with a glassy urethane finish, and I want to rout on the flat side.
Tom
Coincidentally, I've done this before.
 I made the primary cavity routes before I carved the top. Everything clamps up nicely right to the bench.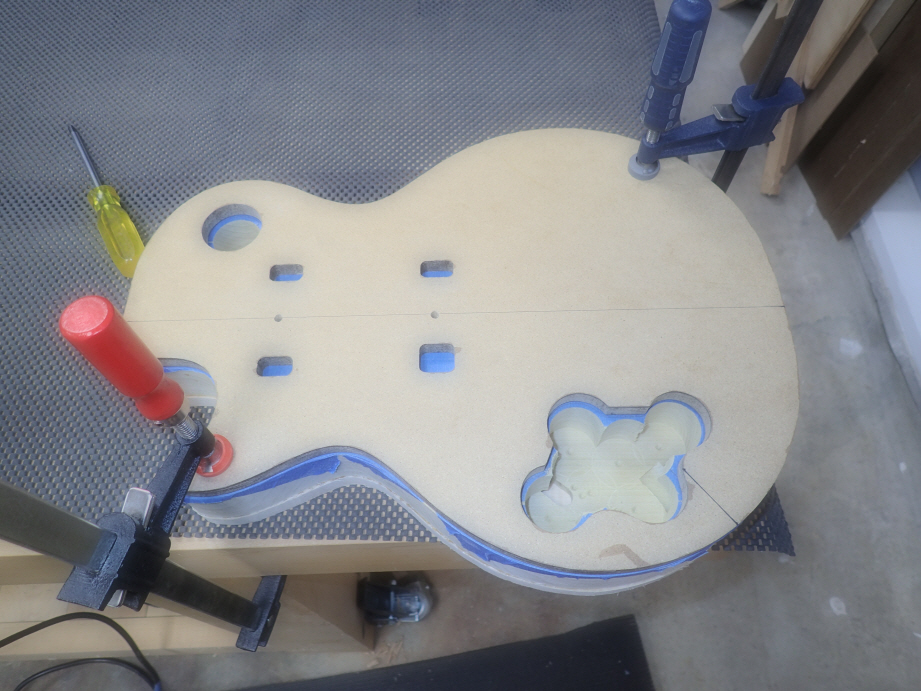
But once you carve the top, you end up with this... as you know.

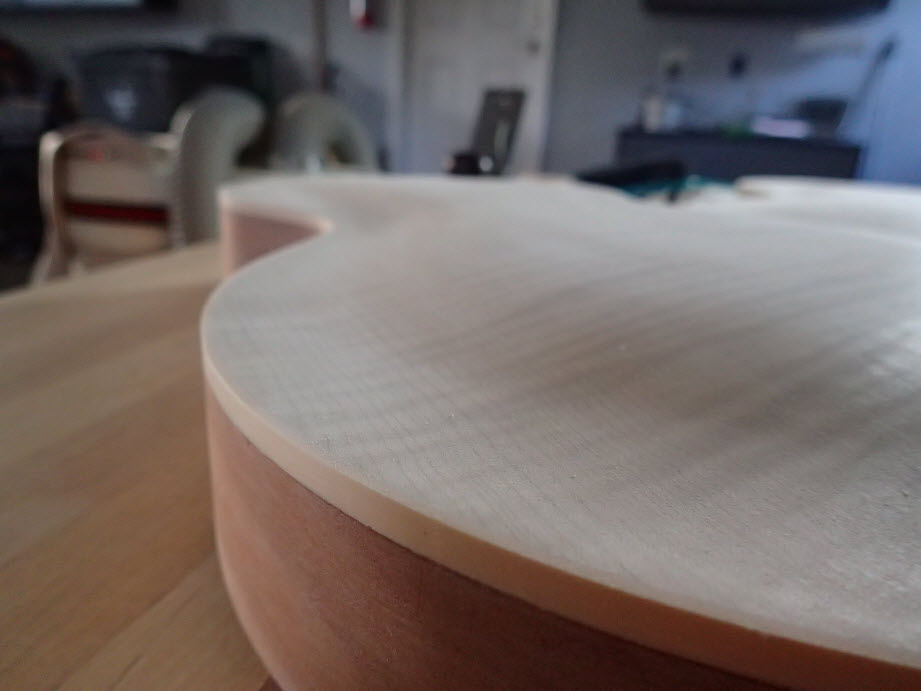
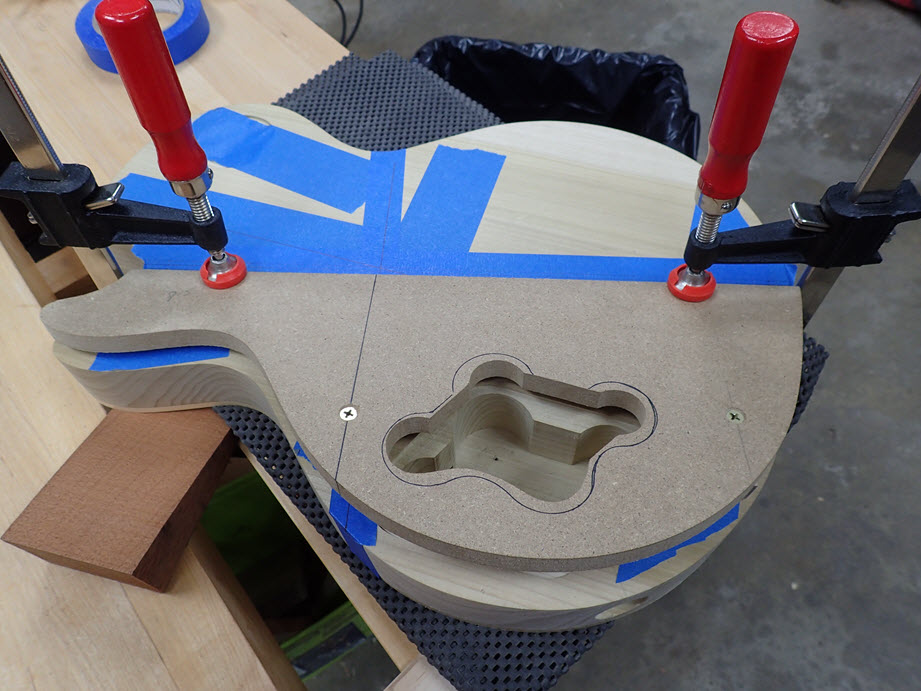
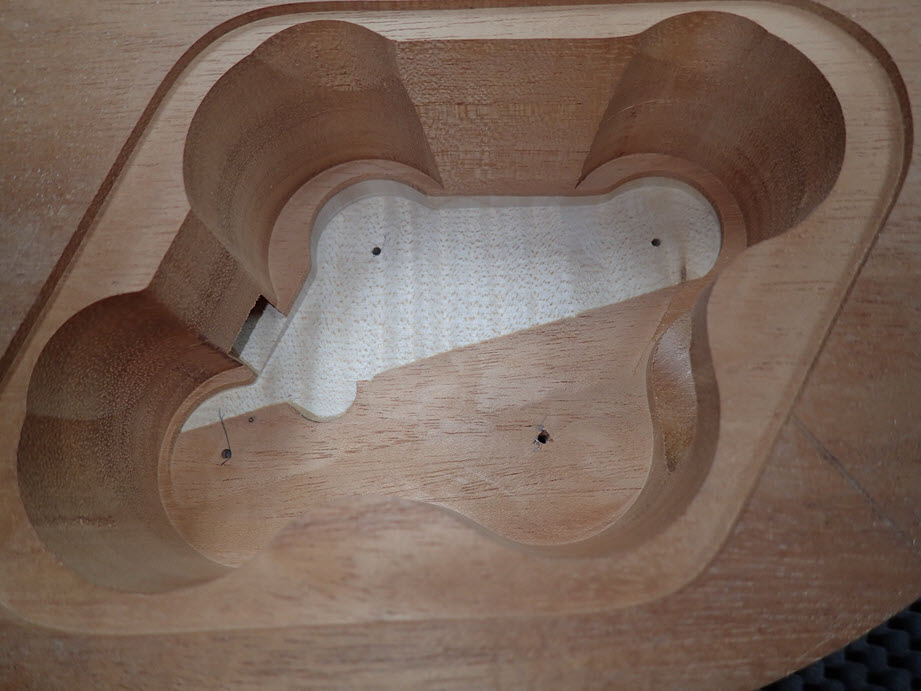
When I went to make the secondary route in the control cavity (this makes the "bottom" of the cavity slanted to roughly match the angle of the top carve so that control pots fit correctly). I just carefully used shims that were strategically placed in the low areas. I should have taken more pictures, but I used a lot of tape and was very careful to pad everything. The template pictured here has wedges attached to the bottom to create the proper angle.
That angle creates the sloped "bottom" which you can see here.
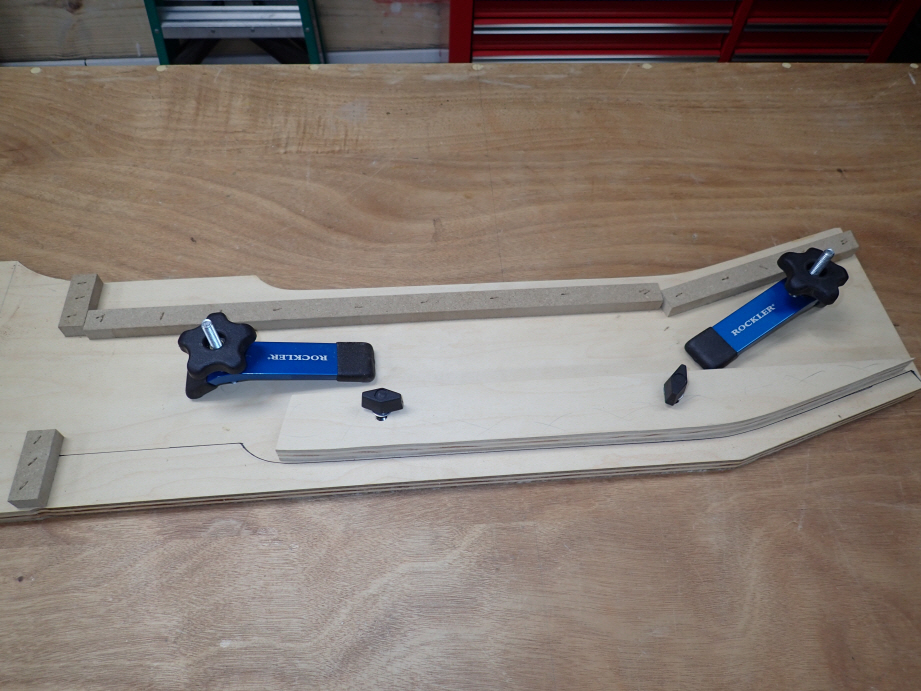
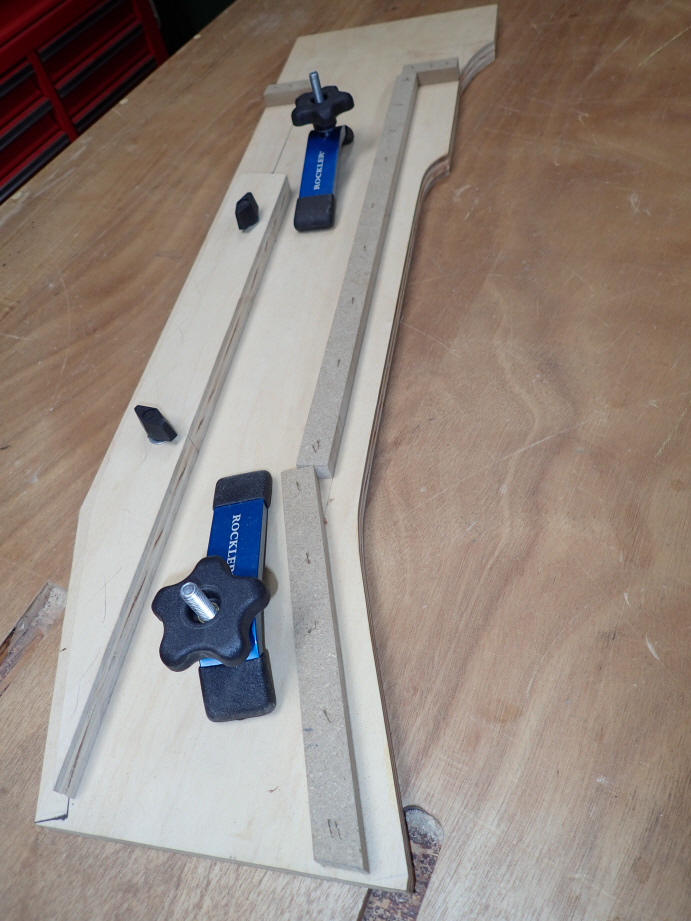
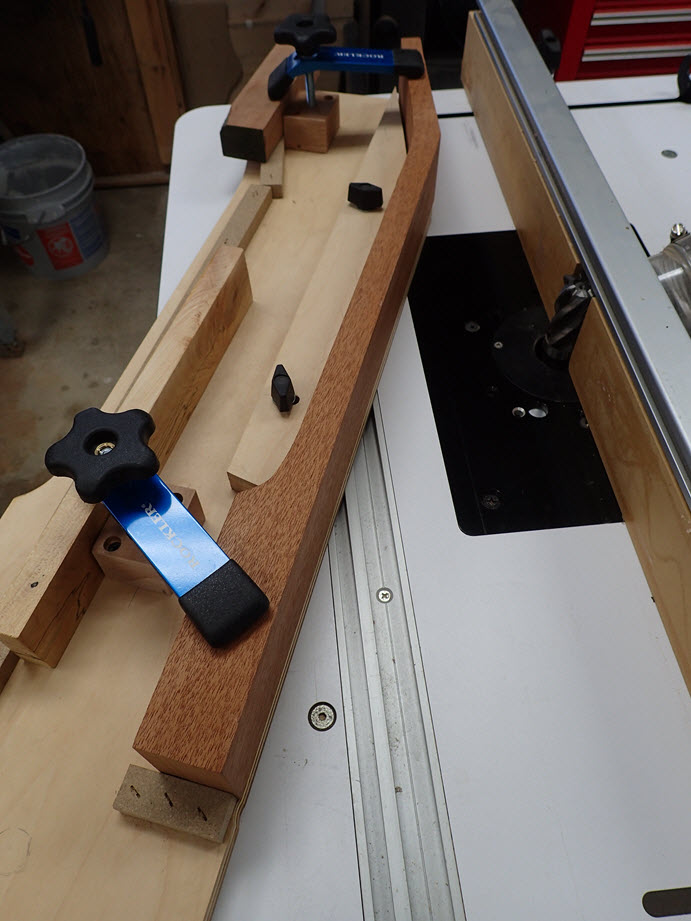
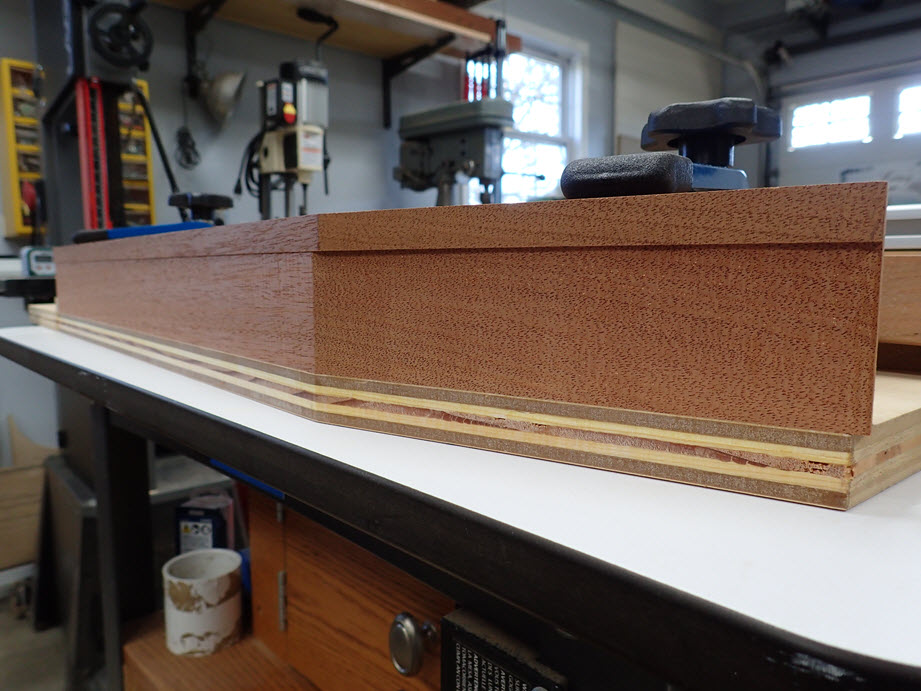
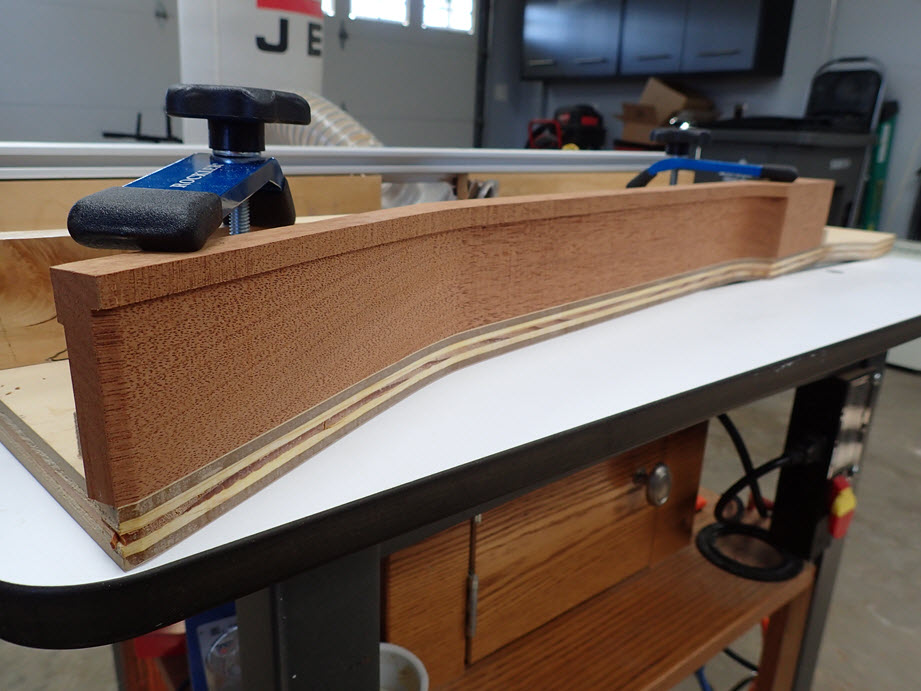
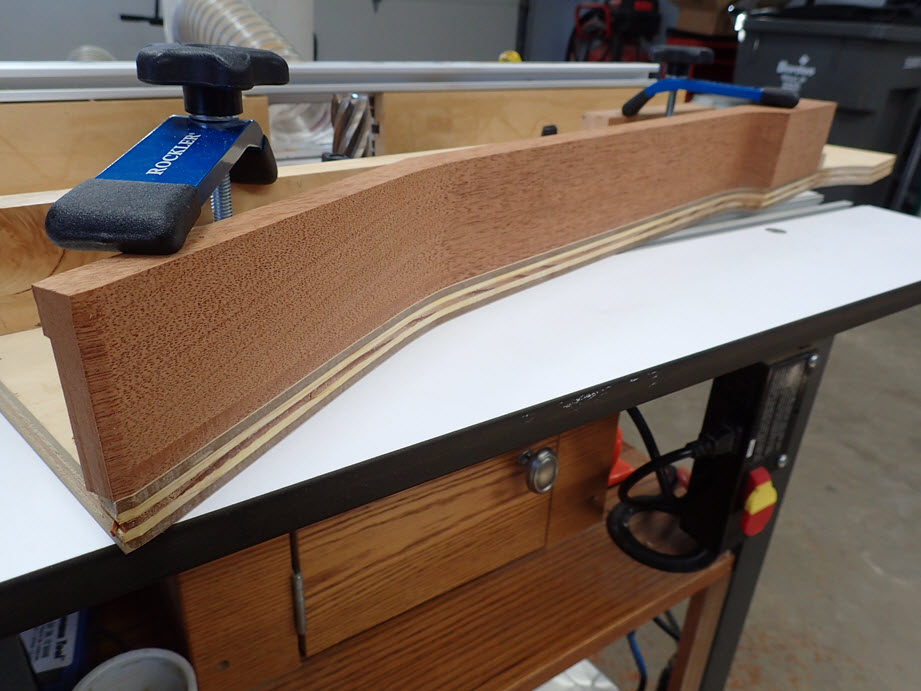
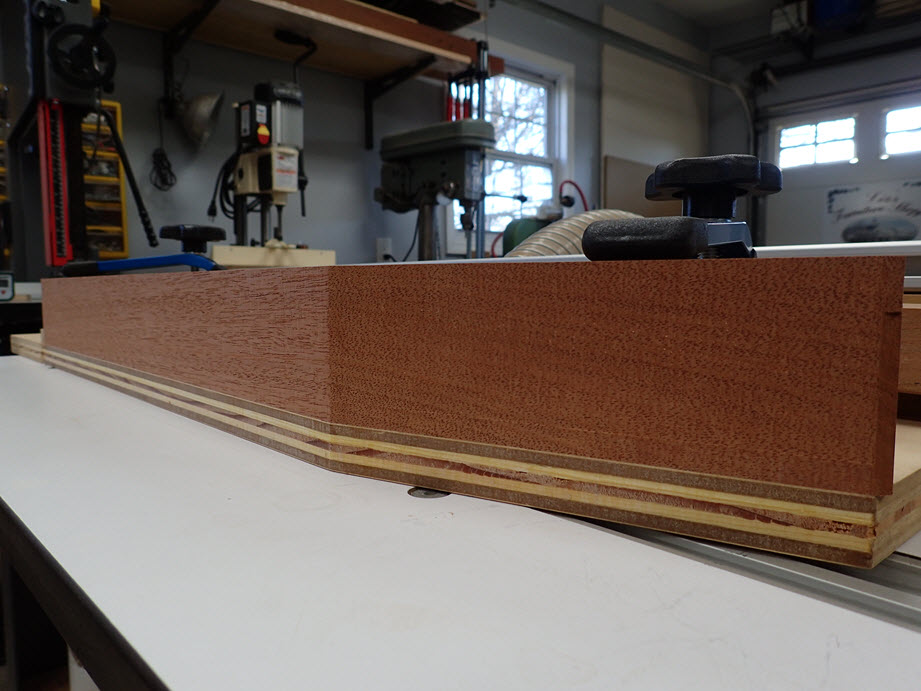
Hey, speaking of Les Pauls, here is a fixture that I built to both thickness and to true up the surfaces of the neck. It has a sliding fence to that you can adjust the overall depth. The neck blank needs to be squared up before starting and it is intended to be used on a router table. This idea could be adapted to making other necks, you just need to make a new base plate with the correct profiles.

The tape on both surfaces and a drop of CA between them works well.Cool thread.
I've been putting off a routing job on the back of a Les Paul body, and any suggestions would be welcomed. Since the top is arched, just clamping a couple of boards across the body is out, and a clamping arrangement involving something carved to cradle the curved top is a bridge too far.
I've read several posts from people who use double sided tape, and tried it myself with mixed results. Sometimes the templates have crept or slipped a little, in testing, and I don't trust it
The body in question is mahogony with a glassy urethane finish, and I want to rout on the flat side.
Tom


Lots of good holding fixture work here! We've all had to deal with the problem of holding onto awkward instrument parts. Much of the creative engineering of being a Luthier is in the fixtures.
In the sub-category of fixtures for holding necks while shaping the back, here's my Neck Horse:
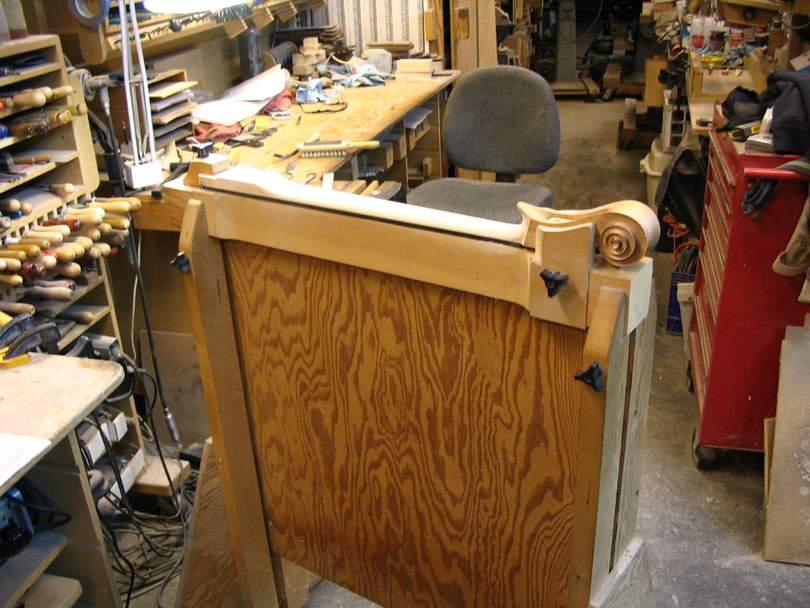
I built it many years ago, specifically for holding necks while I'm shaping the backs with big files and other tools. It's very sturdy, so I can hold the file with both hands and apply some muscle. And there's full clearance all around the neck.
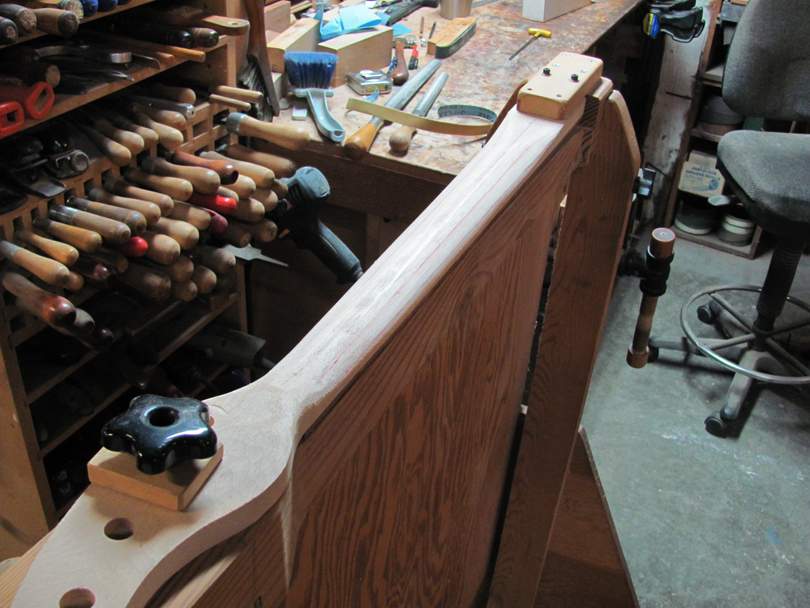
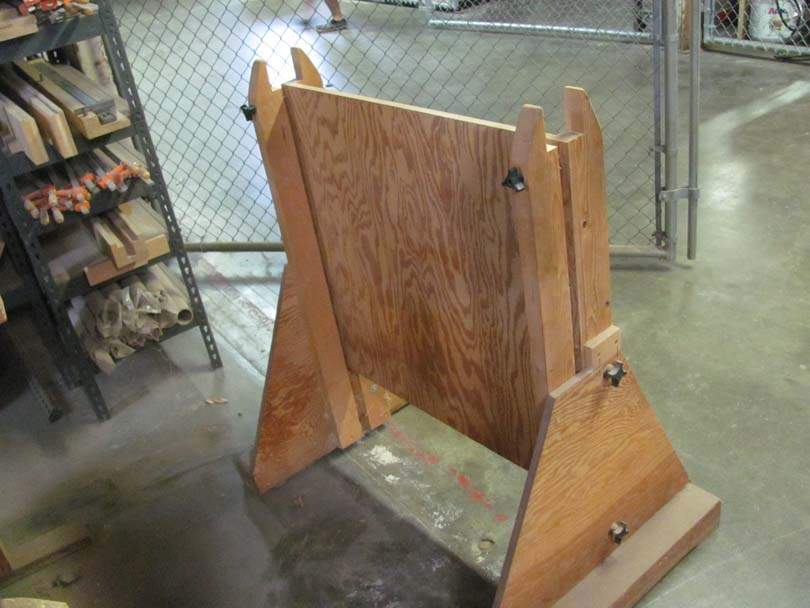
Here's the frame. Simple construction from plywood and 2x4's and some bolts and knobs. It's four point stance on the floor, so it doesn't rock. The two triangular end plates unbolt for more compact storage. But, I use it so often these days that I never take it apart.
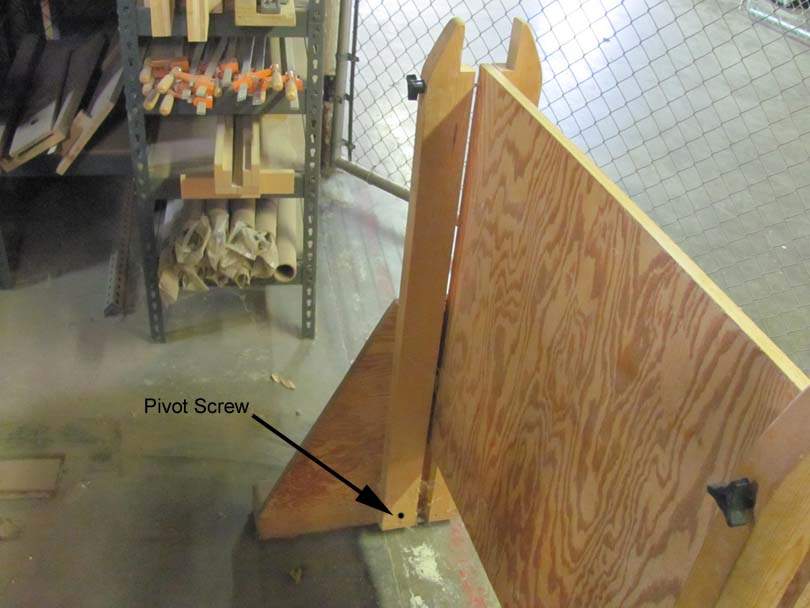
The two ends are tall narrow vises, made from 2x4's. The right side 2x4 is rigidly screwed to the center plywood plate. The left side 2x4 pivots about a screw at the bottom.
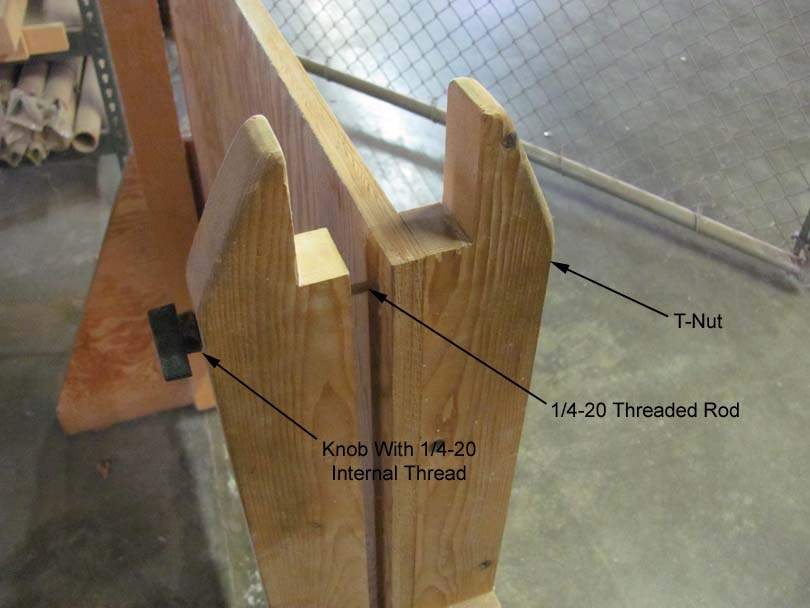
At the top, the clamping is done with a T-nut, a piece of threaded rod, and a threaded knob.
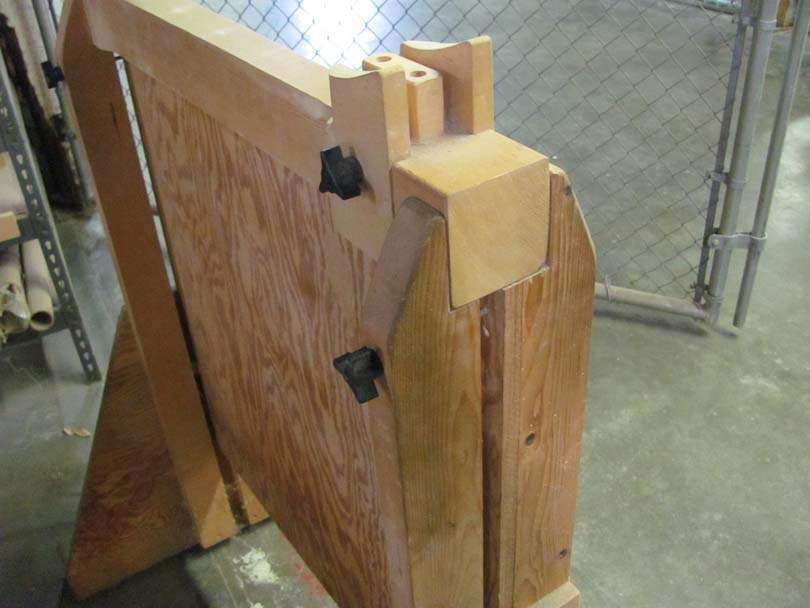
The holding fixtures are made from 4x4's. The ends are left square, so they quickly drop into the frame and are clamped solidly...
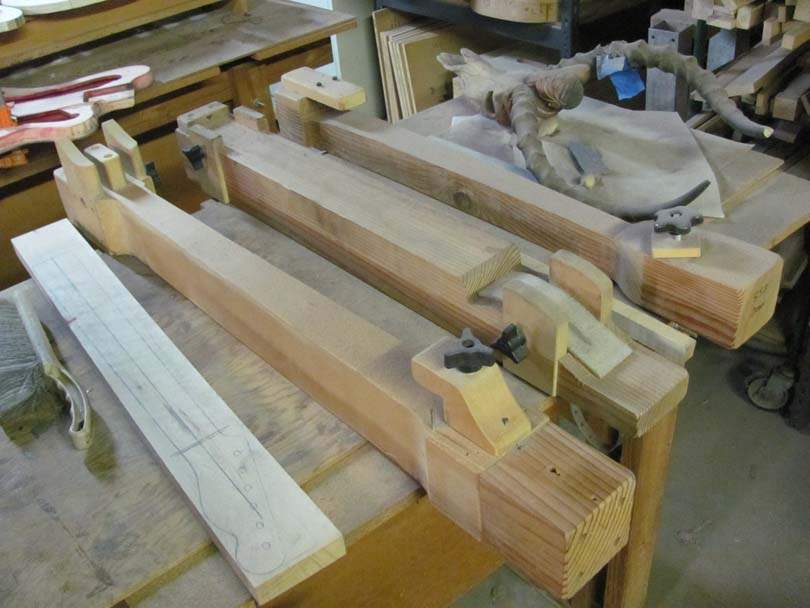
I've made up about ten different holding fixtures that all clamp into the Neck Horse. Different model necks; some face up, some face down.
These holding fixtures also sit nicely on the bench or clamp in the bench vise.
In the sub-category of fixtures for holding necks while shaping the back, here's my Neck Horse:
I built it many years ago, specifically for holding necks while I'm shaping the backs with big files and other tools. It's very sturdy, so I can hold the file with both hands and apply some muscle. And there's full clearance all around the neck.
Here's the frame. Simple construction from plywood and 2x4's and some bolts and knobs. It's four point stance on the floor, so it doesn't rock. The two triangular end plates unbolt for more compact storage. But, I use it so often these days that I never take it apart.
The two ends are tall narrow vises, made from 2x4's. The right side 2x4 is rigidly screwed to the center plywood plate. The left side 2x4 pivots about a screw at the bottom.
At the top, the clamping is done with a T-nut, a piece of threaded rod, and a threaded knob.
The holding fixtures are made from 4x4's. The ends are left square, so they quickly drop into the frame and are clamped solidly...
I've made up about ten different holding fixtures that all clamp into the Neck Horse. Different model necks; some face up, some face down.
These holding fixtures also sit nicely on the bench or clamp in the bench vise.
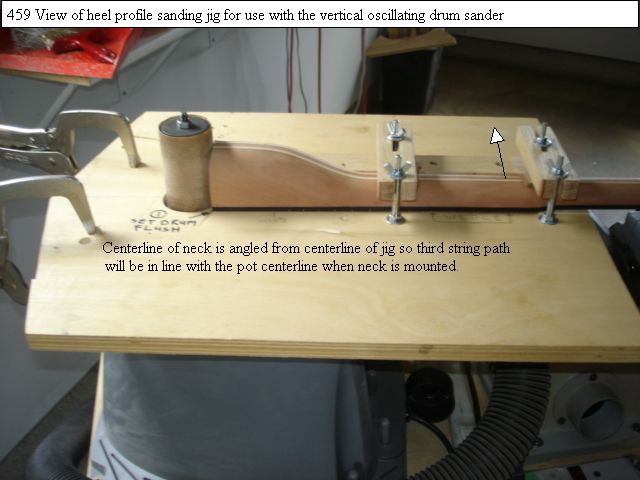
This is how I get a 12 inch radius on the butt end of a neck. It only required One sacrificial hole in my sander.
View attachment 4947050
This is how I get a 12 inch radius on the butt end of a neck. It only required One sacrificial hole in my sander.
That's a great example of a holding fixture, made to solve a specific difficult problem. The neck is clamped down tightly and moved through an arc past the sanding drum, giving the heel a fairly accurate concave radius. The key design points of the fixture are the pivot bolt through the sander's table to control the movement of the fixture, and the adjustable caul blocks along the sides of the neck. Slotted holes and wing nuts; real simple. The toggle clamps as hold-downs are an extra cool feature, but the neck could also be clamped down with maple blocks and bolts and T-nuts.
You can see that a fixture like this isn't very difficult to build, once you've figured out what it needs to do. I'm guessing that Rick spent an hour building this one. Before the fixture, sanding that arc in a neck heel probably took him 20 minutes, with a lot of finicky measuring and fitting. With the fixture, it's 5 minutes and right the first time. The time spent building the fixture paid off in 4 necks.
That's the whole point of building fixtures like this: Investing some time up front to make an operation faster, less fussy, and more consistent. And they will usually pay off quickly. Sometimes it's even worth it to make a special fixture for a one-off job. Just to get it right the first time.
Nice work, Rick.
This is another classic design holding fixture to solve a specific problem: Holding an awkward oversize instrument part in a drill press, to make a consistent pattern of holes. I call this an Overhang Fixture. The key thing is the fairly strong arm that clamps to the drill press table, and the table is swung off to the side and locked. Rick has built a fence onto the fixture that he seats the banjo rim against. This sets the distance of the hole down from the rim edge. Then he locates the sideways position of the holes with pencil lines. Note that the fixture has to be strong enough to take the downward load of the drilling. Rick made this one from plywood.
I've made a few Overhang Fixtures like this for holding guitar/bass bodies up on edge, for drilling output jack holes on the edge. Same basic idea; the body is clamped to a vertical plane of wood that is hanging off the side of the drill press table.
That's a great example of a holding fixture, made to solve a specific difficult problem. The neck is clamped down tightly and moved through an arc past the sanding drum, giving the heel a fairly accurate concave radius. The key design points of the fixture are the pivot bolt through the sander's table to control the movement of the fixture, and the adjustable caul blocks along the sides of the neck. Slotted holes and wing nuts; real simple. The toggle clamps as hold-downs are an extra cool feature, but the neck could also be clamped down with maple blocks and bolts and T-nuts.
You can see that a fixture like this isn't very difficult to build, once you've figured out what it needs to do. I'm guessing that Rick spent an hour building this one. Before the fixture, sanding that arc in a neck heel probably took him 20 minutes, with a lot of finicky measuring and fitting. With the fixture, it's 5 minutes and right the first time. The time spent building the fixture paid off in 4 necks.
That's the whole point of building fixtures like this: Investing some time up front to make an operation faster, less fussy, and more consistent. And they will usually pay off quickly. Sometimes it's even worth it to make a special fixture for a one-off job. Just to get it right the first time.
Nice work, Rick.
Yup. My similar heel profiling jig uses cork padded wood blocks to hold the neck in place.
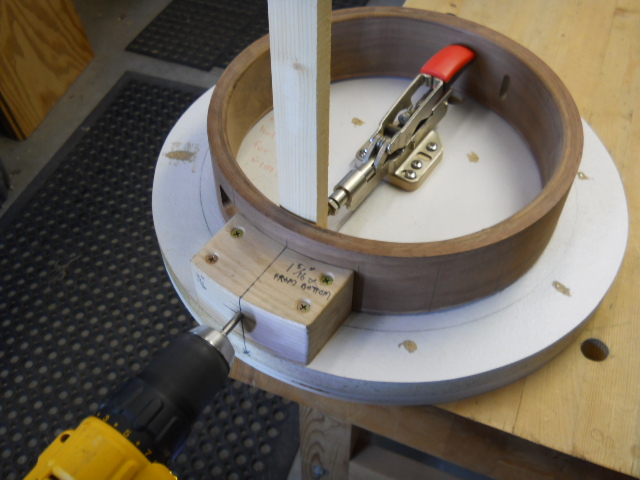
This is another classic design holding fixture to solve a specific problem: Holding an awkward oversize instrument part in a drill press, to make a consistent pattern of holes. I call this an Overhang Fixture. The key thing is the fairly strong arm that clamps to the drill press table, and the table is swung off to the side and locked. Rick has built a fence onto the fixture that he seats the banjo rim against. This sets the distance of the hole down from the rim edge. Then he locates the sideways position of the holes with pencil lines. Note that the fixture has to be strong enough to take the downward load of the drilling. Rick made this one from plywood.
I've made a few Overhang Fixtures like this for holding guitar/bass bodies up on edge, for drilling output jack holes on the edge. Same basic idea; the body is clamped to a vertical plane of wood that is hanging off the side of the drill press table.
The overhang fixture method is what I initially used for drilling banjo rim shoe mounting holes but I didn't care for the amount of setup time, since my drill press is normally set up with a large extension table for planing use.
I found that it was much easier and quicker for me to use a dedicated fixture to drill the holes. In this case the toggle clamp makes a lot of sense.
Looks like all the banjo bros are out in full force on this thread!
My theory on jigs is, If it holds the work steady and eliminates at least one measurement, I will build it.
My theory on jigs is, If it holds the work steady and eliminates at least one measurement, I will build it.
Looks like all the banjo bros are out in full force on this thread!
Hah! I think that banjos, on average, require more special fixtures than electric basses. Something about that round shell....
Oh, man, you should see the giant fixtures that I built to make Banjozilla. I made them 31 years ago, and I still have them stored away here. Even though I've only built one Banjozilla. I have a museum of fixtures here.
The overhang fixture method is what I initially used for drilling banjo rim shoe mounting holes but I didn't care for the amount of setup time, since my drill press is normally set up with a large extension table for planing use.
I found that it was much easier and quicker for me to use a dedicated fixture to drill the holes. In this case the toggle clamp makes a lot of sense.
And there's a basic single purpose drill fixture. A base plate, a clamp, and a maple block as the drill guide. The rim registers on the surface and against the maple block's shape, and the hole height is set by the maple block. Drill powered by a hand drill. Simple and effective.
A hard maple block works surprisingly well as a drill guide, like Rudy has done here. If you want to make it last longer, you can add a steel sleeve or a drill guide bushing to it later. Another trick is to dedicate a particular drill bit to this fixture, then lightly de-sharpen the flutes along the length of the bit on a grinding wheel. Leave the tip sharp. That reduces the wear on the maple.

How about sanding inside the horns? I've got an OSS but - I don't know if it's just the radius matching or what, but it doesn't really seem to help when you have a ton of sanding in there. (Sanding between coats)
Between coats? I always go by hand. Way too easy to burn through color or topcoats with power sanding. The only time I flip on my spindle sander is when I'm still roughing out the body.
My jig is for cutting the forearm contour mainly. I used it for the belly cut for Nazgûl (that I posted on UW), but it was awkward. I need some other cradling/bracing pieces to add to the sled for the belly cut.


