• TalkBass has been independent since 1998. Add your voice.
    Create a free account to reply to discussions, view embedded media, and browse with fewer display ads.
    Join freeLog in
    Want zero display ads or expanded classifieds tools? Compare plans.

Specialized Holding Fixtures for Luthier Work

In the sub-category of Fixtures For Holding Instruments While Painting:

Here's my current rig. It's evolved over the years, and it works very well. It allows me to roll and spin the necks and bodies around while I'm spraying. I've learned how important that is to getting a good finish; moving the light reflection around on the surface, while spraying, so I can see exactly how the paint is laying down.

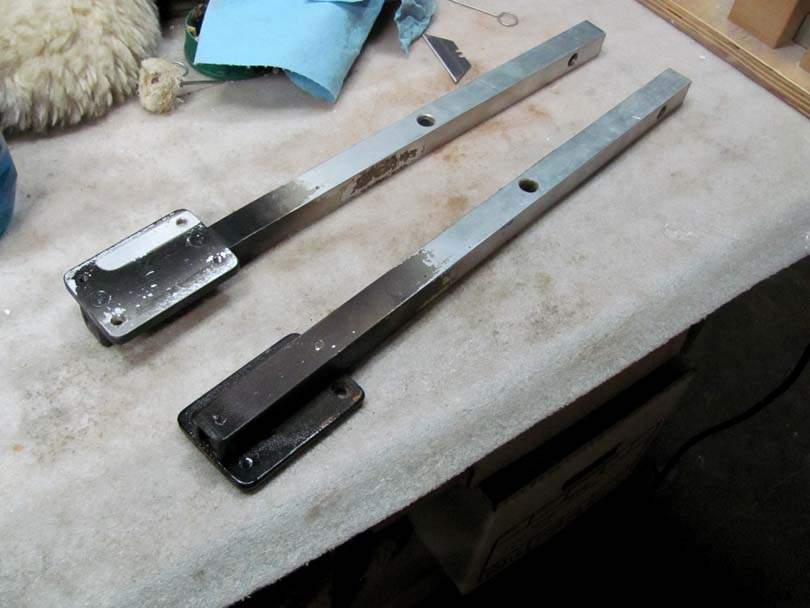
Here are my standard holders. The same holder will attach to either a Scroll Bass body or a neck.
IMG_9250B.jpg


They are made from 3/4" square x 1/8" wall aluminum tubing. A rectangle of 1/8" aluminum is screwed onto one end. The four hole pattern matches my Scroll Basses. Two holes are through-holes; 10-32 machine screws go through them and thread into the heels of my necks (which have threaded inserts). The two diagonally opposite holes are threaded 10-32; the machine screws go through the holes in the bodies and thread into the plate. Very strong and secure.
IMG_9254B.jpg


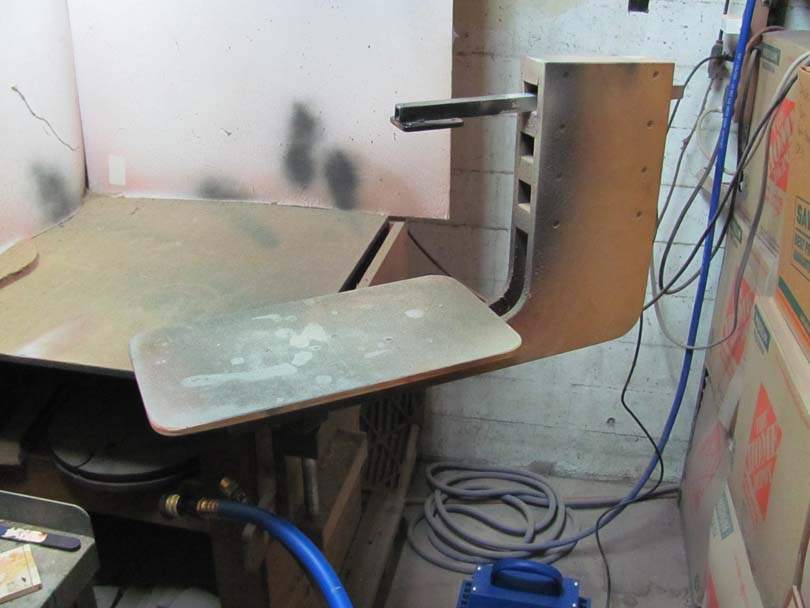
This assembly is mounted on the corner of the bench in my spray booth. It's an L-shaped frame made from plywood and maple blocks. There are three holes through the frame, which are 1 1/4" square. The holders, which are 3/4" square, are placed in those holes. The holes through the frame are inclined back a few degrees, so that when a holder is resting in there, the holder is horizontal.

I made the holders with a square tube, which fits into an oversize square hole in the frame arm for a reason: The holder can be easily rotated within the square hole, but it will snap to 90 degree positions and stay still.
IMG_9255B.jpg


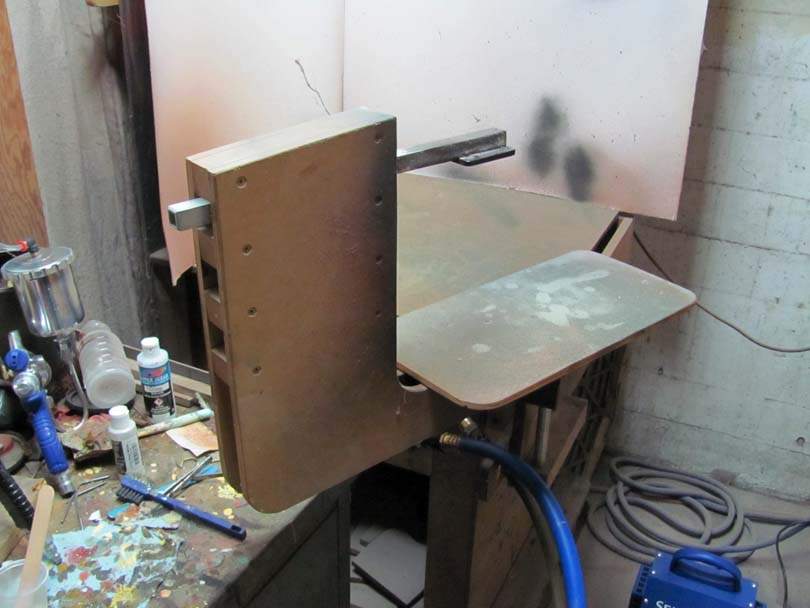
The whole frame also spins around in a vertical axis. An aluminum shaft rides in two wooden bearing blocks that are screwed to the corner of the bench.

The small rectangle is a table for setting small parts. I can spin them around 360 while spraying them.
IMG_9256B.jpg


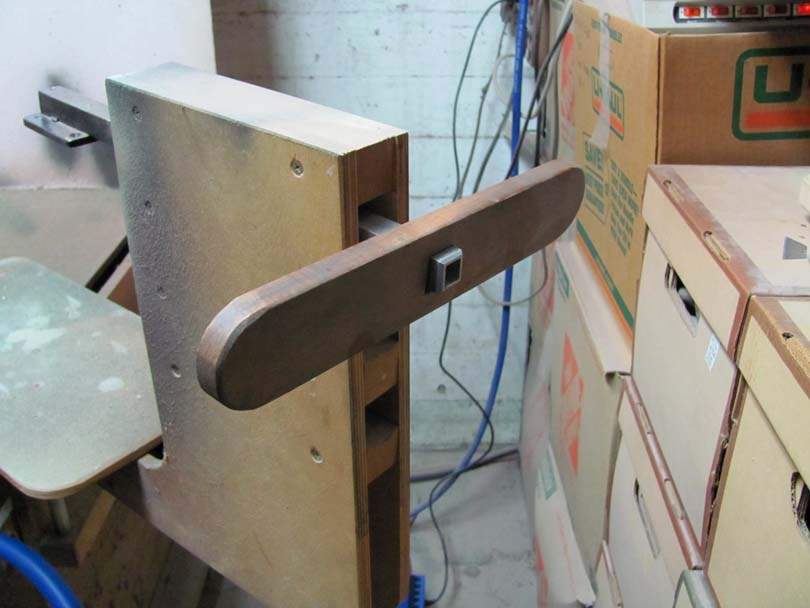
Another important part: This handle is a flat board with a 7/8" square hole in the middle. It slips on the back end of the holder and allows me to rotate it with one hand.
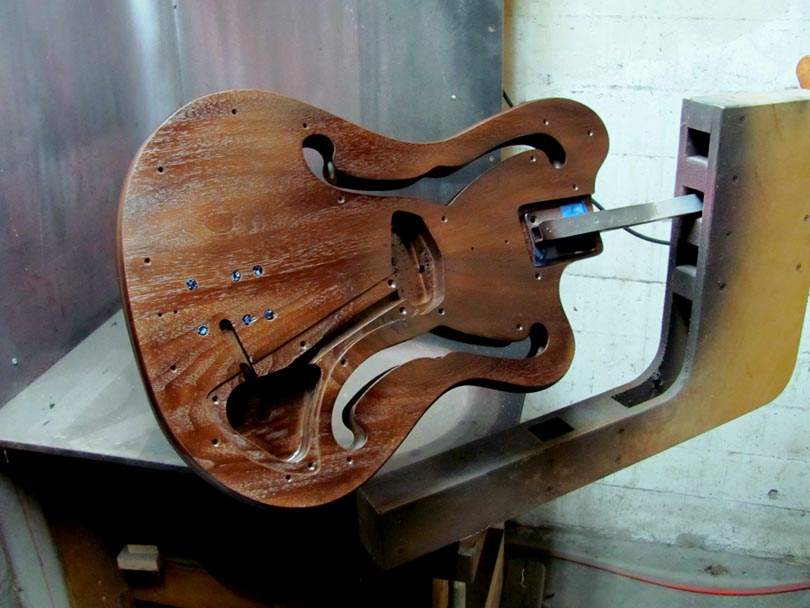
IMG_6592B.jpg


Here it is in action. I'm holding the spray gun in my left hand (I'm left handed) while working the handle with my right hand. I can roll the body 360 in the horizontal axis and spin it 360 in the vertical axis, while spraying. I can reach both surfaces and all around the perimeter.
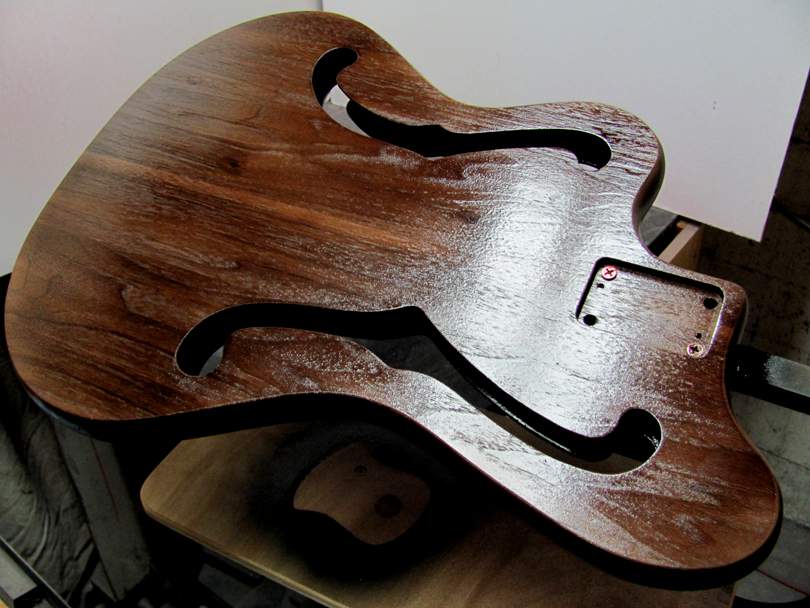
IMG_6948B.jpg


It's all about moving the reflected band of white glare across the surface as I'm spraying, so I can really see how the paint is laying down.
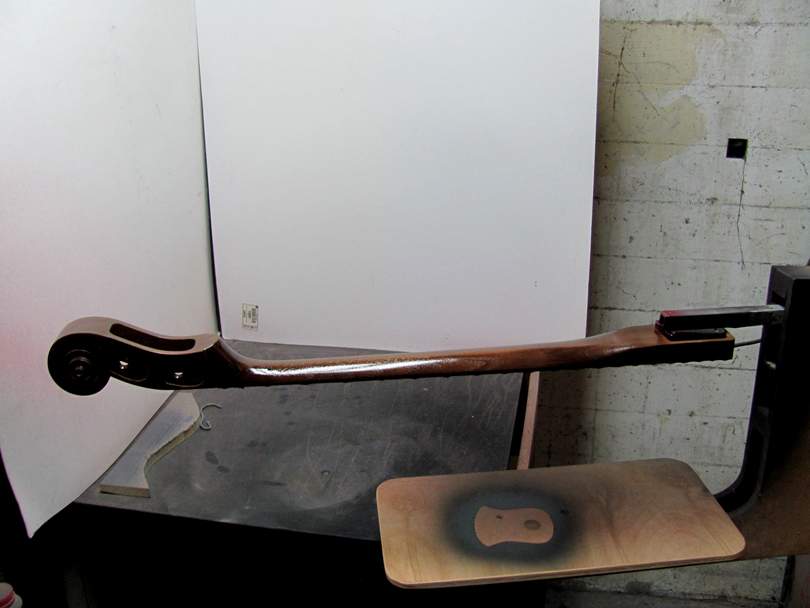
IMG_6950B.jpg


Same with the necks. They spin and roll, so I can see and spray every surface and edge.
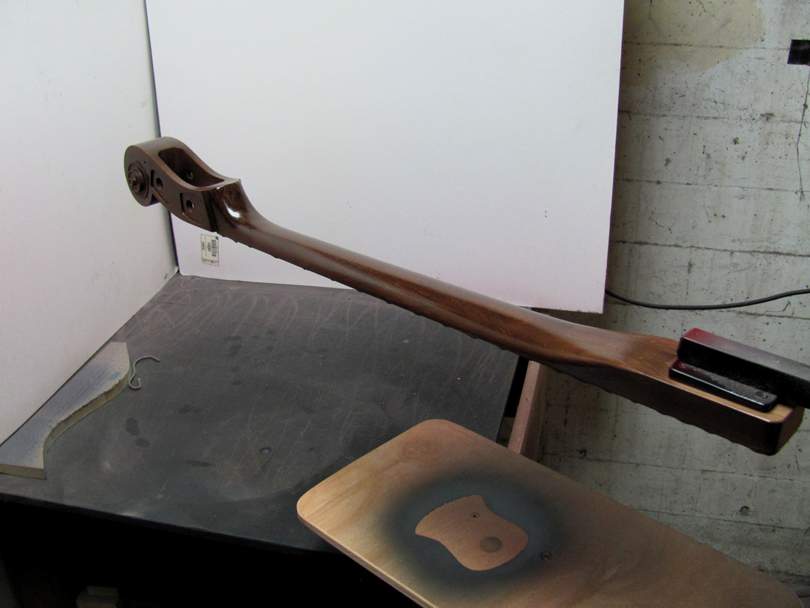
IMG_6951B.jpg
 
Last edited:
More details about my holding fixtures for spray painting:

IMG_9252B.jpg


While drying between coats, the holders are slipped into these wooden racks, which also have square holes. These are three of Jeremy's bodies and necks drying back there right now. Two Pistoleras and one Uno.


IMG_7448B.jpg


IMG_7454B.jpg


I also drilled holes in the holders, so bodies and necks can hang vertically in this rack while waiting their turn for spraying or buffing. They slip onto pieces of 3/16" steel rod.

IMG_6868B.jpg


Other variants of the holder: For Keith's set-neck guitars, I made up simple aluminum brackets that screw down into the pickup cavities....

IMG_6870B.jpg


A straight length of 3/4" square aluminum tubing slips through the brackets. Note the safety screw, so it can't slip off!

IMG_6884B.jpg


And a special long handle with a counterweight, so it rolls easily and stays still in position.

IMG_6886B.jpg
 
Not sure if this would be a "fixture" so much as it is a "hack" but it's something I just discovered today and wanted to share...

So let's say you've gotten pretty much all of the way through a build. You've already shielded the control cavity, thinking it was good to go, but despite your best efforts, when it comes time to add the control pots through the top, you find that you didn't rout the cavity deep enough. Or perhaps like me, in this current situation, it was close before you opted to have it painted, then the paint made things too thick.

Yes, you could rout it deeper. But if you don't want to do that, you can also take it to the drill press and use a Forstner bit around the pot holes on the inside. HOWEVER... as I've found many times over, that is a guessing game that I frequently got wrong.

Until today, that is.

1) Clamp a piece of MDF or other somewhat disposable material to the table of the press.
2) Drill all the way through it with the bit for the size of the threaded portion of the pot that you need (3/8" for me this time).
3) Take the bit out and press it through the hole you just made, leaving a tiny part of the back end of the bit sitting proud of the table.
4) Chuck the Forstner bit in place (this was 3/4") and adjust the depth stop to your proper height.
Everything should be properly centered, assuming you locked the table well and the clamped-on piece of scrap didn't move either. And the point of the Forstner will likely push the standard bit down enough to where you don't have to worry about it dulling the point or drilling into the base.

IMG_3343.jpg

IMG_3341.jpg


5) Use the stub of the bit in the table as a "locating pin" to set each pot hole in place, then drill the body slightly thinner as needed.

IMG_3342.jpg


Pretty much as perfect as you could ask for in this situation. No need to mill the whole top thinner from the inside, just a couple added spritzes of shielding paint and it's good to go!

Just make sure that the contacts of any of the pots don't hit the shielding and you're set to jet.

NOTES:
- The 3/4" bit was what I needed for dime-sized pots, but you'd need something larger for quarter-sized.
- I taped the front, near the holes, just so I didn't accidentally scratch the finish against the "bit pin".
- Depending on how badly you screwed up top thickness to begin with, I've seen some people use a chisel to make the larger area "pot shaped with the tabs." I don't have a pic, but imagine that you carefully chisel out an area at one point of the circle which the tabs of the pot can also go into safely, with no chance of making contact with the sides of shielded cavity.
- The whole process here took all of about 10 minutes to do from beginning to end. I doubt I'd be lucky enough to set this up as a repeated fixture as quickly as I MacGyver'd it like this, but I'm sure it could be done with slightly more effort.
- If you wanted to make the top thinner from the top side, you'd basically just leave the bit which goes into the table piece sticking out much higher. But I'd certainly recommend adding a support of some type around it, because the taller a "pin" sticks out, the more chance of movement. A secondary piece of MDF or scrap wood that doesn't interfere with the inside of the cavity would likely do the trick. But I'll save that experiment for another day and another project.

Hope this helps someone at some point. It was very helpful in this case for me.
 
Cool, Rojo;

That's a great example of what I call Pin Drilling. Like a Pin Router, but with a drill press. You clamp a board or plate down to the drill press table, which has a short vertical pin sticking up. Line the pin up accurately with the spindle of the drill press. Then you can pop a fixture (or an actual body, like you've done here) onto the pin, and quickly drill a hole in an accurate position.

I've been messing with a similar setup over in my metal shop, where I need to drill an accurate pattern of holes in a bridge or tailpiece or some part. I bolt an aluminum plate down to the table of a drill press, with an 1/8" steel dowel pin sticking up from it. Line it up accurately with the spindle. Then I make an aluminum fixture which clamps the aluminum slug of the part. On the underside of the fixture is a pattern of 1/8" holes in the correct positions. Then it's really fast to drill all the holes in the part, setting the fixture on the pin, one hole at a time. And very accurate.

I plan to eventually set up a row of my old antique drill presses as dedicated Pin Drills. Pins on their tables, specific bits in their chucks, depth stops all set, and a group of fixtures. Fast production.

And you can certainly do the same thing in woodworking. For example, all the pickguard screw holes on the top surface of a body. You could build a fixture that holds the body, and has an accurate pattern of 1/8" holes on the bottom. Set up a drill press with a pin on the table. Speed and accuracy, particularly if you are making more than one of a particular body.
 
It works great for drilling string thru holes too, drill half way through one side, flip it over and align with the pin to drill halfway through from the other side to avoid drift and tearout.

Yes, that's another good job for the Pin Drilling technique. And you could also make a fixture/pattern with a pattern of holes in it, accurately aligned and spaced. Clamp the body to that, and set the fixture on the pin.
 
  • Like
Reactions: lbridenstine
Since Bruce asked - he's my hacked together jig for holding bodies for painting. If you actually do this for people I'm sure you already have something nicer than mine, but I built it together out of plumbing parts. For any sort of production - even hobbiest doing more than one or two guitars once in a while - I'd strongly consider some sort of turntable in addition to the rotisserie.

Here's my jig.
IMG_20230217_001745047.jpg

Main bar is 1/2" iron pipe, the Tee, flange and upright are 3/4" so the 1/2" pipe just freely passes through.

And here's a work holder.
IMG_20230216_180733031.jpg
IMG_20230216_180739011.jpg
IMG_20230216_180733031.jpg
I printed mine on a 3D printer, but a hardwood block would probably be faster and better. (The side cuts are just to reduce print time). The little tab on the holder fits into a notch I ground in the end of the pipe, but I think a much better solution would be a 5th hole in the block, and drill/tap the pipe - that'd give you better slip off retention. (Or you can not be stupid like me and don't carry freshly painted guitars around, but I spray outside and move em inside)

I am considering some sort of friction collar to help it say better in unstable positions (it's rather back heavy, especially on basses) But honestly a couple turns of masking tape would work.
 
Since Bruce asked - he's my hacked together jig for holding bodies for painting. If you actually do this for people I'm sure you already have something nicer than mine, but I built it together out of plumbing parts. For any sort of production - even hobbiest doing more than one or two guitars once in a while - I'd strongly consider some sort of turntable in addition to the rotisserie.

Here's my jig.
View attachment 4971195
Main bar is 1/2" iron pipe, the Tee, flange and upright are 3/4" so the 1/2" pipe just freely passes through.

And here's a work holder.
View attachment 4971197 View attachment 4971196 View attachment 4971197
I printed mine on a 3D printer, but a hardwood block would probably be faster and better. (The side cuts are just to reduce print time). The little tab on the holder fits into a notch I ground in the end of the pipe, but I think a much better solution would be a 5th hole in the block, and drill/tap the pipe - that'd give you better slip off retention. (Or you can not be stupid like me and don't carry freshly painted guitars around, but I spray outside and move em inside)

I am considering some sort of friction collar to help it say better in unstable positions (it's rather back heavy, especially on basses) But honestly a couple turns of masking tape would work.

I like it! A good simple design for a home shop. You could add a vertical rotating axis by making the vertical pipe longer, and have it plug into holes in something sturdy. A table, bench, WorkMate, whatever you have.

You could add a simple friction lock by drilling and tapping a 1/4-20 hole in the T-fitting, and threading in a thumb screw.
 
  • Like
Reactions: Roxbororob
Over at TDPRI, eallen built this Fender shop inspired deal, which i really like. I think its a better swivel. When I made mine either I didn't see the need or was scared by price of plumbing parts.

Edit: I think though that the long arm fails to capitalize on an advantage - if you have the lower arm but make the upper arm short, you can get the center of rotation closer to the middle of the body and I think that's probably the main advantage of this contraption.

20220903_155912.jpg
 
Last edited:
Here is my finishing rack, which I made for $7 out of some 1/2” pipe and a two-by-four from Home Depot.

View attachment 4942393


Currently available for sale for $400 on Stew-Mac!


I love this idea - might be my project for this weekend.

How do you have the body attached to the arm? Are you screwing into the pocket or going through the mounting screw holes?

Looking at doing a Tru Oil finish and I think this would a great way to make turning it less hassle.
 
I love this idea - might be my project for this weekend.

How do you have the body attached to the arm? Are you screwing into the pocket or going through the mounting screw holes?

Looking at doing a Tru Oil finish and I think this would a great way to make turning it less hassle.

I can answer for swarfrat;

Most of us attach bodies to the hangers with bolts (machine screws) going through the existing neck-attaching holes in the body. In swarfrat's rig, he pressed threaded inserts into that 3-D printed plastic block. The machine screws thread into them.

My holders, which I showed a couple of posts up, have aluminum plates with 10-32 threaded holes. Same idea.

You could also cut a wood block and put T-nuts into it. Or use wood screws threading into the wood block.

Whatever is easiest for you.
 
  • Like
Reactions: swagbotbilly
This is my refinishing stand. I had an old rotisserie motor laying around, so I thought, "Why not? " I forgot to show the fixture used to mount a body at the neck pocket. It is much like everyone else's. The rotisserie motor works well unless the body is quite heavy. I also like it if I am using a finish that is particularly thick or slow to cure. In those cases, I can leave it running to help avoid runs. When I am turning, I don't have to tie up the lathe and can start on the next turning unless I am doing a friction finish.
20230221_152425.jpg
 
IMG_20230222_192940798.jpg
IMG_20230222_193022158.jpg
IMG_20230222_193509759.jpg
So i chopped the pipe down to just clear the horn on a jazz bass, drilled and tapped the pipe for a 1/4-20 wing nut (which i barely got long enough). I added a pair of elbows and another nipple and then drilled out the 2x4 beneath the 3/4" flange. The hole doesn't quite go all the way through. (on purpose but not convinced its a good idea yet), but the bottom nipple is 2.5" and its about a half inch too long. I bought a 2" nipple but it didn't have a baggie and the the assistant came back with a 2.5". I sort of want the elbow to bear on the flang, but I may still wrap the 1/2" nipple to fit bit more snug but still free to turn.

It holds position better. I'm thinking of the best handle/wheel/counterweight to go on the flange on the horizontal pipe.

The center of rotation is much closer to the center of the body. Close enough to not seriously impact the size of any sort of booth/hood I might make for it.

Overall I think this is much improved. Both because of the swivel and the better attachment . (Excuse the mess. Project room is in a reorg)
 
View attachment 4977779 View attachment 4977780 View attachment 4977781 So i chopped the pipe down to just clear the horn on a jazz bass, drilled and tapped the pipe for a 1/4-20 wing nut (which i barely got long enough). I added a pair of elbows and another nipple and then drilled out the 2x4 beneath the 3/4" flange. The hole doesn't quite go all the way through. (on purpose but not convinced its a good idea yet), but the bottom nipple is 2.5" and its about a half inch too long. I bought a 2" nipple but it didn't have a baggie and the the assistant came back with a 2.5". I sort of want the elbow to bear on the flang, but I may still wrap the 1/2" nipple to fit bit more snug but still free to turn.

It holds position better. I'm thinking of the best handle/wheel/counterweight to go on the flange on the horizontal pipe.

The center of rotation is much closer to the center of the body. Close enough to not seriously impact the size of any sort of booth/hood I might make for it.

Overall I think this is much improved. Both because of the swivel and the better attachment . (Excuse the mess. Project room is in a reorg)

Yeah, that looks good. That's about the same geometry as my rig. The Yaw (vertical) axis is right about at the center of the body/neck, so it spins about in place.

For the handle to rotate the Roll (horizontal) axis, you could mount a simple straight board onto the pipe flange. One of my handles has a sliding steel block as an adjustable counterweight, but that's overkill. You can just screw some metal parts onto the wood board.
 
Sitting at work thinking about it... you want to keep paint out of the pocket and the screws make it a pain to sand the back. It bothers me to screw unto the neck pocket but I think four pins in the screw holes and a center screw into the middle of the pocket would allow better access to the back for sanding.
 
  • Like
Reactions: Flamingo21
Sitting at work thinking about it... you want to keep paint out of the pocket and the screws make it a pain to sand the back. It bothers me to screw unto the neck pocket but I think four pins in the screw holes and a center screw into the middle of the pocket would allow better access to the back for sanding.

Yes, it's handy to keep the holder attached to the body (and neck) while you are doing the between-coats sanding. And, yes, the screw heads can get in the way when sanding the back around them.

The usual trick is to use smaller size screws than what normally go in there to attach the neck. Use 8-32 or 6-32 flat head machine screws. The head is smaller diameter, so it sits down in the countersink in the body, below the surface.

Or, you can do like you are suggesting, and attach the holder to the body with screws going in from the neck pocket side.

That's how Fender does it. When they machine up their bodies, they drill two extra small holes into the neck pocket, about 1/2" deep. They are between the neck-attach holes. Then they have steel holder sticks, hundreds of them, sitting in a bin. They are similar to what we've made up here; a round tube about 3/4" diameter by 24" long, with a square steel plate welded on the end, with the two holes in it. One poor guy in the assembly line takes a body off of the pallet, and a holder stick from the bin, and screws the holder onto the neck pocket with two screws and an impact driver. Again and again, all day. The stick stays on the body through the whole process of sanding, painting and buffing. The stick is the handle, so no one touches the body during the process. The stick gets plugged into a stand or hangs from a hook while spraying, and held by hand while buffing and inspecting. It only gets removed when it has passed inspection and starts final assembly.
 
  • Like
Reactions: Rafar
A tip for any of you using these painting holders:

Put a little disk of masking tape on the heads of the screws, covering the Phillips or socket head opening. And a flag of tape on the exposed end of the screw. It's really annoying to get finished with the painting, and then not be able to get the body off the holder.....because the heads and threads of the screws are jammed with paint overspray. At least once, I had to saw the screws off. That was annoying.
 

Latest posts