• TalkBass has been independent since 1998. Add your voice.
    Create a free account to reply to discussions, view embedded media, and browse with fewer display ads.
    Join freeLog in
    Want zero display ads or expanded classifieds tools? Compare plans.

The Hossenfeffer Bass Build

This is a job well done.
This is a job ALMOST done! Here's another bit of indecipherable spaghetti I have to solder to something. This is a stock Pick of the Ricks pre-wired double jack assembly, which also doesnt seem to entirely match the Cadfael diagram. Anybody know where wires "A", "B" and "C" are supposed to go? It's Pity The Moron with the Soldering Iron time, so toss me a bone!
9KhcDc7.jpg
 
  • Like
Reactions: Spidey2112
Ace,
When you refer to "top" and Bottom" pup switch leaf springs, are you meaning as you see the switch from below (control cavity side) or from above (pickguard side). The Cadfael diagram appears to be oriented from above, in other words viewing top of pickguard. The diagram they used to have in Joey's Bass Notes on RRF does not appear to include a push/pull pot, so I dont think that's accurate for 4003 basses, and it doesn't agree with the Cadfael version. My ignorance on wiring is inexcusable, I know, i've tried and "bounced off" guitar wiring a few times. If I want to keep doing bass builds, I'll have to learn it eventually.
I was referring to the switch leaves where the tone capps are actually soldered, which are furthest away from the guard. Your harness as supplied by POTR was made at Rickenbacker using 330k pots that are usually about 20% under spec. The diagram you refer to there is innacurate, particularly on the output jacks. Here's one of my harnesses with output jacks and the neck pickup assembled on a guard I made for a 5-string conversion project that's in Paul's 2nd edition Rickenbacker bass book.
IMG_20160823_215531364.jpg
 
  • Like
Reactions: Gilmourisgod
I hope you bought the output jack assembly from POTR too, because building one one from scratch is NOT easy. There are a couple Ebayers that build Rick style harnesses that have the outer terminals on the mono jack bent out at an angle so they wont fit in the jack hole. Once compressed to fit, they short out because they aren't using any heat shrink on the inner terminals.

 
I hope you bought the output jack assembly from POTR too, because building one one from scratch is NOT easy. There are a couple Ebayers that build Rick style harnesses that have the outer terminals on the mono jack bent out at an angle so they wont fit in the jack hole. Once compressed to fit, they short out because they aren't using any heat shrink on the inner terminals.


Yep, thats a stock POTR pre-wired output jack assembly in Post #763. One final bit of confusion, the wire with a yellow capacitor connecting the pup switch to the push/pull treble tone pot is connected to the "top left" blade connector with respect to this photo. I'm reading that as where I connect the bridge pup hot wire, Is that right? there is another smaller white capacitor connected to the "lower left" pup switch lug in this picture orientation, but that connects to the center lug of the treble volume pot. I got the neck pop soldered in, but I'm not loving the quality of my solder joints. Looks a little "cold-joint" to my eyes. I was using a fine point tip, I'll try switching to a chisel-tip. I'm paranoid about cooking the pots trying to re-flow those great gobs of solder they puddled on too.
5im42IB.jpg
 
Yes on your 1st question. The yellow caps are the standard .047 tone caps, and the white cap is the .0047 bridge bass cut cap. Don't feel bad about your soldering skills. Most of my favourite builders aren't very good at it (and actually have me make harnesses for them). I'm only good at this because it's what I do most. I wouldn't even ATTEMPT what you just did. A soldering tip for ya...hold your iron close to your subject, melt a bit of solder onto your iron, then touch it to your subject while feeding a bit more solder from your spool.
 
  • Like
Reactions: Gilmourisgod
Thanks for the advice and tips Ace, i hadnt realized how rusty my soldering skills were, havent done it in a while, and it does degrade. I got the jacks soldered in per Aceonbass photo, think I got it right. What a mess of wires, the cavity is PACKED. I'll try to get the rest of the wiring done tomorrow and fire it up.
Pc9Hb15.jpg


Drilled for the pickguard, painful to cut through that paint, but it had to be done. I added some copper foil tabs tack soldered in at a few of the screw holes, including the bridge pup surround. I don't know how much shielding that will really get, since the pup is kind of "out in the breeze", so to speak, but I figured it couldn't hurt.
w8toVmC.jpg
 
Last edited:
It all looks good! One suggestion....loosen the neck volume pot nut. And rotate it clockwise so that the output wire from it passes along the outside of the bridge volume pot. The connection at that pot is VERY fragile, which is why I leave a shield lead on that wire, and solder it to the back of the neck volume to act as a strain relief.
 
  • Like
Reactions: Gilmourisgod
i've tried and "bounced off" guitar wiring a few times. If I want to keep doing bass builds, I'll have to learn it eventually.
Yeah.... Or..... you could just do like me & go with EMG exclusively. Plug & play baby! (And no shielding needed/ NO noise!)
Lucky I totally dig them.... AND their eq circuit.
They are very 'transparent'... & let the wood & strings speak their true voice.
The only time I have had to break out a soldering iron in the last 4 years...was for my Arachno-build with the custom pups by Michael Harwood.

But your tenacity is admirable... and your ability to maintain a standard of excellence & clean work on this bass has been phenomenal. Never mind any slips or boggles you had along the way... it's all about how you recover.
Very well done! :hyper::thumbsup:
 
Last edited:
Yeah.... Or..... you could just do like me & go with EMG exclusively. Plug & play baby! (And no shielding needed/ NO noise!)
Lucky I totally dig them.... AND their eq circuit.
They are very 'transparent'... & let the wood & strings speak their true voice.
The only time I have had to break out a soldering iron in the last 4 years...was for my Arachno-build with the custom pups by Michael Harwood.

But working with molten metal is FUN! (kinda like cooking meat over an open flame :D)
 
I have EMG pups on my 83’ Steinberger, and really like them, though that was before plug n play. I’ll probably use EMG soap bars on Build #3, which will be an Alembic Balance K style hippie sandwich. Gotta work my way up to that one, the Hossenfeffer II will be my first attempt at laminated body top and a 5 piece neck, hope to have the HF II done by spring of 2019 as a graduation present for my son. Barring last minute problems, should have this finished wiring today!
 
  • Like
Reactions: AGH and Rôckhewer
Annnnnnnddddd.... It's wired, verdict still out on actual noise.
MDNH6b6.jpg


I rotated the bass volume pot per Aceonbass suggestion, and (not surprisingly) this seems to accomodate the natural curved "set" of the wires better. Thanks Ace! My wire management skills are... open for improvement. In my defense, it seems like the stock Ric harness uses a lot more wire length than seems necessary, and it's a bit of a mishmash thats hard to track point to point visually. Let's hope it works!
XV79Yxr.jpg


A lot of combined wire tension in the cavity! Hopefully didn't break anything free pressurizing the pickguard down. I made the control cavity a hair small, have to fix that for the HF II.
bzD5Nlp.jpg

xkQXM2A.jpg

hWYSZW0.jpg


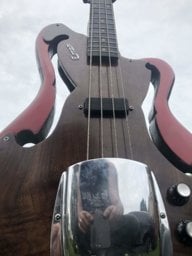
Forgot something kinda important, the nut! Glued in with white elmers, so I'm done for the night, suspense is killing me! I'll string it up tomorrow and see what comes out.
th3fCfQ.jpg