
Out of respect to the OP and his thread, I won't go into details...you may pm me for info ;^)59 jazz
Do you have a link to your build thread? I love scroll headstocks, wish I had the skills to carve one.

TalkBass has been independent since 1998. Add your voice.
Create a free account to reply to discussions, view embedded media, and browse with fewer display ads.
Join free Log in
Want zero display ads or expanded classifieds tools? Compare plans.
Out of respect to the OP and his thread, I won't go into details...you may pm me for info ;^)59 jazz
Do you have a link to your build thread? I love scroll headstocks, wish I had the skills to carve one.


Does anyone out there have any info on required depth of routes for Ric bridge, pickup, and control cavities? I have the footprints for the routes worked out fairly well, but depths is another issue. My plan is to thickness plane the body wings and, leaving them rectangular and oversized for now, attach them to the neck beam with doublestick tape. This will give me square references off centerline and a wide area for the router to ride on. The Ric neck pup pocket looks hugely oversize on most basses, which undermines the neck beam at its weakest point. Id like to avoid that with the absolute minimum depth route needed for pup vertical adjustment. The neck pup magnet is a little lower but much narrower than the pup itself, I figured on a stepped route at two depths. Advice or suggestions appreciated.

25mm in the control cavity. 12.5mm in the neck PUP. 25mm in neck PUP.Xaxxat
Thanks for the diagram, I have the pickups, so setting the depth of the routes is actually more to do with how close they should be to the strings. I found a starting figure of 5/32" on RRF, guess that's a decent starting point. The one number I can't find anywhere is the control cavity depth. Id like to set it up for the option to use the push/pull vintage/modern tone pot, which looks deeper than a standard pot. The body is 1-1/4" thick, so maybe 3/4" deep control cavity?
25mm in the control cavity. 12.5mm in the neck PUP. 25mm in neck PUP.

I put a picture of my bridge in there. It looks horrible. I replaced the R bridge because I couldn't adjust the intonation. I got the idea from Geddy Lee.Robert, You are the man! Plugging that into my design now. Thanks a lot! 25mm rounds up to just under 1" , if the push pull pot is 25-28mm, I may as well set the cavity depth at an even 1", which leaves me a 1/4" thick cavity floor. Thanks to Jon Clegg for the pot dimensions.
You could always pretty it up a bit with a wood inlay to match the fingerboardI put a picture of my bridge in there. It looks horrible. I replaced the R bridge because I couldn't adjust the intonation. I got the idea from Geddy Lee.
That's a good idea. It's been that way for 30 years though. If anything, I would like to get the original bridge to function. Maybe move it back a couple mils. I also need to replace the upper half of the pick guard. It's cracked and the pickup hole is shaped for a standard gtr hum bucker. In the 80's I didn't care about "retro", everything had to be modded.You could always pretty it up a bit with a wood inlay to match the fingerboard
Yes it did Gil. At one point I had EMG jazz PUPs in it. When I put the Ric PUPs back in (5yr ago), I wondered why I ever took them out? They sound great! The only thing I don't like is the hard POP when the string hits the pole piece.Robert
I'm betting a Hipshot Ric bridge would cover the bridge recess completely and really dress that up. It looks like the neck pup cavity was hogged out for humbuckers?

A bit more progress today:
Cut side wing plank to 6" width to flatten on my jointer. I am hoping to use the offcuts as glueing cauls if I can cut close enough to my body lines. I have a lunchbox planer, but it snipes pretty bad and I couldn't afford to waste any board length on snipe. I totally and shamelessley stole this idea by GMC about using a sacrificial board run through the planer along with my maple plank to take the snipe on the ends.
Bass8 Diary Of Contruction page 1
In GMC's words, this "worked a treat"! I jointed a 2x4 and stuck the square edge to my maple board with doublestick tape so the two could be handled as a single board. I can't believe I never thought of this before. Thanks GMC!


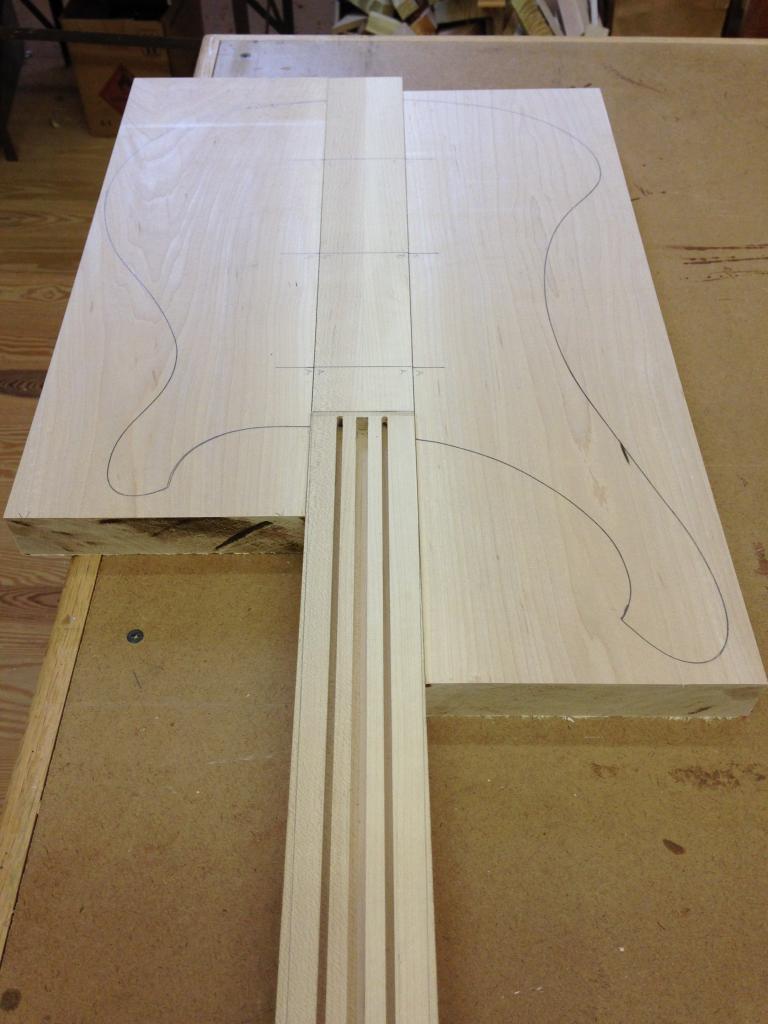
I drilled three 3/8" dowels per side on body wings and neck beam, more as registration devices than anything structural. This will keep everything lined up as a I route for the pickup, bridge, and control cavities. They all fall outside the body routes.

Starting to look vaguely bass-like. Loosely doweled together, this gives me a nice wide/flat bass to route cavities into.

Dang this is fun, wish I had more than 3 hours a week to work on it!


