
I'd go with sanding then to be safe, although personally I'm pretty bad at keeping it level with sandpaper, no matter what sanding blog or technique I use.

TalkBass has been independent since 1998. Add your voice.
Create a free account to reply to discussions, view embedded media, and browse with fewer display ads.
Join free Log in
Want zero display ads or expanded classifieds tools? Compare plans.



I've purchased chinese "celluloid" before which turned out to be poor quality plastic. I'd highly recommend steering clear of that route. Those body wings look gorgeous.After a good bit of agonizing, I decided this grain orientation best exploited the crotch walnut flitches that were so generously gifted to me by @Rôckhewer The pieces were a near-bookmatch, but just wide enough for the body wings. In a perfect world I probably would have cut away some of the lighter ascending grain on the lower bout to create an equal amount of light and dark wood above and below the neck beam, but I didn't have enough extra width, the board edge is about 1/4" beyond the mask you see here. No complaints here! This wood is effing gorgeous.
View attachment 2922810
The upper body wing about to go into glue-up. The crotch walnut was thicknessed to 1/4", and will be laminated to a piece of solid 1" thick plain sawn walnut to form the back and sides. The transition between the crotch and plainsawn walnut will be covered by an ivory PVC binding strip, .060" x .25", same at the headstock, which will also be bound. The plainsawn walnut is nothing special grain-wise, but had the admirable quality of being free, dumpster-picked 1" thick stair treads, poached from a construction site I worked on. Unbelievable what people throw away. I got three treads, but only one with a solid piece wide enough for the body wings. The others are three piece laminates.
View attachment 2922811
And the lower body wing:
View attachment 2922812
Clamp Armageddon. I gotta pick up some of those deep-throw HF clamps. The wood vise is doing half the clamping, but I wasn't taking any chances. Pulled this out of the vise last night and squared it up. Looks perfect. I belatedly realized I forgot to cut wiring channels into the plainsawn slab, but I can still just do a routed slot along the edge that meets the neck beam. D'oh!
View attachment 2922813
Anybody got a good source for ivory-colored plastic binding? I mistakenly bought some "cream" colored binding from Stewmac, thinking it would be cream colored. Nope, looks more like "flesh colored". Godawful, who likes this stuff? Stewmac has "ivoroid" binding, which is real celluloid. You pay $6 for the binding and a special $32 fee to ship it as flammable material! I found a few Chinese sources on Amazon, but it could be crap.

My experience with cream colored parts is that the shade can be all over the place. Even purchasing "cream" from the same supplier is a crap shoot. I bought some cream binding and cream pickup rings from Allparts a while back, and the pieces I got were noticeably different shades.Bam! Bought the Allparts cream binding. I hope it’s actually cream colored like the photo, not “flesh” colored. I originally thought white binding like a 4003W, but I think this will look better, no pickguard either, and I’ll back paint the clear TRC with cream to match.
Well unless someone else is impersonating me, then yes I am the same TundraMan.Hey @TundraMan , are you the same guy who does the Tundraman tutorials? I have read ALL of them multiple times, particularly the painting ones. Nice job spreading the joy, if that is you!


This wood is effing gorgeous.
dumpster-picked 1" thick stair treads, poached from a construction site I worked on. Unbelievable what people throw away.
I belatedly realized I forgot to cut wiring channels into the plainsawn slab, but I can still just do a routed slot along the edge that meets the neck beam. D'oh!
 Aw dang! Mine turned out great....
I saw someone post this the other day. I haven't tried it myself yet, but it looks like a promising alternative:The dark marks on the walnut are residue from the crappy "carpet tape" i used to hold some gluing cauls down. Never again! The stuff is impossible to get off without solvents, gotta find something better that leaves no residue. Suggestions?

The dark marks on the walnut are residue from the crappy "carpet tape" i used to hold some gluing cauls down. Never again! The stuff is impossible to get off without solvents, gotta find something better that leaves no residue. Suggestions?
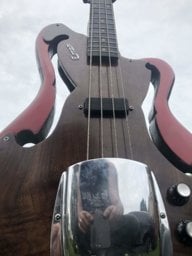
I saw someone post this the other day. I haven't tried it myself yet, but it looks like a promising alternative:


