• TalkBass has been independent since 1998. Add your voice.
    Create a free account to reply to discussions, view embedded media, and browse with fewer display ads.
    Join freeLog in
    Want zero display ads or expanded classifieds tools? Compare plans.

What's On Your Workbench?

View attachment 4001355

What's on my workbench? Glorious space. My husband has been helping me clean up the workshop over the past month, and we're close to being done. Perhaps I can finally finish up that Winter build-off build from 2018.

That's great news, Nexy! I hope you are continuing to recover your strength and energy. The most important thing is that you want to get back out in your shop! Mess around with tools and little projects, and enjoy it. Don't try too hard and get discouraged. Build things for your own personal fun and satisfaction. Don't feel pressured to show us that you can still build cool basses. We know you can.
 
On my bench - a whole pile of clutter, including some sheets of 3/4" glass mosaic tile.

Those have been waiting since 2012? for me to get to them - there actually are now some on the floor and wall, as I decided to delay the euphemism installation long enough to not have to de-install it when I got around to tiling, so now I just have to finish tiling around it one of these days.

Heat Pump guy is coming in two weeks, still hasn't clarified what space he needs so I know where to run the power he needs to...

But today's big win news is that I actually found a Fridge (no, not an Ampeg - a 20+ cubic foot LG with really low power consumption) which puts me a good bit of the ways towards "some mod cons" as our British friends might say, given that it's still well short of all mod cons, but I have to stop camping at my nice neighbor's as of Sunday night. Doors blown off and shelves taken out to make hauling it upstairs on the dolly as easy as it can be. It's not too awful - just over 200 lbs complete and those parts add up to some weight, not that I've weighed them.

Those have been really annoying to find in the covid era - "sure, we think you can have one by January" and as it was, I got to the store and the model I wanted was not on display - but there were 4 (or at least one, but the website that said 5 yesterday said 4 today) in back, so I crammed it into the Pilot and drove it home ("free delivery available" two weeks out, no thanks.) Now I have to claw a path to and up the stairs and get it hauled up, so it can sit still and think about where its oil belongs, so I can plug it in without destroying it. Oddly, no guidance in the owners manual for that, but I know better than to fire it up right away.

So, soon I'll actually be living at the shop, which has now been under construction for at least 17 years (longer if you count the driveway construction before the shop foundation started.) Hemorrhaging money, but that's what it's been getting saved for (I guess I could claim the fridge roughly equals some contracting income from August (gross) or perhaps the net from early September when I finally get that check, but the heat pumps are an order of magnitude more cash out the firehose.) Eventually it might even be civilized, and/or in a state to get some work done in rather than on it.

Tried to add pictures, something seems to have gone horribly wrong with that.
 
Last edited:
Had to clean my workbench again yesterday. It seems to go through these phases where my wife starts piling stuff on it, because that's what she does with any flat surface. :meh:

Took me about an hour to clean it off where I could use it again. But currently it has the lathe bolted back to it. I decided to try turning another handle for my mallet, this one out of bloodwood. Quick aside, crazy splintery stuff that bloodwood! That was not fun, nor was it something an amateur should attempt! I wish the lady at the woodworker's store had maybe mentioned that when she told me "Oh, a mallet handle. Bloodwood would be really pretty!" :meh:
The handle came out "okay"-ish. I'm not unhappy with it, but I'm also not happy with it. I'm also not finished, it still needs a final sand and then a finish put on it. Pics later, once I get that done. I did glue it to the mallet head and the wife said "Oh, Thor!" so I think it looks kind of how I envisioned it would. :roflmao:

My brother-in-law also bought me a new 4-jaw chuck kit that came with 4 different "sets" of jaws and the correct adapter to fit it to my lathe (actually his lathe, but he seems to have zero desire to reclaim it at this point since he has a larger lathe, both were formerly owned by his and my wife's grandpa). He said it's an early Christmas present. My wife insisted he not buy it because of the price but he said "He's gonna make me bowls!" :roflmao: My hope is to learn to turn bowls, but I also don't have a face-plate yet. I'm curious if there's a solid way to chuck up a blank in the spur center and tail cup, turn a "foot" and then chuck it up in the 4-jaw chuck like you normally would. Maybe some of you who have turned a bowl can answer that, am I just asking for trouble here? Normally I see people screw the faceplate to the end that will eventually be the rim, turn the base end down to fit the 4-jaw chuck, then mount it in said 4-jaw chuck and remove the faceplate, then hollow out the part where the faceplate screws were.

Anyways, I also got some fresh logs, roughly 9" to 12" diameter to use as bowl blanks. They will of course need to dry for a bit. Those are not "on" the workbench, but stacked next to it for now.

So yeah, the workbench is currently converted to a lathe station, the bass building will need to wait for now.

EDIT: So yeah, after a quick Google search I see that there are people who fully turn bowls between centers, never using a chuck or faceplate of any sort. So I guess it's possible to just chuck it up between centers, cut the "foot" and then mount the foot in the 4-jaw. :cool:
 
Last edited:
Anyways, I also got some fresh logs, roughly 9" to 12" diameter to use as bowl blanks. They will of course need to dry for a bit. Those are not "on" the workbench, but stacked next to it for now.
A few words of advice (I have, uh, a few, lathes....)

Cut or split those logs in half lengthways before they start drying, or they crack. If your town has "scrap paint exchange" at the transfer station, pick up some free latex paint and dip or paint the end grain. You can also use wax, but that costs money. And cut the blanks 2-4" longer than the diameter of the log (this is ALL crack/check control.)

You can turn the bowls utterly green. If you haven't turned utterly green, it's a whole different thing, and you should try it. Of course the bowls end up oval, but that can be a feature... put them in brown paper grocery bags after turning (or rough-turning, if you want them round in the end - make them about an inch thick and you can usually manage to get a round bowl after the inch-thick bowl dries a lot faster than a log and becomes oval.) The brown bags usually work to slow the drying enough to not crack, and not turn into a mass of mold like a plastic bag would.

Then there's microwaving (don't use your wife's) or boiling the roughed bowls (toss in some strings if you like?) which can also speed drying and reduce cracking at the same time (heat can be good, if it's damp heat.)

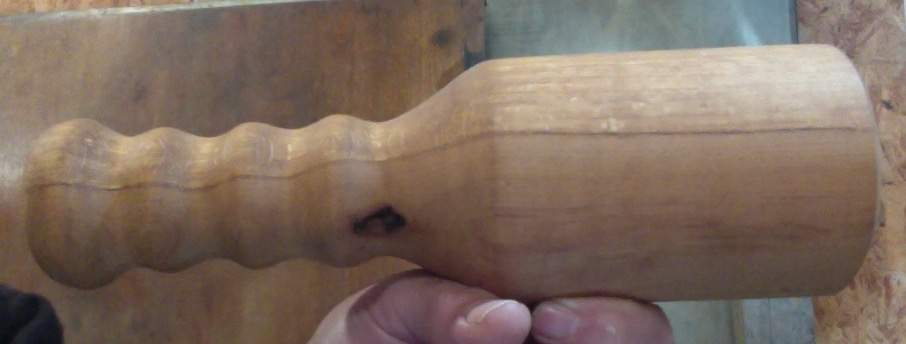
My preferred "mallet" form is more like a froe club - or a wooden wine/beer bottle, if that helps to envision it. Simple "turn from firewood" project, and if it ever breaks, put it in the fire. This is a large one & is used hard, I have others I treat nicer. On my computer it looks like it at least showed the picture, but it added a white line. I uploaded to "media" rather than trying to load the picture directly, since that did not work for me multiple times earlier.

Go for two - a nice one. Smaller, slightly different approach to the handle. Both were firewood before they got "elevated."
 
Last edited:
This short scale 6 string piccolo is officially off the bench and is going to a new home as a gift today. :) This came out really nicely, but working with the ziricote was a chore as usual.

B0wYQBy.jpg


RovYJIl.jpg


rtyto6j.jpg


lDeQIsw.jpg
 
Stunning!

Some day I should make myself one of those "piccolo" basses.

I'm a sucker for the look of ziricote, but have never used it. What is the "chore"?

Thanks, Jeff! :D I love ziricote, but I really struggle with it due to a severe allergy. That's quite a huge pain point as I have to wear a powered respirator and long sleeves, etc.

Aside from the allergy stuff it was very difficult to get the drop top bent around that forearm contour cleanly and without breaking and still maintain a decent glue line. I mostly succeeded but it isn't as crisp as I wanted. That was entirely my fault as I carved the contour too deep.

The last thing is the pore filling... ugh! I used AquaCote which is water based and it just didn't work very well. I think that the problem was that it kept melting under the nitro. Next time I'll use oil based filler to see if it works better.
 
Freaking gorgeous! I love Ziricote. I just haven't found some I can afford. Fine work. I love the headstock rear face. If I do that it's to cover a mistake. Alder body and Bolivian rosewood fretboard? What, no tort on that bass!
Exceptional finish work, the new owner will be very happy.
 
  • Like
Reactions: SlingBlader
A few words of advice (I have, uh, a few, lathes....)

Cut or split those logs in half lengthways before they start drying, or they crack. If your town has "scrap paint exchange" at the transfer station, pick up some free latex paint and dip or paint the end grain. You can also use wax, but that costs money. And cut the blanks 2-4" longer than the diameter of the log (this is ALL crack/check control.)

You can turn the bowls utterly green. If you haven't turned utterly green, it's a whole different thing, and you should try it. Of course the bowls end up oval, but that can be a feature... put them in brown paper grocery bags after turning (or rough-turning, if you want them round in the end - make them about an inch thick and you can usually manage to get a round bowl after the inch-thick bowl dries a lot faster than a log and becomes oval.) The brown bags usually work to slow the drying enough to not crack, and not turn into a mass of mold like a plastic bag would.

Then there's microwaving (don't use your wife's) or boiling the roughed bowls (toss in some strings if you like?) which can also speed drying and reduce cracking at the same time (heat can be good, if it's damp heat.)

My preferred "mallet" form is more like a froe club - or a wooden wine/beer bottle, if that helps to envision it. Simple "turn from firewood" project, and if it ever breaks, put it in the fire. This is a large one & is used hard, I have others I treat nicer. On my computer it looks like it at least showed the picture, but it added a white line. I uploaded to "media" rather than trying to load the picture directly, since that did not work for me multiple times earlier.

Go for two - a nice one. Smaller, slightly different approach to the handle. Both were firewood before they got "elevated."
Thanks for the tips! :thumbsup:

Oh yeah, I made a mallet like that first. I’ve even used it! :cool:
 
This short scale 6 string piccolo is officially off the bench and is going to a new home as a gift today. :) This came out really nicely, but working with the ziricote was a chore as usual.

View attachment 4010751

View attachment 4010752

View attachment 4010753

View attachment 4010754
Yeah, that thing is beautiful! Who ever that goes to is gonna be answering a lot of questions about where it came from, because everyone is gonna love it.

I’ve heard ziricote is hard to work with, so I too was curious how you achieved the arm contour. Stunning work!
 
Freaking gorgeous! I love Ziricote. I just haven't found some I can afford. Fine work. I love the headstock rear face. If I do that it's to cover a mistake. Alder body and Bolivian rosewood fretboard? What, no tort on that bass!
Exceptional finish work, the new owner will be very happy.

Thank you. Haha! Yeah, I totally get what you're saying about covering mistakes! In this case, though, I actually planned for it and cut the headstock to a shallow depth to accommodate it. The body is cherry and the fretboard is Madagascar rosewood. :)
 
Yeah, that thing is beautiful! Who ever that goes to is gonna be answering a lot of questions about where it came from, because everyone is gonna love it.

I’ve heard ziricote is hard to work with, so I too was curious how you achieved the arm contour. Stunning work!

Thanks, Tim. I appreciate that. :) The forearm contour was a combination of kerfing on the back side, heat, moisture, vacuum bag and sweat. :D
 
  • Like
Reactions: TerribleTim68

Latest posts