• TalkBass has been independent since 1998. Add your voice.
    Create a free account to reply to discussions, view embedded media, and browse with fewer display ads.
    Join freeLog in
    Want zero display ads or expanded classifieds tools? Compare plans.

Winter 2017 Build Off - Speak of the Devil

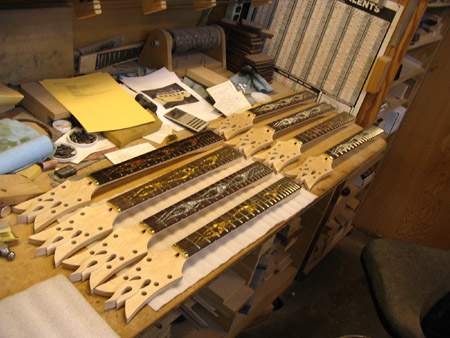
Creating those wild flame inlays in the fingerboards of the Rockit guitars was an R & D project by itself. The process was worked out by Rod MacKenzie, the founder/owner of Rockit Guitars.

Basically, he had the rosewood fingerboard blanks laser cut; the flame pattern was cut all the way through the rosewood. The flames were poured in like a casting, a mix of polyurethane resin, transparent dyes and sparkling metalflakes. It was a tricky process, and every one was different. We trashed a few before we got it all right. Some of them were gorgeous. The fingerboards came to me like that, with the flames cast in through the whole thickness. I routed the back surface flat, glued them on the necks, radiused, slotted, etc.

I believe that Rockit Guitars is now gone. I don't know if Rod is even still alive. There seems to be no mention of him on the net past 2009. The whole project ground to a halt in 2007 when Rod had some serious health problems, and the company had some serious financial problems. I hope he's okay. A very interesting and creative guy.

As far as I know only 25 of the Rockit guitars were ever built, all now in the hands of rock stars and collectors. They were sort of stupid ugly overall, but they really had some sophisticated engineering underneath. Another interesting project in my history. I built all the necks. I still have one of the early prototype necks here.

Here's a shot of 8 of the bare necks, ready to go to him.
IMG_1763D.jpg
 
Last edited:
I thought about rear mounting the tuners. We'll see. I'm a little concerned about the friction of the strings going through holes in the headstock, or even a slot.

You wouldn't want the strings to contact anything between the nut and the tuner.
I'm pretty sure @Bruce Johnson is talking about clearance holes. They can be any dimension that is slightly larger than the string path.
 
  • Like
Reactions: mapleglo
More excellent responses! Thanks. Yeah, those flame inlays would be difficult to say the least. I'll have to looking into how I might do them.

Regarding rear mounting the tuners, I went through how that might play out a few different ways, and each time, the strings were binding up against something. I'm not sure I want to attempt it.

In the mean time, I started slotting the fretboard.

2mrbot5.jpg


2ypn7k9.jpg


Now I need to stop by Home Depot for some more sand paper. I think I keep those guys in business...
 
So do you all think I need a longer truss rod?

2uzqah4.jpg


If i have headstock adjust, it only goes to the 19th fret. If it's body adjust, it ends up somewhere between the 1st and 2nd fret. I'm thinking about full length aluminum stiffening rods, one on each side, 1/4" x 1/2" (or 3/8").

This truss rod is shorter than the usual from BBG which is like 24". This one is like 22-3/4" or something. I got these shorter ones for the 33-1/4" scale necks, but since this one has 24 frets, i'm not sure.
 
So do you all think I need a longer truss rod?

If i have headstock adjust, it only goes to the 19th fret. If it's body adjust, it ends up somewhere between the 1st and 2nd fret. I'm thinking about full length aluminum stiffening rods, one on each side, 1/4" x 1/2" (or 3/8").

This truss rod is shorter than the usual from BBG which is like 24". This one is like 22-3/4" or something. I got these shorter ones for the 33-1/4" scale necks, but since this one has 24 frets, i'm not sure.

Either of those installations should be okay, as long as the neck isn't being cut too thin. If you keep it over 0.820" at the 1st (neck plus fingerboard, without frets), 0.950" @ 12th and 1.100" through the heel, it should be fine. To me, those are the safe zone numbers for a maple laminate neck. If you build thinner than that, particularly at the 12th, then you have to think about putting other reinforcements in.
 
  • Like
Reactions: mapleglo
You wouldn't want the strings to contact anything between the nut and the tuner.
I'm pretty sure @Bruce Johnson is talking about clearance holes. They can be any dimension that is slightly larger than the string path.

Actually, I disagree with that. You can have the string do an S-bend down through the headstock, on its way to the tuner. Use an aluminum or brass block with filed troughs to guide the strings down through the holes. Another one on the back to turn the strings into the tuners. As long as the troughs are smooth, no sharp edges, smooth bend radius, the string will rest in there and slide with no problem. I've even done a few wacko necks in the past, where the string ducks down into a piece of shaped brass tubing that is epoxied into the neck. The string comes out the other end on the headstock, aimed at the tuner.

On my Scroll Basses, I use a zero fret, and then a large aluminum nut (technically a string spacer block) to guide the strings down into the Scroll-style headstock. The inboard strings go over nearly a 60 degree bend as they turn down in and angle towards the center. The slots are filed with standard nut files, a little oversize. I use a B size file for the E string trough, for example. From the side view, the turning-down radius is about 1 1/2".

IMG_2468A.jpg
 
  • Like
Reactions: mapleglo
mapleglo, what saw are you using to cut the frets (in the above pic?) I have the Stew-mac one (looks different than the one in your picture) and I can't stand it. Been looking for a different option with the correct kerf, but haven't been able to find it.

I'm using theInvalid Link Removed.

ae14ib.jpg


I have to get a new one I think. The teeth on this one have hit the metal frame of my miter box once too often, and the teeth are getting dull. I guess I have to fix the miter box as well, to prevent the teeth of the saw from hitting the metal frame. When it was sharp, it worked great.


Actually, I disagree with that. You can have the string do an S-bend down through the headstock, on its way to the tuner. Use an aluminum or brass block with filed troughs to guide the strings down through the holes. Another one on the back to turn the strings into the tuners. As long as the troughs are smooth, no sharp edges, smooth bend radius, the string will rest in there and slide with no problem. I've even done a few wacko necks in the past, where the string ducks down into a piece of shaped brass tubing that is epoxied into the neck. The string comes out the other end on the headstock, aimed at the tuner.

On my Scroll Basses, I use a zero fret, and then a large aluminum nut (technically a string spacer block) to guide the strings down into the Scroll-style headstock. The inboard strings go over nearly a 60 degree bend as they turn down in and angle towards the center. The slots are filed with standard nut files, a little oversize. I use a B size file for the E string trough, for example. From the side view, the turning-down radius is about 1 1/2".

View attachment 1019904

Ok, that makes sense. Perhaps the rear mounted tuners will work after all. I'll have to give this some more thought.
 
  • Like
Reactions: rwkeating
I'm using theInvalid Link Removed.

ae14ib.jpg


I have to get a new one I think. The teeth on this one have hit the metal frame of my miter box once too often, and the teeth are getting dull. I guess I have to fix the miter box as well, to prevent the teeth of the saw from hitting the metal frame. When it was sharp, it worked great.


Ok, that makes sense. Perhaps the rear mounted tuners will work after all. I'll have to give this some more thought.

And I thought it was a Ginsu
 
The "medallion" on the wall behind the couch is a triple moon. It's an old pagan symbol that represents the Goddess. I made that about 20 years ago, and it's been up on my wall ever since. It kind of grew on me.

2vjeut3.jpg


And now that you mention it, it does bear a striking resemblance to the devil bass. I did some more sanding.

25exu1z.jpg


It's getting close. But sanding out those "F" holes is going to be a challenge.

Okay, my only idea to contribute is this:

Keep the headstock design the way it is, and use the triple moon symbol as a headstock inlay (or nameplate etching, if you have a TRC adjustment cavity there).

Really I just think it would be cool to incorporate it somewhere into the design.
 
Okay, my only idea to contribute is this:

Keep the headstock design the way it is, and use the triple moon symbol as a headstock inlay (or nameplate etching, if you have a TRC adjustment cavity there).

Really I just think it would be cool to incorporate it somewhere into the design.

I was actually thinking about using a goat head for the headstock inlay. Something like this:

2r23aec.jpg


But the triple moon would work as well. That might also work well for the 12th fret inlay.
 
had the rosewood fingerboard blanks laser cut; the flame pattern was cut all the way through the rosewood.
@mapleglo .... there are 4 of those laser cutters where I build (TechShop). Like I have said before you should come and check it out. With your combination of technology and woodworking skills I think you would dig it

Or if you just want to cut that goat head plate, bring down the file and we could do that in about an hour

Edit: I have no ulterior motives for trying to push that facility on you... (I mean, sure... if you would happen to buy a membership, we would both get a free month if you list me as a referral);)
But that's beside the point....:)
 
Last edited:
@mapleglo .... there are 4 of those laser cutters where I build (TechShop). Like I have said before you should come and check it out. With your combination of technology and woodworking skills I think you would dig it

Or if you just want to cut that goat head plate, bring down the file and we could do that in about an hour

Very tempting. I rough cut the fretboard, so it's ready for inlays.

s470qo.jpg


Are you going to be around tomorrow? I have the day off.

I guess I ought to spend some time finalizing that flame pattern.
 
OK, some more ideas put to paper, or digital bits as the case may be. The body is pretty heavy, so I thought to rout out some chambers for weight. Since this is a one piece body, I'll have to do it from the top (or bottom). The original covered up the chambering with a pick guard. I thought I'd cover up the chambers with frosted plexi. And while I'm at it, why not fill the chambers with red flashing LED's.

34rc2fc.jpg


I also re-positioned the pickup.