I didn't like the concept of parallel stringers in the neck, I hope it will look good, but who knows
Looking good! Ive been wanting to try wedge stringers also. Wyn does them and it looks pretty good


TalkBass has been independent since 1998. Add your voice.
Create a free account to reply to discussions, view embedded media, and browse with fewer display ads.
Join free Log in
Want zero display ads or expanded classifieds tools? Compare plans.
I didn't like the concept of parallel stringers in the neck, I hope it will look good, but who knows


I didn't like the concept of parallel stringers in the neck, I hope it will look good, but who knows





View attachment 2920137 I've had success bending maple by wrapping it in a thick layer of damp paper towels (4 or 5 layers) and putting it in the microwave for a minute. You have to work quick to bend it and I recommend using blocks and clamps to help push it into shape.

Might even work a little better if the wood is soaked for a while prior to microwaving.View attachment 2920137 I've had success bending maple by wrapping it in a thick layer of damp paper towels (4 or 5 layers) and putting it in the microwave for a minute. You have to work quick to bend it and I recommend using blocks and clamps to help push it into shape.


Wedged stringers look aesthetically better. If I don't used one piece for a neck I have always wedged the layers to give proportionate widths through the whole neck from the bottom of the body to the headstock, like these.Looking good! Ive been wanting to try wedge stringers also. Wyn does them and it looks pretty good
View attachment 2887760
Have to sleep on it, before moving on
what I found important here, was:
Good save!I got it figured out, what happened is not that I tilted my router, actually when I looked at the piece that I cut out with the jig saw, I've noticed, that the blade got skewed while I was cutting out the curve. I probably should have done some relieve cuts to avoid it, which I didn't. Anyway, I decided to plane down that surface to have a nice square side and found a pretty good match out of the headstock scrap. Checked everything for fit and square and glued it on.
View attachment 2922688
View attachment 2922689
View attachment 2922691
View attachment 2922692
View attachment 2922693
Clamping this down is actually pretty tricky due to all the curves, but it holds
1. to take as little off as possible while flattening the surface, so I don't reach the tuner hole. It would be a nightmare to redrilled this.
2. To go with a long piece and not a small patch, to avoid visible glue lines. Hiding them in the endgrain is easier.
3. To match the grain direction and color - if possible both. The patch will be only visible from the back, but it should reflect light the same way to look the best.
Next is reshaping the headstock when it dries.
I thinned a piece of the maple cup from 6mm to 3mm at the end that I was going to bend, then placed it in the improvised steam box for about an hour. It actually got pretty flexible, but still, the piece cracked while bending - that's the bad part. The bad news also is, I didn't have enough of it left to repeat the process on another part. What I think is worth mentioning, and I actually paid attention to it later on is, the maple was quartersawn. A flatsawn piece would probably bend much more easily. I decided to go with it anyway and I believe I can fit the broken piece in without any noticeable gap. So fixing errors continues. Here is where I am right now:
Trials and tribulations.....Very impressed with your problem solving skills....The saving of the headstock went pretty well, it was actually a pretty easy fix. Once the glue dried, I trimmed the excess wood and rerouted the shape. I did correct it a bit, adding some more shoulder to the top. The tuners fit in well and the fix blends in fairly well (the grain pattern is pretty wild and you can tell it is different pieces anyway). It shouldn't be much visible in the final bass.
View attachment 2928282
View attachment 2928283
View attachment 2928284
Now I went on to cutting the headstock to depth. I measure the thickness to 12mm, so I could have around 13-13.5mm after flattening it and adding the maple cap. This time I knew better what I was doing with the Japanese saws and the cut went pretty well. I scored the headstock around and It was easy to cut the rest, having that grooves on the sides. I know, it still looks scary, right?
View attachment 2928287
View attachment 2928288
Then I went on with planing it down, shaping the transition and sanding it to shape. Sanding Bodo is as tricky as planing Bodo. I noticed it is very easy to sand in a dip, depending on the grain in a particular spot. The best so far was approaching it with chisels. Also sanding the neck sides left a lot of feathered tear-outs, and I think I will chisel out the final neck shape instead of using other tools. Will see how it takes a Shinto rasp though.
View attachment 2928289
I did some measuring and trimmed of the neck end to size, then rechecked with the plans. I'm planning to mount set=in the neck deep into the body and hide the heel under the maple cup. It will not be replaceable but on the other hand, who would replace a neck on a neck through or set in any way..
View attachment 2928285
By the way,
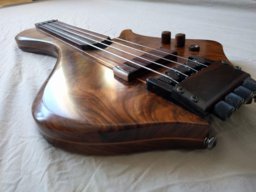
the bridge is an ETS bridge with a 19mm spacing, which I got from Maruszczyk Basses. He sells them a few Euro cheaper, probably due to the branding, which I don't mind at all. Was a free shipping in EU also. It's a nice and heavy piece of gear. Here is a closeup:
View attachment 2928286
I haven't really decided on the pickups yet, which... depend on the fretboard. I planned to use a piece of walnut but checked the Janka scale and walnut looks to be too soft for that, unless it would be a fretless with an epoxy coat. And that would be option number 1. For that, I would then rather go with a single pickup under the wooden cover. I was going fretted, I should replace the fretboard, with something other and I don't think I have a suitable piece of wood at hand. I would then rather mount two humbucking pickups with a preamp into the bass. So I'm currently spinning my head around those ideas. Anyway, here is the piece of walnut fretboard over the neck and the maple cup for the headstock, both treated with a bit of naphtha to see the figure and colour better:
View attachment 2928290
Fretless or not, I moved on to the steam bending of the maple cap to follow the headstock curve. All in all, the process was a disaster so far, but nothing that can be fixed
View attachment 2928291
If it looks familiar, it is a well known Chinese design
View attachment 2928292
View attachment 2928293
View attachment 2928294
So the piece actually does follow the curve pretty well, there are no gaps between the wood, it is thicker on the rest of the headstock and will need some planing down once dry. Tomorrow I will attempt to fix and glue in the broken off piece. I might decide to trim and fit them with a new crisp line, or just slide them back together and mask any cavities with wood filler or dust and epoxy. I have to see how it fits first. That's what you get with a Walnut Karma Bass
I bet you wanna see the broken off piece too, yeah I knew it, here it is :
View attachment 2928295


