• TalkBass has been independent since 1998. Add your voice.
    Create a free account to reply to discussions, view embedded media, and browse with fewer display ads.
    Join freeLog in
    Want zero display ads or expanded classifieds tools? Compare plans.

Winter Build Off 2023- JazzRunner

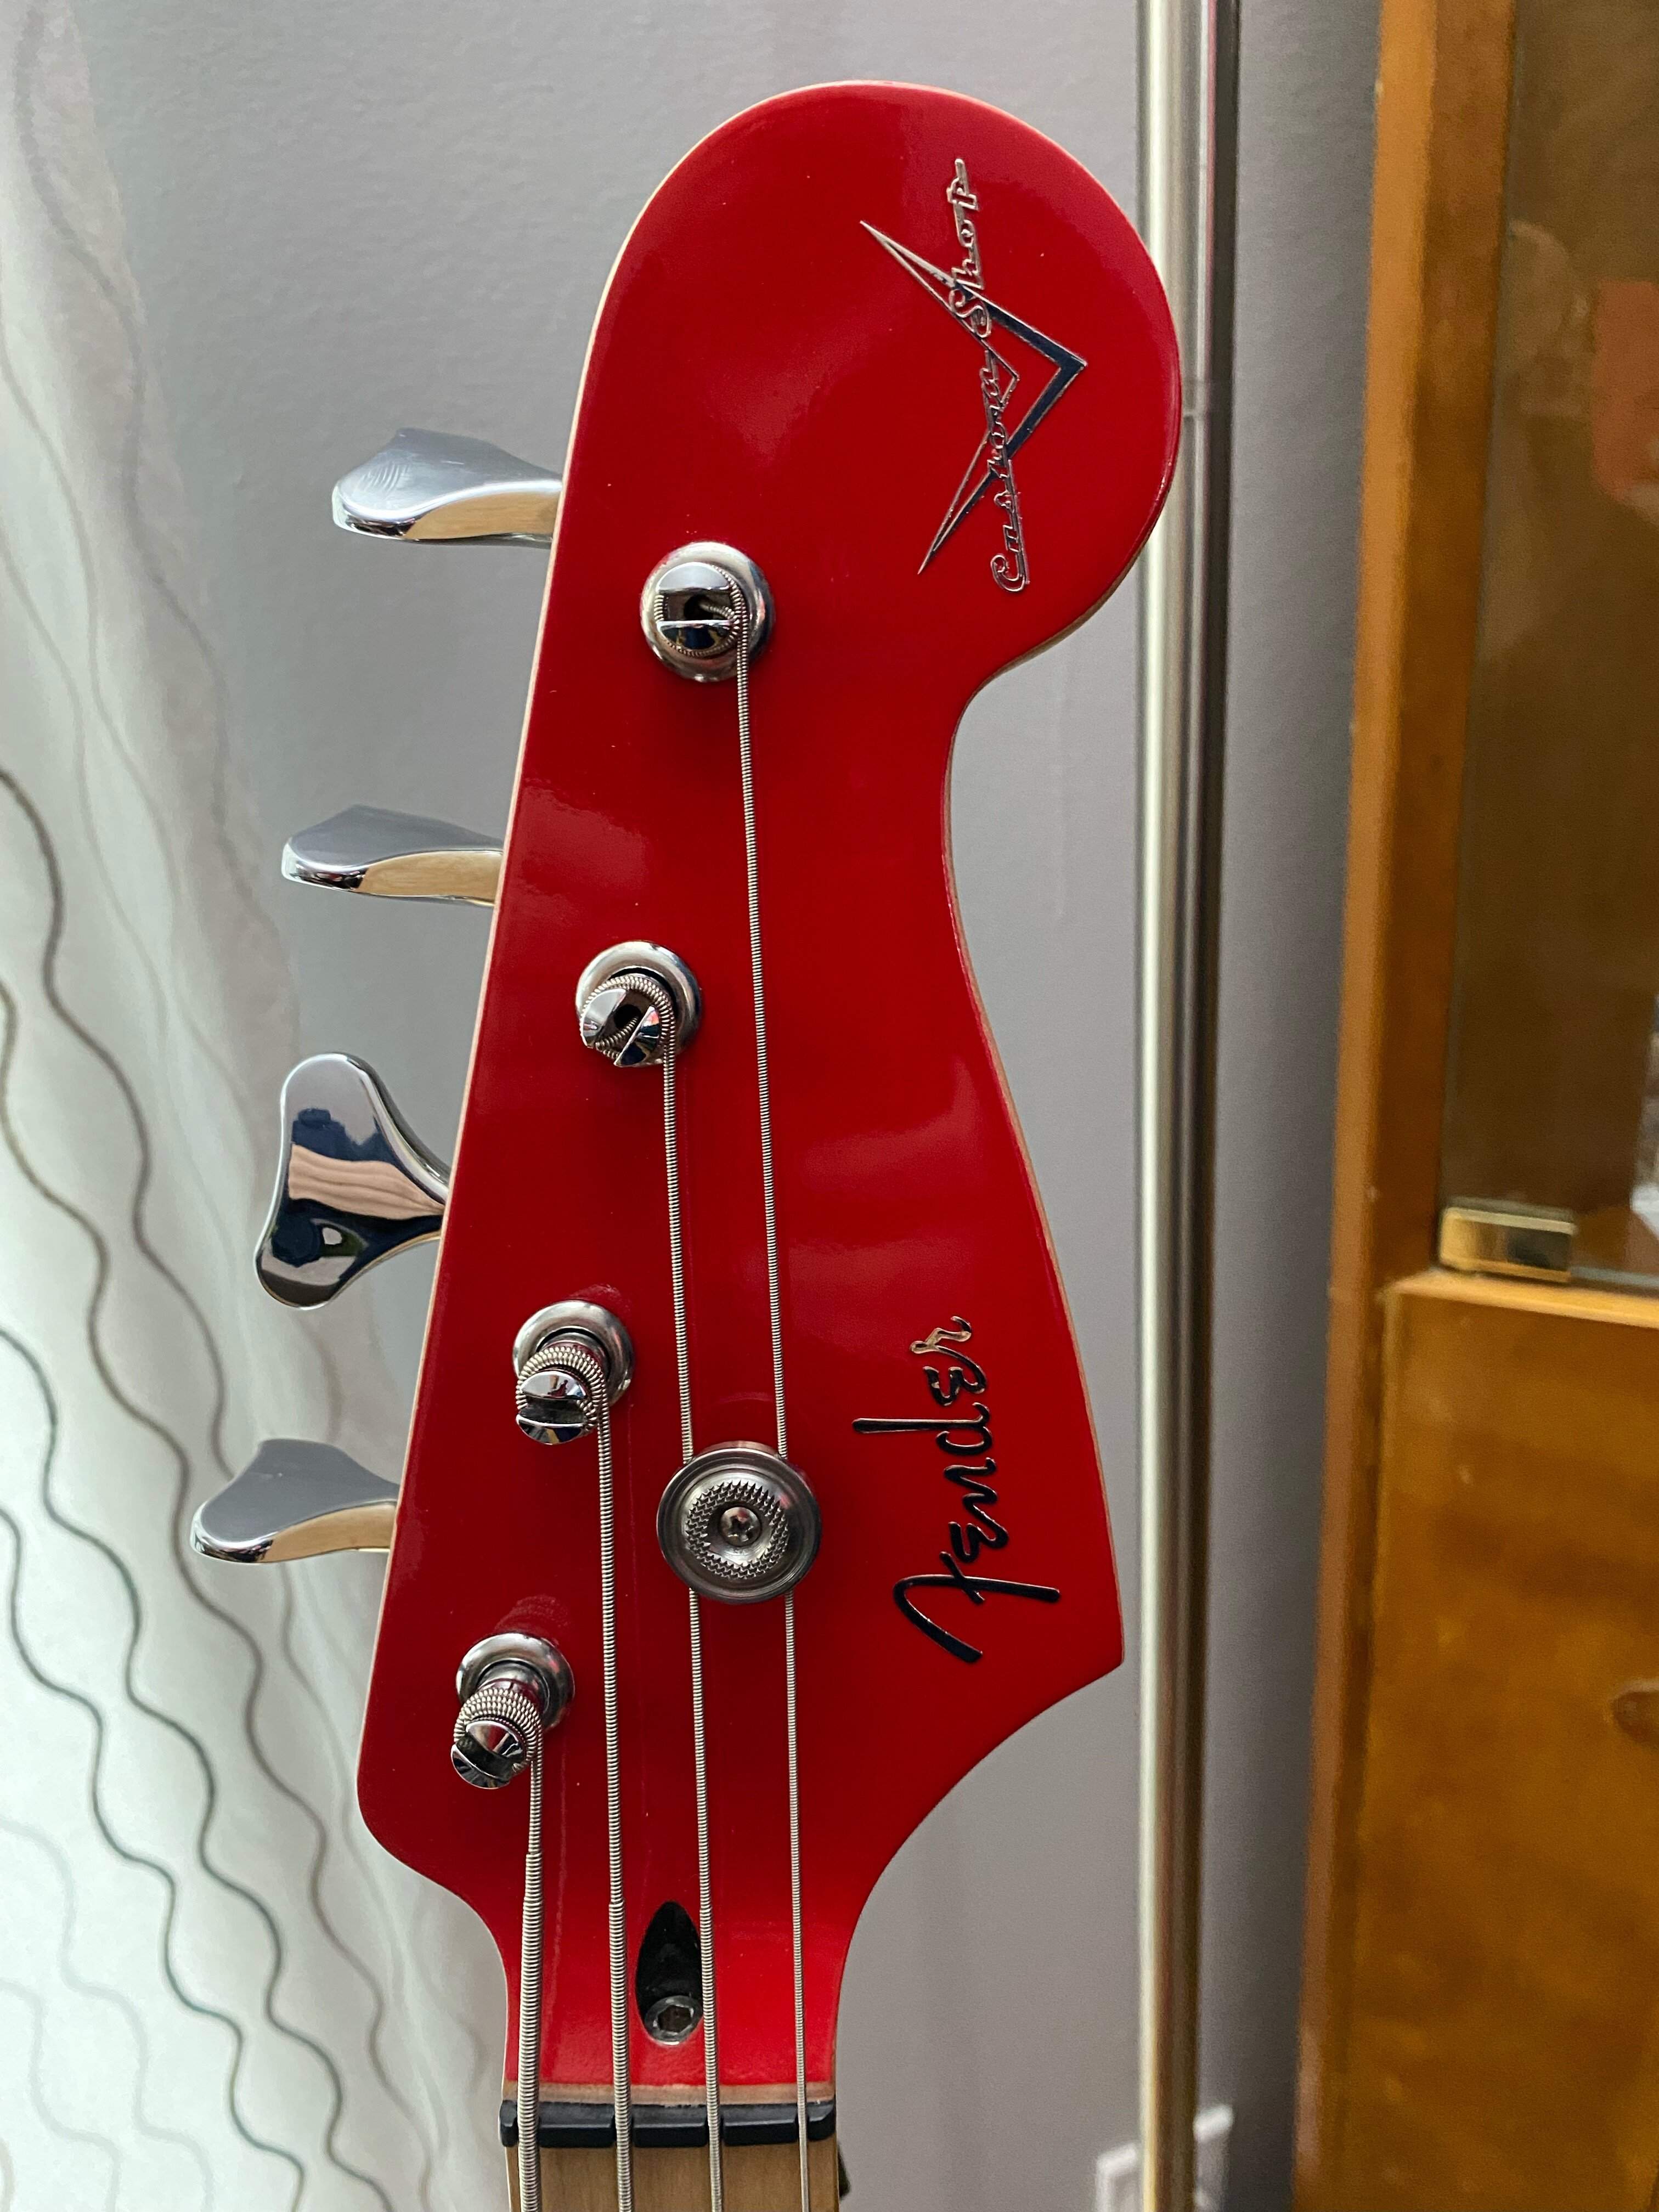
Layed down a bunch more layers of clear and wetsand, really surprised how fast it dries.... I had to gently sand the paint and poly out of the peg holes but got bushings installed without damaging the my work. phew...
Nut is not glued in yet ,but does sit very firmly in the slot. I will have to adjust the slots for the labella strings eventually. I love the way the red and freshing turned and hand checkered string tree pOP!
IMG_1238.jpeg


So now neck is more or less done, I will be wiping on more coats tung oil twice a day as I work on other stuff.
 
I’m not sure if the string tree is nerdy but it’s very cool.

That's from the Age Of Mechanical Nerds. Before computers or calculators. When Nerds hunched in their garages and basements, over oily iron machines. And made beautiful, crazy metal things. Things that would usually go fast, make loud noise, and sometimes explode. I come from that era. And never left.

Bass-Babe obviously has some of that spirit in her too.
 
That's from the Age Of Mechanical Nerds. Before computers or calculators. When Nerds hunched in their garages and basements, over oily iron machines. And made beautiful, crazy metal things. Things that would usually go fast, make loud noise, and sometimes explode. I come from that era. And never left.

Bass-Babe obviously has some of that spirit in her too.


Oh, me too! I remember some of the old motorcycle magazines showing you how to knurl your own pistons and things like that. Later most of the “tech articles” seemed to become “have an expert do this for you” and I haven’t followed any of those mags for a while.
 
That's from the Age Of Mechanical Nerds. Before computers or calculators. When Nerds hunched in their garages and basements, over oily iron machines. And made beautiful, crazy metal things. Things that would usually go fast, make loud noise, and sometimes explode. I come from that era. And never left.

Bass-Babe obviously has some of that spirit in her too.
RC stuff check, tons of airgun parts came off my little machine.
lathe.jpg
 
RC stuff check, tons of airgun parts came off my little machine.
View attachment 4972168

Hah! I fully appreciate the humor in that drawing. I have several old turret lathes here, including a very rare 1907 Bardons & Oliver #0 lathe. I use a '70's Logan turret lathe to make up most of my musical instrument parts.

I did a little bit of gunsmithing back in the '90's, when I had a nice salaried job. That's some serious Mechanical Nerd fun. But it's a very expensive hobby! I still own some guns, but I can't afford to go shooting much these days. I've never messed with airguns, but they sound interesting. A more reasonable way to enjoy shooting sports. And being a Nerd.

Do you come from a background of woodworking, machine shop, engineering?
 
Last edited:
  • Like
Reactions: Matt Liebenau
That's from the Age Of Mechanical Nerds. Before computers or calculators. When Nerds hunched in their garages and basements, over oily iron machines. And made beautiful, crazy metal things. Things that would usually go fast, make loud noise, and sometimes explode. I come from that era. And never left.

Bass-Babe obviously has some of that spirit in her too.
The Nevil Shute novel "Trustee From The Toolroom" is a cool glimpse into the mechanical nerd era.
 
  • Like
Reactions: Bass-Babe
My trusty ryobi compact router with a 12x12 plexi base I diy 'd for it. Makes it much more stable when routing a body and doubles as mini router table whe needed.The micro adjust works very well on it.
IMG_1261.jpeg


After some carefully measuring I mapped out the routing. Main cavity was enlarged by about ½ inch ish. Just to give the jbass pup room to mount. The nick in the top left corner was where stopped after getting annoyed at the nick and made the plexi base out of some scrap I had.
IMG_1112.png

I had made a plexi control panel to make it easier for laying out the controls. Going to be a very compact fit. 4cm on center.
IMG_1161.jpeg
realized I need to carve out the control pnel a touch. to make room for the doublestacked tone/switch .


I decided to use a dremel and sanding drum.Previous owner had copper shielded control section previous to me buying the bronco. I'll fix that when I do the rest , but now controls will fit. IMG_1150.jpeg
IMG_1154.png Copper tape to the rescue
.IMG_1133.png
 

Attachments

  • IMG_1262.jpeg
    IMG_1262.jpeg
    1.4 MB · Views: 36
  • IMG_1112.jpeg
    IMG_1112.jpeg
    694.3 KB · Views: 38
Last edited:
next up before I can do the pickup route I had to copy my acrylic neck pickup template and stretch the copy to fit a Jbass bridge pickup which is 4 mm wider between the mounting screws. I used a my bench a bunch of clamps my trusty blue pencil and laid out the lines and very carfully routed the first half and then shifted the plexi template over for the second half. Took me two trys to get a perfect one. Phew. cheap mdf to the rescue.
IMG_1270.jpeg
Next I lined up the mdf template with the pickup in it to line it up with layout lines etc Then drilled one by one the moumted holes for the pickup securing it to the surface. Now I can remove the template apply double side foam tape and secure back around bridge pickup line it up with previous markings. Grab the router with a ⅜ top bearing flush trim bit and get it done. I go back over it after with a very fragile and expensive ¼ top bearing flush trim bit(40$) that way all the corners get the right radius as ⅜ is too big for outside corners.
Came out prefect! IMG_1111.jpeg , next cross drill the hole for the pickup wire and shielding wire IMG_1215.jpeg.
Get the tape out again shield the new cavity of course. IMG_1114.jpeg. Phewdone. I soldered a piece of copper tape to a ground wire that will go through the same hole as the pickup wire and solder a piece of tape to other end . Now the bridge cavity is grounded to the main cavity shielding.IMG_1216.jpeg.
Next up mount the pickguard and neck template on the masking tape for the foam tape to stick to ,(avoid 30 min wasting time picking tape off after..
neck rout.jpg . Phew got that done then mount the neck pick up. Your can see the soldered ground tape connections as well.
IMG_1275.jpeg .neck pup.jpeg a good fit and sneek peak at the thumbrest I made for this.
So here is control panel wiring it was a mess but working on the clear panel template. So I spent sometime shortening and re routing each wire one by one until it tidy ish. Then transferred it over to the final panel.

The before control panel before.jpeg The aftercontrol panel wiring.jpeg and it is tight fit...
 

Attachments

  • bridge rout.png
    bridge rout.png
    2.6 MB · Views: 49
  • IMG_1112.png
    IMG_1112.png
    11.6 MB · Views: 43
  • IMG_1279.jpeg
    IMG_1279.jpeg
    433.6 KB · Views: 43
  • IMG_1281.JPG
    IMG_1281.JPG
    150.3 KB · Views: 44
  • neck fit.jpg
    neck fit.jpg
    75.3 KB · Views: 44
Here is parts list for this build.
2019 mint Bronco bass -used sourced from craigslist for 100$
Headstock has misaligned string tree(fixed)

G.M. Guitar madness double stacked cois low noise jazz bass pickups set. 30$ ebay
daddario ellipitcal endpins amazon 10$
Grey pearl pickguard blank 30$ amazon
⅜ mdf to make my design custom two piece pickguard template- from my wood scrap bin
Thumb rest made from pickguard scrap and plexiglass chemically welded together.
1/4inch bearing trim flush router bit 40$ amazon.
Labella 760FL-s dtf string 45$ (strings by mail)
Pre loaded jazzbazz plate with series parallel switch etc 17$ ebay but had to completely rewired as it was wrong.It came with knobs That I will modify on my lathe as I hated the chrome button top look.
ebay.ca.jpg obviously the plate will not be used.
Copper tape 15$ amazon.ca
Krylon red gloss and krylon clear gloss for headstock.
Laser cut metal headstock decal from etsy (leftover from other project unused)
Circa 1850 real pure tung oil for neck and fretboard.
Graphtech nut PT-1205-00 42mm nut -string spacing perfect for bronco nut just needed shortening.
String tree stainless steel custom made on my unimat db vintage lathe and hand checkered with files.

More to come as I think about one last nerdy addition.
 
Last edited:
One of the main objectives of this build was to make sure it was quiet, no hum no buzz based upon these G.M. low noise bladed pickups I found . I was hoping they are actually quiet and sound decent but you never know with fleabay. Anyhow I have tested the pickups now and they are indeed extremely quite in both series and parallel.EXCEPT one thing , if you touch the blade it buzzes because it is not grounded and us humans are electrified. So I took decased one pickup to see what I could do.IMG_1301.jpeg.
Pickup is already internally shielded around the coil.The magnet is however very bonded and not coming off. So plan B . Check to see if magnet is conductive. If I ground the magnet does the buzzing stop/decrease , it does.
I'm guessing whatever bonding glue they used was a conductive version on purpose or maybe chance, either way it's plus.
So put pickup back together and decided and wrap bottom half and sides with copper tape , add a grounding pigtail soldered to tape.IMG_1303.jpeg IMG_1306.jpeg
IMG_1310.jpeg

Shiny now. Note I had routed out the original pickup cavity to accomodate the jbass neck pup length , when I did it I gave it enough extra room just in case I want to change the pickup to something else. It is an easy job to make a second pickguard from my 3/8 mdf template I made earlie that could be routed for a different shape pickup down the road.
Rinse and RepeatIMG_1309.jpeg now the bridge is done.
Now it's as close to grounded blades as I could get. Now it is shiny and Quiet. So quiet you can't even tell if it's plugged in or not , even in the 30yr old fender bxr60 combo. Don't need to roll tone off for any hiss etc.
Success!
 

Attachments

  • IMG_1304.jpeg
    IMG_1304.jpeg
    730.3 KB · Views: 31
  • IMG_1305.jpeg
    IMG_1305.jpeg
    662.2 KB · Views: 26
  • IMG_1307.jpeg
    IMG_1307.jpeg
    604.8 KB · Views: 27
  • IMG_1308.jpeg
    IMG_1308.jpeg
    862.2 KB · Views: 30
Last edited:
I like being able to use my lathe for something new, since I did the string tree string tree.jpg I wanted to add something else .The knobs that came with the "donor" plate I bought online are butt ugly , but came with vol/vol/push/pull series/para+ tone controls for 17$ a bargain control plate.jpg
. Anyhow I decided to chuck them in my lathe and reshape the heads removing the grooves etc.
chucked.jpeg
In the end some shaping with micro files and then wetsand 600 grit as I wanted swirly lines like a cats eye vs a fully polished orb.
The hard part is that they were chromed aluminum so there is copper layer underneath the chrome layer to attach too. So you have to cut through both chrome and copper then to base aluminum before you can smooth them . I hit them with a touch aluminum blueing and polishing most off with 0000 steel wool.
cateye.jpeg

Did the other two as well , looking for a slightly worn retro vintage vibe??
knobs.jpeg
 

Attachments

  • knob.jpeg
    knob.jpeg
    377.8 KB · Views: 30
Last edited:

Latest posts



