• TalkBass has been independent since 1998. Add your voice.
    Create a free account to reply to discussions, view embedded media, and browse with fewer display ads.
    Join freeLog in
    Want zero display ads or expanded classifieds tools? Compare plans.

Winter Build Off 2025 - Xena Twins

Jan 19, 2016
102
288
CA
I'm in, simply couldn't pass on the theme :)

History. I've started working on a P bass for SBO 2024. https://www.talkbass.com/threads/summer-build-off-2024-xena.1656026/ Project continued at a slow pace, despite me not sharing status updates. At some point I've decided to do similar build to try to improve improve processes and fix mistakes.

I'm doing partial build of 2 basses:
- Subject 1 consists of partially shaped and fretted neck, rough sanded body.
- Subject 2 has passed through the neck and body blanks glue up.

The plan:
- P bass. 4 strings
- "malicious compliance" ~ 34" scale. Slight changes in Subject 2 to make 34" a center line scale.
- Continued Brucification. Avoid Bruceblock issues in Subject 2. Simplify Brucebars.
- Switch to non-reverse headstock (because E sring winding la bella flats is shorter. fml)
- Minor body shape tweaks.


twin1.jpg
 
The winding length should not make a difference in the headstock (if the winding gets to the nut you're good) so is the core length in silks after the winding actually shorter?

You are correct. Poor wording. The change is due to purely esthetic reasons. My original plan was to go with dunlop flats w/o silks. Realization that I've never tried "the reference" flats multiplied by marketing trickery (sale) made me change my mind.

I've relied on used dingwall strings for a dry fit. I guess they are to remain on Subject 1 until the very late stage of the project.
 
Subject 1. Finish sanded and sealed neck and body. I've started using Ken Parker epoxy rubbing in method just recently and like results a lot.
Sand up to 320 or 600. Wipe on west systems epoxy. I sand cured epoxy at 600 right away as finish layer is very thin. I had luck with touch ups using the method. First layer seems to be easy to blend in.

At this point I'm inclined to keep neck with one or two more coats of wiped on epoxy. Body will get at least one coat of tinted epoxy on the sides to hide greenish poplar.

twin2.jpg

I'm using a variation of the facet method for neck carving. The difference is that I start with 3d model of the neck. End choose facets to carve based on the model vs dividing in half. Technically, profiles are modeled as Bezier curves which makes the facet selection straightforward.

One observation. I've roughed in the modeled profile (4 guiding pieces of plywood in photo), and then switched to adjusting shape by feel. I've made all changes without referring back to the model. To my surprise I've ended up with a noticeable asymmetric profile with neck thickness center moving towards high strings at heel. AFAIK asymmetric profiles are often cut with thickness center moving toward low strings at the heel. Abasi guitars is the only exception I'm aware of. We are yet to see if I'm to enjoy the result long term.


Subject 2. No progress made. Neck scarf joint is next on my todo list.
 
I'm using a variation of the facet method for neck carving. The difference is that I start with 3d model of the neck. End choose facets to carve based on the model vs dividing in half. Technically, profiles are modeled as Bezier curves which makes the facet selection straightforward.

This actually IS the facet method :thumbsup: . I do the same thing by making profile drawings for the 3rd and 12th fret, then measuring carefully and transferring those points to the neck. I know you see a lot of folks simply dividing everything by 2, but that doesn't get you to a specific curve that you may want.

Nice work! :)
 
  • Like
Reactions: joover
It's been a while since last update.

My main challenge with bolt on bass builds is lack of repeatability. I'm not good enough to eyeballing final neck/body/bridge alignment after building body and neck separately. I get a feeling that approach that involves alignment with straightedges along the neck and/or neck pocket template tends to further exacerbate errors.
In an attempt to improve, I've decided to build around aligning templates and parts with pins.

The Alignment Strategy:
- I use 5/32" fretboard markers at high strings (vs center of the neck). Markers also double as alignment pins between neck shaft and the fretboard. Template below has 3 "marker" pins.
- To reduce potential error from the fact that all "marker" pins are on the same line, i also add a few 1/16" holes under frets. 1/16" pins (or smaller) should come in handy to align slotted fretboard to the template (exact process is still TBD)
- Body and Neck use 2 * 3/8" pins (likely aluminum) in the neck pocket to preserve alignment during and after construction.
- To further reduce error (bad at eyeballing, again) I use drill bushings installed in templates to drill holes.

Neck:
twin5.jpg

- Laser cut template wider than neck block
- Align template center line with desired neck center line
- Cut template and neck block to establish a surface equidistant from the center line. I use template as a guide against table saw fence to get straight line. This surface is used to reattach template if needed and as a reference for the router edge guide while cutting truss rod channel.
- Cut and glue ears
- Thanks to the "malicious compliance" multiscale, my headstock is at an angle. I plane desired angle using the neck template as a reference.
- Glue headstock plate.
- Establish nut line and neck template position.
- Drill fretboard alignment (5/32" and 1/16") and neck mounting screw clearance (13/64") holes using template with drill bushings as a guide. At this stage I drill 13/64" screw clearance holes all the way though the blank.

Body:
twin6.jpg
- Attach top to the body blank with double sided tape.
- Attach center block template to the top.
- Drill aluminum bridge block alignment pin holes (3 * 1/4"), bridge mount clearance holes (many) and extra alignment pin holes at pickup position (because you should no longer care at this stage).
- I removed the drop top before proceeding with neck alignment as I wasn't confident that top is of consistent thickness. Template can be positioned back precisely, thanks to multiple alignment pins drilled earlier.

Neck + Body:
twin7.jpg

- Attach neck to the body. Align neck and body using 13/64 pins through neck screw clearance holes and body template.
- Drill two 3/8" holes for the neck/body alignment pins all the way from the neck template into the body. I plan pins to be 8-10mm deep in the pocket.
- Drill 4 * 13/64" holes through the body. The goal is to ensure they align perfectly with neck.

With alignment established I can work on neck and body independently. E.g. I don't need to have neck ready to establish bridge position.
 
Last edited:
I didn't post, yet I made some progress ;)

Here is what I have today:
- Internal cavities are routed
- off the shelf truss rod embedded in epoxy
- 1/6" x 3/8" (?) aluminum stiffening rods
- 4 individual brass brucebars (per-screw)
- aluminum bridge block

tw-8-1.jpg

Below is quick overview of the creative process in the reverse chronological order.

I've decided against multiple screws per bar this time around. The idea is to leverage clearance holes for alignment. I also find it easier to align existing holes in bars and neck vs attempting precise routing and drilling operations. Routing cavities for existing bars is straightforward.

tw-8-2.jpg


Perhaps the most interesting part of body preparation was the control cavity. My goal was to preserve full wood grain match for the lid. I've attempted the same on subject 1 using scroll saw. It's clear now that I can't cut to a line, as I've ended up with 2mm gap. I went with a template and router for subject 2. I've removed the wood down to 6mm and used 6.2 deg v groove bit with 1/32" tip diameter. It turns out 6.2/2 deg angle is hardly noticeable and I kept it as is. I've glued 0.7mm veneer to the lid border to reduce the gap. It's not a tight fit, yet everything looks fine.
Put removed wood back into the cavity. Remove the wood one more time, but keep the lip for lid to rest on.

tw-8-3.jpg


Just one 4-40 tap was lost to the aluminum block! And I have reasons to believe that next build may be completed without tap sacrifices.
It's commonly suggested to use drill press to start tap straight. The advice doesn't work for me with aluminum. I'd imaging tapping cheese with bacon would feel similar. Meanwhile tapping by hand is fine. wd-40 seems to do a better job than regular tap fluid.

tw-8-4.jpg

More soon-ish. I had first successful run of the mailicious-compliance-multiscale-fret-slot-sled contraption on a test piece today.
 
Last edited:
I've used a laser cut template to make fretboard for Subject 1. I engraved the cut line matching saw kerf width into the plywood deep enough for the saw to register. I think it worked ok. Precision seemed to be there (as much as I could measure multi scale fretboard with calipers). Yet it was an error prone manual process.

I've devised a multiscale-aware fret slotting sled for Subject 2. Below is first test fretboard cut using the jig.

tw-10-1.jpg

The idea is very straightforward: table saw, fret slotting blade and a cross cut sled. Instead single alignment pin at the edge I've used two pins to define cut line on a plane.

The process is not as fast as the single pin method. One needs to lift the template up off the pins and align with next pair of holes afterwards.

Blade side:
tw-10-2.jpg

Operator side:
tw-10-3.jpg

In case you wonder about precision, I had test pieces cut within less than 0.1mm width difference, measured at top and bottom of resulting pieces.

tw-10-4.jpg

In fact, setting the jig up wasn't that challenging:
- Lock blade between two templates accounting for blade kerf. Use another template to ensure correct relative hole positions. See picture above.
- Drill alignment pin holes in the sled.
- Make setup template. Cut the setup template. Measure after the cut. Adjust template. Repeat until satisfied.
- In my case initial alignment worked out pretty well. I had to turn template by <0.2deg and move by <0.15mm to get satisfactory results.

The fretboard slotting went smoothly. I spent more time cleaning burnt wenge off the blade than actual slotting.
tw-10-5.jpg
 
Subject 2.

Top glue up went ok. At the very last moment I've decided to use tightbond instead of epoxy in vacuum bag. I was concerned that epoxy may bleed through and thus make staining impossible. This glue up was the first time when I caught myself thinking that working with epoxy is in actually easier :)
As some might have already guessed, there not many options for water to evaporate in a vacuum bag. I left the bag over night. Some glue didn't harden. Bag lost pressure, some glue hardened. Luckily, cutting body to shape revealed that all gaps have closed up.


tw-11-2.jpg


Neck glue up also had a thrilling moment. Sorry, i forgot take a photo while panicking. I've noticed that fretboard is badly misaligned with neck shaft after taking my time to use as many clamps as I could fit in. Only one of 3 alignment pins was engaged. I had to unclamp, adjust, make sure pins are properly fitted and clamp everything up again. I keep telling myself that the fix was possible only thanks to epoxy.


As of today, neck and body are rough cut. Frets are in. I've used hide glue while putting in frets (inspired by Ted Woodford). I like the result. I've nipped ends of fret tangs on this build, and tbh regret doing it. There are 2 or 3 proud fret ends, which makes me think situation won't improve over time.

tw-11-3.jpg

Subject 1.

Neck is done. I'll probably remake the nut. Building one out of wenge seemed too fun enough to ignore at the time. It won't last, so I should make a bone nut.
I've made last minute change to go with gloss finish. I had no gloss polyurethane, so I decided to proceed with table top epoxy. Should have went shopping instead :) Epoxy is hard to sand, hard to apply level, it takes 24 hours to cure.

88 hours till deadline.
 
My submission to Winter Build Off 2025 in partial build category. Xena Twins

PXL_20250320_225707314.jpg

Update;

Twins, they look similar but they behave differently ;)

Similarities:
- Malicious compliance 34" scale (863mm +/- a few mm)
- Body shape inspired by Zeta Prism bass
- P pickup
- Controls: Anthony Jackson needs none!
- Gotoh hardware

Differences:
- Reverse headstock vs Revere-Reverse headstock
- Truss rod adjustment at heel vs nut
- African Mahogany + Poplar vs Maple + Cherry
- Rounds vs flats
- Chrome pickup cover vs nobody-had-chrome-p-in-classifieds cover
- Shiny strap buttons vs seated-only playing
 
Last edited:
A few overdue build progress photos.

Neck carving was fun. I just wish I had a few extra days to obsess over results, yet deadline was approaching.

tw-13-1.jpg

I've used blue resistor for added tone and sustain. Truth be told I was initially trying to find vintage military spec ones, but then decided to persuade modern tonal pallet.

tw-13-2.jpg

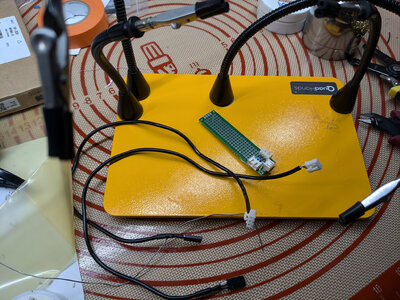
One of the pickups had dupont connector. The only appropriate response was to add jst connector at the opposite end! Note similar modern tone preference.
Personally I find connectors on pickups lame, I'd rather use connector at the "pot" end. Dupont connectors are loose fitting and have no lock.
tw-13-3.jpg

No finishing process photos. Sanding epoxy is no fun, I'll keep promising myself not to do it again ;(
I left maple bass unfinished for now. The original plan called for dark red stain. The change was spontaneous; the new plan calls for bleached (or white) maple against cherry. I have no idea how to execute on new plan yet.
 
Last edited:

Latest posts