• TalkBass has been independent since 1998. Add your voice.
    Create a free account to reply to discussions, view embedded media, and browse with fewer display ads.
    Join freeLog in
    Want zero display ads or expanded classifieds tools? Compare plans.

wooden bridge insanity (help designing)

so...........like I said............you ARE saying the opposite. Either the saddles HAVE TO float .....or.....they don't HAVE TO float. It can't be both.

Stop trying to be Mr. Know it all. Cause you aint. And you don't.
No matter what school you go to you can't have two opposites be true at the same time. Sorry.

Wow dude, remind me to never give you advice in the future. :rollno:
 
Thought I may as well change the subject as we have entered "The Scary Door" and it will save bumping up another old thread. So here we go.....can anyone tell me why the wooden bridge in the tutorial (in the how to section) is backwards? It has the bar where the strings would normally go through (and intonation screws) at the front (pickup side) instead of at the rear. Just wondering what the reason for this was, as I would like to use the tutorial but think it looks weird backwards.
 
Thought I may as well change the subject as we have entered "The Scary Door" and it will save bumping up another old thread. So here we go.....can anyone tell me why the wooden bridge in the tutorial (in the how to section) is backwards? It has the bar where the strings would normally go through (and intonation screws) at the front (pickup side) instead of at the rear. Just wondering what the reason for this was, as I would like to use the tutorial but think it looks weird backwards.

Are you referring to Mario's bridge tutorial? I see what you mean; it does look a little odd "backwards". It has the look of a Hipshot A-style, but the strings are anchored to the body, not the bridge. With Mario's design, if the bridge was oriented the other way, the strings would not have the proper break angle because they would contact the edge of the bridge before going down through the body. Just my two cents.
 
so...........like I said............you ARE saying the opposite. Either the saddles HAVE TO float .....or.....they don't HAVE TO float. It can't be both.

Stop trying to be Mr. Know it all. Cause you aint. And you don't.
No matter what school you go to you can't have two opposites be true at the same time. Sorry.

Maybe this will help.

SaddleFlowChart.jpg


A compensated saddle is usually stationary, but removable and made out of bone or something similar. Since it is removable, it can be replaced with a newly compensated saddle if your current setup (string gauge, action, tuning) does not fit your needs. The compensation on guitar is more drastic than the bass because it has both wound and unwound strings.

Hope that helps.

By the way, I don't know everything and I do not claim to, nor will anyone else at the LC. Take any advice you get with a grain of salt, but take it just the same.
 
Are you referring to Mario's bridge tutorial? I see what you mean; it does look a little odd "backwards". It has the look of a Hipshot A-style, but the strings are anchored to the body, not the bridge. With Mario's design, if the bridge was oriented the other way, the strings would not have the proper break angle because they would contact the edge of the bridge before going down through the body. Just my two cents.

Yes, thats the one. I think I get what you mean...so if it wasnt strung through the body and instead top loaded you could put it the right way round without the strings touching the edge? Or would the pull of the strings be too great on the wooden bar (where the ballends go)?
 
Maybe this will help.

SaddleFlowChart.jpg


A compensated saddle is usually stationary, but removable and made out of bone or something similar. Since it is removable, it can be replaced with a newly compensated saddle if your current setup (string gauge, action, tuning) does not fit your needs. The compensation on guitar is more drastic than the bass because it has both wound and unwound strings.

Hope that helps.

By the way, I don't know everything and I do not claim to, nor will anyone else at the LC. Take any advice you get with a grain of salt, but take it just the same.


Just as an interested observer I must say I admire your restraint sir,thanks for not lowering yourself!!
Just my personal non-expert observation,my old Gibson 56 LP junior only has it's smooth bar tailpiece as the bridge,no compensation at all.But those guitars are still very desirable and playable.Is the intonation perfect? Probably not,can I hear the imperfection? not at all (go ahead,tell me I don't have an ear for pitch!!LOL).My 64 Gibson SG also doesn't have a separate bridge but it does have compensating saddles cast into the top of the tailpiece,who knows what gauge strings it's designed for? it's possibly even designed for wound "G"strings.To be honest I'd never really worried about the difference.
I just bought a Carvin 5 string thru-neck (from 49sfine of TB)to build my first bass, and this thread has me thinking that I'll probably try and make my own bridge,Thanks everyone for all the helpfull info!!!
 
The bridge on the linked bass is also interesting...
Did babicz copy this principle you think, or did they just come up with something very similar a few years after the one in the link came about?(meant as genuine question and NOT as an inflamatory comment which some might read into it!)
Invalid Link Removed
 
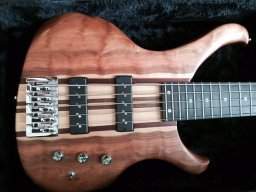
DSCF0279-1.jpg


IMG_0206.jpg


This is how I go about making them now, I have nice milling so making the saddles is a breeze. Fully adjustable, costs about 90 cents of aluminum and 4 cents each screw. Springs come from window hardware I bum at my dad's shop. Sure it takes a few hours to make but I love em
 
Very cool, T2W. It looks like the strings are anchored through the body. Do your bridges have a top-loading option? If the wood along the back edge was a little thicker, or reinforced with aluminum or something, then that could be a solution to Meatrus' question.
 
with the milling, Ill be able to use solid aluminum blocks and do my bridges the same way i did in the tutorial, with the channels for each string. That way Ill also be able to make the strings through body or top loading.

Yes the upside down L is a thumbrest, but also my logo, its a an L and a half T, for Tremblay, my name. both side by side it means Tremblay Lutherie.