

Enjoy the benefits of a premium membership!
Upgrade Account
-
TalkBass has been independent since 1998. Add your voice.
Create a free account to reply to discussions, view embedded media, and browse with fewer display ads.
Join free Log in
Want zero display ads or expanded classifieds tools? Compare plans.
You are using an out of date browser. It may not display this or other websites correctly.
You should upgrade or use an alternative browser.
You should upgrade or use an alternative browser.
Carbon fiber neck build
- Thread starter Jeroen914
- Start date
More options
Who Replied?

Carbon fibre neck?
Why?
I used to do a lot of archery and I enjoyed it a great deal.
Carbon Fibre arrows crack way to quick and are not easy to see, often leading to very painful hand injuries.
The thought of using a C.F for a bass neck unnerves me greatly.
I have never heard of a C.F neck used by any manufacture before. Can someone tell me who does?
Thanks
Clayton
The only person you need to talk to regarding this subject is the Godfather of the graphite neck, @GeoffGould who invented the CF/graphite neck and founded Modulus and continues to build basses to this day under his own name. I've owned 6 basses (still have 4) with CF necks and there is nothing unnerving about them. I still have great respect for wood necks, but once you play on CF you start to feel spoiled by how nice it is.
Last edited:

GeoffGould
Commercial User
I think this is fun! Enjoy the adventure!

@MPU ... I'm sure I could if I tried it, but something in my mind freaks me out about shaping a neck by hand
A local guy here teaches classes on neck making with hand tools. He made a neck for my baritone guitar conversion. He was done in about 2 hours. Of course he used to work for Santa Cruz guitars and can do it while sleeping. Unga Guitars


I know if I really put my mind to it, I could and I probably will, at some point...Oh come on, summon up your courage! Carving a neck from wood is probably the most enjoyable and satisfying part of being a Luthier. You should learn to do it.

And using facet method it's quite easy. For a plug you can use alder or something similar easy carving and sanding wood.Oh come on, summon up your courage! Carving a neck from wood is probably the most enjoyable and satisfying part of being a Luthier. You should learn to do it.
Plug must have some give so you can release the mold from it. Heel and headstock area of a ready made neck are problematic areas and need some shaping to have that give.
Started the mould of my MM neck...
First completely wrapped the neck in vinyl, so I'm sure it's safe and nothing will happen to it
Then stuck it to a board with some double sided tape and filled the edges to the board
Fat layer of spraywax after that
First layer of gelcoat is applied. It's tacking up nicely, so I'll add another coat in a couple of minutes and let it cure a bit more before adding reinforcements
I have honestly no idea how this will turn out... fingers x-ed

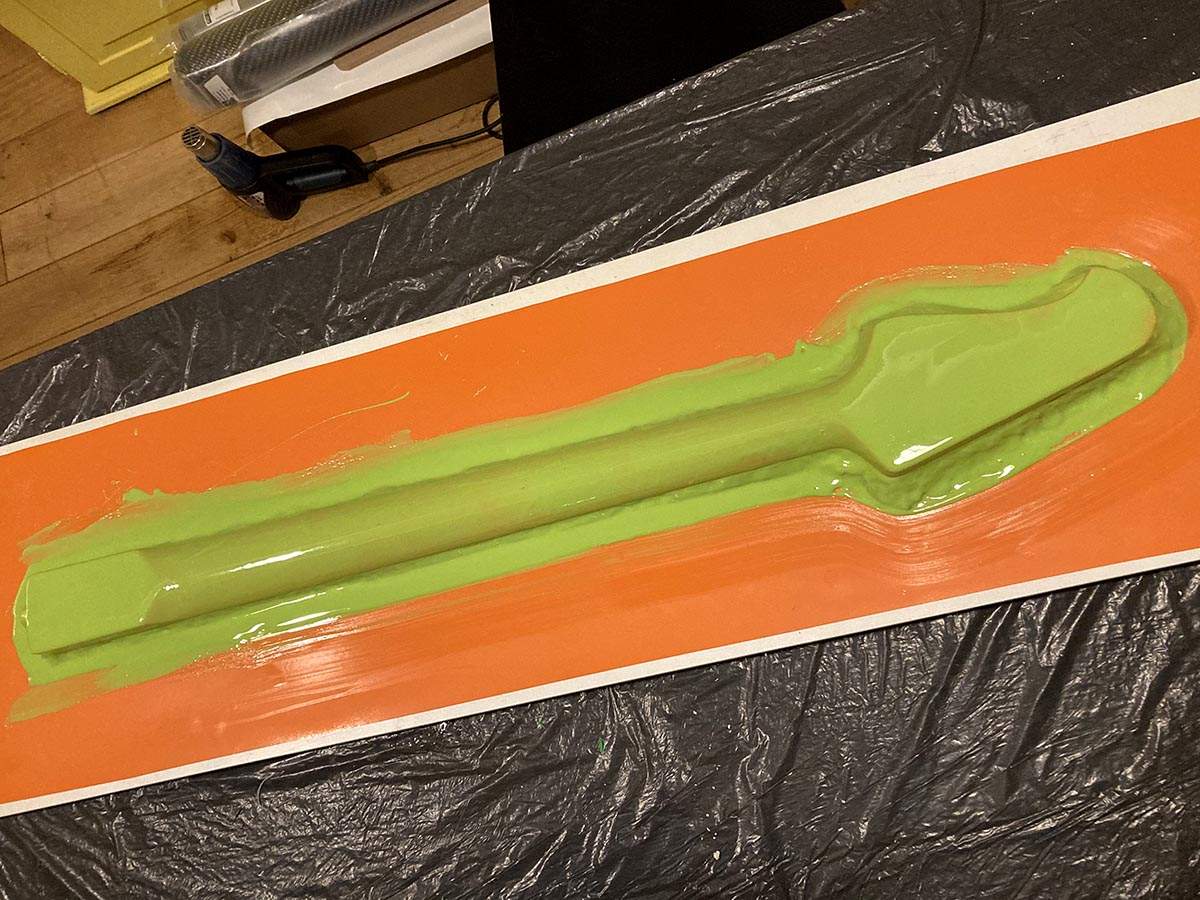
First completely wrapped the neck in vinyl, so I'm sure it's safe and nothing will happen to it
Then stuck it to a board with some double sided tape and filled the edges to the board
Fat layer of spraywax after that
First layer of gelcoat is applied. It's tacking up nicely, so I'll add another coat in a couple of minutes and let it cure a bit more before adding reinforcements
I have honestly no idea how this will turn out... fingers x-ed
GeoffGould
Commercial User
Yeah... that's the scary part
I packed it up real good, so 99% sure it'll come out undamaged
(even if I have to ruin the mold)
I packed it up real good, so 99% sure it'll come out undamaged
(even if I have to ruin the mold)
well... the reinforcement is over the gelcoat
now let it cure
patience grasshopper

now let it cure
patience grasshopper
So close, but no sigar...
(just yet)
The mould popped from the backing board real easy
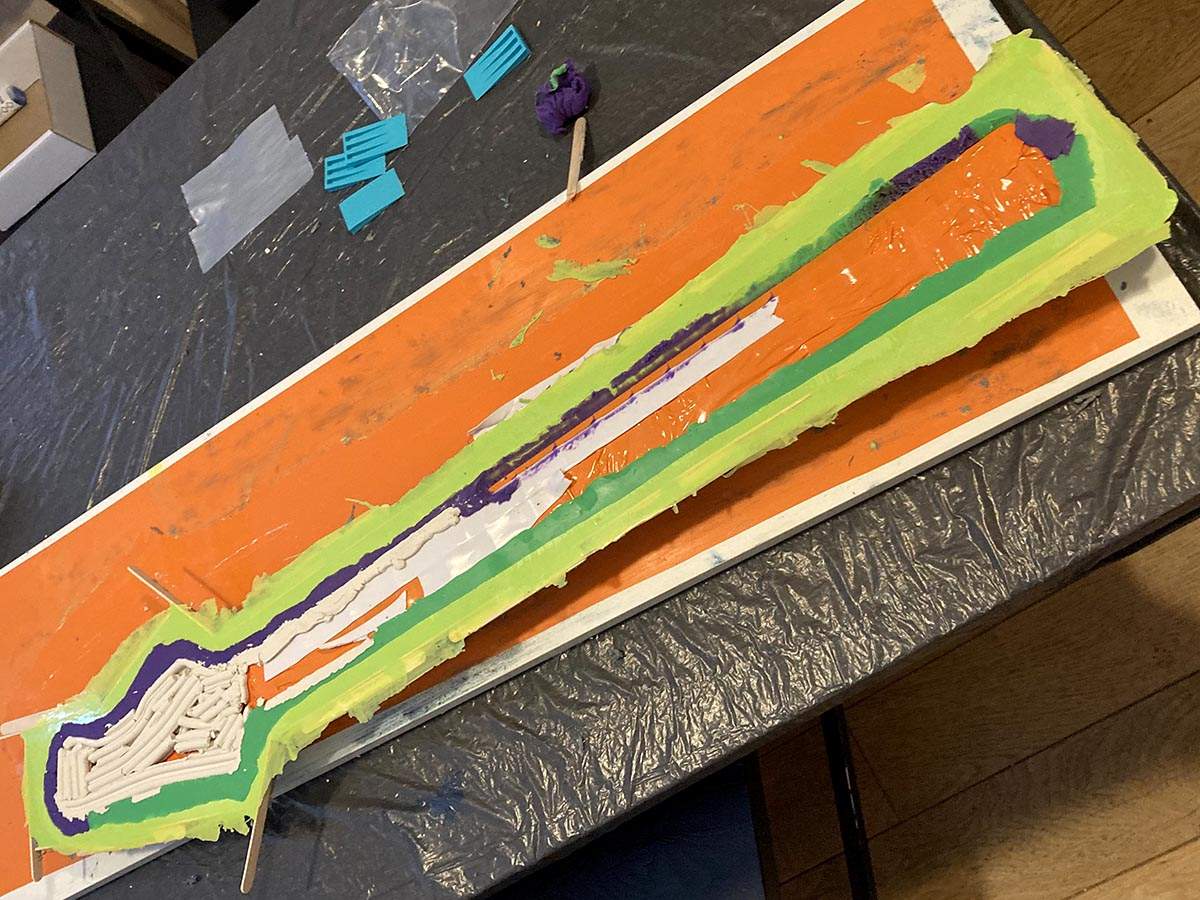
Cleaned out the clay and moved on removing the neck from the mould
Even though the clay fillets made sure there was no "mechanical lock" it proved very hard to get the neck out
Quite nerve wrecking to be honest, as I was scared to damage the neck
Finally got it to budge, but at the very last bit, it broke
The mould that is, not the neck (thank god)
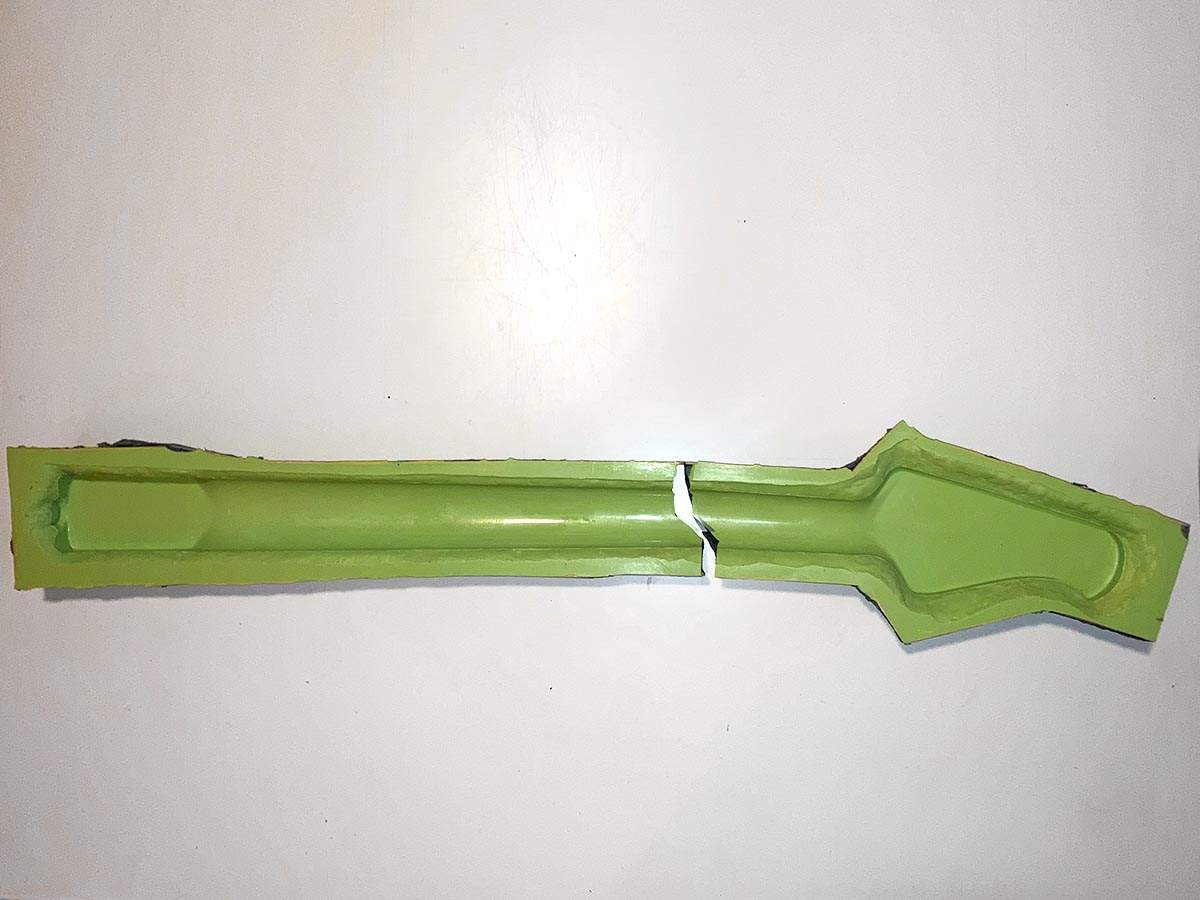
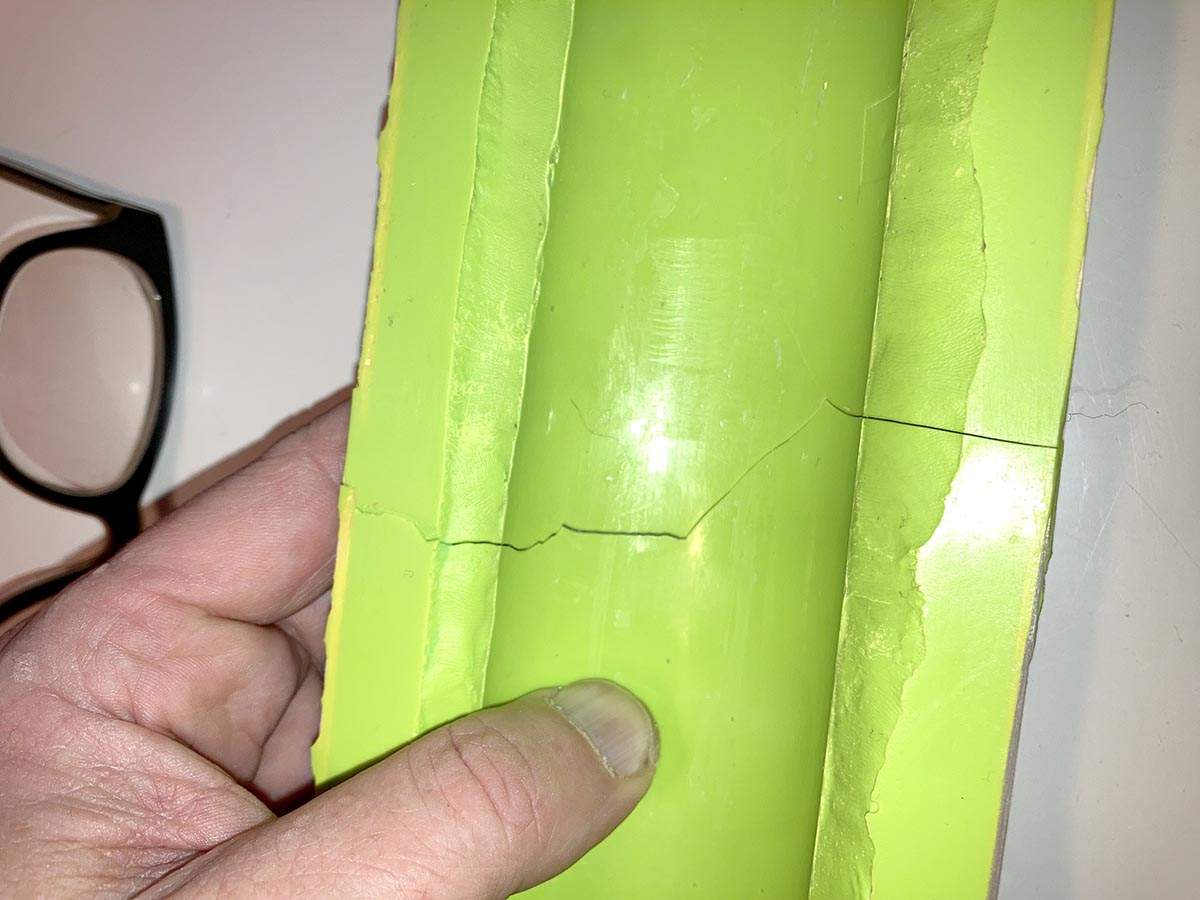
So yeah, bit of a set back
Told ya: watch me fail
So darn close though
In hindsight (always 20/20) I should have reinforced the mold with regular fiberglass and not this epoxy-putty
The fiberstrands in the putty are way to short to give it strength. It was real easy to work with though (which is why I got it) but it's better for smaller molds
Would have been even better to make it a 2 part mould
(although not quite like I have now )
)
Anyways, just give me a minute as I crawl into a corner and cry
Then I'll figure out how to fix this and move on...
Cool side note: the gelcoat is real nice and captured every little detail
You can even read "Made in San Luis Obispo" that was printed on the back of the headstock
(just yet)
The mould popped from the backing board real easy
Cleaned out the clay and moved on removing the neck from the mould
Even though the clay fillets made sure there was no "mechanical lock" it proved very hard to get the neck out
Quite nerve wrecking to be honest, as I was scared to damage the neck
Finally got it to budge, but at the very last bit, it broke
The mould that is, not the neck (thank god)
So yeah, bit of a set back
Told ya: watch me fail
So darn close though
In hindsight (always 20/20) I should have reinforced the mold with regular fiberglass and not this epoxy-putty
The fiberstrands in the putty are way to short to give it strength. It was real easy to work with though (which is why I got it) but it's better for smaller molds
Would have been even better to make it a 2 part mould
(although not quite like I have now
)Anyways, just give me a minute as I crawl into a corner and cry
Then I'll figure out how to fix this and move on...
Cool side note: the gelcoat is real nice and captured every little detail
You can even read "Made in San Luis Obispo" that was printed on the back of the headstock
Last edited:

So close, but no sigar...
(just yet)
The mould popped from the backing board real easy
View attachment 4958331
Cleaned out the clay and moved on removing the neck from the mould
Even though the clay fillets made sure there was no "mechanical lock" it proved very hard to get the neck out
Quite nerve wrecking to be honest, as I was scared to damage the neck
Finally got it to budge, but at the very last bit, it broke
The mould that is, not the neck (thank god)
View attachment 4958332
View attachment 4958333
So yeah, bit of a set back
Told ya: watch me fail
So darn close though
In hindsight (always 20/20) I should have reinforced the mold with regular fiberglass and not this epoxy-putty
The fiberstrands in the putty are way to short to give it strength. It was real easy to work with though (which is why I got it) but it's better for smaller molds
Would have been even better to make it a 2 part mould
(although not quite like I have now
Anyways, just give me a minute as I crawl into a corner and cry
Then I'll figure out how to fix this and move on...
Cool side note: the gelcoat is real nice and captured every little detail
You can even read "Made in San Luis Obispo" that was printed on the back of the headstock
You should be able to glue the mold back together, and add some more fiberglass and epoxy on the back to reinforce it. Touch up the crack with CA glue and sanding. It's just plastic. It can be repaired.
GeoffGould
Commercial User

What Bruce said. That’s not a failure, that’s 99% of the way to success.
Yeah, wasn't really worried
Just a minor setback / disapointment, as was to be expected somewhere along the line
Steep learning curve, which is half the fun
Already got the fix curing
I'll clean up the mould tomorrow, so there's no more sharp edges to poke through the vacuumbag and lay up some CF
I think that's the most frustrating with this stuff: waiting for everything to cure
Just a minor setback / disapointment, as was to be expected somewhere along the line
Steep learning curve, which is half the fun
Already got the fix curing
I'll clean up the mould tomorrow, so there's no more sharp edges to poke through the vacuumbag and lay up some CF
I think that's the most frustrating with this stuff: waiting for everything to cure
There’s a story here, isn’t there?use graphite for the mold, but don't hold me responsible for what happens to your MM!
Difference between epoxy and polyester resin is that epoxy does not shrink like polyester does. If you make a polyester mold and make an epoxy laminate inside it you may have one solid lump because of mold shrinking around the final piece. Epoxy mold and epoxy final piece should work fine if the mold has enough give at heel and headstock and the mold is properly treated with release agent.


