• TalkBass has been independent since 1998. Add your voice.
    Create a free account to reply to discussions, view embedded media, and browse with fewer display ads.
    Join freeLog in
    Want zero display ads or expanded classifieds tools? Compare plans.

Club Sadowsky!!!

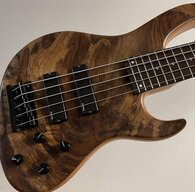
“Naked” MV5 take 2:

Sorry if I’m over sharing on this topic, but I can’t seem to shake wanting the naked, pickguard-free look on my MV5. This time around, rather than filling the pickguard screw holes with a plain pan head screw (which stuck up higher than I liked and seemed a bit unfinished), I used oval head screws and tiny black nylon washers that I painstakingly countersunk for the screw head on my drill press. I think it now looks cleaner and more finished than just plain screws. All the work that went into the washers is really only visible up close (see last pic), but I’m kind of a detail guy and enjoy the good, clean fun of easily reversible mods.

View attachment 4181261 View attachment 4181263 View attachment 4181264
The screws are more noticeable than if you just left the open holes.
 
  • Like
Reactions: Robert Darby
No offense, but I think I just would have put the screws back in. It may not mate flat with the body that way, but it would probably stick out a little bit less, right? Otherwise, you can always try a smaller screw that goes pretty much flush, even if you have to use a toothpick piece to keep it in? Anyway, beautiful bass, and that's the bottom line.

The oval head screws actually stick out the same amount with or without the countersunk washer, since the washer is countersunk past the bottom so that the screw goes in the same amount either way. I thought about your smaller screw idea, but the factory finish around the holes wasn’t clean and finished enough (some were a bit ragged with minor chips around the holes) for a smaller screw to cover the edges of the finish completely. I needed a bit of overlap to cover everything cleanly, hence the washer.

Without the washer, it would have taken a larger-than-factory screw to fully cover the finish edges around the holes. This way, I can use a factory size screw and not alter the holes in any way. I wanted everything to be totally reversible. If I wasn’t so persnickety, and the finish around the holes was cleaner, I would have just hit them with a blue sharpie and left them open, but my personality would never allow me to do such a thing, lol! Way more than any of you wanted to know, I’m sure! :)
 
Last edited:
The oval head screws actually stick out the same amount with or without the countersunk washer, since the washer is countersunk past the bottom so that the screw goes in the same amount either way. I thought about your smaller screw idea, but the factory finish around the holes wasn’t clean and finished enough (some were a bit ragged with minor chips around the holes) for a smaller screw to cover the edges of the finish completely. I needed a bit of overlap to cover everything cleanly, hence the washer.

Without the washer, it would have taken a larger-than-factory screw to fully cover the finish edges around the holes. This way, I can use a factory size screw and not alter the holes in any way. I wanted everything to be totally reversible. If I wasn’t so persnickety, and the finish around the holes was cleaner, I would have just hit them with a blue sharpie and left them open, but my personality would never allow me to do such a thing, lol! Way more than any of you wanted to know, I’m sure! :)
gotcha. I guess in that case, I'd probably just use a little bit of touch up paint to hide the chipping/holes and maybe call it a day. But to each their own.
 
No offense, but I think I just would have put the screws back in. It may not mate flat with the body that way, but it would probably stick out a little bit less, right? Otherwise, you can always try a smaller screw that goes pretty much flush, even if you have to use a toothpick piece to keep it in? Anyway, beautiful bass, and that's the bottom line.
I put a perspex p/g on my quilted top as a change from the tort guard to show more quilt. Same screws. I took it off again 3 months later.
 
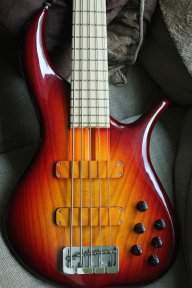
I saw pictures of your Geddy while looking for examples of pickguard-less basses...it looks great! I used to have one myself...kind of makes me wish I had it back, it was a sweet Jazz!
i still have my Geddy. it's on the heavy side, plus I play 5's mostly, but damn, when I get it out, it KILLS.
 
i still have my Geddy. it's on the heavy side, plus I play 5's mostly, but damn, when I get it out, it KILLS.

I'm in the exact same place. I ordered it knowing it wouldn't get a ton of playing time, but it gets even less than I'd expected. :( If only it were a 5.

Such a treat to play with though, when I have time to fool around with a 4 string. Between that and a 4 string 4003W I also love, I regret not having enough time for the 4s.
 
  • Like
Reactions: Spidey2112
I like the naked look too.
20210105_190039.jpg
 
Anyone know how different (if at all) the size is for the screw part of the strap button when comparing "OEM" Dunlops with the Schaller s-locks? Would like to swap from the former to the latter and am curious if I'll need to drill further or add toothpicks, etc.
 
Anyone know how different (if at all) the size is for the screw part of the strap button when comparing "OEM" Dunlops with the Schaller s-locks? Would like to swap from the former to the latter and am curious if I'll need to drill further or add toothpicks, etc.
why the HECK would you go from good to bad???

(jk total troll post, been discussed a bunch lol)
 
why the HECK would you go from good to bad???

(jk total troll post, been discussed a bunch lol)

I know- I've seen them, I've even been in them....I just don't if I've ever seen actual size discussed and if I actually have to do anything different than screw / unscrew. It obviously isn't difficult, I just don't feel like even turning the screwdriver once until I know (more). It *looks* like the dunlop is a bit deeper.

Real reason is basically because 5 of my other basses are Schaller.
 
Last edited:
  • Like
Reactions: kobass and Vic
Anyone know how different (if at all) the size is for the screw part of the strap button when comparing "OEM" Dunlops with the Schaller s-locks? Would like to swap from the former to the latter and am curious if I'll need to drill further or add toothpicks, etc.

I recently went from S-Locks to Dunlop with no issue. I don't have a measurement of the thread or anything like that.
 
  • Like
Reactions: Vic and JoshS
Thanks. That's kind of what I was looking for. Is the thread / pitch / diameter / depth different? -In which case I probably won't bother. (Edit: If dramatically different)

IME the Dunlop screws are smaller than most others. So, when I do a replacement, I often have to go with the toothpick-and-Elmers-glue solution. The only caveat is not to use too much glue. Has always worked fine for me.

I haven't used the newer Schallers (and it's literally been decades since I used the originals), but I doubt that their screws are smaller than Dunlops. But if they are: toothpicks and glue!