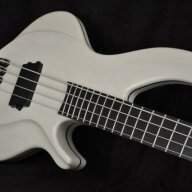
I don't know if this is a good idea or not but it's what I came up with: Hollow out the wings as you suggest from the neck side of the wings and then 'plug' the hollowed out sections with something like 1 inch thick (or more?) wood blanks at the ends. It seems like this would give more structural stability at the wing/neck joint and still give you chambers.

Enjoy the benefits of a premium membership!
Upgrade Account
-
TalkBass has been independent since 1998. Add your voice.
Create a free account to reply to discussions, view embedded media, and browse with fewer display ads.
Join free Log in
Want zero display ads or expanded classifieds tools? Compare plans.
You are using an out of date browser. It may not display this or other websites correctly.
You should upgrade or use an alternative browser.
You should upgrade or use an alternative browser.
First Build: 4string through-neck
- Thread starter Zwieke
- Start date
More options
Who Replied?
Neckangle considerations aside, I would like to bump the question above.
Does anybody have any tips on chambering / reducing weight on the 'one-piece' bodywings?
I did mine like this with a Forstner's bit, then cleaned up with the router.
Other people do it by drilling lots of holes (miziomix):
Here's one with slots (found on google, don't know who's it is):
Since yours are one piece, maybe you can have them sliced down the middle thickness wise (re-sawn) and do your cavities, then glue them back together?

It doesn't happen to all instruments but it happens, often. Which is why you often have to resort to shimming on old basses, or countersinking the bridge into the top in the case of a neckthru.What are you talking about? The angle becomes smaller as the instrument ages? That's utter nonsense! That would make all vintage instruments unplayable unless fixed...
Since yours are one piece, maybe you can have them sliced down the middle thickness wise (re-sawn) and do your cavities, then glue them back together?
I actually was hoping not to be dealing with any resawing in this build

When I have finished roughing out the bodywings, and planed them to thickness, I will weigh them and then reconsider. Perhaps the plug-thing is not so bad of an idea. Or I could also consider some Wenge backplates... I still have some beautiful wenge.
OK, a little more progress!
First, I needed to straighten/joint the neck laminate pieces on the ends that need to be glued. I started out using a hand plane, only to find out that I will need a lot more practise with that thing to get anywhere close to straight.
sooo, I decided to make a makeshift jointing fence for my mini router table:
[Invalid or Expired Link Removed]
The outfeed fence is offset ~1mm from the infeed fence. This is accomplished by wedging a cardboard shim between the router table's original fence and the piece of MDF.
Problem is, I dont have a long enough router bit to joint the entire piece... this was about the max I could do:
[Invalid or Expired Link Removed]
So I decided to flip it over and 'copy' the jointed part with a template bit. (needed 3 passes in total). The compounding of any imperfections resulted in an edge which still needed some work. So I decided to use sandpaper and elbowgrease for the last part, using a length of wood as a long sanding block.
[Invalid or Expired Link Removed]
Now each of the laminates has a straight edge, it is time for the taper in the Padauk.
[Invalid or Expired Link Removed]
The straight edge is facing downwards. Around the Padauk I built guides which are perfectly parrallel to the length of the neck laminates, and are at an incline of ~1 degree from the table. This means the guides are ~15mm higher at the 'bridge end' of the laminates.
This gives me a good support to rout a precise angle into both the laminates at the same time, ensuring that they are exactly mirror images of eachother:
[Invalid or Expired Link Removed]
So, after cleaning up the two pieces with some more sanding (to get rid of router marks), it is time for a test-fit:
[Invalid or Expired Link Removed]

Pretty happy with the result. Tomorrow I will be glueing the laminates & veneers, and then it is on to more work on the body.
Altough I was originally not planning on resawing anything, I have since decided that I will be resawing the Bubinga for the body, to make chambering more easy.
I still do not have a bandsaw, but did aquire a combination saw(mitre saw /flips over to become a table saw) the other day. Boy, that's a lot of tool for it's relatively small footprint!
[Invalid or Expired Link Removed]
So I will be resawing the bubinga on the table-end of this machine this week, but first I will need to build a jig to do that safely.

First, I needed to straighten/joint the neck laminate pieces on the ends that need to be glued. I started out using a hand plane, only to find out that I will need a lot more practise with that thing to get anywhere close to straight.
sooo, I decided to make a makeshift jointing fence for my mini router table:
[Invalid or Expired Link Removed]
The outfeed fence is offset ~1mm from the infeed fence. This is accomplished by wedging a cardboard shim between the router table's original fence and the piece of MDF.
Problem is, I dont have a long enough router bit to joint the entire piece... this was about the max I could do:
[Invalid or Expired Link Removed]
So I decided to flip it over and 'copy' the jointed part with a template bit. (needed 3 passes in total). The compounding of any imperfections resulted in an edge which still needed some work. So I decided to use sandpaper and elbowgrease for the last part, using a length of wood as a long sanding block.
[Invalid or Expired Link Removed]
Now each of the laminates has a straight edge, it is time for the taper in the Padauk.
[Invalid or Expired Link Removed]
The straight edge is facing downwards. Around the Padauk I built guides which are perfectly parrallel to the length of the neck laminates, and are at an incline of ~1 degree from the table. This means the guides are ~15mm higher at the 'bridge end' of the laminates.
This gives me a good support to rout a precise angle into both the laminates at the same time, ensuring that they are exactly mirror images of eachother:
[Invalid or Expired Link Removed]
So, after cleaning up the two pieces with some more sanding (to get rid of router marks), it is time for a test-fit:
[Invalid or Expired Link Removed]
Pretty happy with the result. Tomorrow I will be glueing the laminates & veneers, and then it is on to more work on the body.
Altough I was originally not planning on resawing anything, I have since decided that I will be resawing the Bubinga for the body, to make chambering more easy.
I still do not have a bandsaw, but did aquire a combination saw(mitre saw /flips over to become a table saw) the other day. Boy, that's a lot of tool for it's relatively small footprint!
[Invalid or Expired Link Removed]
So I will be resawing the bubinga on the table-end of this machine this week, but first I will need to build a jig to do that safely.
So I will be resawing the bubinga on the table-end of this machine this week, but first I will need to build a jig to do that safely.
Practice on scrap!

Thanks!
@ Lisa... Ofcourse I will be practising on scraps
I decided to give the tablesaw a good tune-up & new blade (with less TPI as well)today as I had bought it second hand, and must say the difference is phenomenal!
I built a resawing jig, based on Link Removed, which seems to be centered around keeping your hands clear from the sawblade, which appealed to me for some reason.
I tried it out with a piece of Cherry I had lying around, which was roughly of the same dimensions, and the resaw went very well!
@ Lisa... Ofcourse I will be practising on scraps
I decided to give the tablesaw a good tune-up & new blade (with less TPI as well)today as I had bought it second hand, and must say the difference is phenomenal!
I built a resawing jig, based on Link Removed, which seems to be centered around keeping your hands clear from the sawblade, which appealed to me for some reason.
I tried it out with a piece of Cherry I had lying around, which was roughly of the same dimensions, and the resaw went very well!
Some slow but steady progress.
I'm currently glueing up my neck laminates.
[Invalid or Expired Link Removed]
The veneers are glued to one of the sides first. The whole thing will be glued together tonight, so after that I can start cleaning up the final neck blank.
In other news. I resawed the body blanks. This will allow me to make a continuous control cavity cover, and drill out the body wings for weight reduction.
Here's a shot of the jig I built, which is basically a tall fence with an adjustable hold-down. It slides along the tablesaw's original fence. Also in the shot is my DIY fugly but functional featherboard, made from strips of hardboard glued together.
[Invalid or Expired Link Removed]
Result:
[Invalid or Expired Link Removed]
Cleaning up the sawmarks with random orbital sander:
[Invalid or Expired Link Removed]
Rougly sawn back pieces:
[Invalid or Expired Link Removed]
And currently working on the rough cut of the solid pieces. For lack of a bandsaw, I decided to go for the 'drill lots of holes' approach.
Which is sloowwwwwwww... And still leaves a lot of material to be cleared out by the router. So I hope that will end well...
[Invalid or Expired Link Removed]
[Invalid or Expired Link Removed]
I'm currently glueing up my neck laminates.
[Invalid or Expired Link Removed]
The veneers are glued to one of the sides first. The whole thing will be glued together tonight, so after that I can start cleaning up the final neck blank.
In other news. I resawed the body blanks. This will allow me to make a continuous control cavity cover, and drill out the body wings for weight reduction.
Here's a shot of the jig I built, which is basically a tall fence with an adjustable hold-down. It slides along the tablesaw's original fence. Also in the shot is my DIY fugly but functional featherboard, made from strips of hardboard glued together.
[Invalid or Expired Link Removed]
Result:
[Invalid or Expired Link Removed]
Cleaning up the sawmarks with random orbital sander:
[Invalid or Expired Link Removed]
Rougly sawn back pieces:
[Invalid or Expired Link Removed]
And currently working on the rough cut of the solid pieces. For lack of a bandsaw, I decided to go for the 'drill lots of holes' approach.
Which is sloowwwwwwww... And still leaves a lot of material to be cleared out by the router. So I hope that will end well...
[Invalid or Expired Link Removed]
[Invalid or Expired Link Removed]

Today I started by cutting to length and sanding down the saw marks on the wenge which is to become the fingerboard.
[Invalid or Expired Link Removed]
I hope I will be able to saw fretslots tomorrow.
also cleaned up the neckblank, using a router sled.
[Invalid or Expired Link Removed]
[Invalid or Expired Link Removed]
With all the ugly squeezeout removed, the blank is looking awesome Very happy with the result!
[Invalid or Expired Link Removed]
[Invalid or Expired Link Removed]
I hope I will be able to saw fretslots tomorrow.
also cleaned up the neckblank, using a router sled.
[Invalid or Expired Link Removed]
[Invalid or Expired Link Removed]
With all the ugly squeezeout removed, the blank is looking awesome
Very happy with the result![Invalid or Expired Link Removed]
Update time!
[Invalid or Expired Link Removed]
Cut the fretslots using a glued on CAD drawing
[Invalid or Expired Link Removed]
And tapered the fretboard on a purposebuilt tapering sled.
[Invalid or Expired Link Removed]
A test fit also shows the padouk/maple veneers which will be sandwiched between the neck and the fretboard. Looks pretty good doesn't it?
But... I realized that my fretboard (+laminate) is way to thick for my preference.... almost 12mm (~½ inch). So I cut the fretslots a bit deeper and routed it to a shallower thickness. Would have been better/easier to do this before cutting fretslots and the taper I guess, but it seems as though it turned out ok:
[Invalid or Expired Link Removed]
supports for routing
[Invalid or Expired Link Removed]
Much better!
Also routed the Trussrod channel:
[Invalid or Expired Link Removed]
Trussrod fits very snuggly. The slot is slightly skewed though, by about ½ to 1 mm... will that matter at all? Or is it negligable?
One other question; upon closer inspection it seems that there are some areas in the neckblank where the glueline is visible a bit:
[Invalid or Expired Link Removed]
Is not that apparent from a small distance, but it's still bugging me. Any tips on how to improve?
[Invalid or Expired Link Removed]
Cut the fretslots using a glued on CAD drawing
[Invalid or Expired Link Removed]
And tapered the fretboard on a purposebuilt tapering sled.
[Invalid or Expired Link Removed]
A test fit also shows the padouk/maple veneers which will be sandwiched between the neck and the fretboard. Looks pretty good doesn't it?
But... I realized that my fretboard (+laminate) is way to thick for my preference.... almost 12mm (~½ inch). So I cut the fretslots a bit deeper and routed it to a shallower thickness. Would have been better/easier to do this before cutting fretslots and the taper I guess, but it seems as though it turned out ok:
[Invalid or Expired Link Removed]
supports for routing
[Invalid or Expired Link Removed]
Much better!
Also routed the Trussrod channel:
[Invalid or Expired Link Removed]
Trussrod fits very snuggly. The slot is slightly skewed though, by about ½ to 1 mm... will that matter at all? Or is it negligable?
One other question; upon closer inspection it seems that there are some areas in the neckblank where the glueline is visible a bit:
[Invalid or Expired Link Removed]
Is not that apparent from a small distance, but it's still bugging me. Any tips on how to improve?
Designing the control cavity, and deciding where to drill for weight reduction.
[Invalid or Expired Link Removed]
A lot of drilling later:
[Invalid or Expired Link Removed]
And, cleaned up the cavity:
[Invalid or Expired Link Removed]
I needed to fix a small mistake with some glue and sawdust.
Today I learned that when using pattern bits with a plunge router, you need to make sure you're deep enough for the bearing to hit the template. (but it will be hidden by the copperfoil anyway.)
[Invalid or Expired Link Removed]
A lot of drilling later:
[Invalid or Expired Link Removed]
And, cleaned up the cavity:
[Invalid or Expired Link Removed]
I needed to fix a small mistake with some glue and sawdust.
Today I learned that when using pattern bits with a plunge router, you need to make sure you're deep enough for the bearing to hit the template.
(but it will be hidden by the copperfoil anyway.)I spent today working on the blockinlays.
With some spare MDF, a piece of acrylic and some nuts'n'bolts I made a improvised routing base for my dremel's Flexible shaft.
[Invalid or Expired Link Removed]
[Invalid or Expired Link Removed]
Man, routing these inlays was a pain to get just right.. But I think the results are quite OK. Probably needs some microadjustment here and there, but I'll find out once I have my pieces of MOP cut. I couldn't resist already making one (and breaking my first MOP blank, boy that stuff's brittle)
[Invalid or Expired Link Removed]
[Invalid or Expired Link Removed]
As you can see, the inlay is quite deep. After all the MOP pieces are installed, I will fill the holes with Epoxy. After radiusing the edges will be just shy of flush with the fretboard.
With some spare MDF, a piece of acrylic and some nuts'n'bolts I made a improvised routing base for my dremel's Flexible shaft.
[Invalid or Expired Link Removed]
[Invalid or Expired Link Removed]
Man, routing these inlays was a pain to get just right.. But I think the results are quite OK. Probably needs some microadjustment here and there, but I'll find out once I have my pieces of MOP cut. I couldn't resist already making one (and breaking my first MOP blank, boy that stuff's brittle)
[Invalid or Expired Link Removed]
[Invalid or Expired Link Removed]
As you can see, the inlay is quite deep. After all the MOP pieces are installed, I will fill the holes with Epoxy. After radiusing the edges will be just shy of flush with the fretboard.


