• TalkBass has been independent since 1998. Add your voice.
    Create a free account to reply to discussions, view embedded media, and browse with fewer display ads.
    Join freeLog in
    Want zero display ads or expanded classifieds tools? Compare plans.

First Build - And May My Mistakes Be Minimal

Thanks guys!

Next up is figuring out the wiring. What I have is cobbled together from various Aria threads. I figure if I just leave the VariTone circuit out and only use Volume and Tone, it should work OK. I think I've got all the parts I need. As soon as I can this week, I'll drill some holes in a board to hold the pots and get to soldering. My electronics skills are not fantastic, but I can solder and know the basics (i.e. P-Bass circuit).

So, pins 6 and 7 will be excluded (top), and 4 and 5 (bottom). The preamp is labeled, so I am not concerned about the pinout disparity.
10pinbb2.jpg

sb-1000 wiring_1-001.jpg
 
Thanks so much! The next two should be much quicker efforts, but I am just amazed that I was able to accomplish this. I also have fairly decent woodworking skills now. And SOOOO much more to learn.

If not for LC, I'd likely not even be considering woodworking projects.

You guys and gals rock!!
 
  • Like
Reactions: Thumpin_P
Sorry for the delay! It has been a busy month, being the holiday season and whatnot.

Update: I have been working with the new bandsaw, trying to get it tuned to the point where I can actually resaw something. Almost there!

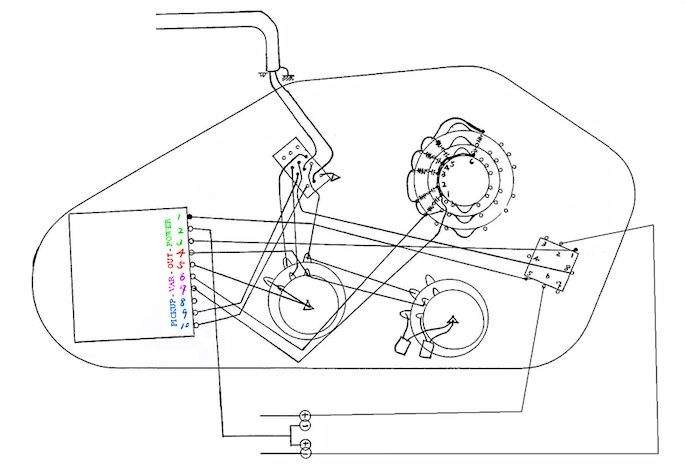
Currently working out the electronics. Despite not having the VariTone circuit, this has turned into quite the complicated situation for this electronics novice. My experience extends to 1/10th scale electric off road RC cars in the 80s and a P-Bass remodel last year. Sure, I can solder, but this is new territory! Luckily, the super-talented @Prostheta has been amazing and is currently proofing what I hope to be a glimpse at the electronics finish line. Here's where we are now (pardon my colour scheme and wonky lines--and if anyone sees a flaw, please let me know!):

wiring.png


I took the Seymour Dunan humbucker wire colors and translated to the fabulous Viejo Rautia SB-1000 repro pickup he makes. I hope that I got it right when translating that back to a Series/Split/Parallel On/On/On DPDT mini toggle. My big issue was having never worked with a preamp, the old Aria schematics being oddball (in my eyes), and not actually understanding engineering schematics. I am a Production DBA, not an engineer.

Looks like I have two more holes to drill to facilitate the toggle switch and the LED. No big deal as long as I remain diligent in Measure X 2 / Cut X 1. This build has taken ages. I am sincerely looking forward to putting a bow on it. :D

Edit: Notes on the 9-Lug Stereo Jack: Lugs 3 and 7 are not used since they are for a closed circuit when the plug is NOT inserted. Lug 8 is the ring, but it seems to not be needed since lugs 2 and 6 handle the actual battery switching. That makes sense, right?? err...
 
  • Like
Reactions: Thumpin_P
Holy crap. How did you do this without me noticing?!!?
No, you don't need to jump any pins. The varitone connections can be left open circuit and work perfectly well on my RSB-600 resto and 1951-5 P bass hybrid circuits.

No need to do anything with the ring lug. It could be tied to the earth/sleeve lug but will likely have zero effect unless used with a stereo cable which is also plugged into another stereo jack used as power switching for a pedal.

Errrr. Don't use stereo cables and be weird is all we can take from that I think.
 
Last edited:
Holy crap. How did you do this without me noticing?!!?
No, you don't need to jump any pins. The varitone connections can be left open circuit and work perfectly well on my RSB-600 resto and 1951-5 P bass hybrid circuits.

No need to do anything with the ring lug. It could be tied to the earth/sleeve lug but will likely have zero effect unless used with a stereo cable which is also plugged into another stereo jack used as power switching for a pedal.

Errrr. Don't use stereo cables and be weird is all we can take from that I think.

Yup!

I will be back from vacation tomorrow so I should be able to continue on. All that is left is to solder those tiny molex pins on the wires. They are giving me fits!!!
 
IMO, if I may:
I like the headstock, after much internal debate. It's a tasteful homage while being an alteration that marks it as your own. Definitely needs some finish treatment.

The body looks quite good. Quite. Very quite. Again, faithful enough, but still yours.

Get some friggin' knobs for Pete's sake. (Pete needs knobs. Please don't disappoint Pete.)

How's it sound/play?
 
  • Like
Reactions: Thumpin_P
image.jpeg
IMO, if I may:
I like the headstock, after much internal debate. It's a tasteful homage while being an alteration that marks it as your own. Definitely needs some finish treatment.

The body looks quite good. Quite. Very quite. Again, faithful enough, but still yours.

Get some friggin' knobs for Pete's sake. (Pete needs knobs. Please don't disappoint Pete.)

How's it sound/play?

Yup. Around 4 coats of tru oil for the headstock upcoming.

Yes, I have knobs :p

Sounds fabulous! I need to intonate, along with the aforementioned finishing tasks. I'll post clips! I really like the series/split/parallel toggle. It really brings out the range of Viejo Rautia's pickup design.

@Prostheta - wiring worked out perfect! Thanks for all of your help and guidance!!!!

And thanks! I am pretty happy with this project's results!


All the details to come soon.
 
  • Like
Reactions: AGH and Thumpin_P
IMG_1421.JPG
I'm truly gratified. Just a little bit of insulating sponge around the batteries and you're golden. How much of a nightmare were the Molex KKs? If I recall, they're easier than the TE CST100 equivalents.

You should enter her in the ProjectGuitar.com Guitar Of The Month when she's finished :)

Oh man, I don't know if I qualify for the PG guitar of the month! Those are some truly magnificent instruments. I'll be happy to post an abbreviated build thread though! This on has been , cough, cough, rather long-winded. :)

And yup! I'll be fixing up the cavity organization. I have some lovely server packing foam that I'll use. It is wonderful as insulation and even flotation--I used to use it to wrap leaders around for salmon and steelhead fishing.

The only worrisome bit is the jack... I need to re-solder the wires at perpendicular angles in order to handle the cavity clearance. Keep in mind, I went a bit thinner than the original body, so I don't quite have the head space!

Here are a couple comparison shots to my 1991-1994 Aria Pro II SB-1000 (second series):

IMG_1422.JPG

IMG_1423.JPG
 
Last edited:
Damn that came out great! Glossy purpleheart goodness! This has inspired me to try tru-oil on my next clear finish build. I saw Duran Duran is going out on tour, wonder if he'll play the Aria? I'm in the same boat on electronics, I can solder well, but don't have a clear idea what's going on electrically. I'm strictly monkey-see/monkey-do from a wiring diagram. It looks like you nailed it. Thank god for guys like Prostheta willing to lend their expertise. I've really enjoyed watching your build.

Edit:
I like the headstock as-is, reads as an extension of the light maple neck beam, plus nice figure on it. My $.02
 
Damn that came out great! Glossy purpleheart goodness! This has inspired me to try tru-oil on my next clear finish build. I saw Duran Duran is going out on tour, wonder if he'll play the Aria? I'm in the same boat on electronics, I can solder well, but don't have a clear idea what's going on electrically. I'm strictly monkey-see/monkey-do from a wiring diagram. It looks like you nailed it. Thank god for guys like Prostheta willing to lend their expertise. I've really enjoyed watching your build.

Edit:
I like the headstock as-is, reads as an extension of the light maple neck beam, plus nice figure on it. My $.02

Thanks!! Yeah wiring can be tricky, but I definitely have a handle on switches and 9-lug jacks now!

Regarding the headstock, I just need to finish-sand and oil the cut part. As pictured, it was only hit with the spindle sander.
 
  • Like
Reactions: Thumpin_P