• TalkBass has been independent since 1998. Add your voice.
    Create a free account to reply to discussions, view embedded media, and browse with fewer display ads.
    Join freeLog in
    Want zero display ads or expanded classifieds tools? Compare plans.

First Build, Performer Copy

So I started looking at a belly cut and tried my rasp on a test piece.
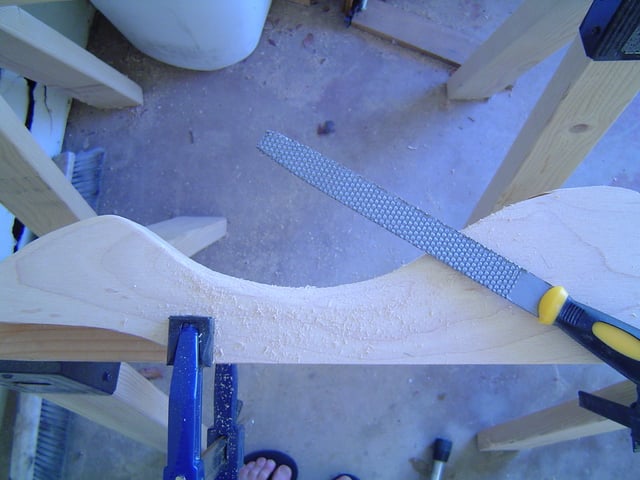
DSC02037.jpg


I figured I'd take a look at the cut on my Ibanez Roadstar II P-Bass copy for a guide.
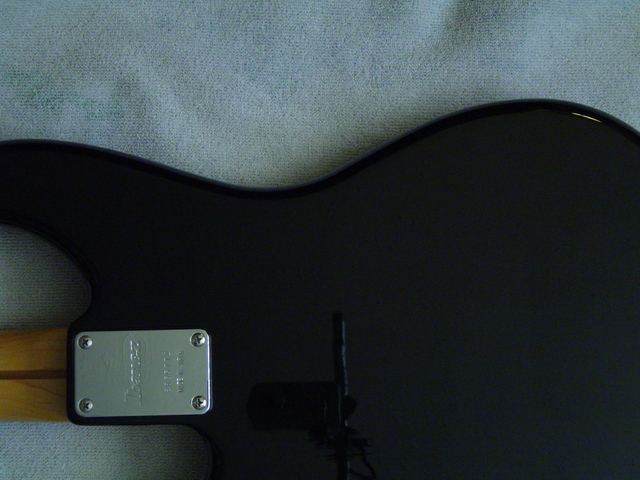
DSC02038.jpg


No belly cut at all, and I've always found this bass pretty comfortable. Granted, it's a pretty thin body at 1 5/8", though my build's body is just over 1 1/4". I'm not sure I'll even need a belly cut now, not to mention a forearm cut.

Compared to a Rickenbacker (which in my mind, is the bass to which all others are compared), there's a very mild belly cut and no forearm cut, with a similar body thickness to my build.

4003cut.jpg


I just may go with a mild belly cut like the Ric, and no forearm cut.

 
Nitro is the way I would go then. Nitro works well out of a rattle can, urethane quality suffers pretty badly when it is made to work out of a rattle can. Oil is about the easiest finish to apply but its not all that protective.


I recently painted my first body using urethane out of rattle cans (sonic blue custom mixed at an auto paint store). For my first time painting, I thought it turned out pretty well. But maybe it could have been better, had I used nitro?

I chose urethane for what I perceived to be its quick cure time, color stability (I wanted to minimize the "yellowing" of the sonic blue that seems to happen with nitro over time), and durability (e.g compatibility with instrument stands, etc.). BUT -- I am very much a neophyte painter, and there's much I don't know. And my painting process wasn't trouble-free. I'm very interested to know what might have gone differently had I used rattle-can nitro in lieu of urethane.

(For those interested, my urethane rattle-can painting travails are described here: ://k6jca.blogspot.com/2013/09/building-bass-guitar-kit-part-2.html)
 
I recently painted my first body using urethane out of rattle cans (sonic blue custom mixed at an auto paint store). For my first time painting, I thought it turned out pretty well. But maybe it could have been better, had I used nitro?

I chose urethane for what I perceived to be its quick cure time, color stability (I wanted to minimize the "yellowing" of the sonic blue that seems to happen with nitro over time), and durability (e.g compatibility with instrument stands, etc.). BUT -- I am very much a neophyte painter, and there's much I don't know. And my painting process wasn't trouble-free. I'm very interested to know what might have gone differently had I used rattle-can nitro in lieu of urethane.

(For those interested, my urethane rattle-can painting travails are described here: ://k6jca.blogspot.com/2013/09/building-bass-guitar-kit-part-2.html)


Here's the proper link, I hope!

http://k6jca.blogspot.com/2013/09/building-bass-guitar-kit-part-2.html
 
For what it's worth, I'll also be painting outside. We don't have too many pine trees here in Phoenix, but I will have to schedule around the dust storms, which hopefully are done for the season.

In the mean time, I spent about an hour sanding, and have yet to do the belly cut. Now I'm thinking I may not. I did round over the front of the body, which looking back, should have done prior to gluing up the body wings. Again, live and learn.
 
Rics don't have a belly cut, they have a partial roundover.

The 4001 C64 has it on the front and back.

[Invalid or Expired Link Removed]

On finishing...read, re-read and read again Reranch 101.

Post your build over at www.reranch.com/reranch an you'll get some really good feedback there. too.

Since you're not doing a color or burst, you may consider saving a few bucks and trying Minwax Black Label Nitro in a can.

Some folks I know have had very good results with it.

0002742615200_500X500.jpg
 
What brand of paint is that? It looks pretty professional. In my experience a non catalysed poly in a rattle can just never seems to get hard enough.


The color coat is standard auto poly (mixed at the store), but the rattle-can clear coat is actually a 2-part catalyzed paint. On the bottom of the can is a large red "button" that you must first press to release the catalyst into the can. Then you shake like hell and begin spraying. But you must use the contents within 24 hours of pressing the button.

This clearcoat is "SprayMax 2K Glamour High Gloss Clearcoat" and it is compatible with the poly color that I painted under it (important!), per the clerks at the auto paint store where I purchased everything.

I gave it a week to cure, which might have been longer than necessary. But it's tough as nails.

I learned of the SprayMax clearcoat (and the use of polyurethane paint) in a book I picked up on Amazon titled, "How to Create a Factory Guitar Finish With Just a Couple of Spray Cans," by John Gleneicki. He also discusses spraying with lacquer, for those who don't want to spend the extra money for polyurethane. For me, the book was a huge help.
 
Thanks for the tips. I've never done a "real" refinish on an instrument, so this will be a first for me. This will be, hopefully, the final purchase for this build. That Reranch web site also has a sandpaper pack for $10.00 that includes all the fine grades, up to 2000. So I'll order that along with the clear.

I still have some final shaping to do to the body, and of course, the pickups and controls. So it'll be a month or so before I'm ready to start the finish. As soon as I pay down my credit card, I'll order the finishing supplies.

When spaying, edges will tend to build up so watch for that. And always use a sanding block on your flat areas to keep it evenly level. And have a reasonably sized test piece of the same wood that goes through the exact same process. It will give you something to break in before staring on the bass all along the way.
 
The exceptionally nice thing about a natural finish with nitro over maple:

Sand through?

No problem..hit it with a little more clear in that spot, sand it down and buff it out.

You're doing the easiest possible finish to botch 1000 times and still have it come out looking perfect.

Seriously, you could use the Minwax brushing lacquer and paint it with a nail polish brush.

As long as you're willing to sand...recoat...sand...recoat, you can't go too far wrong with nitro.

By the way, get a respirator and nitrile gloves.

Nitro is nasty stuff, chemically speaking.
 
The knobs, pots, switch, and caps came in yesterday, so I'll be routing out the control panel area tomorrow. I'm thinking something like this:

DSC02039.jpg


I have plenty of extra maple pieces to make a cover for the back.
 
The color coat is standard auto poly (mixed at the store), but the rattle-can clear coat is actually a 2-part catalyzed paint. On the bottom of the can is a large red "button" that you must first press to release the catalyst into the can. Then you shake like hell and begin spraying. But you must use the contents within 24 hours of pressing the button.

This clearcoat is "SprayMax 2K Glamour High Gloss Clearcoat" and it is compatible with the poly color that I painted under it (important!), per the clerks at the auto paint store where I purchased everything.

I gave it a week to cure, which might have been longer than necessary. But it's tough as nails.

I learned of the SprayMax clearcoat (and the use of polyurethane paint) in a book I picked up on Amazon titled, "How to Create a Factory Guitar Finish With Just a Couple of Spray Cans," by John Gleneicki. He also discusses spraying with lacquer, for those who don't want to spend the extra money for polyurethane. For me, the book was a huge help.

Gotcha, that would be about the only way to make a urethane in a rattle can work well. Thanks for clearing that up.
 
Started to make the templates for the control cavity.

After that was done, I started on the inset cover template.

DSC02042.jpg


The first cover template came out a little too large. Somethings, I guess one can't just eyeball. Second try came out much better. Rulers don't lie :)

DSC02043.jpg


Now I think I'll make a cup of coffee as I prepare myself for the scary part - cutting the control cavity into the bass. I'm thinking about cutting the cavity, leaving about 1/4" to mount the switch and pots.
 
1/4" might be too much unless you have long threaded shafts on the switch and pots.

I'm a little scared to go thinner than 1/4" - it just seems so thin. I measured the shaft on the pots and switch, and they're just over 1/4", so I'm hoping for the best. If need be, I'll thin out the area just under (or is that above) the mounts.


Rout slowly and carefully, take off a little at a time, and be careful. Also, go slowly. :D

Seriously, that is looking great!

Thanks :)

I have a history with routers. About 15 years ago, I was working in a place that had a pretty extensive wood shop, and they had a table router. After work one day, I started working on a decorative holiday piece, and that router grabbed my project, ripped it out of my hands, and threw it across the room. I'm lucky it didn't spit it out into my face. I walked away in shame, head down, tail between my legs.

The following Monday, I told that router that I wouldn't take any of its crap, and started the project anew. Of course, the router was much stronger than I, and again grabbed the piece, laughed, and threw it across the room.

I've since gained a very healthy respect for them. I'm just hoping the router I currently have is not a relative of that table router. We didn't get along.

In any event, since then, I always take it very slow, and route very thin strips at a time. Any time I try to cheat, even just a little, bad things happen.

That said, I started by cutting out most of the wood with forstner bits in the drill press. The drill press can become angry too, so I like to clamp everything.

DSC02044.jpg


Getting there.

DSC02045.jpg


Once finished with the drill press, I clamped the template into place, and started the first of several sweeps with the router.

DSC02046.jpg


Here I'm making a template out of 1/2" plywood because the one that's 3/4" didn't let me route deep enough. I really need to buy a bunch of proper router bits.

DSC02047.jpg


Done.

DSC02048.jpg


I'm a little concerned about the back control cavity cover. The total thickness of the body is just about 1 3/8 thick, which, when adding the 1/4" front, and the pots, doesn't leave a lot of thickness left for the rear cover. I sliced off a piece of maple and tried to route it down to 1/4", but I guess I need some better double stick tape. The router grabbed the piece, tore it off the tape, and spit it out (which reminded me of my earlier experience).

Even at 1/4" though, I think I'm running out of room. I may just go with an 1/8" piece of white plexi.
 
I wanted to set the knob spacing, and see if they'll all fit on a 1/4" mount, so I made yet another template.

knobs.jpg


The switch is a little closer to the pots than the pots are to each other - 1 1/2" between the pots and 1 1/4" between the switch and pot. I wanted to leave a little extra room between the bottom pot and the edge of the bass as the jack will be right there. I think the tip of the jack may even protrude a little into the control cavity. It's going to be tight.
