

Enjoy the benefits of a premium membership!
Upgrade Account
-
TalkBass has been independent since 1998. Add your voice.
Create a free account to reply to discussions, view embedded media, and browse with fewer display ads.
Join free Log in
Want zero display ads or expanded classifieds tools? Compare plans.
You are using an out of date browser. It may not display this or other websites correctly.
You should upgrade or use an alternative browser.
You should upgrade or use an alternative browser.
Lefty Fretless Jazz Bass
- Thread starter Brett Zeppelin
- Start date
More options
Who Replied?
Brett, I agree, it's looking great!
(By the way, I just finished mine: http://k6jca.blogspot.com/2014/08/mellow-yellow-bass-kit-build.html )
(By the way, I just finished mine: http://k6jca.blogspot.com/2014/08/mellow-yellow-bass-kit-build.html )

Brett,
In case you are interested...a book that I found very useful is this one, by John Gleneicki: How to Create a Factory Guitar Finish with Just a Couple of Spray Cans!
Pictures aren't great, but overall I've found it to be very informative. And John was quite accessible via email when I had questions after reading the book.
Here's a link on Amazon: http://www.amazon.com/Create-Factory-Guitar-Finish-Couple/dp/1456517031/
I followed his techniques when painting my two bodies (so an expert I am NOT), and they both came out well, in my opinion. The only issues I had was when I deviated from what he recommended.
Also, I've been spraying with urethane color (auto paint, put into a rattle can) and urethane clear-coat rattle cans (the latter is a 2-part clear coat: Spraymax 2K Glamour High Gloss Clear Coat). With these, you don't need to sand the color coat before applying the clear coat, as the urethane clear coat "melts" into the color coat when it hits it (or so I've been told, and its been true two of two times for me). Also (and important to someone as impatient as I am), you can start sanding the urethane clear coat after a week, rather than waiting a month, as might be required when using other types of clear coats.
Cool, John's an old neighbour of mine! (neighbour, not neighbor because we lived in Canada). I hope you don't mind if I link your recomendation on his FB wall.
As an Amazon Associate, TalkBass may receive commissions from qualifying purchases made via links on this site.

That's looking really good!
Thanks, guys. This has been quite a project.Brett, I agree, it's looking great!
(By the way, I just finished mine: http://k6jca.blogspot.com/2014/08/mellow-yellow-bass-kit-build.html )
I'm also getting some weird stuff going on in the area where the pots are to be installed. If you look at the couple pics below, you'll see that there's this almost half-circle shape around the pot holes. That shape is the silhouette of the control cavity that is on the other side. For some reason, the paint and clear on that part of the guitar just aren't coating the same, and it's now reflecting light differently, as you can see:


Brett, I'm no expert. I'm wondering if this is in the color coat or in the clear coat? If the latter, it might sand out.
According to a couple experts, this looks to be blushing. I am trying to work it out as we speak with lacquer retarder, but it is a little frustrating. The rest of the body looks great.Brett, I'm no expert. I'm wondering if this is in the color coat or in the clear coat? If the latter, it might sand out.

Does anyone have any ideas on what to do with these little areas where the washers masked the paint? Should I just leave these? They will be under the neck plate, but I don't want to leave them as-is if they'll be problematic later; e.g. a source of where paint chips.

I need to touch-up the corner there (upper right; also visible in the previous image)...

We've also got this little dandy…

Looks like I am not finished with the rattle cans.
Ah, rookie mistakes.

Jimi still approves.
I need to touch-up the corner there (upper right; also visible in the previous image)...
We've also got this little dandy…
Looks like I am not finished with the rattle cans.
Ah, rookie mistakes.
Jimi still approves.

- Jun 30, 2010
- 49,618
- 222,148
- Disclosures
- musician/artist/owner - Gildaxe
Sometimes you just have to make those mistakes to impress yourself to develop a better approach next time. As easy as installing washers to separate the neck-pocket support from the body. The frayed top neck pocket edge can be masked off so you don't have to re-spray the whole body.
Same with the body/neck holes - you can avoid that issue by insetting screws instead of overlapping onto the body. (I wouldn't fuss w/that area as the plate covers it all) Details details…
Same with the body/neck holes - you can avoid that issue by insetting screws instead of overlapping onto the body. (I wouldn't fuss w/that area as the plate covers it all) Details details…

Yep, washers will do it for the neck pocket thing. I can't believe I spaced so hard on that one, because I really scrutinized the details. Whoops. I may also modify my pseudo-neck to have a raised area in the middle of the hole pattern — effectively doing the same thing as washers by offering space between surfaces. That may be something I entertain for the next build, depending on my schedule coming up.Sometimes you just have to make those mistakes to impress yourself to develop a better approach next time. As easy as installing washers to separate the neck-pocket support from the body. The frayed top neck pocket edge can be masked off so you don't have to re-spray the whole body.
Same with the body/neck holes - you can avoid that issue by insetting screws instead of overlapping onto the body. (I wouldn't fuss w/that area as the plate covers it all) Details details…

- Jul 1, 2005
- 4,292
- 21,945
- 80
- Disclosures
- CataldoBasses: Designer/Builder ThunderBuckerPickups:Consultant
Something like this:
IMO you still have a problem with it contacting part of the same area that chipped.
This is my solution but you could do similar by reshaping the dowel or just adding a .25-.5 inch thick spacer to your current set up.
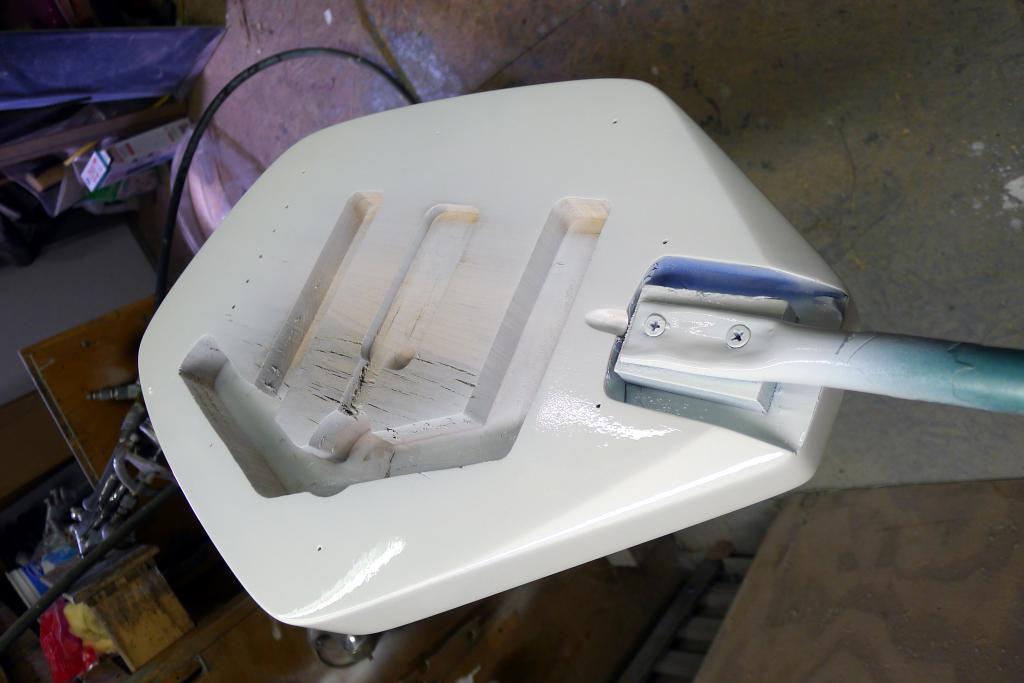
Indeed. I just need a little space in there. Yay to being a rookie.
Your solution and mine are essentially the same thing. Here's what I'm doing right now, for tonight that is:


Eventually I will fix my dowel so it is similar to what was in my post above yours. In my rendering I didn't extend the plateau/raised area as far as I would eventually do it in the real world. I would probably make it just go all the way back.
I'm kind of bummed about respraying tonight for a number of reasons. One of them is I got the horn cutouts to be damn perfect as far as color and clear coverage and overall smoothness. This is even before final polishing/buffing, too. I'll have to go back in and work on that a little now that I added color to the finish. The good news is @Hopkins pointed me pointed me in the direction of using Deft clear coat, and I am pretty sure I will never look back. I can get a can of that stuff and be back to the paint booth in like 10 minutes, and it only costs me about $6. Compare with waiting a week for ReRanch and paying about thrice as much total (which is factoring in shipping costs).
Your solution and mine are essentially the same thing. Here's what I'm doing right now, for tonight that is:
Eventually I will fix my dowel so it is similar to what was in my post above yours. In my rendering I didn't extend the plateau/raised area as far as I would eventually do it in the real world. I would probably make it just go all the way back.
I'm kind of bummed about respraying tonight for a number of reasons. One of them is I got the horn cutouts to be damn perfect as far as color and clear coverage and overall smoothness. This is even before final polishing/buffing, too. I'll have to go back in and work on that a little now that I added color to the finish. The good news is @Hopkins pointed me pointed me in the direction of using Deft clear coat, and I am pretty sure I will never look back. I can get a can of that stuff and be back to the paint booth in like 10 minutes, and it only costs me about $6. Compare with waiting a week for ReRanch and paying about thrice as much total (which is factoring in shipping costs).
Last edited:
[QUOUTE/]The good news is @Hopkins pointed me pointed me in the direction of using Deft clear coat, and I am pretty sure I will never look back. I can get a can of that stuff and be back to the paint booth in like 10 minutes, and it only costs me about $6. Compare with waiting a week for ReRanch and paying about thrice as much total (which is factoring in shipping costs).[/QUOTE]
I bought a couple cans of the stuff a while ago and am using it to do test pieces now. I haven't been able to do any finish sanding on the pieces yet but I'm wondering how it differs from the reranch stuff. I'm on pins and needles to hear about your experience with it versus reranches.
I bought a couple cans of the stuff a while ago and am using it to do test pieces now. I haven't been able to do any finish sanding on the pieces yet but I'm wondering how it differs from the reranch stuff. I'm on pins and needles to hear about your experience with it versus reranches.
Just replace the brackets you have with this:I'm bad at quoting...
[QUOTE ="Brett Zeppelin, post: 16304618, member: 248405"]
Remove the space after the word "QUOTE" (before the equal sign) and that will fix it up.
I would say from my experience that Deft is every bit as good or better than ReRanch. My favorite things about it are how fast I can get it, for how inexpensively, and the nozzle that comes installed on the can. The nozzle really puts out the volume, which is nice for covering area. The two brands definitely look a little different from each other when dry, but I can't say for sure if one looks better as a finished product, because I'm still working on the same project. I would say the Deft appears to take a little longer to dry, but not much.I bought a couple cans of the stuff a while ago and am using it to do test pieces now. I haven't been able to do any finish sanding on the pieces yet but I'm wondering how it differs from the reranch stuff. I'm on pins and needles to hear about your experience with it versus reranches.
Last edited:


