• TalkBass has been independent since 1998. Add your voice.
    Create a free account to reply to discussions, view embedded media, and browse with fewer display ads.
    Join freeLog in
    Want zero display ads or expanded classifieds tools? Compare plans.

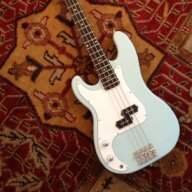
Lefty Fretless Jazz Bass

Sweet. That makes me pretty stoked to hear/read. Just so I understand this correctly: I am to start sanding now to prep for the first clear coat, which will make then take this nice shine out and make the color coat dull — correct?

Yes, you sand the colorcoat until it's uniformly dull (with 400) and spray gloss lacquer that will be as shiny as the color coat was before you sanded it. Hopefully without either runs or major orange peel.
 
Yes, you sand the colorcoat until it's uniformly dull (with 400) and spray gloss lacquer that will be as shiny as the color coat was before you sanded it. Hopefully without either runs or major orange peel.
Got it. How "uniform" do you make it? I recall from my sanding between color coats that while the level of the paint was pretty level, there was definitely some discernible sheen going on where you could see that little spots were shinier than others. I mean like really small spots. Kinda hard to explain really. Is the entire body supposed to be the exactly matching dullness? I mean should it look like a primer coat?

Sorry for the questions, and most likely the wrong terminology. I just want to make sure I've got it right.
 
Yes, you want to use a flat sanding block, and get all of the low spots out of it. Any area that is still shiny has not been leveled. This step can take quite a bit of work, the way I do it is to fill a squirt bottle with water, and add a few drops of dish soap. Mist the body, wet sand , then wipe it dry to check your progress. Just be careful to not sand through the color coat.
 
Yes, you want to use a flat sanding block, and get all of the low spots out of it. Any area that is still shiny has not been leveled. This step can take quite a bit of work, the way I do it is to fill a squirt bottle with water, and add a few drops of dish soap. Mist the body, wet sand , then wipe it dry to check your progress. Just be careful to not sand through the color coat.
Sounds great. I was wondering when the wet-sanding would come into play. I have quite a bit of color on this thing so I don't think I'll sand through it. I will definitely look out for that, though. The tip of one of the horns had some really strange run to it, so I could see something happening there.

Any recommendations on how to sand? I see that you're recommending the sanding block, so I would think that pretty standard back-and-forth is adequate. I actually found that I'm a little more adroit with hand sanding sans block unless I'm really trying to remove a lot of material over a large area, in which case I prefer the block by a great margin over hand sanding. Do you see anything wrong with sanding without a block or is there a technical reason that I should use a block here? I'm good with whatever is needed; I'm just curious.

I'm more than OK with putting in the work, which I think we've seen so far in this build thread. I think this thing is going to look really good when it's done, if the current paint job is any indication of the final product. I kind of don't want to sand it because that's how nice it looks! I guess if clear-coating it will make it look even better, then I'm cool with that!
 
Sounds great. I was wondering when the wet-sanding would come into play. I have quite a bit of color on this thing so I don't think I'll sand through it. I will definitely look out for that, though. The tip of one of the horns had some really strange run to it, so I could see something happening there.

Any recommendations on how to sand? I see that you're recommending the sanding block, so I would think that pretty standard back-and-forth is adequate. I actually found that I'm a little more adroit with hand sanding sans block unless I'm really trying to remove a lot of material over a large area, in which case I prefer the block by a great margin over hand sanding. Do you see anything wrong with sanding without a block or is there a technical reason that I should use a block here? I'm good with whatever is needed; I'm just curious.

I'm more than OK with putting in the work, which I think we've seen so far in this build thread. I think this thing is going to look really good when it's done, if the current paint job is any indication of the final product. I kind of don't want to sand it because that's how nice it looks! I guess if clear-coating it will make it look even better, then I'm cool with that!

A sanding block is flat, your hand is not, sanding with a block gives you a flat, even finish.On the horn, use the block, and lightly sand the run out, to much pressure will cut through the thinner finish around it. A smaller block, like 1" x 1" using double sided tape or spray adhesive to attach the paper works well for this application.
 
A sanding block is flat, your hand is not, sanding with a block gives you a flat, even finish.On the horn, use the block, and lightly sand the run out, to much pressure will cut through the thinner finish around it. A smaller block, like 1" x 1" using double sided tape or spray adhesive to attach the paper works well for this application.
That's kinda what I thought about block vs. hand. I usually use block for large flat areas, but I tend to go with my hand when it comes to the corners and tight spots in general. A little bit of creative folding of the sandpaper plus good touch seems to work well.

I'll give the small block sand a shot and see how it goes. I think I've got some scrap wood laying around that I can chop into smaller sections that would work well for this application.
 
Another thing that works well for getting inside the horns, is to wrap the sand paper around a cylinder, like a piece of PVC pipe of the best size you can find to fit the shape of the horn.
 
Another thing that works well for getting inside the horns, is to wrap the sand paper around a cylinder, like a piece of PVC pipe of the best size you can find to fit the shape of the horn.
Sage advice, once again. I was planning on doing this (per your suggestion) with tonight's sanding, but I didn't have any round stock at home so I had to improvise. It ended up working out well, but just took a little extra time.

I went ahead and got this whole thing sanded down. It's quite nice and flat now. Much duller than the shiny paint coat it had before I started. I'm not gonna lie: it made me a little sad to sand that off. I just need to have faith in the process and get all these steps under my belt so I can see how it all works.

Here's a pic of when I stopped sanding a while ago:

0D641BAB-CF00-4AAA-A9B9-551BED1E8109_zpsgbh0itje.jpg


It looks pretty solid. No shiny spots, everything even.

I did encounter some thin spots of paint and I ended up sanding through in a couple areas:

268B0F9C-486F-416E-AB26-6A1DE1699F80_zpscvdbjiwa.jpg

DA9118EC-3D2F-4D7D-A517-FF23243DD3E1_zpszkotc3yy.jpg


These were the same areas that when I was priming and painting, the primer/paint didn't really coat as well as the rest of the body. I did not start the clear spray tonight because of these areas. I am guessing that it's OK to fix them by painting just those areas and not the rest of the body, then the next day sanding down to match the rest of the sanded body.
 
All right, I'm pretty convinced I am doing something incorrectly here. I cannot get the paint to cover adequately in a few "problem spots" and I just keep painting, sanding, painting, sanding…it just keeps sanding through. I'm getting a little irritated now. I've got to place another order for paint (I'm about to run out), so hopefully I can get this figured out between now and the next time I lay some more paint down. I wonder if I'm just trying to sand too much and am going for too dull of a finish. Hmm.

An air compressor and official spray gun are sounding really good right about now. Part of the issue I'm experiencing is each can of paint has had a different consistency, which means it's been going on at a different rate and covering area differently.
 

Hope you resolve the small area burn through issues - wanted to point out to be careful when removing your support. The paint is caked over the nut/bold and unless scored first around the washer - it could pull off a chunk of paint. For the future, it's better to have that bolt reversed so that this is on the pocket side, and the bolts head is only just bigger than the holes.
 
  • Like
Reactions: Brett Zeppelin
Hey is it possible the wood is a little higher in those spots causing it to sand through the paint?
Great work on this by the way, I cant wait to see the final result. Especially a lefty!!
That seems plausible. I've started giving some coats and extremely careful sanding to these areas and I'm hoping to have an answer tonight as to where to go next with it. I am pretty sure I took care of one or two areas completely. Now I just need to make sure I get the next couple (there at about four total).

Thanks for the lefty love.
 
Hope you resolve the small area burn through issues - wanted to point out to be careful when removing your support. The paint is caked over the nut/bold and unless scored first around the washer - it could pull off a chunk of paint. For the future, it's better to have that bolt reversed so that this is on the pocket side, and the bolts head is only just bigger than the holes.
Thank you for the tip. This is in my mind already, and I have actually removed these a couple of times during this process, being careful to score the paint around the nuts just as you said.

I agree that the better way would be with the nuts on the other side. For some reason I concluded that this would be the best way, but that was lots of thoughts and issues ago so I don't remember exactly how I settled on it. :facepalm:
 
Don't get too discouraged. I am not experienced enough to say what is going wrong but that is a really good looking bass you have so don't smash it! From what I've read you wouldn't be the first person that had to remove a finish, fix something and start over but hopefully that isn't necessary.
 
Don't get too discouraged. I am not experienced enough to say what is going wrong but that is a really good looking bass you have so don't smash it! From what I've read you wouldn't be the first person that had to remove a finish, fix something and start over but hopefully that isn't necessary.
By the looks of it, and what all of my pro resources are telling me, I am dealing with some high spots. I need to coat the areas further before I can get a thick enough set of coats to sand back without getting that nasty sand-through.

I put another order in for paint at Reranch, so I am probably that store owner's favorite customer at this point. It doesn't help that I spent the first two cans basically learning how to paint.

I just realized (last night) why the last can was going on so funkily: it's because the nozzle's insert was rotated 90° from where it was on the first cans. I didn't realize they were adjustable until I visited the Reranch forum last night, then I put it together as to why this can was spraying so differently. Yay, me.
 
Brett,

In case you are interested...a book that I found very useful is this one, by John Gleneicki: How to Create a Factory Guitar Finish with Just a Couple of Spray Cans!

Pictures aren't great, but overall I've found it to be very informative. And John was quite accessible via email when I had questions after reading the book.

Here's a link on Amazon: http://www.amazon.com/Create-Factory-Guitar-Finish-Couple/dp/1456517031/

I followed his techniques when painting my two bodies (so an expert I am NOT), and they both came out well, in my opinion. The only issues I had was when I deviated from what he recommended.

Also, I've been spraying with urethane color (auto paint, put into a rattle can) and urethane clear-coat rattle cans (the latter is a 2-part clear coat: Spraymax 2K Glamour High Gloss Clear Coat). With these, you don't need to sand the color coat before applying the clear coat, as the urethane clear coat "melts" into the color coat when it hits it (or so I've been told, and its been true two of two times for me). Also (and important to someone as impatient as I am), you can start sanding the urethane clear coat after a week, rather than waiting a month, as might be required when using other types of clear coats.
 
Last edited:
As an Amazon Associate, TalkBass may receive commissions from qualifying purchases made via links on this site.
Brett,

In case you are interested...a book that I found very useful is this one, by John Gleneicki: How to Create a Factory Guitar Finish with Just a Couple of Spray Cans!

Pictures aren't great, but overall I've found it to be very informative. And John was quite accessible via email when I had questions after reading the book.

Here's a link on Amazon: http://www.amazon.com/Create-Factory-Guitar-Finish-Couple/dp/1456517031/

I followed his techniques when painting my two bodies (so an expert I am NOT), and they both came out well, in my opinion. The only issues I had was when I deviated from what he recommended.

Also, I've been spraying with urethane color (auto paint, put into a rattle can) and urethane clear-coat rattle cans (the latter is a 2-part clear coat: Spraymax 2K Glamour High Gloss Clear Coat). With these, you don't need to sand the color coat before applying the clear coat, as the urethane clear coat "melts" into the color coat when it hits it (or so I've been told, and its been true two of two times for me). Also (and important to someone as impatient as I am), you can start sanding the urethane clear coat after a week, rather than waiting a month, as might be required when using other types of clear coats.

Thank you, sir! I am a big fan of taking in as much information as I can, so I might have a look at that book.

In chatting with various members of this forum, I must say that I am fairly heavily leaning to eventually getting myself a legit — or at least somewhat legit — paint setup with an air compressor and paint gun. It seems like if I really want to do this thing right (meaning painting future builds), then I should have a proper setup. I think I am doing OK with the rattle cans, and maybe better than the average Joe off the street who just grabs a can and goes for it, but at the same time I would like to have something that is a little more credible and reliable. I think I would also like to dabble in the world of custom colors and let some of my own creativity come out. This is a little easier with traditional paint methods than rattle cans, although I'm still the latter is still possible with the right techniques (like emptying the rattle can's contents and then saving it in another container for later).

Shipping from Reranch is expensive as heck, and it takes forever to get the product. That's a very frustrating attribute of buying those custom paint rattle cans, and just one of a few issues I have with the rattle can approach.

All in all, this is still a great experience and I'm learning a ton. I wouldn't change anything that I've done so far in this build other than a few small things here and there (such as buying more paint in my first shipment!) as it's really helped me understand the process.
 
As an Amazon Associate, TalkBass may receive commissions from qualifying purchases made via links on this site.